To avoid these ads, REGISTER NOW!

Moto race shop remodel

FOCUS.FREAK

Well-known member
Joined
Nov 17, 2013
Messages
840
Location
Burr Ridge, IL
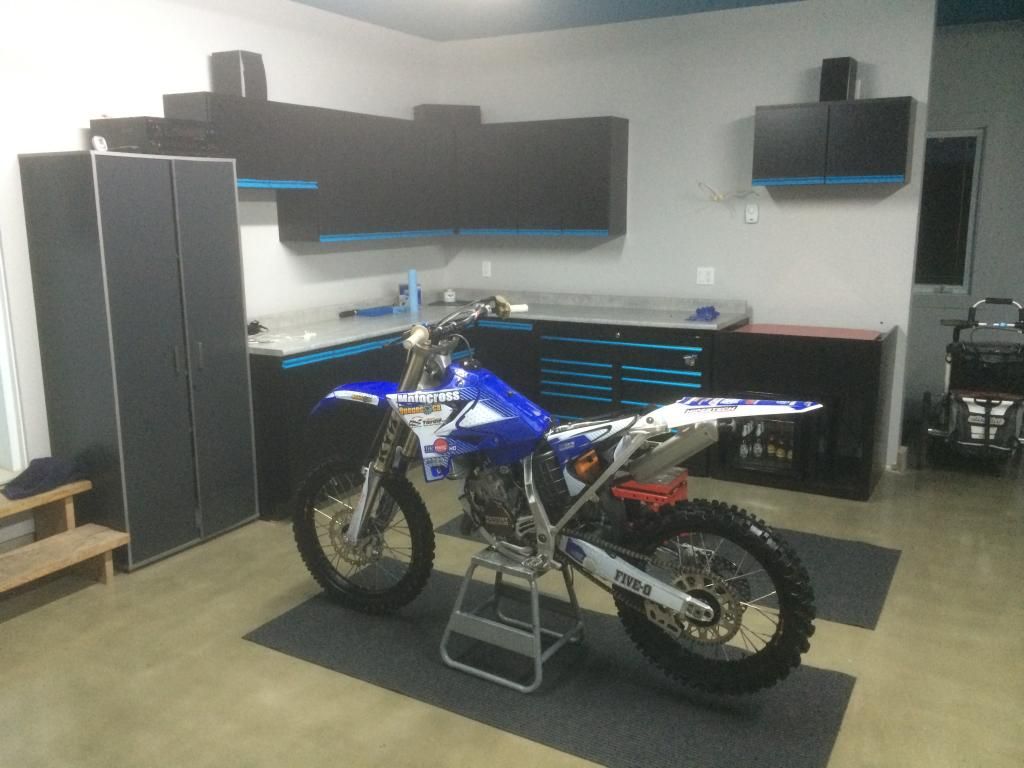
I like what I'm seeing. You are doing a great job. Also good to see some 2 stokers here. It's a 93
6uploadfromtaptalk1392173019842.jpg
Sent from my SPH-L720 using Tapatalk
 
To avoid these ads, REGISTER NOW!
OP
S

Sheriff245

Well-known member
Joined
Oct 18, 2013
Messages
88
Got my parts washer yesterday. I thought the brush came with it, but I was wrong. So I have that on order now.

F6332A7D-A1FA-4ECF-9795-E709D78DBE7E_zps9xqnvpgf.jpg


Drywall joints will not be finished until around Tuesday, so it will be another 2 weeks before I get to start painting. I'll work on my parts washer cabinet in the meantime.
 
OP
S

Sheriff245

Well-known member
Joined
Oct 18, 2013
Messages
88
I realized it's been a while since I posted an update, so here it goes.

The foundation wall was not sitting flush with the gypsum board, so I had to build some kind of baseboard to hide it.
C04DB7E4-0793-4960-B423-20CEDCD10B7F_zpsoftjiepp.jpg


We used thermofoil to insulate the concrete a bit while we were at it. There was some frost in one corner and we didn't want the baseboards to rot, so the foil was taped top and bottom (not pictured).
FC1D2B0E-34D7-498C-92E5-9B1A5F6F53D5_zpsiadiqfyn.jpg


Pine 2x6 with 5/8 pine trim on top to hide the concrete.
DA809F93-B044-49F0-AD13-304A9809E6D8_zpsrrgczyu9.jpg


While we were at it we built window and door trim with 5/8 x 2 1/2 pine.
48B38478-0A19-4F1D-9970-7046B4546DC4_zpstzg0ljeo.jpg


I had some very qualified and experienced workers helping me for this task.
E4AEED05-FD6D-470D-9D52-77C071519038_zpsxojjgdqg.jpg


All done and ready for primer and paint (finally!)
8C419A6A-2096-4A01-B2B6-CEF99FB0A703_zpsfl0fvb8n.jpg

9168FADF-80CF-49CC-87EB-4CB89BF794AC_zpskqcs02il.jpg

91D1E2D3-D47D-4078-948A-2011AFF67BB8_zps1hhe4far.jpg


The goal for this weekend was to prime walls and ceilings for the whole basement and garage. We were done by 2PM on Saturday so we did the first coat of color on the garage ceiling the same day. We went with this gay blue color that matches the toolbox handles.
F878C201-01C9-4C01-A255-9D010B821EAD_zpsa1mjnuxq.jpg


On Sunday morning we discovered there was something wrong with the second can of blue that we used. The color was much darker and the coverage was not as uniform. It looked like ****. First can on the right, second can on the left.
9F0A5161-C4B6-4FFF-BFA4-586713459436_zpswtcmhqea.jpg


I was not happy about that so I'll take both cans back to the store tomorrow after work for a refund or a new can. In the meatime I rolled a coat of primer over the bad paint to hide the darker color. I'll start over in that part of the ceiling when I get my new paint.
D8B26CF1-1950-48DB-9A86-170B5F96F013_zpsl7dltvhk.jpg


We also gave the walls their first coat of color. It's hard to see from the pictures as it was starting to get dark when I was done cleaning up, but the color is a light grey, kind of aluminum-like. It looks almost white under bright light and looks almost like a dark grey in low light. Pretty cool.
94F6EA02-89C5-423C-8036-68CCE4529831_zpsrncpitu5.jpg

AB28C6AA-AB95-4A22-BB40-7623DCB81671_zpsjxmbsibm.jpg

B1F45C3C-7E45-482E-A142-BACBBBB15BEA_zpsglpcljwj.jpg

91BE57F1-808C-4314-989D-E0343765C98F_zpsinogqngi.jpg

605278E2-674B-40BA-82EC-A74DD389E49C_zpsvtpugztv.jpg


We plan on applying the second coat next weekend and finish painting the basement as well. Then on to the cabinet restoration. It should be pretty involving but I'm confident that they will turn out well. I'll post updates as I go on this project.

Also, I will need to decide if I go stainless or something else for the benchtop. I want something low maintenance for dirt bike maintenance, easy to clean, chemicals-, abrasion- and impact-resistant, and somewhat affordable. I'll do some shopping around, but I'm afraid SS will be too expensive at this point, considering I paid $175 for a whole kitchen's worth of cabinets last fall. If there's a significant price difference, I might go with some kitchen counter stuff, like Formica or similar. I don't want wood or concrete that's for sure, but I am open to comments and suggestions.
 
OP
S

Sheriff245

Well-known member
Joined
Oct 18, 2013
Messages
88
Things ended well and I was able to have my paint can replaced. I was able to get the paint done today.

9DB6CECC-0303-46DB-88BB-59EB9E6C6444_zps8jumlvts.jpg

597AC13F-8482-4B2B-A5EF-03F4A12CFC91_zpsshvry3li.jpg

CA2FAF30-B448-4ED5-95FD-18C8E4CA62F8_zps4y6efsgq.jpg


Color match check. Close enough. The match looks better in person actually.
7E8B3027-8E69-46B6-B65D-8EEED2AD82E2_zpspovrro6a.jpg


I brought the cabinets up from the basement and put them in place to check fitment. As you can see in the next picture, they are offset from the wall. This will allow me to have a deeper counter top. I'm going shopping for that tomorrow.
AF6E4E09-B5AD-4326-8C1F-C409A59E3CA6_zps8zmfltfe.jpg


Sink cabinet. Notice it doesn't match the rest. It actually matches those I have in the kitchen. It was sitting in the projected basement bathroom when we bought the house. It's been there, brand new, for almost a decade. All cabinets will be finished the same way. This one will have different handles than the rest, obviously. Holes will need to be drilled in the slab for the piping.
2CE78FD1-09AC-4419-A488-9BAF51924C4A_zpscuxevwiu.jpg


This closet will be installed between the bench and door. I will try to match its color on the cabinets.
4CBFA3D8-4A6C-4A79-B231-FA7D310D698B_zpsuuhr8ope.jpg


Finally, some memorabilia to hang on the wall. This plate was in front of one of the most important jumps on the moto track I learned to ride on. It closed its doors for good last fall. I'm debating whether I put a clear coat over the dirt to protect it or if I leave it as is.
AFD6A883-9BF6-455A-A40A-289B3D28D252_zps94chmleq.jpg


That's it for now. Look for another update some time next week.
 

kippieland

Well-known member
Joined
Oct 22, 2011
Messages
1,123
Location
Western Washington
I have NEVER seen a difficulty sign on a jump in my life! Not a bad idea...would have saved that broken wrist and concussion I got a couple of years ago....
 
OP
S

Sheriff245

Well-known member
Joined
Oct 18, 2013
Messages
88
I have NEVER seen a difficulty sign on a jump in my life! Not a bad idea...would have saved that broken wrist and concussion I got a couple of years ago....

Each jump had a name and a difficulty and risk level. The Logan was right before the mythical 110, named after it's nominal length (was actually about 85 feet long). It had a high risk level, but it was actually pretty easy to clear once you mastered the Logan.
 
OP
S

Sheriff245

Well-known member
Joined
Oct 18, 2013
Messages
88
Here's a quick update:
Since the last update I was able to make shims for the cabinets. They will make them easier to screw into the walls and allow for a deeper counter top:
6B37A8DF-C020-43F7-AD98-76FE5F0B2A4B_zpswabsikev.jpg


I then took the cabinets apart to fix them.
89A74661-2E11-4A48-A30E-22DFC3D1933C_zpsyygtthii.jpg


I also built one to fit the parts washer and beer fridge in :
0CFDB784-34E9-4C8F-ABCF-404B31955DA8_zpskwzdbbnl.jpg

6FD11698-0193-41F0-9F32-BB92882E27A1_zpsbdkk21gp.jpg

FD5F3ED8-65CD-461E-8E7A-622470B11159_zps3rcoyfmh.jpg

750BAE25-E5C1-4F0D-BA08-F9DC73368355_zpsh30me995.jpg

84C2DB6F-9432-4E65-AD11-015BA7D34E7B_zpsmwaff1un.jpg

EC4AB52D-BD6A-4363-B56C-70935FF79300_zpsn5itc2bv.jpg

23D5B4A5-D8BF-45EF-98C2-843CC76E7BC9_zpsgdlanxa4.jpg


Some bodywork:
22F93114-2F28-49D6-83F5-C68B8A4286D1_zpsquax80se.jpg

57B38FE5-5522-4340-A27E-D0788AB9F6D4_zpsup8twadc.jpg


I also built a top for the sink cabinet:
C556F9B1-90D0-47FE-8D4F-4A8DDA4B7371_zps4sy8kyyq.jpg

897CF936-1E02-4075-9CAB-73CD2FA524D4_zps5wbbh3yl.jpg


Then everything got disassembled for primer...:
9BC30363-6366-4115-B63C-02FF18383D91_zpsbemjtmdb.jpg

9B6EB2A9-A8AD-4C6B-BF80-A43C05CD1DEC_zpsm7i6hxms.jpg

BC94E6A1-07A7-4E99-8E3B-5FF624386F4D_zpsjxesnjli.jpg

C589EBB6-1E72-4415-92C1-1FC5FF1EF5A2_zpsdwemhsol.jpg


... and then paint. Black is the new black :
F6657E6B-A3F6-42BF-92C7-4739C4A08583_zpsjpuiroc9.jpg

0A07A709-37CA-4045-A4E7-8A15403B70FB_zpsnkgpzbsi.jpg


Not really happy with the finish on the doors. Seems like this cabinet paint gives better results on vertical surfaces. I don't have pictures to show, maybe later. I'll sand them and give them another coat once they're back on the cabinets.

In the meantime, I got this new hi-tech sound system to bury my tinnitus while I'm working in the shop.
45C2DF9F-2C65-4470-A782-8BA16EF951A9_zpsw75fucts.jpg


Anyways, I spent all day today putting some of the cabinets in place. I have two left to install. Here's how it sits right now:
73C6F7D9-D8C4-4843-A240-06F37E1CEB89_zps1hjsdjvy.jpg

3A3BA5BE-9C07-4B2F-9F97-E37765F5778F_zpsxeoxmbqn.jpg


I hope to get the other two in place tomorrow. I still have some work left to do on the parts washer cabinet, and then I'll start working on the counter tops. I'll keep you guys posted.
 

Gentle_Ben

Well-known member
Joined
Nov 10, 2012
Messages
530
Location
Manitoba, Canada
Very awesome work, I love the black cabinets.

You don't know how many times I looked at that same mastercraft tool chest in the store, it was exactly what I wanted but I couldn't get past the blue handles at the time so I went a different route.
 
OP
S

Sheriff245

Well-known member
Joined
Oct 18, 2013
Messages
88
Very awesome work, I love the black cabinets.

You don't know how many times I looked at that same mastercraft tool chest in the store, it was exactly what I wanted but I couldn't get past the blue handles at the time so I went a different route.

I went through the same phase myself. I was planning a different color scheme at first but this chest was the exact dimensions I needed and it's very well made for the price. I did some research and couldn't find an alternative in a more classic color combo so I waited for it to go on sale and picked it up.

By the way, I just happened to check your build thread this morning. I absolutely love what you did with the cabinets and lighting.

I like what you're doing there :thumbup: , I'm working on my cabinets too.

I think you will have a great place to work in, yes keep us posted please.

Thank you for the kind words guys.

Today I put the sink cabinet in place, temporarily. I still have to drill the slab for the drain, which won't be done for a while :
70191B38-3F92-46A5-9798-74F1B1DCDE7C_zpsztoskynl.jpg

7AC46EF8-14D9-46E4-A936-E164117CFAF0_zpsm5nlo93w.jpg


I also assembled the closet:
E671D9CF-49EE-40D2-B9DA-4F8AB468D9F3_zpsdwzncuni.jpg

40288871-B714-4E67-9330-CD4EA78DB411_zpskwbyeflq.jpg

9671E2AB-79F9-4213-AE23-3258070873F1_zpss6mbfmjf.jpg

176E5650-A8D8-46F5-8DDB-81750DCC6954_zpsvod33vye.jpg


And debadged the tool chest:
96BB79EF-C481-4C87-9D1E-F0B541548F0D_zpsyqrwqtu2.jpg


That's it or this week-end folks. I hope to get the door panels ready to install this week and get the counter tops done next Saturday.
 
Last edited:
To avoid these ads, REGISTER NOW!

sunsation288

Well-known member
Joined
Mar 20, 2012
Messages
730
Location
Eastern Townships PQ
Wow nice update ! , if you don 't mind asking , any way to have the drain of the sink go trough the wall ? And re-route to another drain ? hope my question made sense :) , like you know sherrif my english is not so good :)
 
OP
S

Sheriff245

Well-known member
Joined
Oct 18, 2013
Messages
88
Wow nice update ! , if you don 't mind asking , any way to have the drain of the sink go trough the wall ? And re-route to another drain ? hope my question made sense :) , like you know sherrif my english is not so good :)

Your english is good and your question was clear, no need to make excuses about it :thumbup:

Going through the wall was my initial plan, but the basement is finished on the other side and I would need to demolish a lot of stuff to make it go to the nearest drain pipe inside the house. Whereas under the garage slab I already have the garage floor drain pipe visible and easy to access there so drilling a 2" hole in the slab makes more sense technically.

As you can see in the following picture, the drain pipe is already there. My sink would drain through a hole that would be located in the right corner, close to the heater, then turn and follow the slab with a small slope down to the vertical part of the floor drain.
IMG_0405_zps88d8ed07.jpg
 
OP
S

Sheriff245

Well-known member
Joined
Oct 18, 2013
Messages
88
And now's the time for a weekly update. This weekend we tackled the counter tops. They were basically 10 foot lengths of laminate counter tops that I bought at HD for $135 a piece. Unfortunately I don't have pictures of the process, but we reinforced them with 5/8" MDF sheets, glued and screwed under the particle board. Not much to explain other than cutting laminate with a 60-tooth blade on a skill saw is a charm, but getting your 45 degree cuts right is a pain in the ***. The gap is anywhere from 0 to 1mm at the joint. Not bad, but I wanted it perfect. Still doesn't look too bad.

CEE808FA-D358-459B-AE90-3771F649CACC_zpsh38sehxr.jpg

1B9B968B-F220-45EF-9E19-18E150F01244_zpsn4dtbuyf.jpg

03070C6C-FC21-49E8-B34F-4E6C141123DA_zpsxvp6nkiu.jpg

B475BF6F-DF20-4913-9A9C-5CBFAFDB28F2_zpsxnxh6eqp.jpg

AFFFAD85-D74E-4A8B-85CA-0F0F9A80BF05_zpsxencv5p2.jpg

74FBD9A9-F1AC-43CF-8551-891A8B774482_zpsipss4yhj.jpg

B799F613-A664-425E-B745-F2C0BA241AEA_zps1rbfwg48.jpg

C1ABA81C-69E7-47CD-B004-F40024120A6E_zpsz3tdlq7l.jpg

123AE8E5-8347-4933-9A70-8CD56F658814_zpsqoqlifbq.jpg


The edges were a ***** to trim. I'm not totally satisfied with my performance there.
9140CAD8-EE89-4D0E-AE9B-69A65CD7061D_zpsyhwqfkif.jpg


As you may have seen in other pictures, I put the vise in place, just for show. I still have to bolt it in place.
A90D1596-ACBC-4CBD-A98B-7B67A31E0D12_zpsoqpfqfbv.jpg


As a Sunday night project, I built a kind of counter top to seal the edge around the parts cleaner out of 5/8" ply. I still have some sanding to do before painting it.
98DA5268-A887-48C4-A3A9-CC9019B8A883_zpsycsovhg4.jpg

E282FD15-89B2-4D94-BFF5-66D261FF928F_zpsldripf42.jpg

59A4ECA8-DEE1-4004-A497-0059A625DC46_zpshudxtjbe.jpg

200B9A9B-4474-4835-B310-4091E3724519_zpsmhfnzm6f.jpg

A0F6B65A-BB65-48D4-8965-15BDE422D4FD_zpsrlur1fdw.jpg


Things are starting to look very classy in there, with the gloss black and grey. I really like it. Some things aren't perfect, but I guess that is to be expected when most steps are first times for me.

That's a wrap for this week. The goal for next week is to clean up the place a bit and start prepping the bikes, van and travel trailer. The racing season starts in 3 weeks and from the looks of things, the first race will also be my first ride of 2014. Apart from some door and shelf installation here and there, I don't think I'll be able to get things moving in the garage for almost a month.

I'll keep you guys posted.
 
OP
S

Sheriff245

Well-known member
Joined
Oct 18, 2013
Messages
88
I am sorry for taking so long to update guys. Believe or not, I've actually been getting phone calls from people wanting to know why I wasn't updating.

The truth is, I did some small stuff since the last update, but I wanted to do a thorough clean up of the place before my next update. On top of that, I needed to get things done in the basement, as we will have to move our son's bedroom downstairs some time in August. We also got a new travel trailer, and the old one needed some love before sale.

Then, on the day I was supposed to do said clean up, the weather was so nice that I decided to go riding instead. I came home with a broken collarbone and elbow. So needless to say things haven't been progressing since!

Anyway, here are the pictures of the "small stuff" that's been done so far.

I put the cabinet doors in place, then had some work to do on the 150. The tools are still in the red toolbox I had before (not shown in this picture). I've been using it for 12 years so I know where everything is, and it'll be hard to move stuff into the new box.
B6EFC1C0-1B53-4885-B755-65F619F7D27D_zps92ztjrto.jpg


I painted the counter top around the parts washer
31DE359B-BDF5-478B-B4EE-826E1360EE51_zpsqscmhyqp.jpg


The place is messy!
8F5A0014-1C87-4FC5-BB79-75FC45F6A93B_zps1c9g09ph.jpg


Painted the door handles with the same blue as the ceiling and tool box handles.
A2309E5C-E748-4394-B16A-1021523E8148_zpspgs9yhlv.jpg


And plugged the most important piece of the project, finally. I was getting thirsty!
B05D6FD7-DA71-446C-A970-072300484FB8_zpsnvvz69fd.jpg

6DCF9D09-82E6-4EEF-B9A2-51C9B7C8F536_zpsoemuv8xx.jpg

7A2A6031-32AE-45C9-A9A2-96DBD0AFC55F_zpsgrs5md2w.jpg


My oils and lubricants sponsor sent me this stuff for the parts washer:
F7044C4C-AEF5-45D4-8B78-2461D4C9D371_zpsplv3zqtl.jpg


I tested it on an old engine head that had been sitting dirty since 2003. I let it sit in the stuff for about a minute and rubbed it a bit with a tooth brush. Came out like new!
DCC6E19A-B34D-480B-97D5-50E59CC52EB2_zps0hpd5xad.jpg

F89452E6-5C9D-48C1-96B0-A12F042EABC9_zpsxitbkmek.jpg


Filled up a few cabinets:
2749004B-ED13-45A0-AEB0-5606D4FB4ABB_zpsf1x5epwg.jpg

D35772E3-03F6-470C-8D9E-5B465D765167_zps8cpngks4.jpg

50AFF26A-87D5-47F7-8A35-242D2D795406_zpsymhdwrjz.jpg


Next step is to get this place cleaned up, and putting the finishing touches here and there. Then I'll take some more quality pictures.
 

Black95Z28

Well-known member
Joined
Sep 5, 2012
Messages
69
Location
Northern Colorado
I really like the cabinet lay out, great job, everything looks awesome. Hope you heal up soon (if you havent already)
 
Last edited:
OP
S

Sheriff245

Well-known member
Joined
Oct 18, 2013
Messages
88
Here's an update. I had some x rays taken on the 11th, 5 weeks after my injury. Here's what it looked like in there:
1a4c1344-8e76-4c8f-b44e-35496d65ad6b_zps990ae636.jpg


So needless to say, I've been laying low again the past two weeks.

I still managed to get the sound system rigged up. It's my dad's old home theater amp with three speakers on the wall cabinets. I know it was top of the line back then but I have no idea how it compares to today's stuff, other than it sounds great to me:
CA6B109E-392C-441C-8555-633EB1E92C45_zps6vltoy4k.jpg

B2263952-476C-44BC-9242-293204047139_zpspbouynow.jpg

7BB556DD-15F6-4ABD-8931-310D55263316_zpscd8b0iqf.jpg


Then came the time to start moving my tools in the new toolbox. The carrying case for the ratchet set was bulky and inconvenient in this new setup, so I had to do something about it first. I did some research and came up with this idea on Youtube. Picked up a set of Connectamats from WalMart, $12 for 4 2x2 mats, and a 9mm knife from the hardware store:
6F0AB0F5-0779-4C66-BF75-FE7CFD72B2FC_zpsci3kzhef.jpg

E4EFAD9E-6467-4F01-A021-5B7CD70FE71F_zpstaw4mm0o.jpg


Then cut some tiles to fit inside the drawers:
F5D3E17B-C8AE-4AEE-B227-E55555843618_zpsxx0n2nba.jpg


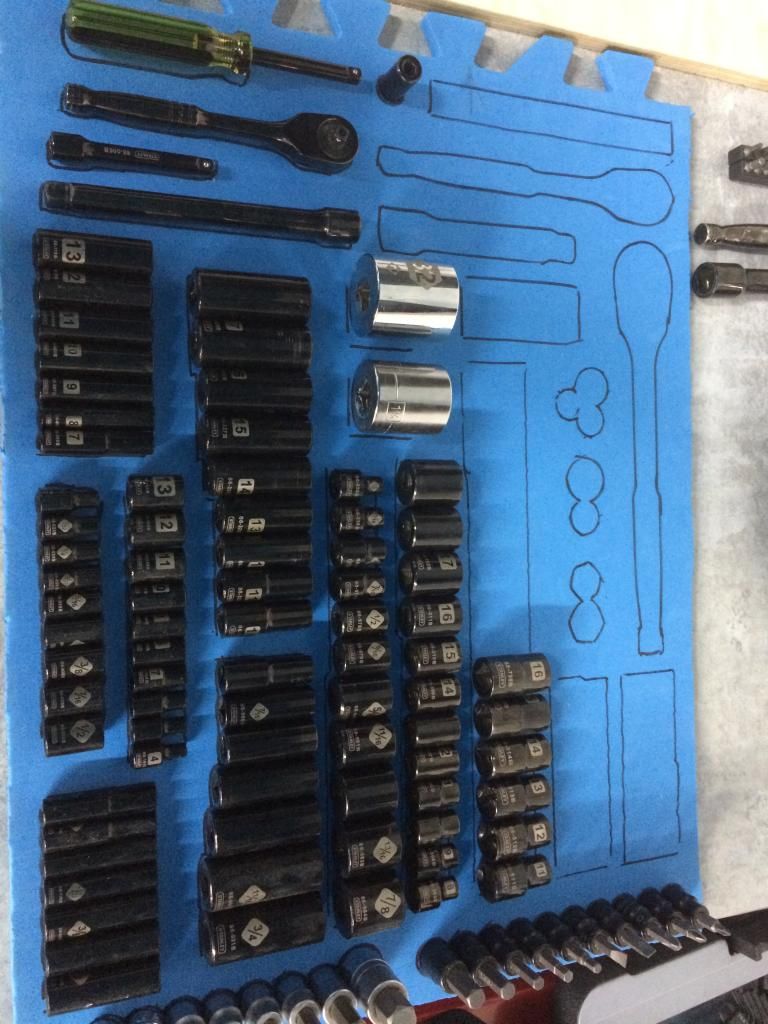
I laid my sockets and ratchets on one of the tiles and tried to fit them all in place, then used a sharpie to outline the tools:
DA6784A6-1FF2-4486-87BD-A57444FC8B20_zps33zdrjdw.jpg

23DA1FEE-22BE-4060-96CD-F70BBF9D9441_zpsye21lc8u.jpg


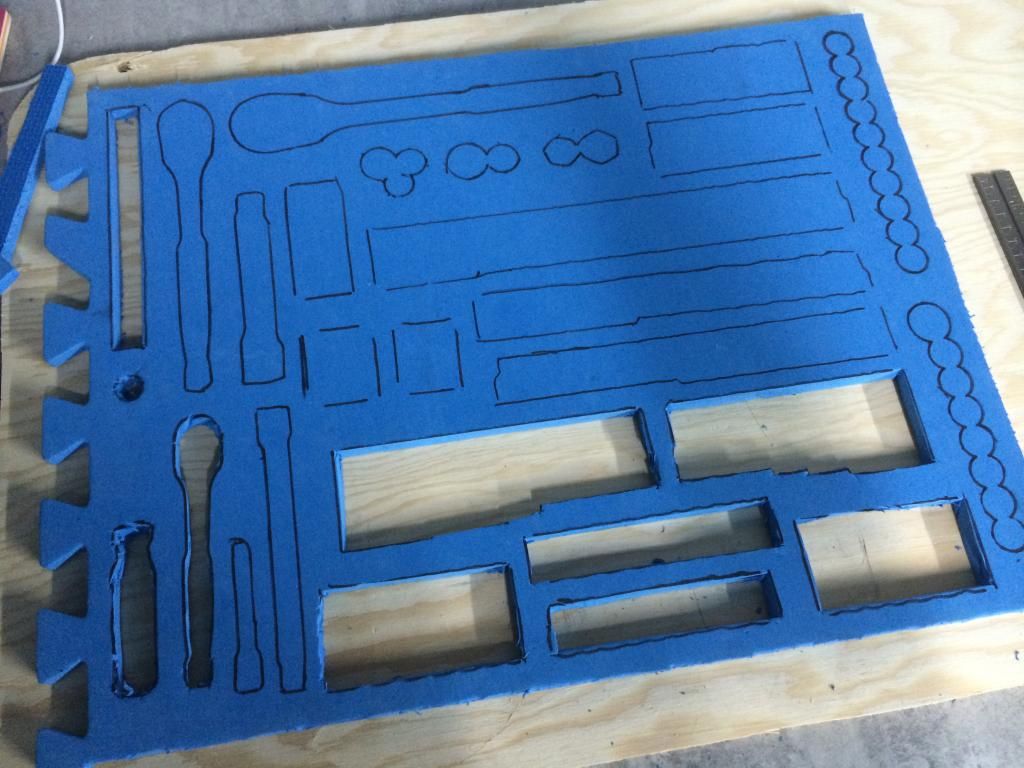
Using my new utility knife, I cut the holes in the mats:
C40B9000-54B5-4C7C-B167-F9847C9A701D_zpseku8rfuz.jpg


For the smaller sockets, I split the cut outs in half to reduce their thickness and put them back in place (not pictured). I put the mats back in place:
6A284047-90D4-4CC4-9A32-D60B2E6CAC33_zpsnsxyevnc.jpg


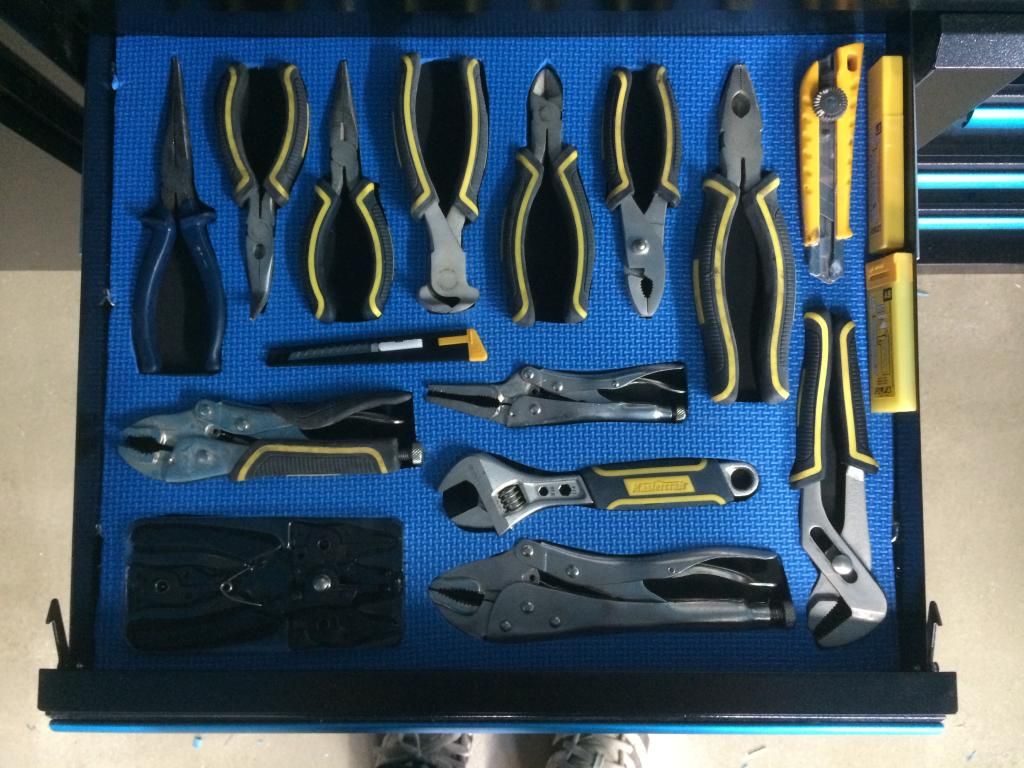
Now with tools in the drawer:
21F8AEF3-EADD-4773-8CD2-70077EA6E815_zpsef685qmr.jpg

D9096927-6EB0-4A42-911C-53002BB300CA_zpsry3tojuu.jpg

50AD6146-8581-4421-8C86-E6B770DE6D98_zpscimuxake.jpg


I really like this picture for some reason:
F66B1E18-5BD7-4087-AFC0-A7C121FDD936_zpszyw5vp8f.jpg


I still have the other drawers to do. I may not cut out all the tools, only those that can move and roll around. I'll be on vacation for the next two weeks, so I should be able to get a few things done.
 

Hostyle

Well-known member
Joined
May 8, 2014
Messages
272
Location
Geldrop (NL)
That's a sweet idea to keep the drawers organized!

And that x-ray looks nasty. Does it have to heal on it's own or do you need to undergo surgery?
 
OP
S

Sheriff245

Well-known member
Joined
Oct 18, 2013
Messages
88
That's a sweet idea to keep the drawers organized!

And that x-ray looks nasty. Does it have to heal on it's own or do you need to undergo surgery?
I don't know where it's going yet. The doc didn't look surprised by what he saw. He told me to come back at the beginning of September. If it hasn't started healing by then, we'll consider surgery. With a 15-month old and another one due in Sept., I have no idea how I'll be dealing with this.

LOVE this idea. So stealing it!
Please do!
 
OP
S

Sheriff245

Well-known member
Joined
Oct 18, 2013
Messages
88
I just realized I didn't update after my vacation, so here's what's been going on.
First of all, I lit up the candle. It smells good but gives me a headache, so I'll save it for special occasions.
8793344E-AAC3-4CDA-86F1-EC9103CC7A89_zpsyrzqlwu6.jpg


While my head was spinning, I filled a few more drawers.
74E9DC73-8C0B-4FB4-865C-DC20048A78EE_zpsayxompkd.jpg

6D0D893D-5E54-457D-9FA4-C97B077D65EA_zpsceb7jn6e.jpg

E4DA36AC-A27B-44C8-8C41-4020B5E2A010_zpsaqnat2xr.jpg

73E2980C-AE6C-4106-A739-60AE91AA595A_zpsv8gbmnnw.jpg


I also found a way to put my t-handles on the wall. This magnetized screwdriver holder looks cool...
F52F6715-0FBD-4426-BC1F-EE881D43E7E5_zpsrwgmfc7x.jpg

52B821FE-0C5D-4CA4-829B-BE4EA61E45CE_zpsmf7cyxyn.jpg


...but it was made to stick to steel, and double-sided tape wasn't strong enough to hold it in place, so my t-handles are sitting on the floor behind the toolbox. FML

I'm still trying to figure out where to put them. I want easy access, preferably on a wall.

Fast forward to today. Well, after 3 months, the bone is still not healed and will require surgery. Because everything is happening at the same time, surgery will have to wait. Early November is the target as of now. It will give me some time to get the cars, travel trailer, van and bikes ready for winter. I started the process today by washing the bikes. Not an easy task, considering they've been dirty since May.

A956FFD2-2207-4DE4-B108-B6D61896700C_zpspk7nto03.jpg


I also moved a few things around and swept the floors. Then I unrolled the new carpets.
95ED607E-E739-4503-BDF2-2705592D0C04_zpsonms1fx9.jpg

CC7007E5-3040-419D-99B8-E498CFA84B1C_zpss9qs9vgl.jpg


This is the stuff I have to move elsewhere before winter.
CB138FAE-7FF6-4D05-B8ED-72EAEE4DF899_zpsiavqbuj6.jpg


I don't plan on riding this winter, so the van will sleep in the garage. Fortunately, I have enough room in there to work on three bikes with the van parked in there. Also, since I won't be riding, and the pressure washer was out, I washed the snow tires and dressed them to keep the rubber from drying out.
8F92B32D-FB21-4264-A353-9D00A74DBA1A_zpsoenzjncl.jpg

6C17F67C-2AB4-419B-8CA5-8A33BE6EFBA6_zpsrrghkq41.jpg
 

LaCorski

Well-known member
Joined
Oct 11, 2013
Messages
62
Location
Central Washington
Luv it! The attention to detail is great, such as they blue pull handles that match the ceiling and the blue box liners. Awesome work! Most people wouldn't care to put this much work into a garage, that's why I like this forum so much, I'm crazy like you guys! I plan on starting my post real soon so I too can show the world why I'm locked away in a metal box all day and nite! Keep up the great work.
 

sean Buick 76

Well-known member
Joined
May 7, 2013
Messages
3,221
Location
Edmonton Alberta
Great work, I first saw this thread today and I am impressed with the work you are doing! Top notch job and I especially like the way you matched the colors around the toolbox. The flush mounted parts washer is cool too!
 
OP
S

Sheriff245

Well-known member
Joined
Oct 18, 2013
Messages
88
Alright, time for a Thursday afternoon update.

I've been on parental leave for the last two weeks, since my daughter was born on Sept. 23. I've managed to use some of this time to get things done in the garage, mainly easy stuff.

First thing I did was to install a vise. Nothing special, just a standard 4 inch Mastercraft, except I installed Race Tech aluminium jaws on it. Easier on aluminium parts, and it has a V cut out on one end to grab fork tubes without damaging them.
A72A5654-2699-44D2-A79F-1B5E6C249C31_zpsuslsnxsm.jpg

013D8D81-FBCD-464F-9430-311E397FB69F_zpsyxczqtbn.jpg

E44D086F-1C7B-4664-9399-B58254370A37_zpsnumtufoj.jpg


Next thing I did was remove the parts washer pump. The impeller had been freezing from the very beginning, and I was determined to open it up and see if I could free it for good. Here's how the pump looked when I took it out:
0F201D33-7B34-433A-AC11-C5F702367386_zps3eyodf39.jpg

17D0A22F-9C50-45CD-8E46-089F6AA0A036_zpsooimzvv5.jpg


Needless to say, I won't waste any more time with it. I have ordered a Little Giant pump and toying the idea of installing an automotive oil filter in line with it, like I've seen somewhere on this forum.

Some of you might remember the vacant space next to the fridge, under the parts washer. I still had no idea what to do with it until I started using the stereo. The small speakers sounded good, but had no bass. So I took out the matching subwoofer that was in the basement. I fits like a glove, and sounds great too!
FFC27295-4933-4DFB-BA4D-C5B999F78F41_zpsmnl2t3qo.jpg


I also got new tools and some safety devices to get the place ready for my new helper
203DAD2D-E6EF-4080-80E7-9B04D0D38FCB_zpsji4inleh.jpg

E11897ED-DBD2-42C0-9D3C-AA1C81B03430_zpseefd1kbm.jpg


That's it for now. I have a few things I want to get done before I get my surgery, so expect another update soon.
 
To avoid these ads, REGISTER NOW!
Top Bottom