To avoid these ads, REGISTER NOW!

MP&C Shop Projects

TimeWarpF100

Well-known member
Joined
Aug 21, 2010
Messages
6,784
Location
not here
Dropped it off before work, picked it up afterward.


Picture%203866.jpg


After about an hour in the driveway with an air hose, the flow of trapped media is scarce, but I'm sure there's still some there. We'll get some SPI epoxy sprayed tomorrow night...


Picture%203867.jpg


Picture%203868.jpg


Picture%203869.jpg

Frame is looking good! Really like the mods you have done.
 
To avoid these ads, REGISTER NOW!
OP
M

MP&C

Well-known member
Joined
Oct 21, 2009
Messages
4,396
Location
Leonardtown, MD
You need a bigger shop!


Haha! I think that's all of us Randy. Well, except for Don, he's about set.. :lol:


The frame had some slight pitting so the sides were hit with the DA to flatten things out a bit, and some Evercoat 416 used to address some of our plug weld grinding marks on the frame plates...


Picture%203882.jpg


Picture%203880.jpg


Picture%203881.jpg


Here's the "winter" heating method for spraying in cold temps. 170,000 BTU aimed at the air return, and the air handler fan turned on constant to circulate the heat. Open window for air intake..


Picture%203883.jpg


Picture%203884.jpg


Picture%203885.jpg


After three coats of primer, the sides of the frame are looking much better than before...


Picture%203886.jpg


Picture%203887.jpg


Picture%203889.jpg


Also got some more primer on these parts as well, should be ready for blocking in a few days.


Picture%203891.jpg


Picture%203892.jpg
 

white6589

Well-known member
Joined
Feb 27, 2011
Messages
351
Location
Maryland
Man, that frame looks good Robert. :thumbup:

I'm noting all of the over spray on the floor and the filters. There must be a lot after 3 coats, huh?

Happy holiday to you and yours,

Steve
 
Last edited:
OP
M

MP&C

Well-known member
Joined
Oct 21, 2009
Messages
4,396
Location
Leonardtown, MD
That's also from the other night and the bus spray sessions as well. No sense wasting the labor getting it spotless for epoxy primer, it will be like that again when you're done..
 

iajonesy

Well-known member
Joined
Feb 8, 2009
Messages
2,467
Location
Iowa
Robert, is that only primer on that frame ? That looks like you could buff that right now and be show ready.

Hope you and your have a very Blessed Christmas and a great 2016.

Mike
 
OP
M

MP&C

Well-known member
Joined
Oct 21, 2009
Messages
4,396
Location
Leonardtown, MD
Mike, it should dull out a bit more in the next couple days, it's SPI Epoxy primer only, which is what the owner asked for..

Merry Christmas everyone!
 

don long

Well-known member
Joined
Mar 31, 2012
Messages
8,841
Location
southern california
Robert
I know that I don't say much, but I follow along weekly and feel the need to thank you for all the things I've picked up from watching you.

The year is almost gone and I want to wish you a very Merry Christmas and a big and happy new year.

Thanks again
Don
 

xtremek

Well-known member
Joined
Apr 13, 2012
Messages
11,603
Location
St. Johns, Mi
It's to bad you live so far away, I'd volunteer to be a grunt for you just to learn how to do things right. You're a true artist and talented journeyman. This is one of my favorite threads.
 

gasgas17

Well-known member
Joined
Nov 7, 2009
Messages
443
Location
Nova Scotia, Canada
Will the epoxy primer keep any rust from coming back to the surface? Is it some thing that I could grind off the the rockers on my work van and seal any left over pitting with to keep it from coming back? We live in the rust capital of the world with one of the highest concentrations of road salt in NA. So ensuring the surface is sealed is paramount or it will just rust in no time.
 
OP
M

MP&C

Well-known member
Joined
Oct 21, 2009
Messages
4,396
Location
Leonardtown, MD
Thanks for all the kind words fellas.


Will the epoxy primer keep any rust from coming back to the surface? Is it some thing that I could grind off the the rockers on my work van and seal any left over pitting with to keep it from coming back? We live in the rust capital of the world with one of the highest concentrations of road salt in NA. So ensuring the surface is sealed is paramount or it will just rust in no time.


IMO nothing will keep rust from coming back to the surface unless you can get rid of the rust that's there to begin with. For something that shows a bit of pitting, I personally would use some media blasting to insure all the rust is removed, then apply about 3 coats of SPI epoxy, then any topcoat you wish. .............and if it's that bad, new rockers may be in order, where I'd epoxy inside and out prior to installing..


The other day when we primed the frame a second time we also did the front side of the trailer wheels..


Picture%203893.jpg


and today I mixed up some Centari that has been sitting on the shelf a few years.. It sprayed pretty decent...


Picture%203896.jpg


Picture%203897.jpg


And more blocking.....


Picture%203900.jpg


Picture%203901.jpg


Picture%203902.jpg
 
Last edited:

bulletpruf

Well-known member
Joined
Nov 28, 2013
Messages
10,912
Location
San Antonio
Robert -

I may have missed it, but what are the owner's plans for the wagon? Is this a driver, a show car, or both? Staying with stock-ish suspension? Late model drivetrain? A/C? Original interior or custom? Just trying to picture the car when it's done.

Thanks,

Scott
 
OP
M

MP&C

Well-known member
Joined
Oct 21, 2009
Messages
4,396
Location
Leonardtown, MD
Scott, I guess this will fall in the category of both, with more emphasis on drivability. Lowered, 4 wheel disc, 383 stroker, AOD, 4.11 locker rear, AC, some mods to the interior..


If it helps any, here is an artist's rendering.. We are following this design "very loosely" :lol_hitti


0604001848.jpg
 
Last edited:

HD FLHX

Well-known member
Joined
Jul 10, 2011
Messages
1,100
Location
Central Iowa
Here's the "winter" heating method for spraying in cold temps. 170,000 BTU aimed at the air return, and the air handler fan turned on constant to circulate the heat. Open window for air intake..


Picture%203883.jpg

I use the same method to supplement the heat for my paint room. Does well for me as long as its above zero. Once it gets in the negatives it can be a struggle to keep 70* paint room temps.
 

bulletpruf

Well-known member
Joined
Nov 28, 2013
Messages
10,912
Location
San Antonio
Scott, I guess this will fall in the category of both, with more emphasis on drivability. Lowered, 4 wheel disc, 383 stroker, AOD, 4.11 locker rear, AC, some mods to the interior..


If it helps any, here is an artist's rendering.. We are following this design "very loosely" :lol_hitti


0604001848.jpg

Thanks for the details, Robert. Glad it's not getting an LS like everything else these days. Sounds like it's going to be a great driver.

Is that close to the color that it will be painted? Normal stuff or flake, pearl, etc?

Thanks again,

Scott
 
OP
M

MP&C

Well-known member
Joined
Oct 21, 2009
Messages
4,396
Location
Leonardtown, MD
Colors (this week) will be organic green kandy basecoat from House of Kolor, from bottom of windows down.


HOK-KBC09-3.jpg


From bottom of windows up will be a platinum silver, still TBD, and hopefully a lace pattern in green Kandy to break up that big expanse of sheet metal up top.. The owner has yet to pull the trigger on final, but I will be spraying a test panel in the near future for her to look at..
 

white6589

Well-known member
Joined
Feb 27, 2011
Messages
351
Location
Maryland
I like the green but......on the top a creamy white such as wimbledon white would look sharp to me. Even with the lace it would keep that classy 50's two tone look.

JMO
 
To avoid these ads, REGISTER NOW!
OP
M

MP&C

Well-known member
Joined
Oct 21, 2009
Messages
4,396
Location
Leonardtown, MD
Thanks for the feedback guys. I think I'd prefer something more white with pearl to give the roof more pop, but we'll see how this pans out. Getting closer to paint, may need to make our minds up soon.. :D


Made another trip to the car wash tonight. Tire soak, high pressure soap, and a rinse...


Picture%203904.jpg


Picture%203905.jpg


Picture%203906.jpg


While Kyle was media blasting, I used the 36" AFS to block the tail gate.


Picture%203907.jpg


This had been blocked a couple times before and never seemed to come out right. Of course, I was using a shorter block as well. The 36 really did the trick in getting things nice and flat...


Picture%203908.jpg


Picture%203909.jpg


.....and getting things ready for another epoxy session...


Picture%203910.jpg


Picture%203912.jpg


Picture%203913.jpg


Picture%203914.jpg


Moved these out of the way, closer to the door so we can get tires on this weekend. Order trim rings today, now for some baby moons that fit... I swear they get brighter every time I look at them..


Picture%203911.jpg
 

yaidunno

Well-known member
Joined
Feb 10, 2011
Messages
1,336
Location
WI
That orange is a wonderful color!

Excellent work, as I've come to expect Robert. I always enjoy seeing, reading, and learning from your updates! Thanks again for taking the time to share.
 
OP
M

MP&C

Well-known member
Joined
Oct 21, 2009
Messages
4,396
Location
Leonardtown, MD
Thanks!


I had a request to show more details of the louver punching process, so I'll just post it here for others to see as well.

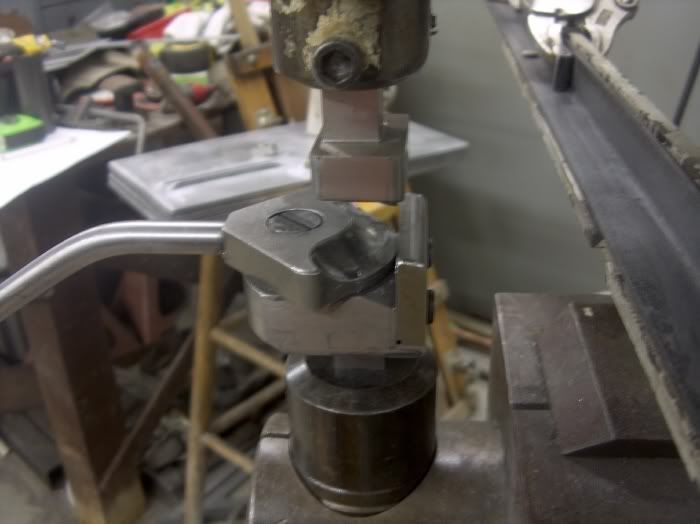
My Lennox Tru-edge had a dovetail fixture and a fence, where it can be moved forward and backward, and clamp to set the backstop distance. Shown here, we also have a 1x1x1/8 steel angle bolted in to extend the fence length, then some bent stops clamped in with vise grips. This allows us to set the width distance of our louver.


HPIM6296.jpg


The duck bills were clamped on to have a handle for better control. Even though the fence helps out, the panel does have a tendency to bounce/oscillate a bit, which may affect the accuracy of the louvers if it can't be controlled. For the forming process, the initial cut is done just enough to slit the panel. If the punch presses through too far on the initial cut, it will stretch too much and you'll end up with a wavy louver, with little chance of success in removing the distortion. It's here that test panels are beneficial, to see what depth setting brings in that distortion, then back up a bit on the adjustment and use this for the initial. Then additional passes are made, incrementally increasing the depth with each pass, until you get to a depth you're happy with.


HPIM6297.jpg


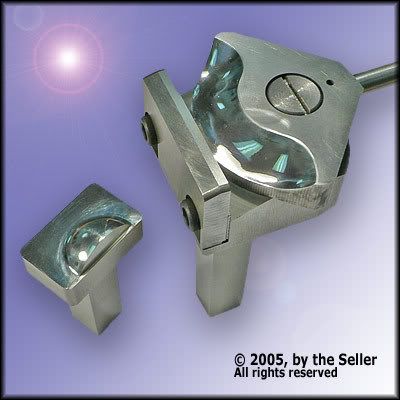
The tooling was purchased from Neil Dunder, www.gogitzit.com and the design works well in punch varying length louvers. If you're looking for a specific size with all the same size, a fixed die punch will be quicker. For the option of varying the length, this die is the cat's meow.


HPIM6299.jpg


HPIM6301.jpg


louver.jpg


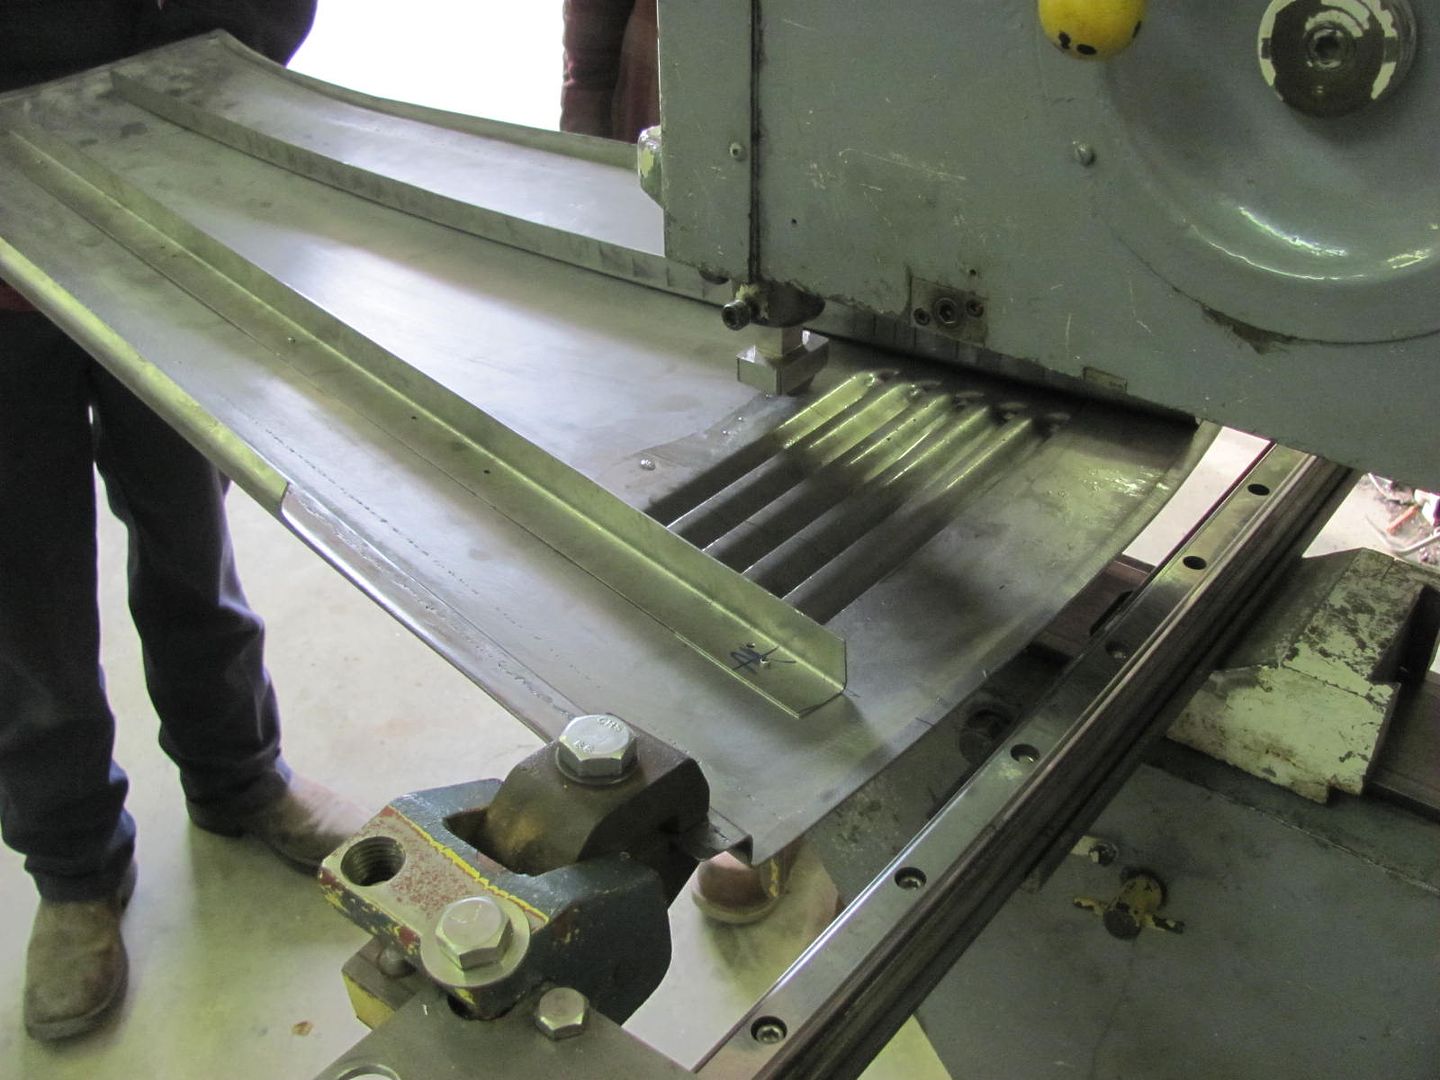
The straight through feature allows you to make the louver however long you'd like, then on the VERY LAST pass, the handle is rotated to the side to "coin" the ends. Here's some panels that we did with using the manual fence and the clamped stops.


HPIM6332.jpg


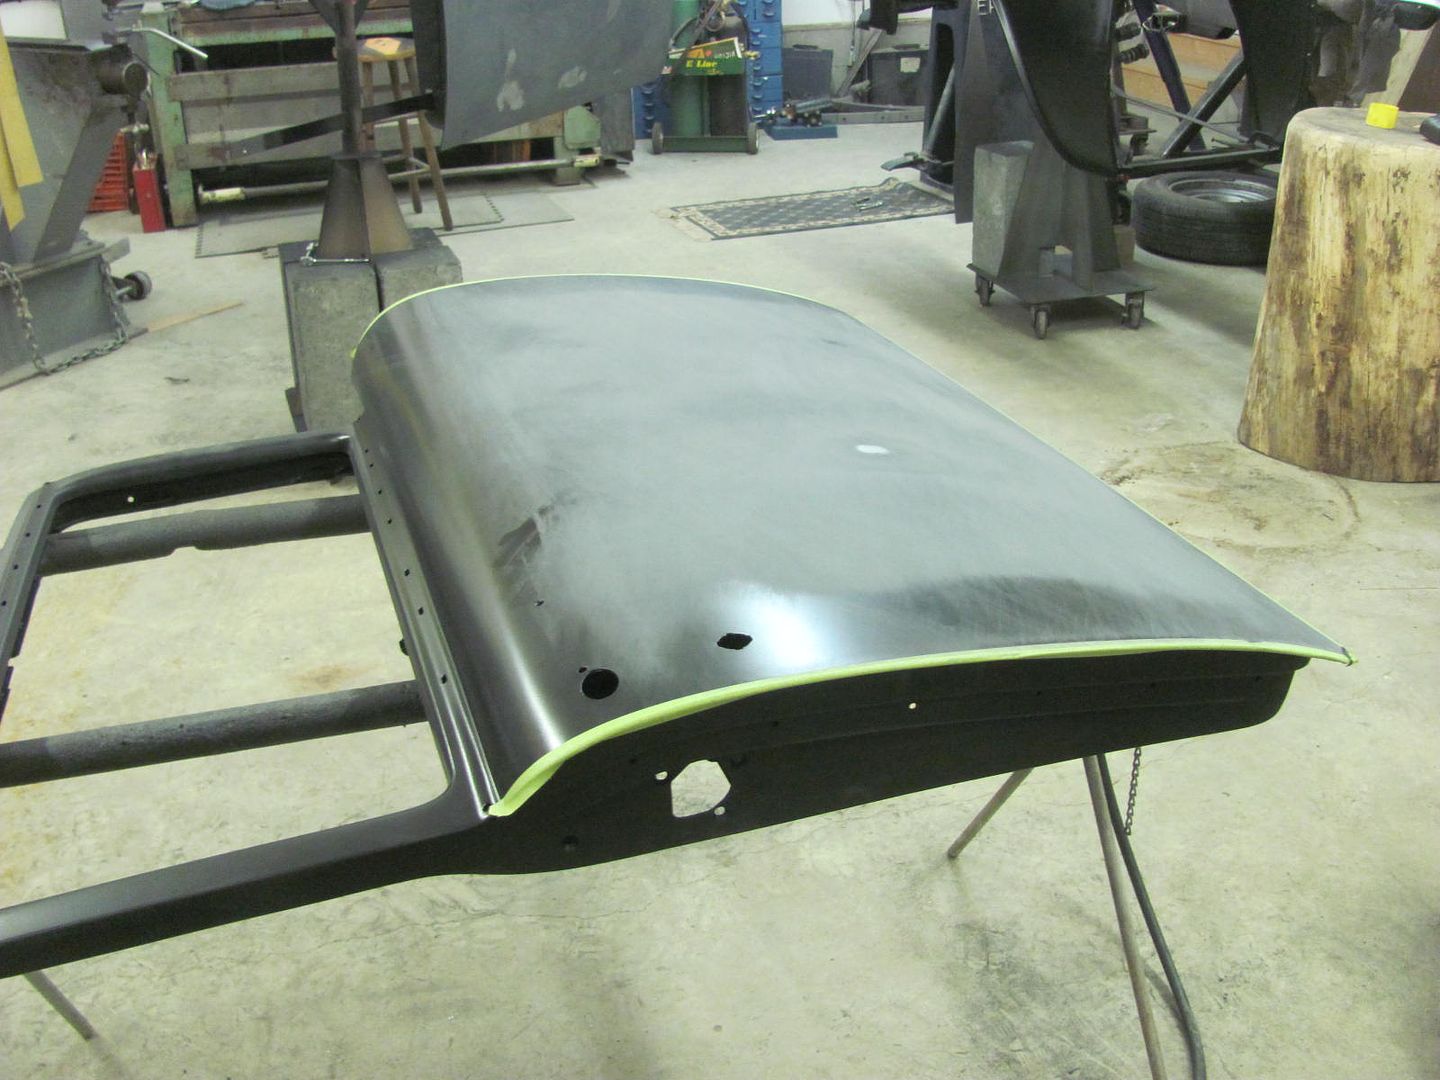
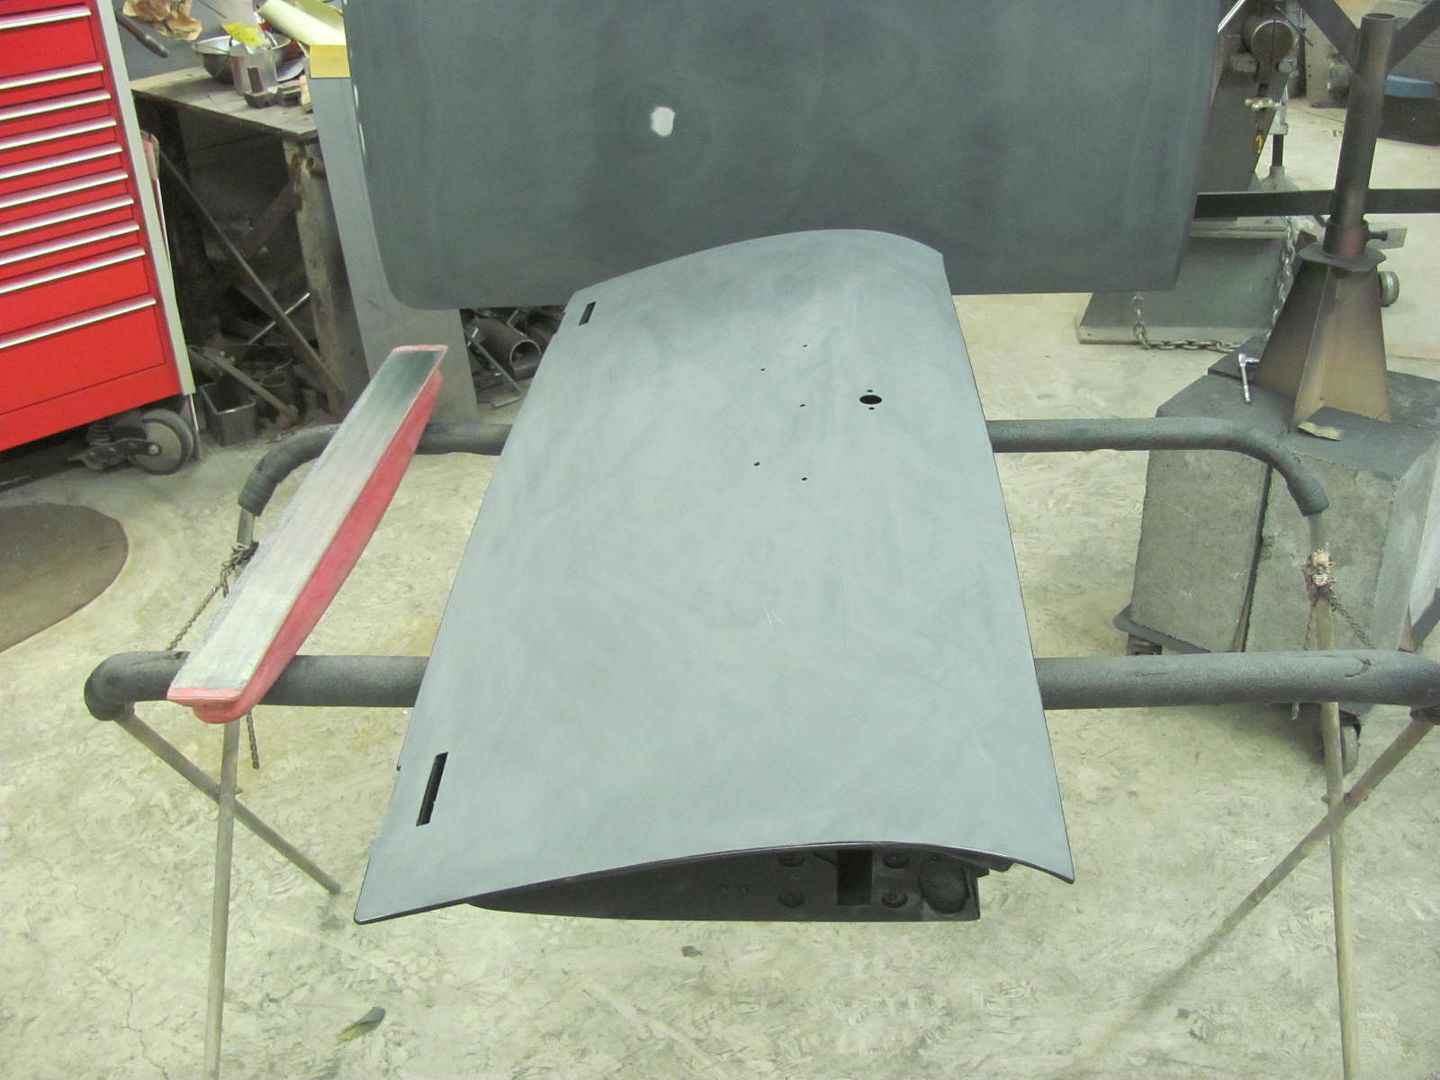
Recently I was contacted by David Thomas and Cody Walls about punching louvers on the hood sides of the 35 Chevy that Cody is building for David. Now I'd never had much issue with using the fence as a backstop before, but I'd seen Cody's work thus far on the 35 on the HAMB, and didn't feel we needed to take a chance. I had some material clamps in the shop from a duplicator that went to another machine, and started surfing CL for a used linear slide. This would allow us to still use the dovetail to set the backstop distance, but the work would be clamped in place for better accuracy (less chance of a screw-up) for the side to side travel. Also, I hoped that the clamps would help to limit some of the chattering/oscillation that this process would tend to inflict on the panel as you formed the louvers (which it did). I struck gold with a pair of 48" linear slides for $50. To attach to the dovetail fixture, the fence was removed, and I used this "U" channel, attached to the dovetail fixture with some countersunk 1/4-20's.


Picture%203920.jpg


Picture%203921.jpg


......followed by a piece of flat bar that fit fairly snugly inside the bottom of the U channel....


Picture%203922.jpg


......which was then drilled to match the linear slide's hole pattern..


Picture%203923.jpg


Picture%203924.jpg


I also used some 1/4-20 bolts and riv-nuts as end stops, as it saves on sudden uptakes. (yeah, I did that....)


Picture%203925.jpg


Picture%203926.jpg


The material clamps are bolted via an interface plate, which also allows us to put the clamp above or below for some adjustability to the tooling height in the machine. For flat panels it worked out hanging below the plate, for stepped flange panels like Cody had on the hood sides, we had to move the clamp as shown.


Picture%203916.jpg


Picture%203917.jpg


To set the louver widths (varying lengths) we used 1 x 1 bent angle out of 18ga sheet metal, and used the shrinker to add a radius to the lower line.


Picture%203836.jpg


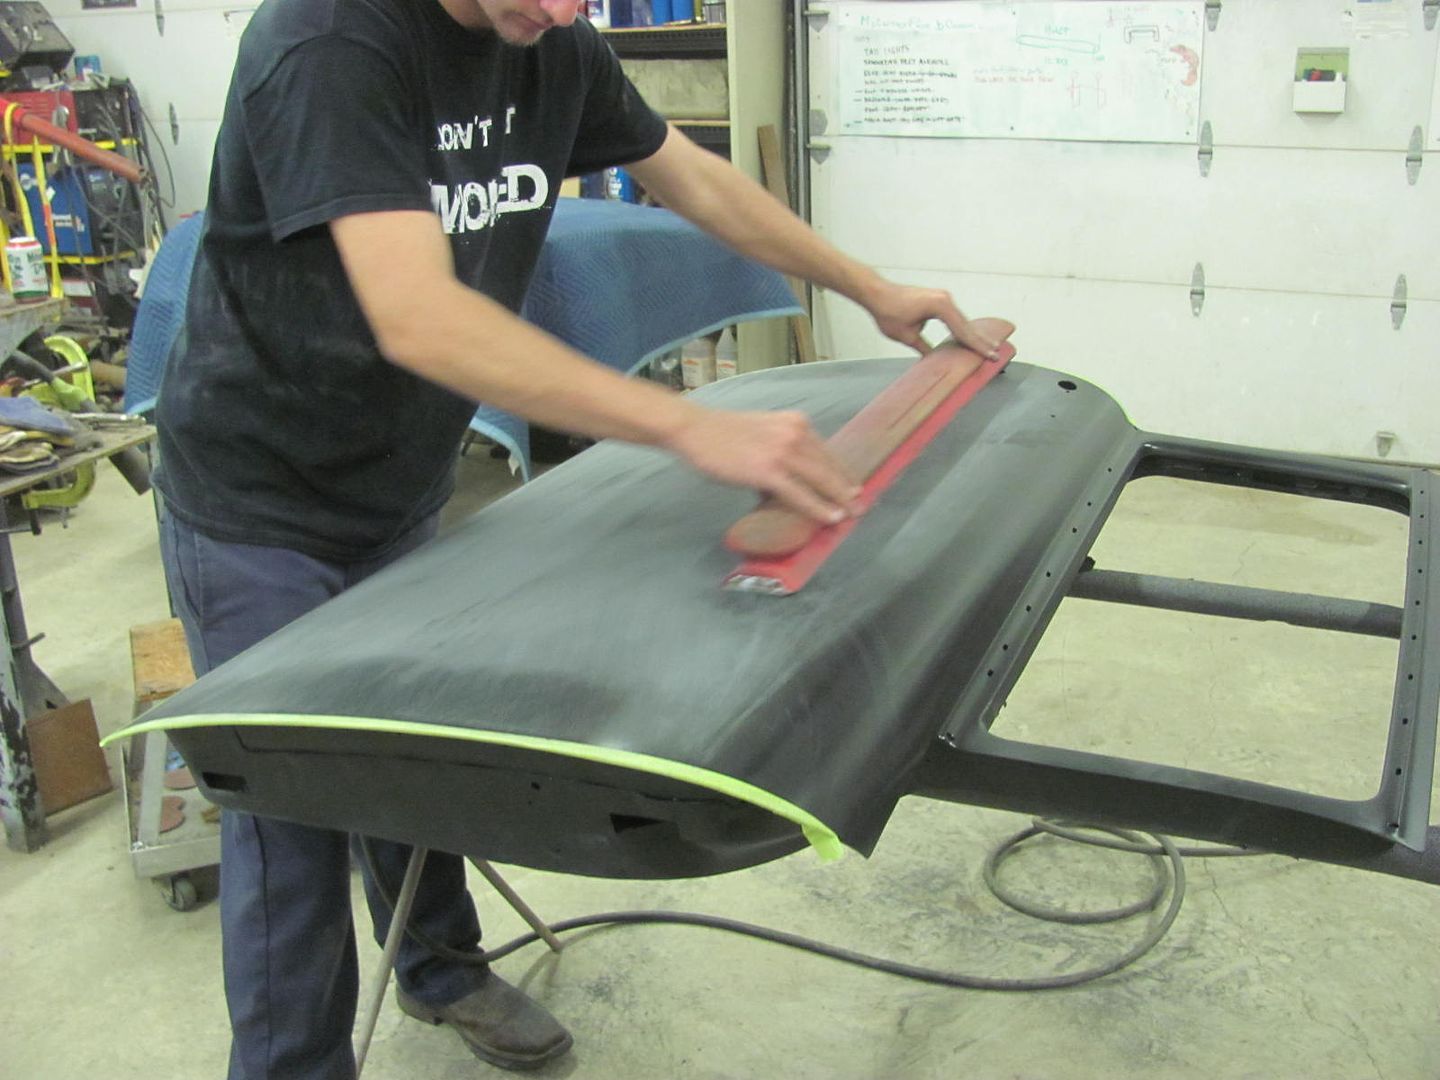
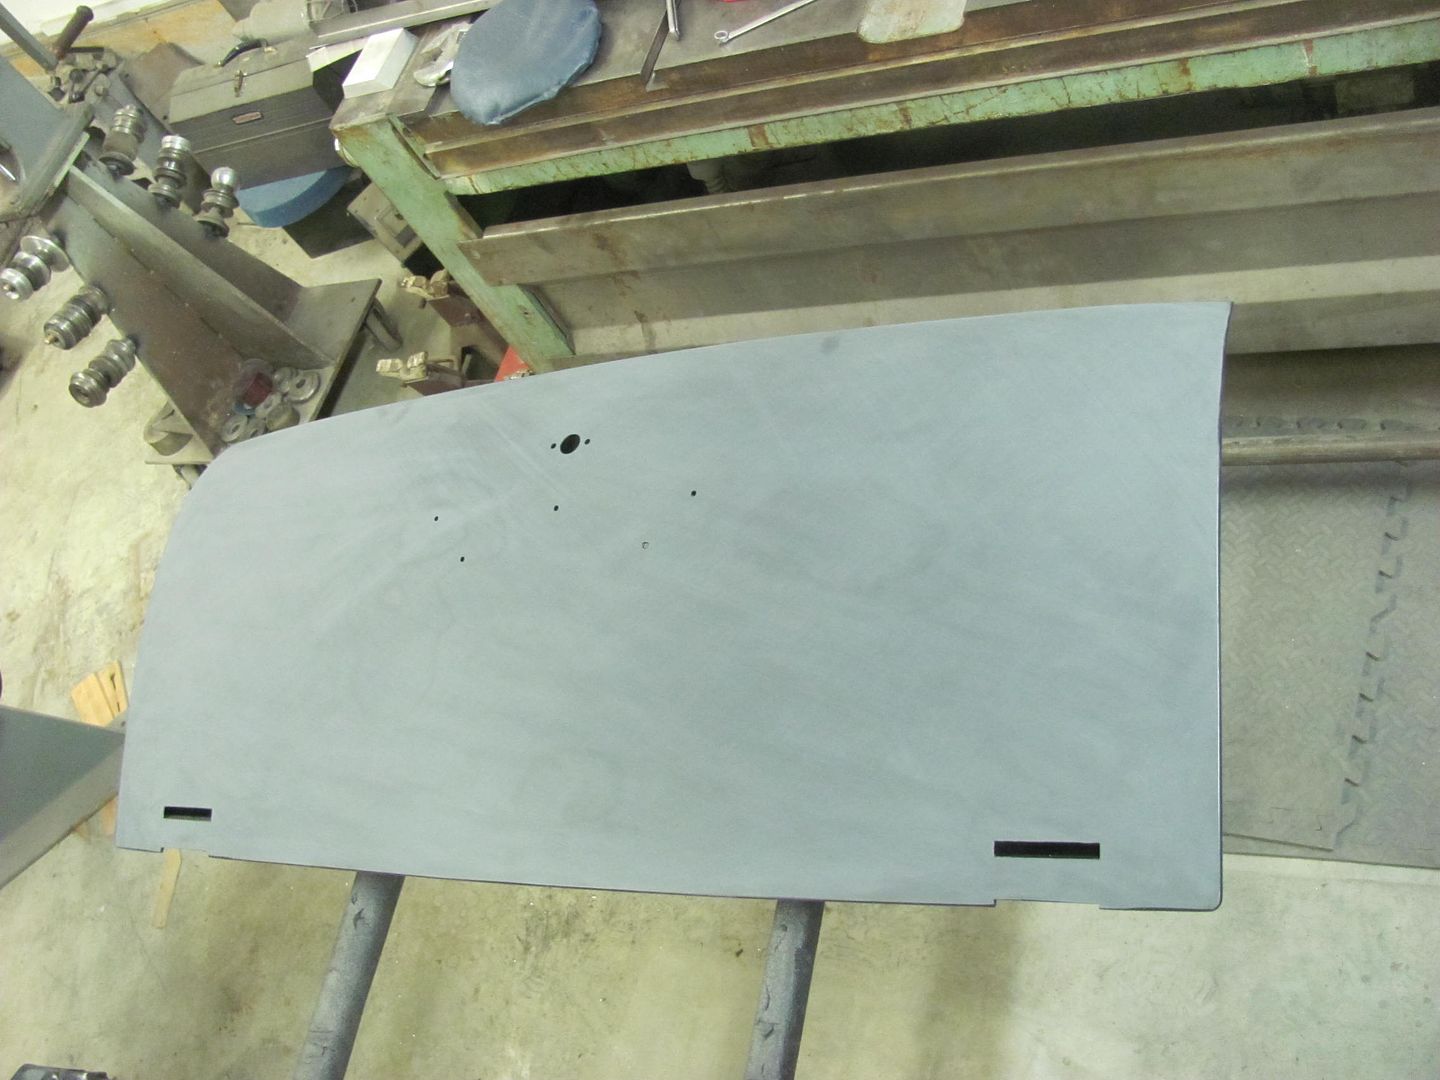
It always pays to do a test panel, here clamped in place, before punching the real thing that someone has countless hours into it fitment perfection..


Picture%203832.jpg


Then jump on the good stuff..
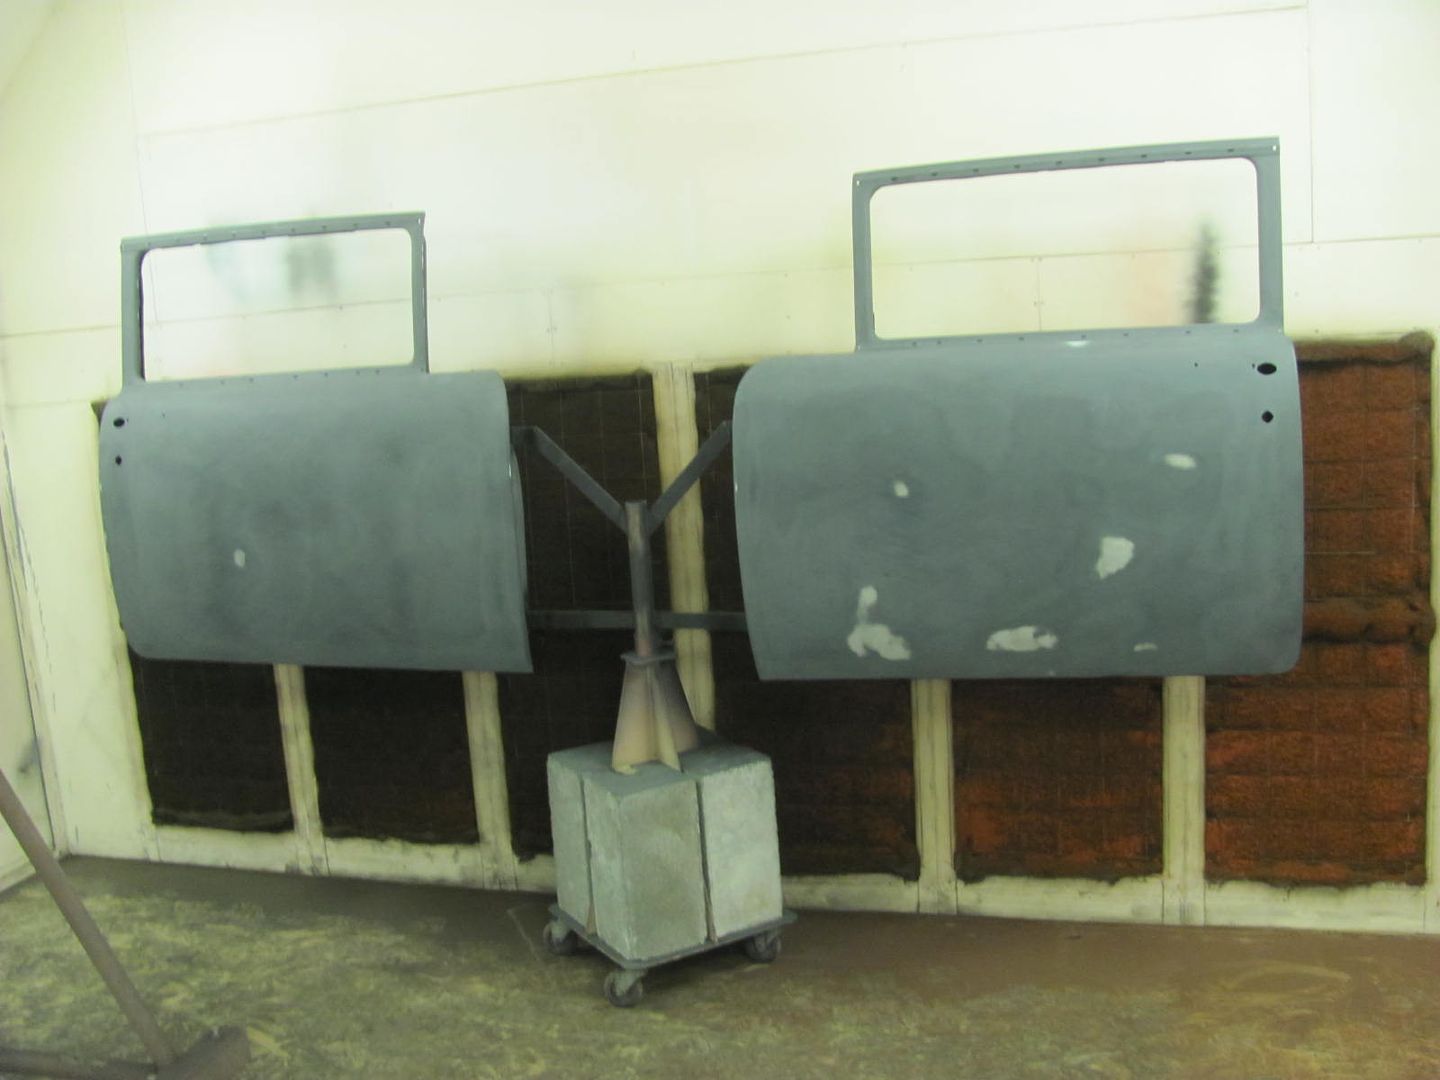

Picture%203837.jpg


Finished panels...


Picture%203840.jpg


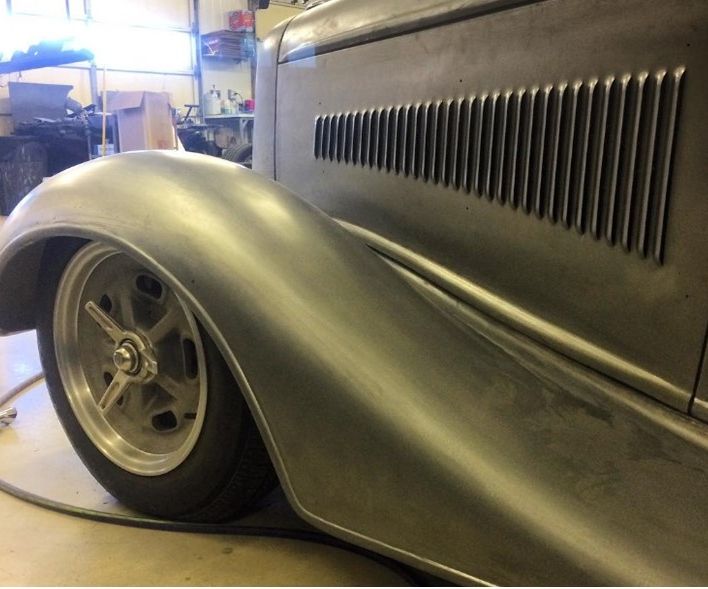
As fitted to the car....


35%20Chevy.jpg


As stated in earlier thread, Cody is the one who did all this beautiful metalwork on the 35, the only thing we did was to put a bunch of controlled holes in his work.... :lol:

Also, to those who don't follow Cody on IG, it looks like the 35 will be headed to GNRS in about a month. Very fitting for all of Cody's hard work and eye for detail. :bowdown:
 
Last edited:

MScott

Well-known member
Joined
Jun 30, 2009
Messages
1,616
Location
Eastern Ontario
Thanks for the explanation. I had wondered how you could punch the louvers in varying lengths as any I have seen used a fixed punch. Very interesting and great work as usual.:bowdown:
 

TimeWarpF100

Well-known member
Joined
Aug 21, 2010
Messages
6,784
Location
not here
Waaaaay Cool!

30's cars of any brand really do it for me. Hope to have another some day.

Maybe in 2039 when I finish current projects . .
 
OP
M

MP&C

Well-known member
Joined
Oct 21, 2009
Messages
4,396
Location
Leonardtown, MD
You and me both Randy. I think I'm going to start working on 30's cars, less parts, less sheet metal, quicker turnaround.. ;)


Picked up some 400 grit PSA paper yesterday, used it this evening to get the tail gate finished to 400 grit, next week we'll wet sand to 600 grit.


Picture%203932.jpg


Nephew Chris came over and helped Kyle and I get the frame off the rotisserie and back on the floor..


Picture%203933.jpg


Picture%203934.jpg


With the rotisserie freed up, we now have a new paint fixture...


Picture%203937.jpg


Picture%203935.jpg


Parts prepped for epoxy primer tomorrow...


Picture%203936.jpg


Picture%203939.jpg


Picture%203940.jpg


While I was getting these parts taped off, Kyle started blowing apart the rear end for media blasting..


Picture%203943.jpg
 
Last edited:

TimeWarpF100

Well-known member
Joined
Aug 21, 2010
Messages
6,784
Location
not here
While Kyle was media blasting, I used the 36" AFS to block the tail gate.


Picture%203907.jpg


This had been blocked a couple times before and never seemed to come out right. Of course, I was using a shorter block as well. The 36 really did the trick in getting things nice and flat...


Picture%203908.jpg


Picture%203909.jpg


IMG]http://i5.photobucket.com/albums/y167/rmccartney/Other/Picture%203911.jpg[/IMG]

I know you said but where can I find those long blocking boards? If I messed with the bedside I would need a 8 footer! Ha

 
OP
M

MP&C

Well-known member
Joined
Oct 21, 2009
Messages
4,396
Location
Leonardtown, MD
AFS, or Adjustable Flexibility Sanders. They have removable rods to adjust how much tension they have in remaining flat. Most of your online Autobody stores will carry them, Northern Tool, and as much as I hate to mention, Eastwood. Shop around, I got most of my sanding blocks from Northern Tool and they beat the hell out of Eastwoods price at the time..
 

Bob Heine

ALLIANCE MEMBER
Joined
Oct 24, 2009
Messages
10,703
Location
Boca Raton, Florida
Robert,

Based on your (and many others) recommendation, I just bought an AFS board. It's a huge improvement over my longest (16") Durablock but I don't think I can put even pressure on a 36" board and probably not on a 27" board either. I'm doing bodywork on a 72 Corvette and the only sort of flat spots are the hood, doors and rear deck.

I ended up buying a 21" and almost every place I looked they wanted $70+. I ended up buying it from Summit for $60 (they also have the 36" for just under $200). I'm learning that bodywork supplies are expensive. When I discovered a box of fifteen 5000 grit 6-inch DA disks cost almost a hundred bucks, paint prices don't seem so outrageous (especially SPI products).

http://www.summitracing.com/parts/afy-8907688307/overview/
 
OP
M

MP&C

Well-known member
Joined
Oct 21, 2009
Messages
4,396
Location
Leonardtown, MD
Bob, typically for blocking with the 36, I don't put any pressure on it, I use a thumb and forefinger a few inches in from each end to grasp it, and let it glide back and forth, let the paper do the work.. But like you suggest, irregular shapes require different shaped blocks...
 

cat06

Well-known member
Joined
Oct 22, 2005
Messages
229
Location
in tha garage
lol kinda expensive tie wire to hang parts with ;) lol (looks like copper, here the prices dropped but still a tad over 2.00 a pound for scrape) just poking a little fun at you, great work
 
OP
M

MP&C

Well-known member
Joined
Oct 21, 2009
Messages
4,396
Location
Leonardtown, MD
No sweat, just had my eyes checked two weeks ago, Doc said I couldn't see as well as I thought and I needed stronger reading glasses.. :lol_hitti
 
OP
M

MP&C

Well-known member
Joined
Oct 21, 2009
Messages
4,396
Location
Leonardtown, MD
Today Kyle worked on getting the axle pads welded on....


Picture%203945.jpg


Picture%203946.jpg


.....while I was spraying some SPI epoxy....


Picture%203949.jpg


Picture%203950.jpg


Picture%203948.jpg


.....and while I had some epoxy mixed, we poured some inside the tailgate to seal the inner and outer skins ..


Picture%203951.jpg


Picture%203952.jpg


Picture%203969.jpg


Axle pads done, then heated the opposite side to counter the weld shrinking...


Picture%203954.jpg


Picture%203955.jpg


Picture%203956.jpg


Picture%203959.jpg


It's real close, just a little more straightening to do...


other parts from the booth today....


Picture%203962.jpg


Picture%203963.jpg


....and then sprayed some silver metallic Imron on the A-arms..


Picture%203965.jpg


Picture%203966.jpg
 

TimeWarpF100

Well-known member
Joined
Aug 21, 2010
Messages
6,784
Location
not here
AFS, or Adjustable Flexibility Sanders. They have removable rods to adjust how much tension they have in remaining flat. Most of your online Autobody stores will carry them, Northern Tool, and as much as I hate to mention, Eastwood. Shop around, I got most of my sanding blocks from Northern Tool and they beat the hell out of Eastwoods price at the time..

Thanks! Like Bob H posted after you said what they were I ordered 3 different sizes from Summit. Quite a bit cheaper than Eastwood.

Those pieces are looking pretty sharP!
Looks like you have been quite busy . .

Many years ago it was weekly I was straightening the axle housing in my brothers roundy round car (ASA type) Its amazing how much you can get them to move heating with the torch.

Also quite surprising is checking how far out some of the "name brand" housings are when they show up at ones door for big bucks.
 

iajonesy

Well-known member
Joined
Feb 8, 2009
Messages
2,467
Location
Iowa
Robert, I know you are really big on the SPI products and would like to know if you use their thinners and top coats too ? Can they mix custom colors for you or do they only offer a basic line of colors ? Also, do they offer their epoxy primer in other colors ? Thanks a lot for your time and trouble.

I really enjoy following your thread on the 55 build.

Mike
 
OP
M

MP&C

Well-known member
Joined
Oct 21, 2009
Messages
4,396
Location
Leonardtown, MD
Robert, I know you are really big on the SPI products and would like to know if you use their thinners and top coats too ? Can they mix custom colors for you or do they only offer a basic line of colors ? Also, do they offer their epoxy primer in other colors ? Thanks a lot for your time and trouble.

I really enjoy following your thread on the 55 build.

Mike


Mike, check out their website, http://www.southernpolyurethanes.com/

They have epoxy in black, white, grey, and red oxide. They have clears, high builds, etc, and solid urethanes in red, black, orange, etc.


Well tonight we worked on getting the parts out of the booth so we can get the next load of parts ready for epoxy, and in between spent some more time on straightening the rear. In measuring at the bead of the 18" wheels, we had a +/- .020 on the passenger side and a +/- .035 on the drivers side.


Picture%203977.jpg


....and more heat applied for some shrink..


Picture%203979.jpg


Picture%203981.jpg


We'll let that cool and get some of the front end parts bolted up..


Picture%203982.jpg


Picture%203983.jpg
 

bonneyman

Well-known member
Joined
Apr 22, 2010
Messages
8,757
Location
Desert SW
Awesome craftsmanship! :eyecrazy:

And most of that beauty will be invisible when done - all hidden under body panels and such.
 
To avoid these ads, REGISTER NOW!
Top Bottom