To avoid these ads, REGISTER NOW!

MP&C Shop Projects

OP
M

MP&C

Well-known member
Joined
Oct 21, 2009
Messages
4,396
Location
Leonardtown, MD
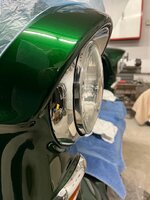
So I've had some questions as to why this or that with modifying the air cleaner. I was going to hold out with the REAL reason, but here goes.... This firewall is just too clean that I can't bring myself to clutter it up (or the wheelwell) by mounting an ignition coil and then being forced into using an overly long coil wire..


IMG_8282(1).jpg


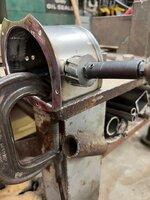
So as shown here.... this will be the approximate location as we fabricate a sealed cavity from the bottom of the air cleaner to mount the coil. This should put the coil wire about two inches in front of the distributor...


IMG_1616(1).jpg


So this should give us a nice clean look and keep the firewall as open as we can...
 
To avoid these ads, REGISTER NOW!

BMW Rider

Well-known member
Joined
Apr 8, 2010
Messages
346
Location
Calgary, Alberta, Canada
How is the wingnut securing the air cleaner lid going to handle the weight of the coil? Its a clever idea, but I'd be concerned about the offset weight causing the air cleaner to want to tip and unseal.

Or is the coil being secured to the engine and this is just to conceal it?
 
OP
M

MP&C

Well-known member
Joined
Oct 21, 2009
Messages
4,396
Location
Leonardtown, MD
It does use a 5/16-18 threaded stud into the EFI. Even if it were 1/4-20, I really don’t foresee it being an issue. The coil can’t be any more than two pounds.
 

Monza Harry

Well-known member
Joined
Dec 29, 2018
Messages
1,433
Location
Windsor ON
How is the wingnut securing the air cleaner lid going to handle the weight of the coil? Its a clever idea, but I'd be concerned about the offset weight causing the air cleaner to want to tip and unseal.

Or is the coil being secured to the engine and this is just to conceal it?

It does use a 5/16-18 threaded stud into the EFI. Even if it were 1/4-20, I really don’t foresee it being an issue. The coil can’t be any more than two pounds.
Robert I would be worried about the die-cast throttle body though, not a very tough material {brittle}. A simple stanchion [or 2 (triangulated)] with a rubber interface will alleviate a lot of stress on an expensive part, If it is going to bedriven or especially when trailered, it will be vibrated like having the living $#!+ shook out of things, all levered on to the throttle body.

Just my thoughts for your consideration, Harry
 
OP
M

MP&C

Well-known member
Joined
Oct 21, 2009
Messages
4,396
Location
Leonardtown, MD
I think the FI Tech is a bit more beefy than you guys give it credit for. That teensie looking hole in the middle is 5/16-18. The structure surrounding it looks to be substantial enough to support what I am putting on there and more


D21E5580-F5B0-44DC-A537-FDE76A09053B.jpeg


The entire air cleaner assembly should top out at about 6 pounds. I seriously don’t see this being an issue.
 
Last edited:
OP
M

MP&C

Well-known member
Joined
Oct 21, 2009
Messages
4,396
Location
Leonardtown, MD
More work on the Caddy air cleaner, time to fabricate the pocket for the coil. Our radius brake that is bolted to the front of the shear is used to bend some 18ga into a horseshoe. One side is trimmed short and the other is left long to bend and form the bottom in the magnetic brake.


IMG_1702.jpg


IMG_1689.jpg


IMG_1690.jpg


IMG_1691.jpg


And end plate is cut out to seal off the void from the rest of the air cleaner innards. This gets tacked in place and then fusion welded using the TIG.


IMG_1695.jpg


IMG_1699.jpg


IMG_1701.jpg


A holesaw is used to get the hole started and offset Wiss snips to trim out the hole in both the housing and the mounting flange. TIG tacked and fusion welding on the flange, and it then gets trimmed to fit inside the air cleaner housing.


IMG_1703.jpg


IMG_1705.jpg


IMG_1706.jpg


IMG_1707.jpg


IMG_1708.jpg


IMG_1709.jpg


IMG_1713.jpg


IMG_1714.jpg


IMG_1717.jpg


IMG_1716.jpg


Yup, that's what I was looking for...
 
OP
M

MP&C

Well-known member
Joined
Oct 21, 2009
Messages
4,396
Location
Leonardtown, MD
Our weld seam for the bottom panel we installed will be bumped up a bit and yeah, some filler if need be. If your talking about the seam around the middle perimeter, that’s factory seam and will remain as is.
 

RADcustom

Well-known member
Joined
Aug 1, 2011
Messages
180
Location
NW Louisiana
Yes, I was referring to the perimeter seam. All of your fab work looks amazing. Thank you for posting it here for us to admire and learn from.
 
OP
M

MP&C

Well-known member
Joined
Oct 21, 2009
Messages
4,396
Location
Leonardtown, MD
Now for our bottom plate for the air cleaner.. In order to keep the filter located properly (keep it from moving around) we decided to add a bead to the bottom of the plate.


IMG_1721.jpg


IMG_1727.jpg


IMG_1729.jpg


IMG_1730.jpg


Then the plate is trimmed to a circle, and the thumbnail dies in the Lennox used to start the shrinking process around the edge.


We then jumped on the Erco kick shrinker to flatten the uneven surface..


And repeat. Repeatedly. We have two or three more rounds to go and we can start tipping and stretching.


IMG_1740.jpg


IMG_1747.jpg


IMG_1751.jpg
 
To avoid these ads, REGISTER NOW!
OP
M

MP&C

Well-known member
Joined
Oct 21, 2009
Messages
4,396
Location
Leonardtown, MD
Thanks!! I started about 30 years or so ago doing my own rust repairs, and I’ll add, some work I would redo if I saw it today. Then people saw what I did and asked me to work on theirs. I will say, I find it much cheaper to work on someone else’s stuff. :ROFLMAO: With each job I’ve tried to add a new tool that would make things easier/quicker or look for another instructional video, etc. Then being exposed to metalmeet and Allmetalshaping forums really opened my eyes to what others were doing. But hands down, going to local meets or taking classes where you get down and dirty is where you really learn. Having someone that can guide you through a process and help effect correction when/where needed really helps out with the learning curve, much like I’ve tried to do with this entire thread. Before all that, I learned carpentry following along as a young lad in helping my father on odd jobs. I think he laid the foundation for work ethic, doing things right, and treating people right.

But to simplify, there’s three things we can do to change sheet metal. Shrink, stretch, or bend.
 
Last edited:
OP
M

MP&C

Well-known member
Joined
Oct 21, 2009
Messages
4,396
Location
Leonardtown, MD
Last night we changed out the thumbnail shrinking dies for linear stretch dies in the Lennox TE250 in order to tip the flange back horizontal again. We have a backstop / fence that had been notched for tooling and this did a nice job of getting the flange depth consistent.


IMG_1767.jpg


As this gets bolted to our linear slide and we'll need that to remain stationary, some Cerutti built clamp blocks are added.


IMG_1764.jpg


IMG_1765.jpg


IMG_1766.jpg


Linear stretch dies in action:


IMG_1783.jpg


Next, we had been having issue with the Skat Blast cabinet, and given the sale going on this week at TP Tools, ordered a new high volume cabinet gun and nozzle, some high flow fittings, and while we're at it, how about some fresh glass..


(edited)_IMG_1775.png


IMG_1789.jpg


Amazing....we can see!


IMG_1778.jpg


IMG_1777.jpg


IMG_1779.jpg


But alas, all the new parts did not fix the losing media about 5-10 seconds in. So we figured this was a blockage with the suction tube, which requires removing the expanded metal deck inside. Which has sealant along front and rear edge. So a handy utility knife was employed, along with this fancy tool we had made up for removing tiles in raised flooring, as it did well in pulling up the expanded metal.


IMG_1328.jpg


The screen was tipped up out of the way and a large magnet holds it in place...


IMG_1784.jpg


Once we had access to the pickup tube, we noticed a hole in the inside corner that didn't belong.


IMG_1786.jpg


Once we removed the tube, we noticed it was more widespread...


IMG_1787.jpg


Well, I guess we have found the suction/media issue, and now have a used High flow gun/nozzle for sale. Luckily the sale is still going on, ordered the replacement tube last night..
 
Last edited:

Bob Heine

ALLIANCE MEMBER
Joined
Oct 24, 2009
Messages
10,703
Location
Boca Raton, Florida
Robert, if the suction tube disintegration was under the glass bead it probably didn't have a huge effect but once a hole developed above the media it was no longer a suction pipe, just a secondary air source.

I will never get back all the hours wasted on TV shows so I really appreciate your videos. I'll never use ALL the information you post but I've learned so much from it that I am no longer afraid to try.
 
OP
M

MP&C

Well-known member
Joined
Oct 21, 2009
Messages
4,396
Location
Leonardtown, MD
Thanks Bob!

I would never have imagined that the media travelled uphill with enough force to wear away at the pipe...
 
OP
M

MP&C

Well-known member
Joined
Oct 21, 2009
Messages
4,396
Location
Leonardtown, MD
Now to fold the outer perimeter of our air cleaner base. I thought of using a tipping wheel, but that appeared to be rather close for comfort. So a curved piece of bar stock in the scrap pile (resource inventory) was selected and a drum sander used to fine tune the radius to match our part.


IMG_1798.jpg


IMG_1800.jpg


IMG_1801.jpg


IMG_1805.jpg


Then a hammer form was made to stretch and shape the "horn" of the base. Quite a bit of stretch needed but you don't know until you try...


IMG_1816.jpg


IMG_1817.jpg


Video of hammer action:


Alas, cracking occurred, so the horn was trimmed just down from the radius and a piece of 18ga was hemmed, rolled, and welded, to form a band. The band was tacked up for a test fit, we'll get it fully welded tomorrow and get all the parts bolted up with some rivnuts and press nuts..


IMG_1833.jpg


IMG_1835.jpg


IMG_1848.jpg


IMG_1852.jpg


IMG_1851.jpg


Yesterday we got our replacement tube from TP Tools for the Skat Blast 1536 cabinet. Can't remember the last time it worked like this, so I'd guess we've had a "leak" for a while now.


And since we replaced the nozzle unnecessarily, we now have a good used media blast cabinet gun for sale. Has the High Volume power head (20-25 cfm required) and tungsten carbide nozzle, if anyone needs one. I think $50 plus shipping would be fair. No trigger, intended for use with foot pedal. For a hopper/suction machine, it does work nicely..


IMG_1847.jpg
 

klhansen

Member
Joined
Jan 28, 2021
Messages
8
Location
Eagle River, Alaska
Browsing thru your thread again Robert, and saw the flying pig.
OK Claude, here you go, one flying pig...


Picture175-3.jpg
So I though I'd post mine. Had a dead expansion tank and some scrap metal. My wife is a pig fanatic and this is just a small part of her collection. :dunno: He doesn't have wings, though. ;)

pig.jpg

Painted him rustoleum red, so he's a Duroc. :)

As always, I find something new I can use here. (y)
 
Last edited:
OP
M

MP&C

Well-known member
Joined
Oct 21, 2009
Messages
4,396
Location
Leonardtown, MD
Browsing thru your thread again Robert, and saw the flying pig.

So I though I'd post mine. Had a dead expansion tank and some scrap metal. My wife is a pig fanatic and this is just a small part of her collection. :dunno: He doesn't have wings, though. ;)

Painted him rustoleum red, so he's a Duroc. :)

As always, I find something new I can use here. (y)


Nice Pig Kevin!! Give him a chance, he'll earn his wings and soar with the rest of the pigs :ROFLMAO:
 
OP
M

MP&C

Well-known member
Joined
Oct 21, 2009
Messages
4,396
Location
Leonardtown, MD
More travel for the day job, had to install a 24' video wall. Back in the shop finally, progress on the air cleaner continues.. We had some stainless mesh left over from our speaker grill fabrication that we plan on using to address air flow inside our pocket for the ignition coil.


IMG_1883.jpg


An 1-1/2" Rotacut is used to provide the hole in the pocket, two pilot holes spaced 1/2" apart will expand the hole for us.. The venturi effect inside the breather should promote air flow across the coil.


IMG_1886.jpg


IMG_1887.jpg


IMG_1888.jpg


IMG_1889.jpg


Next, to hold the mesh in place some retaining rings will be needed. We'll use some MDF trimmed to size to fabricate these...


IMG_1894.jpg


IMG_1897.jpg


Or the action version....


IMG_1898.jpg


The newly formed part has a tight hold on the hammer form, so much so that we can clamp it in the vise, drill the two pilot holes to match the pocket, and drill out two 1-1/2" Rotacut holes without the part budging..


The dynabride belt sander cleans up the points into flats, the side flanges are trimmed to size with a roloc sander, and then we can roll to fit the inside of the pocket.


test fit....


Holes are added for some 3/32 rivets to clear the mesh


IMG_1944.jpg


Aluminum pop rivets are used to get a better view of the final look before we blow it apart for priming..


IMG_1952(1).jpg


We will be using press nuts in the coil to ease the pain of assembly, and we also added some more shiny stuff on the front end..


IMG_1869.jpg


IMG_1872.jpg
 

Attachments

  • IMG_1872.jpg
    IMG_1872.jpg
    118.7 KB · Views: 8
  • IMG_1869.jpg
    IMG_1869.jpg
    385 KB · Views: 9
  • IMG_1952.jpg
    IMG_1952.jpg
    107.4 KB · Views: 11
  • IMG_1944.jpg
    IMG_1944.jpg
    127.2 KB · Views: 10
  • IMG_1898.jpg
    IMG_1898.jpg
    212.4 KB · Views: 9
  • IMG_1897.jpg
    IMG_1897.jpg
    120.8 KB · Views: 8
  • IMG_1894.jpg
    IMG_1894.jpg
    160.3 KB · Views: 8
  • IMG_1889.jpg
    IMG_1889.jpg
    169.4 KB · Views: 13
  • IMG_1888.jpg
    IMG_1888.jpg
    277.3 KB · Views: 12
  • IMG_1887.jpg
    IMG_1887.jpg
    187.2 KB · Views: 13
  • IMG_1886.jpg
    IMG_1886.jpg
    129.7 KB · Views: 12
  • IMG_1883.jpg
    IMG_1883.jpg
    110.8 KB · Views: 10
Last edited:

xtremek

Well-known member
Joined
Apr 13, 2012
Messages
11,603
Location
St. Johns, Mi
I'm about 4 months away from bringing in my truck for it's build. Just before I start, I'll be reviewing reference material and taking notes. This thread is at tied at the top of my list.
 

stinkity stoink

Well-known member
Joined
Apr 8, 2007
Messages
729
Location
New Jersey
once again. A simple air cleaner that’s not so simple. just looking at it and you would have no idea how much fabrication is in it. Great job !!
 
OP
M

MP&C

Well-known member
Joined
Oct 21, 2009
Messages
4,396
Location
Leonardtown, MD
Some repairs to round out the year. Our tried and true Lathem time clock in the shop gave up the ghost the other day. In speaking to Lathem, this model has been obsolete for some time and the only parts available are the print ribbon and a replacement motor. Doesn't help me with this little part...


IMG_1958.jpg


IMG_1969.jpg


But for a $1.99 package of music wire from Hobby Lobby and some round nose pliers, we are back in business....


IMG_1971.jpg


IMG_1972.jpg


IMG_1973.jpg


I had received a pair of Fairmount wire edge pliers for Christmas, which had quite a twist to the handles where it was difficult for the catch to swing over the adjacent handle:


Since these aren't available for return at the local hardware store, and also since they are drop forged, I decided to do some heating and twisting. The Meco torch was used to bring the handles to a light tan color.... and a twisting device employed with a bit of tension via ratchet strap as the handles cooled...


IMG_1997.jpg


IMG_1998.jpg


IMG_2005.jpg


IMG_2006.jpg


IMG_2009.jpg


....and here they are in use on a test sample. These do a nice job of locking the wire tight to the flange as you stake the wire..


Finally, since the artist in the family was looking for a canvas to paint, I pointed her to the Lennox. Here is the layout on the one side in Sharpie in prep for painting..


IMG_2007.jpg


Happy New Year to one and all!!
 

Attachments

  • IMG_2005.jpg
    IMG_2005.jpg
    314.3 KB · Views: 38
Last edited:
OP
M

MP&C

Well-known member
Joined
Oct 21, 2009
Messages
4,396
Location
Leonardtown, MD
On ebay. They pop up on there on occasion. These were priced at $60. Fairmount 1073 is the number to search for.
 
To avoid these ads, REGISTER NOW!
Top Bottom