To avoid these ads, REGISTER NOW!

Above 1200 Sq/FT My 40X32 Post & Beam with Elevator

Wokspaces above 1200 squarefeet.

Chris 50

Well-known member
Joined
Feb 4, 2007
Messages
86
Location
LaPorte IN.
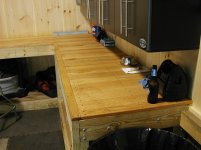
Thanks Free Willie. The T&G pine is smooth, trimmed out in rough sawn cedar. I too went through the painstaking process of brush and roller application, however I did each board inside and out, top to bottom, let them dry, and then installed. :rolleyes2
 
To avoid these ads, REGISTER NOW!
OP
F

Free Willie

Well-known member
Joined
Dec 29, 2008
Messages
382
Location
Connecticut
Well I finally got around to building my workbenck. I was waiting - a local bowling alley was going to renovate and I thought I might be able to get a lane to use as the top but now I don't think it's gonna happen. So I went with oak flooring on top of an old solid conference table top I had. Also 2x4 joists at 1ft on center. I think I could park a car on top if I had to.:thumbup:

Next up is the elevator... soon I hope.
I saw a bunch of different security systems in some of your garages so I put in a pic of mine. Not too vicious but if she wakes me up you can be sure you are in range:gunfire:
 

Attachments

  • P6140048.jpg
    P6140048.jpg
    143.8 KB · Views: 973
  • P6140049.jpg
    P6140049.jpg
    142.8 KB · Views: 915
  • P6140051.jpg
    P6140051.jpg
    140.6 KB · Views: 895
  • P6140054.jpg
    P6140054.jpg
    141.8 KB · Views: 868
  • P6140055.jpg
    P6140055.jpg
    143.7 KB · Views: 831
  • P6140056.jpg
    P6140056.jpg
    147.5 KB · Views: 805
  • P6140068.jpg
    P6140068.jpg
    139.7 KB · Views: 1,047
OP
F

Free Willie

Well-known member
Joined
Dec 29, 2008
Messages
382
Location
Connecticut
Elevator? Tell me more...
Have'nt started it yet - been real busy. What I am going to do is cut out the loft floor
inbetween the 4 center posts and use it as the platform. (approx 6 x 12). If you look at the upstairs pictures you see the posts are all locked together with headers. Across the headers (long way) will be a bar -in pillow blocks- with spools on each end run by an electric 4000lb boat lift motor. Two 3/8 cable will run down the posts thru/ under the platform and dead end on the opposite posts. the platform will have a sheave in each corner for the cable to run thru. to keep it stable while going up and down there will be hook rollers on each corner traveling on angle iron on each post.
When not in use it will be pinned in place for safety.
With this design most people wouldn't even know it's there.:pimpflash

I work at a large crane company so I had some help engineering it.:beer:
 

rlme36

Well-known member
Joined
Feb 17, 2008
Messages
331
Hi Chris, I used 7/8 T&G pine and used almost 11 gallons of this stuff.

The cabinets are great as I did not want steel and I searched around different places for these (sears had a killer deal but they weren't in stock anywhere) Best price was on Carparts.com Free shipping and well packed.:thumbup: They are Ultimate cabinets.


Did you use the same Cabot stuff on the exterior or is that a different product?
 
OP
F

Free Willie

Well-known member
Joined
Dec 29, 2008
Messages
382
Location
Connecticut
Thats a great looking shop. Got anymore build pics ?

Ok let's see how these turn out.
Day 1,2,3 of the erection.
Then after a few more pieces were added they handed it off to me.
 

Attachments

  • scan0001.jpg
    scan0001.jpg
    150.6 KB · Views: 635
  • scan0004.jpg
    scan0004.jpg
    151 KB · Views: 629
  • scan0002.jpg
    scan0002.jpg
    153.5 KB · Views: 645
  • scan0003.jpg
    scan0003.jpg
    132.3 KB · Views: 659
OP
F

Free Willie

Well-known member
Joined
Dec 29, 2008
Messages
382
Location
Connecticut
And these are the others
 

Attachments

  • scan0006.jpg
    scan0006.jpg
    152.7 KB · Views: 415
  • scan0005.jpg
    scan0005.jpg
    136.7 KB · Views: 442
  • scan0007.jpg
    scan0007.jpg
    144.7 KB · Views: 415
OP
F

Free Willie

Well-known member
Joined
Dec 29, 2008
Messages
382
Location
Connecticut
Great looking shop. IMO P&B or timber frame is about the best look to be had for a shop.

Thank you, I agree about the look - just have to be careful when welding and grinding.

Little late to the show, but did the elevator ever come to life? Would love to see it.

Have not built it yet. Still gonna happen some day. I'll post pics when I do.
Thanks for the interest though.
 
OP
F

Free Willie

Well-known member
Joined
Dec 29, 2008
Messages
382
Location
Connecticut
Ok finally got something new to add, I've been looking for an old farmhouse sink for the corner near the man door. Very hard to find a 3' sink as most seem to be 4 or 6' and I wanted one with some patina. I had just enough Hemlock left over from the build to make a cabinet for the sink and I installed a 6 gallon water heater under it. Really nice to have hot water and a place to wash hands.

Next I got a call from my friend/oil guy. He found me a 6yr old Carrier 99,000 BTU furnace for $400. :thumbup: Now the best part - it came with the A frame and 5 ton condenser for central air. :D 
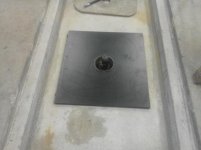
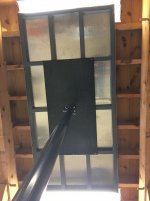
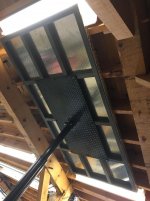
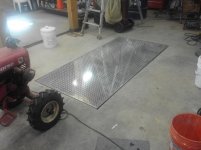
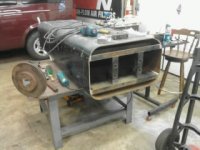
Another friend who is a retired tin knocker built the enclosure for the A frame and the plenum with two 14" elbows to send the air in the right direction.
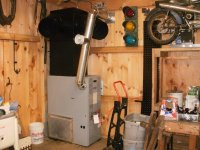
Still no elevator yet. Still looking at different ways to do it. Hopefully I can do it over the winter.
 

Attachments

  • furnace.jpg
    furnace.jpg
    92.2 KB · Views: 386
  • sink 2.jpg
    sink 2.jpg
    55.2 KB · Views: 352
  • sink 1.jpg
    sink 1.jpg
    55.2 KB · Views: 369

48windsor

Well-known member
Joined
Jan 24, 2013
Messages
407
Location
Olympia ,Wa.
FreeWillie very classy to have not forgot your wife . cudos. Nice garage . I will say this just bought a place without a shop but looked at afew . Wife knows I want one and it will happen . Got a nice house on 2 acres so there is space .
 

carterbeauford

Well-known member
Joined
Oct 2, 2011
Messages
1,550
Location
NW PA
I drive across northwestern CT on 44 sometimes and love some of the New England style barns and homes up there, beautiful shop.
 
To avoid these ads, REGISTER NOW!

Anthonyca

Active member
Joined
Jun 10, 2012
Messages
30
That is a beautiful building! So much character. Great job and thanks for posting.
 
OP
F

Free Willie

Well-known member
Joined
Dec 29, 2008
Messages
382
Location
Connecticut
Ok I finally have an update! After much delay and many design changes I have started building the elevator.
Started with a hydraulic cylinder from a dump truck and made a "cassette" out of a piece of boom from a 40 ton crane. I welded the mount frame inside the boom section then welded a 1/2" plate to seal the bottom.
 

Attachments

  • lift 2.jpg
    lift 2.jpg
    24.1 KB · Views: 303
  • lift 3.jpg
    lift 3.jpg
    46.5 KB · Views: 291
OP
F

Free Willie

Well-known member
Joined
Dec 29, 2008
Messages
382
Location
Connecticut
Then I rented a concrete saw to cut the section of floor out. Then started digging and that's where the trouble started. About 2' down we hit a rock the size of a small car, so off to rent a hammer drill and jackhammer. Lets just say that sucked!
 

Attachments

  • lift 6.jpg
    lift 6.jpg
    136 KB · Views: 303
  • lift 5.jpg
    lift 5.jpg
    94.9 KB · Views: 314
  • lift 4.jpg
    lift 4.jpg
    57.1 KB · Views: 275
  • lift jackhammer.jpg
    lift jackhammer.jpg
    146.7 KB · Views: 308
OP
F

Free Willie

Well-known member
Joined
Dec 29, 2008
Messages
382
Location
Connecticut
Once that was out of the way, we got the cassette in the hole and carefully back filled it keeping it plum and centered. Then set the cylinder in to check our measurements and we wound up being within an 1/8th of an inch of being on center with the plum bob. :beer:
 

Attachments

  • lift 5.5.jpg
    lift 5.5.jpg
    139.2 KB · Views: 281
  • lift 6.5.jpg
    lift 6.5.jpg
    147.6 KB · Views: 271
  • lift 7.JPG
    lift 7.JPG
    146 KB · Views: 307
  • lift 8.jpg
    lift 8.jpg
    135.4 KB · Views: 286
OP
F

Free Willie

Well-known member
Joined
Dec 29, 2008
Messages
382
Location
Connecticut
With everything looking like it should, concrete was next. (18 bags) The platform will sit flush with the floor when not in use so it will sit on the shoulder I poured. Next was the upper support collar with screw jacks to adjust it to plum. The adjuster nuts will be tack welded after.
 

Attachments

  • 0305171311a[1].jpg
    0305171311a[1].jpg
    135.9 KB · Views: 262
  • 0305171311[1].jpg
    0305171311[1].jpg
    91.8 KB · Views: 262
  • 0226171518[1].jpg
    0226171518[1].jpg
    81.2 KB · Views: 240
OP
F

Free Willie

Well-known member
Joined
Dec 29, 2008
Messages
382
Location
Connecticut
The black diamond plate is the "hat" that will be pinned to the top of the cylinder. It has 8 - 1/2" grade 8 bolts welded to it that will bolt to the 2x2 frame which will be covered with top shell made of 1/8" aluminum diamond plate. I built it this way so if there is any failure I can take it apart even if it is at rest. That is all I have for now.
 

Attachments

  • lift 9.jpg
    lift 9.jpg
    142.6 KB · Views: 223
OP
F

Free Willie

Well-known member
Joined
Dec 29, 2008
Messages
382
Location
Connecticut
Got it all plumbed and wired so today we tested!:D
 

Attachments

  • lift 9aaa.jpg
    lift 9aaa.jpg
    101 KB · Views: 293
  • lift 9aa.jpg
    lift 9aa.jpg
    139.7 KB · Views: 301
  • lift 10.jpg
    lift 10.jpg
    142.6 KB · Views: 347
  • lift test.jpg
    lift test.jpg
    145.4 KB · Views: 370
OP
F

Free Willie

Well-known member
Joined
Dec 29, 2008
Messages
382
Location
Connecticut
Then took the tractor off and back up to the floor joists. Everything worked like it should so the next step is cutting the floor out and framing it in to use as the platform. That's it for now.
 

Attachments

  • lift test 2.jpg
    lift test 2.jpg
    131.4 KB · Views: 250
  • lift test 3.jpg
    lift test 3.jpg
    138.7 KB · Views: 250
  • lift down.jpg
    lift down.jpg
    137.9 KB · Views: 260

Whitey1

Well-known member
Joined
Oct 26, 2013
Messages
132
Location
Ohio
Thats looks awesome! Bike lift and elevator in one. I know it was a lot more work than using the boat lift style cable setup, but this is a much cleaner install. Will you have a flip up trap door in the loft so there is no gaping hole when not in use? A good torsion spring like on lift gates could make it a 1hand operation.
 
OP
F

Free Willie

Well-known member
Joined
Dec 29, 2008
Messages
382
Location
Connecticut
Thats looks awesome! Bike lift and elevator in one. I know it was a lot more work than using the boat lift style cable setup, but this is a much cleaner install. Will you have a flip up trap door in the loft so there is no gaping hole when not in use? A good torsion spring like on lift gates could make it a 1hand operation.

No on the trap door, the floor will be cut out between the 4 posts and framed. It will be the platform "floor" of the elevator. The table will go up to the floor (which will be pinned in place when not in use) and lower the floor to the concrete. Load a bike on it and back up.:thumbup:
 
OP
F

Free Willie

Well-known member
Joined
Dec 29, 2008
Messages
382
Location
Connecticut
Very nice shop!
And build!

Love the wheel horse as well!
Was that the lift test subject!

Also the professional bike parking pic!

Just picked up the tractor (literally). My 2 nephews are doing garden tractor pulls. Their dad tells me there are no rules so I'm thinking a shovelhead motor with a shot of NO2.
:3gears:

Someone finally noticed the pro bike parking!:rocker:
 
To avoid these ads, REGISTER NOW!
Top Bottom