To avoid these ads, REGISTER NOW!

My 5x10 trailer

toofart

Well-known member
Joined
Sep 27, 2013
Messages
280
Location
Qc
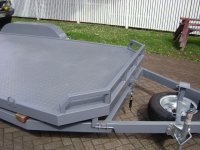
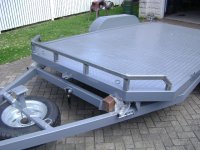
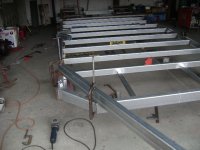
Inspired by members like koditten, kerrynzl and others, I decided I'd build my own trailer. Plans were a 5x8 but ended up 5x10.

My ultimate goal is to build a car hauler, but I figured I'd practice on something smaller first.

DSC_0335_zpseee364c5.jpg

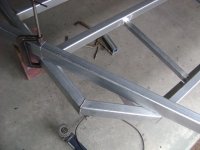
Frame is 2x1 .125 tube, crossmembers are 2x2 3/16 angle, tongue is 3" 4.1lb channel.


DSC_0336_zps83591764.jpg

Since I eventually want to build a car hauler, which will require a wrap-around tongue, I wanted to practice on this first. Overkill for a 3500lb trailer, but it was good fun.


DSC_0337_zps68b0fd8e.jpg

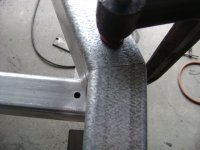
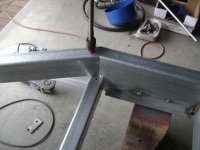
The welds are coming out pretty good, I think. Hobart 210 using flux core wire, .035


DSC_0338_zpsca61cf41.jpg

I need to work on my consistent speed. I tend to go slowly, so I turn the wire speed down from the recommended settings.


DSC_0339_zpsfc09d016.jpg

I screwed up the gap on this one. I'll patch it with some 1/8" plate. Won't need thicker since this is not the direction of stress.


DSC_0341_zps9b06e755.jpg

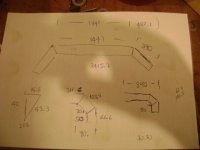
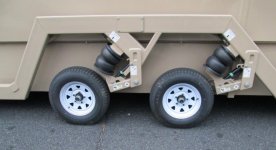
The axle is just sitting there... But must have made X measures with the tongue and frame about 17 times. Next up is to fully weld the tongue to the frame.


So far I'm having lots of fun building this thing.
 
Last edited:
To avoid these ads, REGISTER NOW!

kerrynzl

Well-known member
Joined
Nov 8, 2013
Messages
5,054
Location
Tauranga, New Zealand
Cool you’re having a bit of fun.

I’ll give you a tip on doing “Pie cuts” for your next project.

When cutting a pie cut out ,it is always measured to the INSIDE wall . So if you need to bend a section of 2” C channel with a 1/8” wall , The pie cut needs to be 1-7/8” deep.
This is also the standard practice with bending brakes

Using a metric ruler is easier unless you use imperial “thou”.[or decimal imperial measurements]

All “A” frame couplers are at a 50° angle, so each side of the tongue is 25° from the centreline.
So to get the “cut back tongue” parallel with the frame you need a 25° pie cut on the sides.

To get a 25° pie cut perfectly symmetrical [so the ends meet together] you will need to divide the 25° by two .
Or 12.5° each side of perpendicular

There is a tool on the net that will help you here
http://www.csgnetwork.com/righttricalc.html

Just load in 2 basic parameters and it does it for you.

Example:
2” C channel with 0.125 wall [1/8”] = 1.875”
25° pie cut ÷ 2 = 12.5°

on the calculator b = 1.875 and A = 12.5
Side a [ the cut ] is calculated at 0.42” each side of perpendicular or a total pie cut of 0.84”

This is a lot easier to do this than to “uncut” it later.

Many years ago during a job interview I was asked what I considered my greatest attribute to the job would be.
I answered “My ability to measure **** properly”

I got that job [ and this ability still applies to everything else I do today ]
 

Outlander

Well-known member
Joined
Jul 30, 2010
Messages
5,154
Location
Quebec, Canada
toofart - your welds need practice and you are in Quebec and I have a trailer that needs welding. When do you want me there with your 'test piece'? :)

Seriously, nice job and great to see you taking the challenge of building it yourself.

Please keep the pictures coming!
 
OP
T

toofart

Well-known member
Joined
Sep 27, 2013
Messages
280
Location
Qc
To get a 25° pie cut perfectly symmetrical [so the ends meet together] you will need to divide the 25° by two .
Or 12.5° each side of perpendicular

Thanks for the feedback! It became obvious that I needed to split my 25* angle in two after I bent the first channel, but alas the other was already cut. The huge gap is because I failed to take into account the width of the blade (x2).

Thanks for the math, though. I'll probably practice once more on scrap before tackling a critical project.

toofart - your welds need practice and you are in Quebec and I have a trailer that needs welding. When do you want me there with your 'test piece'? :)

Hah! I do need practice. I'm in the Outaouais, if you're close bring the trailer and the beer, we'll fix her up good.
 

kerrynzl

Well-known member
Joined
Nov 8, 2013
Messages
5,054
Location
Tauranga, New Zealand
Thanks for the feedback! It became obvious that I needed to split my 25* angle in two after I bent the first channel, but alas the other was already cut. The huge gap is because I failed to take into account the width of the blade (x2).

Thanks for the math, though. I'll probably practice once more on scrap before tackling a critical project.

I'm making a cutback tongue over the weekend, so I'll post some pics.
All my pie cuts are done with a 1mm wide cut off wheel in a 115mm [4-1/2"] angle grinder.

Remember the old saying
"measure with a vernier, Mark it with chalk, cut it with a torch.......and it's F***ed when a welder can't fix it" :D

Your trailer is looking good
 
Last edited:

kerrynzl

Well-known member
Joined
Nov 8, 2013
Messages
5,054
Location
Tauranga, New Zealand
Here is a nudge bar I built for a trailer.

It had a 45 degree cut back it 2 dimensions and was done with pie cuts.
I also had to allow for heat shrinkage in the cuts on the inside edge [which was a challenge itself ]
 

Attachments

  • Nudge Bar 1.JPG
    Nudge Bar 1.JPG
    143.2 KB · Views: 496
  • Nudge Bar 30.JPG
    Nudge Bar 30.JPG
    138.2 KB · Views: 478
  • Nudge Bar 28.JPG
    Nudge Bar 28.JPG
    140.6 KB · Views: 466
  • Nudge Bar 16.JPG
    Nudge Bar 16.JPG
    138.6 KB · Views: 543
  • Nudge Bar 10.JPG
    Nudge Bar 10.JPG
    138.3 KB · Views: 481
  • Nudge Bar 9.jpg
    Nudge Bar 9.jpg
    31.7 KB · Views: 465
  • Nudge Bar 2.JPG
    Nudge Bar 2.JPG
    143.8 KB · Views: 447
OP
T

toofart

Well-known member
Joined
Sep 27, 2013
Messages
280
Location
Qc
Wow, awesome design on that bar. It came out really nice.

I need to start working in mm instead of inches. I live in Canada for fark's sake :)
 

koditten

Well-known member
Joined
Apr 10, 2008
Messages
5,528
Location
Midland, Michigan
Hey, this is a trailer build thread, leave that metric **** at the door!

Just kidding. Glad to see the trailer build thread. Keep us posted and don't be shy about asking questions.

Subscribed.

KO
 
OP
T

toofart

Well-known member
Joined
Sep 27, 2013
Messages
280
Location
Qc
Sure, I'll grab one later. I believe axle centreline is at the 55% mark to help compensate.
 

MoonRise

Well-known member
Joined
Nov 5, 2010
Messages
4,028
Location
NJ
Hmmm, OK a Hobart Ironman 210 should have enough power to weld 1/8 and 3/16 inch thick steel. Good to go on that aspect.

But you said
flux core wire, .035
.

Exactly what FCAW-S wire are you using? Because the 'standard' Lincoln Innershield NR211-MP wire that is useful and handy and runs pretty well on the 'little' machines (anything that is not an 'industrial' machine counts as a 'little' machine here) and a decent wire used within its limit is NOT what I would use for welding a trailer together.

Why?

Because that particular wire (and there are others as well in the E71T-11 category, I'm not just picking on Lincoln. Like I mentioned, I generally like Lincoln's wires) has no impact-rated properties.

I would want a T8 impact-rated FCAW wire or just use some 70S-6 solid wire and C25 gas or straight CO2 gas. Mostly for the impact-rated properties.

I'll be real picky here.

From just a few pictures over the Net, I can't really tell how good your welds are.

You acknowledge that you need to work on your travel-speed consistency. Yup. Not horrible, but could be improved.

But I can't really tell how well you have fused the pieces together. I can't tell how well you achieved penetration into your workpieces to tie them all together into one structural item.

Some more tips/hints.

Don't put stops/starts on corners. There are enough stress concentrations going on there that you really-really don't want to add any more from a weld stop/start. Wrap the weld around the corner.

Back-step when you are ending/stopping a weld bead so that you don't have any ending craters.

Don't use the 'pick' on a slag hammer to 'pick' at the weld slag. Use the 'pick' to scrape only, so you don't put any pick-marks into the workpiece. Or just use an angle grinder with a wire wheel to remove the slag and weld spatter.

Speaking of angle grinders, I don't see any evidence (from a few pictures on the Net, blah, blah, blah) that you removed the mill scale before welding.

Yeah, -some- welding process 'tolerate' some crud better than others (GTAW tolerates almost NO crud/dirt/rust/oxides/etc/etc while SMAW tolerates more), but you ALWAYS get a better weld if you clean anything and everything that is not clean shiny metal away from the weld zone before you make the weld.

Fit-up and cleaning and prep are about 90% of the time/effort of making a good weld joint. The actual welding is just that last 10%. :D

Remove grease and oil and water and paint and rust and mill scale from the weld zone before you go to do the actual weld. The result will be better welds.

Do some test welds with some scraps of your actual materials and then cut them apart and pry/peel them apart to check your weld parameters and technique for adequate penetration/fusion into the weld joint. Wire-feed welders are notorious for making 'pretty' welds that are just lying on top of the workpiece metal (aka lack of fusion, aka lack of penetration, aka cold-lap).

:beer:
 
OP
T

toofart

Well-known member
Joined
Sep 27, 2013
Messages
280
Location
Qc
Hmmm, OK a Hobart Ironman 210 should have enough power to weld 1/8 and 3/16 inch thick steel. Good to go on that aspect.

The machine is rated up to 3/8". Two years ago I welded up a plow harness using 1/4 inch material and I push it hard. I inspect everything.


Exactly what FCAW-S wire are you using?

I will have to check. I do remember seeing E71T, but point taken on making sure I'm using the correct wire.

I'm burning through my last spool of flux core, after that I am moving to gas. I've been told that if I can be proficient at flux core, I should have no problems transitioning to gas.

Some more tips/hints.
Thanks for all the tips!!

Speaking of angle grinders, I don't see any evidence (from a few pictures on the Net, blah, blah, blah) that you removed the mill scale before welding.

I *definitely* cleaned, then ground off the mill scale before welding the axle brackets. For the crossmembers and other joints, I ran the wire brush after tackwelds. I find the welds have more crud/porosity if they are not cleaned up properly.

Years ago I tested welding on all kinds of rusty/greasy surfaces with test pieces. Not pretty, and the welds failed easily so I'm pretty strict with cleaning.

I do leave the mill scale and crud on the bare metal since it doesn't rust as fast, and clean up before paint.

Do some test welds with some scraps of your actual materials and then cut them apart and pry/peel them apart to check your weld parameters and technique for adequate penetration/fusion into the weld joint.

I have done that. Actually, I do that each time I must weld sizes and shapes I've never welded before. I welded some tube, angle and channel sections in various positions and placed them on the press, partially supported to stress the joint. In all cases the joint held when the pieces would bend out of shape. I realize this does apply the same stress as repeated impact or metal fatigue, but it gives me confidence that the welds are correct.

Thanks again for the tips, keep 'em coming!
 

MoonRise

Well-known member
Joined
Nov 5, 2010
Messages
4,028
Location
NJ
I *definitely* cleaned, then ground off the mill scale before welding the axle brackets. For the crossmembers and other joints, I ran the wire brush after tackwelds. I find the welds have more crud/porosity if they are not cleaned up properly.

pssst, a wire wheel will not remove mill scale. That 'shiny' you see on the mill scale after you run a wire wheel on it is just slightly 'polished' mill scale.

It takes a grinder wheel or flap disk to remove mill scale.

The wire wheel can remove light surface rust and some paint and most slag after welding, but it does almost nothing to mill scale.

:beer:
 
OP
T

toofart

Well-known member
Joined
Sep 27, 2013
Messages
280
Location
Qc
Because that particular wire (and there are others as well in the E71T-11 category, I'm not just picking on Lincoln. Like I mentioned, I generally like Lincoln's wires) has no impact-rated properties.

I would want a T8 impact-rated FCAW wire or just use some 70S-6 solid wire and C25 gas or straight CO2 gas. Mostly for the impact-rated properties.

I have a new 2lb spool of ER70S-6 ... I suppose that's the 70S-6 you're referring to. I've been reading up, and I suppose that wire would be superior for what I'm doing.
 
OP
T

toofart

Well-known member
Joined
Sep 27, 2013
Messages
280
Location
Qc
Can I get a side pic so I can see your axle position? That a frame tongue will be a bit heavier than a straight tongue.

Here you go:
DSC_0344_zpsed7ec9f2.jpg


Overall frame length is 122", axle centreline is at 68", so about 56% towards the rear.

Trailer definitely has a bow to it. I'm hoping it straightens out when I do the horizontal welds on the flip side.

DSC_0345_zps54abe92f.jpg


The hitch welds turned out OK, but welding galvanized *****. I ground off as much as I could and cranked up the heat. Since this is my first trailer, I decided to also use four 1/2" grade 8 bolts. This hitch will not fail on my watch.

DSC_0347_zps1b64d9f4.jpg


I'm ready to flip it over, but I'll clean it with a flap disc since it's easier to do the undercarriage now than when it's an actual trailer.
 
OP
T

toofart

Well-known member
Joined
Sep 27, 2013
Messages
280
Location
Qc
Question for the pros: how tight should the springs be in the hangers? I know there needs to be movement, just wondering how much. I tightened them very tight to get the bolt splines to dig into the hanger, then loosened the nuts about 1/2 turn to 3/4 turn or until I could feel that the spring could move just slightly. Too tight?
 

koditten

Well-known member
Joined
Apr 10, 2008
Messages
5,528
Location
Midland, Michigan
I use an impact to tighten them and to pull the splines on the bolts thru the hangers and links. Once they are good and tight, I back the nuts off a half turn. The are squashed so the will never back off. Sometimes I might take my big swatter and pound the bolts back a mm.
 
To avoid these ads, REGISTER NOW!
OP
T

toofart

Well-known member
Joined
Sep 27, 2013
Messages
280
Location
Qc
I use an impact to tighten them and to pull the splines on the bolts thru the hangers and links. Once they are good and tight, I back the nuts off a half turn. The are squashed so the will never back off. Sometimes I might take my big swatter and pound the bolts back a mm.

Thanks! Looks like I did that correctly.

OP . . . ie TooFart . . . . your PICS in original post from PhotoBucket are not showing up.

Sorry bout that, I fixed them.
 

kerrynzl

Well-known member
Joined
Nov 8, 2013
Messages
5,054
Location
Tauranga, New Zealand
Trailer definitely has a bow to it. I'm hoping it straightens out when I do the horizontal welds on the flip side.

When you flip it over, Try and clamp a straight piece of steel along the frame, then do your top welds. When it cools it should pull straight or pull the tension out of it. [ I use an unassembled axle and a couple of G clamps]
Sometimes I grind a V in the weld and re-weld to make "adjustments"

Have you tried "heat straightening" with a low temperature torch? It is easy to do and quite controllable
You'll probably need to heat straighten on the top sides of the suspension hangers and where the tongue is welded
 
OP
T

toofart

Well-known member
Joined
Sep 27, 2013
Messages
280
Location
Qc
Indeed, I think it curved when I welded the suspension on. Since I am using 2x1 tubing, I had to double up for the axle brackets. I should have probably cooled it more aggressively with compressed air.

When I flip it over I'll try suspending the trailer on all four corners and putting the wheels on before finishing the welding. I'm hoping the heat from the welding + the weight hanging in the center should take most of it out. If not, I'll go with plan B.
 

kerrynzl

Well-known member
Joined
Nov 8, 2013
Messages
5,054
Location
Tauranga, New Zealand
I've found suspending it is not enough [past experience ]

Heat straightening is the most successful method.

I've also used a grinder to grind two "V" grooves just inside the shoulders on the topside [above the hangers] then fill it with a Hot weld

When they cool ,grind them flush.
 

Attachments

  • heat straightening.jpg
    heat straightening.jpg
    13.8 KB · Views: 81

RogueFab

Well-known member
Joined
Jun 27, 2013
Messages
430
Location
Oregon
You shouldn't need any more heat on galv/zinc coated metal... zinc melts about 1000F below steel. Nice work so far. Any plans for corrosion protection inside the enclosed aread (box tube)?
 

kerrynzl

Well-known member
Joined
Nov 8, 2013
Messages
5,054
Location
Tauranga, New Zealand
Here's some pics of the "cutback tongue" I said earlier that I'd post here.
The pie cuts were calculated exactly as I mentioned in post # 2


The cut was done with a 1mm cut off wheel in a grinder.
I also run a grinder along the cut to grind a "V" to get a deaper weld.

It's not highly skilled to do, it just requires a bit of thought.
 

Attachments

  • DSC04392.JPG
    DSC04392.JPG
    133.1 KB · Views: 221
  • DSC04391.JPG
    DSC04391.JPG
    142.4 KB · Views: 228
  • DSC04390.JPG
    DSC04390.JPG
    143.1 KB · Views: 235
  • DSC04389.JPG
    DSC04389.JPG
    142.7 KB · Views: 243
  • DSC04388.JPG
    DSC04388.JPG
    140.9 KB · Views: 245
  • DSC04386.JPG
    DSC04386.JPG
    135.2 KB · Views: 250
  • DSC04385.JPG
    DSC04385.JPG
    141 KB · Views: 256
OP
T

toofart

Well-known member
Joined
Sep 27, 2013
Messages
280
Location
Qc
You shouldn't need any more heat on galv/zinc coated metal... zinc melts about 1000F below steel. Nice work so far. Any plans for corrosion protection inside the enclosed aread (box tube)?

I'll be spraying some rust paint in there with the help of compressed air. I'll also close off the open ends. Since the tube is small and has very limited air, I think internal rust will be minimal. It will rust eventually, like everything else on our roads up here. It is what it is.


Here's some pics of the "cutback tongue" I said earlier that I'd post here.

Those are pretty tight. Sure it requires thought, but also experience. I'm sure the first ones you've done were not as tight.

What do you use to weld your galvanized steel?
 

rslaback

Well-known member
Joined
Jul 24, 2010
Messages
4,062
Location
Westcentral Wisconsin
I know you really like your current tongue setup but I don't think I would even consider making a trailer that size that doesn't tilt. The actual tilt mechanism is so easy to do that even if you never tilt it is a shame to not make it tilt.

If resale is ever a plan down the road it will greatly increase the value as well.
 
OP
T

toofart

Well-known member
Joined
Sep 27, 2013
Messages
280
Location
Qc
Gotta start somewhere, I say. It gives me something to aim for the future.
 

kerrynzl

Well-known member
Joined
Nov 8, 2013
Messages
5,054
Location
Tauranga, New Zealand
Gotta start somewhere, I say. It gives me something to aim for the future.

Haha! I know exactly how you feel here. Everytime I build a trailer ,I think of a better way to do it [next time]
What I've learned over the years is Style will always outsell Practicality .

So if you come up with a practical design/idea people don't even notice it, but if you show good workmanship or it "looks quality or stylish" they do.

With those pie-cuts you're correct, I did have a gap problem at the beginning .
I always had the angles correct. Then my Press Brake Guy told me you always measure a fold on the inside edge.

When I weld Galv, I always keep a wire brush handy [and brush it when hot ]
I run a hotter weld, so it just vaporises the zinc.
You'll need to clean the nozzle more often , and also change the tips. I never use anti-splatter when welding Galv.
I pull the torch away instead of pushing it [ this makes a hotter weld, and vaporises the zinc better ]

I don't worry about all those toxic fumes, it is an urban myth.
Zinc Oxide is relatively harmless [like sea water] but too much will make you feel sick for a while.

And one very important tip [for all the Aussies and Kiwis]
"Don't wear flip flops when welding Galv :D " [pic 7]
 
OP
T

toofart

Well-known member
Joined
Sep 27, 2013
Messages
280
Location
Qc
Got some more work done this week -- tacked up the sides and top rails.

DSC_0359_zps1023e013.jpg


I took a hint from Kerry and made a nice double top rail... adds about 40 lbs and some build time, but it's a nice design that may help resale value later.

DSC_0360_zps0d61aacd.jpg

Sides are about 18" tall (or 19" -- can't remember. Top rail is 1 1/2 square tube .125 and lower rail is 1 1/4 .125 I'm using a little 120v welder for tacking up. It barely does the job.

DSC_0357_zpsd19019de.jpg

I also took a hint from Kirk and used 2 tubes for the sides. No sense reinventing the wheel here, if it works for him, it should work for me. Everything else just lined up easy as pie, with minimal need to ratchet straps.
 
Last edited:
OP
T

toofart

Well-known member
Joined
Sep 27, 2013
Messages
280
Location
Qc
I need a band saw to do better 45* cuts. The abrasive chop saw is a nightmare.
 

koditten

Well-known member
Joined
Apr 10, 2008
Messages
5,528
Location
Midland, Michigan
Looks great!

The double top rail is not my design. Must have seen it somewhere else. Still, looks awesome. That thing will be super sturdy. I'm in to the end.

Later

KO
 

kerrynzl

Well-known member
Joined
Nov 8, 2013
Messages
5,054
Location
Tauranga, New Zealand
I need a band saw to do better 45* cuts. The abrasive chop saw is a nightmare.

No you shouldn't.

I just got rid of my bandsaw. If I need an accurate 45° cut, I scribe it and cut it with a 1mm blade in a grinder.

The next accurate saw I use is a power hacksaw.

If you want to test how good a bandsaw is, try straight cutting some angle.
I've never seen any home workshop bandsaws do this successfully.

I've got a friend with a slow "cold cut" chop saw, the blades are expensive but from what I've seen are worth it.

Now change of subject:
On your trailer , [or any north American utility trailer I've seen] Why do you put a fixed panel across the front.

Over here we have interchangeable front and rear tailgates, so we can transport longer pieces of wood etc without too much rear overhang.
 
OP
T

toofart

Well-known member
Joined
Sep 27, 2013
Messages
280
Location
Qc
Looks great!

The double top rail is not my design.

Sorry, I meant the two vertical tubes on the corners. I've seen you do that on your trailers.

I've got a friend with a slow "cold cut" chop saw, the blades are expensive but from what I've seen are worth it.

I've been looking at those. If nothing else, they would cut down on the dust that abrasive blades do. It's on my list.

Now change of subject:
On your trailer , [or any north American utility trailer I've seen] Why do you put a fixed panel across the front.

Over here we have interchangeable front and rear tailgates, so we can transport longer pieces of wood etc without too much rear overhang.

I'm not sure how long lumber is over there, but here it's typically 12' max. which this trailer will handle with the tailgate I have in mind. With that being said, I'm the guy who typically does things removable as you suggest, but for now I'm going for simplicity.

For the tailgate I'm planning on a 5' tailgate hinged in the middle, similar to the photo below. I hate those tailgates that extend upwards forever.
P4040003.JPG


I will also use chains or cable so that the tailgate can be flat with the floor, like a pick-up truck tailgage, effectively making the floor almost 13' long.
trailer8.jpg
 

kerrynzl

Well-known member
Joined
Nov 8, 2013
Messages
5,054
Location
Tauranga, New Zealand
Typical lengths over here are 4.8m [16'] which makes 2 x 8' studs.

our laws only allow for 1.2m [4'] rear overhang, so if you can lay down the front gate the problem is fixed.

I've also seen 10 x 5's carting around canoes/kayaks etc.

In NZ overloading a trailer seems to be a national sport [unlike USA:bounce:]
 

PCO6

Well-known member
Joined
Dec 25, 2008
Messages
4,573
Location
Newmarket, Ontario
If you want to test how good a bandsaw is, try straight cutting some angle.
I've never seen any home workshop bandsaws do this successfully.
What kind of band saw do you mean? A basic 4"x6" horizontal/vertical band saw will give you a straight cut.
 
OP
T

toofart

Well-known member
Joined
Sep 27, 2013
Messages
280
Location
Qc
Typical lengths over here are 4.8m [16'] which makes 2 x 8' studs.

I'm not sure about the US, but here in Canada when we want 8' studs we buy 8' lumber. Fewer cuts maximizes beer time, our National Sport :)

And around here if you buy enough [wood, steel, anything] they deliver it to your door. Nice service for steel/AL which comes in 20/24' lengths.

Today I'll weld up the sides, put the fenders on and start the tailgate.
 

Thumper68

Well-known member
Joined
May 16, 2013
Messages
5,134
Location
Duluth MN
Very nice looking first trailer build.

I was using my first trailer yesterday, built in '90 still going strong, with a few minor repairs over the years, not to bad considering that it was built using a junk yard axel and scraps from other projects.

I was just talking to a buddy a few weeks ago about his and my need for a 5x10 or 12 dump bed trailer. something that might just happen later winter early spring.

Anyhow nice job.
 
To avoid these ads, REGISTER NOW!
Top Bottom