To avoid these ads, REGISTER NOW!

My air compressor and air line upgrade

IMCA38

Well-known member
Joined
Sep 21, 2007
Messages
998
Location
Bennet, NE
BACKGROUND-
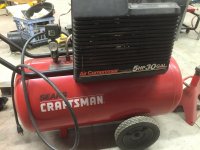
I got my original air compressor back when I first got my own garage, around 1992. I went to Sears one day to look at a modest portable unit. They had a 5HP/ 30 gallon unit on the floor that had been closed out. The clerk told me that if I was interested in that one, he'd make me a deal just to get rid of it.
If memory serves me right, he knocked 10% off of the clearance price, and as it had been used as a "donor" unit for some small parts, he started pulling items off of the hooks to make sure it was complete. I recall that he pulled a regulator, a couple of pressure gauges, some fittings, a bottle of oil, etc.
I put everything together, ran a 220 line to the garage and I was in business!
A few years later, we moved to our first acreage, and the compressor was moved into my new detached shop. I added a hose reel on the wall and later on, an old tire machine. These were connected using short whip hoses and a brass tee connector.
In 2000, we moved to our current place and I got a sheep barn to repurpose as a shop.
As I planned the remodel of the barn, I built out a storage room in one corner and put the air compressor in that room so I could shut the door and have some quiet.
At that time, I had designs of sometime moving up to a larger unit, so I built the area out with that in mind. We ran an electrical sub panel into the room and ran a 220 outlet from that for the existing compressor.
Having the subpanel in place was one of the steps to plan for an eventual larger compressor.
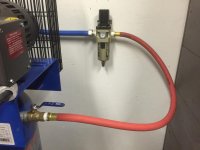
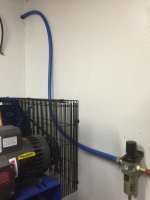
I put a regulator/filter on the wall and ran out 1/2" PVC lines with several outlets.
This setup worked well and I never seriously looked at a new compressor as the 10cfm/90psi air delivery of the Craftsman was close to what a cheap upright unit will do.
I ended up getting a large bead blast cabinet a couple of years ago, and that was likely the beginning of the end for the old Craftsman.
Last winter, I went to start it one night and it wouldn't move. I opened it up to discover one of the rods galled onto the crank journal. Probably a combination of overheating and maybe low oil.
One of my peeves on the Craftsman was how hard it was to accurately check the oil level with the shallow "tee" that came out of the oil pan.
I briefly considered trying to fix it, but found parts non-existent.
Here are a couple pics of the old Craftsman and my space in the storage room.
 

Attachments

  • IMG_2404.jpg
    IMG_2404.jpg
    136.8 KB · Views: 156
  • IMG_2406.jpg
    IMG_2406.jpg
    151.6 KB · Views: 131
  • IMG_2095.jpg
    IMG_2095.jpg
    137.1 KB · Views: 176
  • IMG_2248.jpg
    IMG_2248.jpg
    126.3 KB · Views: 168
Last edited:
To avoid these ads, REGISTER NOW!
OP
I

IMCA38

Well-known member
Joined
Sep 21, 2007
Messages
998
Location
Bennet, NE
No bashing on the Craftsman. It served me very well for about 25 years!

But, as they say, things change. With the Craftsman no longer working, it was time to belly up for the long-contemplated upgrade.

After lots of research and consideration, I saw that Northern put up a great sale on the Quincy QT-54 60 gallon unit. The sale price was like $150 off plus free shipping and a $200 Northern gift card.
I figured that was my sign and placed the order and hatched a plan to use the gift card to purchase a RapidAir line kit.
I liked the free shipping as this is a pretty large unit and I'd have been very nervous hauling one home in my pickup or on a trailer and then unloading, etc.

After some delays for the Quincy factory being shut down over the holidays, it arrived the first week in January. Luckily, I have a very nice machine shop operation next door and the owner is a great guy. The freight truck pulled into their lot and they unloaded it with their forklift. Unfortunately, the forklift couldn't bring it over to my shop due to the rough ground, so I took my small tractor/loader over and chained it up to the bucket for the trip to my shop.
Sorry, no photos of that process as it was cold and windy that day with snow coming. I just wanted to get it hustled into the shop!
 
OP
I

IMCA38

Well-known member
Joined
Sep 21, 2007
Messages
998
Location
Bennet, NE
Overall, I'm very impressed with the Quincy. It was crated up nicely, and had zero issues with damage, etc.
I moved the crate into my shop and tore the sides of the crate off.
To get it off the skid, I cut the skid in half with my sazall and unbolted one side. I then rocked it up onto the bolted side, kicked out the loose piece of skid and set it down. I then unbolted the other side and kicked that piece out. I then walked it into the store room and got it set in the final resting place.
I drilled holes in the floor and installed wedge anchor bolts. I put down thin rubber pads that I cut out of old machine belting just to save rattling and viabration. As per the instructions, the nuts were only tightened a bit more than finger tight. Just enough to keep it from jumping around.
I got a piece of 4 conductor wire from HD and wired into the subpanel. The existing 220 outlet was disconnected, the plug removed and the box closed off with a cover plate. The short run of wire stayed in the wall and I just tucked the end down in the bottom of the subpanel.
I made a temporary connection from the Quincy into the existing air line while I planned out and purchased the RapidAir system.
Attached are some photos of these things.
 

Attachments

  • IMG_2414.jpg
    IMG_2414.jpg
    139.2 KB · Views: 185
  • IMG_2415.jpg
    IMG_2415.jpg
    132.7 KB · Views: 165
  • IMG_2249.jpg
    IMG_2249.jpg
    134.5 KB · Views: 148
  • IMG_2412.jpg
    IMG_2412.jpg
    136.4 KB · Views: 162
  • IMG_2253.jpg
    IMG_2253.jpg
    136.3 KB · Views: 192
Last edited:
OP
I

IMCA38

Well-known member
Joined
Sep 21, 2007
Messages
998
Location
Bennet, NE
Although I'm very impressed with the Quincy, there are a couple of things that I find mildly annoying. First off, the pressure switch enclosure is tight tight tight. You about have to be a heart surgeon to make the wiring connections inside it!
Second, I don't understand why the outlet is only 1/2". The 3/4" Maxline kit seems a natural fit for this compressor given the air output. It would be perfect if you could run everything out in 3/4". Unfortunately, that isn't to be as the port in the side of the tank is even just 1/2".
 

Attachments

  • IMG_2409.jpg
    IMG_2409.jpg
    142.6 KB · Views: 140
  • IMG_2413.jpg
    IMG_2413.jpg
    149.2 KB · Views: 147
OP
I

IMCA38

Well-known member
Joined
Sep 21, 2007
Messages
998
Location
Bennet, NE
I bought the 100' Maxline kit from Northern with my gift card. I managed to catch it on sale for $20 off.
I also picked up a few extra parts to make my run as I wanted it.
I did have to go to a local compressor place to get a dual outlet port that I ran to my tire machine. I wanted a dual port so I could have one line to the tire machine and a seperate line for the inflation line.
I also had to get a RapidAir filter/regulator with 1/2" ports as my old unit was only 3/8". I bought a 1/2" jump hose from Amazon and the first parts were ready to go.
 

Attachments

  • IMG_2407.jpg
    IMG_2407.jpg
    139.8 KB · Views: 185
  • IMG_2410.jpg
    IMG_2410.jpg
    132.8 KB · Views: 159
Last edited:

mrobins297aaa

Well-known member
Joined
Sep 20, 2010
Messages
3,283
Location
south east michigan
man that's a nice compressor, that's probably in my near future also, my 6.5 horse upright I bought in 1996
looks like your doing a nice job of installing it also
 
To avoid these ads, REGISTER NOW!
OP
I

IMCA38

Well-known member
Joined
Sep 21, 2007
Messages
998
Location
Bennet, NE
oh it's coming........all the pvc bashers must already be in bed..........

I'll plead ignorance on the PVC. I put those in back in around 2002. My first taste of GJ wasn't until 2007, so I didn't have the collective wisdom of the board to steer me away from such an awful choice. :dunno:
I will say that the PVC performed well for me for about 15 years and I had virtually no leak issues.
That being said, it was an eye opening experience when I dropped one of the sticks of pipe on the floor and it shattered! :yikes:
 
OP
I

IMCA38

Well-known member
Joined
Sep 21, 2007
Messages
998
Location
Bennet, NE
As my shop has a second floor storage area, I have a large steel beam running down the middle of the shop. I decided to mount a line down the beam and put a hose reel on the steel support post in the middle of the shop.
I wanted the line down from the ceiling as the ceiling is unfinished, and I may get ambitious and want to sheet it sometime. I decided to go ahead and paint the bean in that area as well, because if I didn't do it then, it was likely not going to happen.
I also welded 2x2 angles onto the beam flange every 30" to hold the conduit clamps for the line.
Here you see the line coming through the wall of the storage room, and a tee that takes the line down the wall from the beam. Note that I had to cheat the angle of the line slightly to miss the studs in the side wall of the store room.
This first drop then goes down to a 30' self-retracting Zilla reel. The second drop goes to the blast cabinet and the third one to the tire machine.
 

Attachments

  • IMG_2417.jpg
    IMG_2417.jpg
    123.3 KB · Views: 216
  • IMG_2418.jpg
    IMG_2418.jpg
    131.5 KB · Views: 192
  • IMG_2382.jpg
    IMG_2382.jpg
    123.1 KB · Views: 217
OP
I

IMCA38

Well-known member
Joined
Sep 21, 2007
Messages
998
Location
Bennet, NE
View of the dual outlet for the tire machine and the drop to the hose reel on the center post.
I found the line was pretty easy to work with, a little hard to get perfectly straight. The frequent conduit clamps help with that though.
The compression fittings take a lot of grunt to get fully tightened. My advice is to tighten it 3/4 turn as per instructions and then give it one more good grunt!
 

Attachments

  • IMG_2383.jpg
    IMG_2383.jpg
    130.8 KB · Views: 208
  • IMG_2416.jpg
    IMG_2416.jpg
    121.9 KB · Views: 187
OP
I

IMCA38

Well-known member
Joined
Sep 21, 2007
Messages
998
Location
Bennet, NE
I did make a few "field modifications" as seen in the photos. I added ball valves on each drop so I can shut them off individually if desired. Also, I added a drip leg to the two end drops. I will probably go back and add them at the other two drops as well.
As it stands right now, I still have around 40-50' of line left. I will probably go back and extend one of the runs in the future and look at a couple of additional outlets. Probably one at my workbench, and maybe by my drill press to blow off the debris.
Overall, I'm pretty satisfied with the compressor and the Maxline kit.
 

md21722

Well-known member
Joined
Nov 30, 2015
Messages
1,840
Location
Mt Juliet, TN
PVC explodes, typically at the joints, after time.

The QT-54 is a POS compressor, does not have a proper magnetic starter, has a small tank, and spins the pump fast. However, it is a truer 5 HP air compressor than the 3.x HP Craftsman that you had.

Did I do enough bashing?
 

phillyzj

Member
Joined
Oct 22, 2013
Messages
5
Location
maryland
I have run compressors like that old Craftsman for years. I picked them up cheap and ran them til they didn't run. Generally it was the motor that went. Last variant was a 1.5hp Harbor Freight motor, Craftsman head and an 80 gallon tank. Ran constantly when my CNC plasma table was running but never skipped a beat. I traded it for a smaller one, otherwise it'd probably be in my new shop.

What I really liked about them is that the different sized models all had very similar parts, the compressor head was definitely interchangeable, it was the size of the pulleys that got switched around.

Yea, they aren't industrial grade, but i would pick them up for 100-150 and use them for years and then recycle the parts.

The rapidair looks good, i like your modifications. I'm contemplating running it in my new shop when the time comes, though copper is also on the list.
 
To avoid these ads, REGISTER NOW!
Top Bottom