
To avoid these ads, REGISTER NOW!

My Air compressor build is finally complete (Almost)

TdK71

Well-known member
Joined
Apr 10, 2014
Messages
69
I've had this old Sears compressor for the last three decades, my Dad didn't to take it with him when he moved to South Carolina so I've been using it since then and it's been very reliable but somewhat underwhelming as far some things are concerned.


PXL_20230627_141828489.jpg
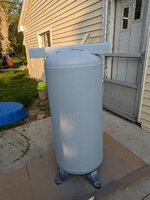
So my brother and I kept an eye out on FB Marketplace and stumbled across a nice 60 gallon tank for $50. We picked it up and the it sat in the garage for a year or so until I figured out how I wanted to build it out.
PXL_20230518_233835403.jpg
Here it is in primer after I welded on the extension pad to better Mount the Harbor Freight 5hpcompressor pump.
PXL_20230510_233704454.jpg
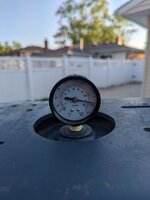
I ran a hydrostatic test on it and it held pressure for 12 hours. This meant I could move onto the next steps in the project.
PXL_20230627_141930855.jpg
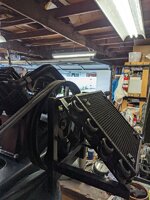
I built a bracket out of 3/16 plate, some 1 inch tube and angle iron to mount the Derale oil cooler that I'm using as an aftercooler for this project.
PXL_20230416_001010226.jpg
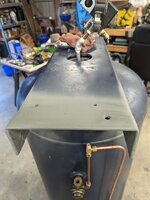
This is the extension that I welded onto the mounting pad so that the pump didn't overhang the centrally mounted pressure switch port and allowed me to center the entire assembly.
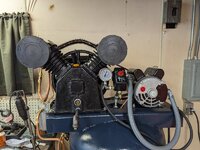
PXL_20230627_141837512.jpg
I bought a Vevor Motor off eBay to go with the Harbor Freight pump, and used Compressorsource.com to source the pulley for the motor and the pressure switch, as well as the new check valve for the tank. I utilized Amazon for the Derale oil cooler, and the moisture trap that I've installed between the cooler and the check valve.
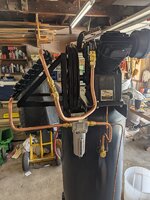
PXL_20230619_202151415.jpg
This is how I ran the piping with 5/8" copper coming off the pump reduced down to 1/2" going into the cooler and 1/2" running down to the tank.

PXL_20230627_010130487.jpg
I moved it to its location yesterday and tested it out, after I ran it for 30 minutes with no load and then changed the oil. It took 4 minutes to go from 0 to 150 psi. The next step is to run my shop air piping and finish this project off so that I can get my blast cabinet setup for my restoration projects and for painting as well as air tool usage.
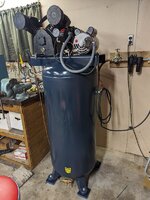
PXL_20230627_010141370.jpg
Overall I'm pretty happy how this is turning out so far.
 
Last edited:
To avoid these ads, REGISTER NOW!

GeoBruin

Well-known member
Joined
May 5, 2018
Messages
3,750
Nice work. Compressors were like black magic to me back when I first needed one, so I bought a gently used, but still complete compressor. Knowing what I know now, I would definitely have pieced one together and would likely have wound up with a better performing overall compressor for less money.

Why did you cant the bottom of the aftercooler away from the fan shroud? I suspect it probably allows better cooling of the pump but not quite as effective cooling of the air in the cooler. I mostly ask because I struggled with the same tradeoff when I mounted mine, although I ultimately mounted it right smack against the shroud solely on the basis that others had done it that way so it was probably fine.
 
OP
T

TdK71

Well-known member
Joined
Apr 10, 2014
Messages
69
Nice work. Compressors were like black magic to me back when I first needed one, so I bought a gently used, but still complete compressor. Knowing what I know now, I would definitely have pieced one together and would likely have wound up with a better performing overall compressor for less money.

Why did you cant the bottom of the aftercooler away from the fan shroud? I suspect it probably allows better cooling of the pump but not quite as effective cooling of the air in the cooler. I mostly ask because I struggled with the same tradeoff when I mounted mine, although I ultimately mounted it right smack against the shroud solely on the basis that others had done it that way so it was probably fine.
I saw a video on you tube by an old engineering guy that basically said that standing it straight up will leave water in the the condenser tubes, if you look at the tubes on the output side they are on a 45° angle so if you tilt the condenser on that angle it will drain properly.
 

redmondjp

Well-known member
Joined
Nov 25, 2014
Messages
2,318
Location
Redmond, WA
You may want to lower the turnoff pressure down to 120-130psi - the pump will be much happier. I would only go to 150psi using a two-stage pump.
 
OP
T

TdK71

Well-known member
Joined
Apr 10, 2014
Messages
69
You may want to lower the turnoff pressure down to 120-130psi - the pump will be much happier. I would only go to 150psi using a two-stage pump.
The pump is rated for 145psi I've got it cutting out @ 150psi I can throttle it back a bit.
 

redmondjp

Well-known member
Joined
Nov 25, 2014
Messages
2,318
Location
Redmond, WA
The pump is rated for 145psi I've got it cutting out @ 150psi I can throttle it back a bit.
Just because you can, doesn't mean that you should - Compare the time it takes to go from zero to 120psi, to the time that it takes to go from 120 to 150psi. There is a very good reason why two-stage pumps were invented.
 
OP
T

TdK71

Well-known member
Joined
Apr 10, 2014
Messages
69
Just because you can, doesn't mean that you should - Compare the time it takes to go from zero to 120psi, to the time that it takes to go from 120 to 150psi. There is a very good reason why two-stage pumps were invented.
Turned it down to 135psi goes from 0 to 135psi in 3minutes and 40 seconds. I'm planning on running my shop air @90psi so that should be sufficient for my application. Thanks for the advice I appreciate it.
 

rgviewer

Member
Joined
Jan 23, 2012
Messages
5
Just picked up one of these yesterday, Can I ask what you used to make the connections coming off the pump into the 5/8 copper. Also is there any problems stepping down to 1/2". I would also like to put an after cooler, but was afraid of limiting or restricting the pump.
 
To avoid these ads, REGISTER NOW!

GeoBruin

Well-known member
Joined
May 5, 2018
Messages
3,750
Just picked up one of these yesterday, Can I ask what you used to make the connections coming off the pump into the 5/8 copper. Also is there any problems stepping down to 1/2". I would also like to put an after cooler, but was afraid of limiting or restricting the pump.
It will be specific to your compressor, but generally, it will be a threaded or flare fitting on one end, and a compression fitting for 5/8" copper pipe on the other. What does the outlet on your pump look like?

Can I ask why you want to use 1/2" copper?
 

rgviewer

Member
Joined
Jan 23, 2012
Messages
5
It will be specific to your compressor, but generally, it will be a threaded or flare fitting on one end, and a compression fitting for 5/8" copper pipe on the other. What does the outlet on your pump look like?

Can I ask why you want to use 1/2" copper?
I have the same Harbor Freight pump that the original poster also has. I am not exactly sure what size is coming out of the pump, as to why I asked what he used, I planned on using 5/8 copper from the pump, but would also like to use an after cooler before the tank, but I see he used 1/2" and most after coolers I find use 1/2" tubbing with the aftercooler. I was worried about restricting the flow, and look for any advice to anyone who has done something similar. Thanks
 
OP
T

TdK71

Well-known member
Joined
Apr 10, 2014
Messages
69
Just picked up one of these yesterday, Can I ask what you used to make the connections coming off the pump into the 5/8 copper. Also is there any problems stepping down to 1/2". I would also like to put an after cooler, but was afraid of limiting or restricting the pump.
This is a very tricky connector to find, it took me almost a month to locate the right one. I got it here:
G Thread (Metric BSPP) 3/4" Female to NPT Thread 3/4" Male Pipe Fitting Adapter - Lead-Free (3/4 inch)

You can find other ones on ScAmazon but this one worked perfectly.

Oh and no problems stepping down to 1/2" from 5/8". The compressor takes 3minutes and 40 seconds to go from 0psi to 135psi.
 
OP
T

TdK71

Well-known member
Joined
Apr 10, 2014
Messages
69
It will be specific to your compressor, but generally, it will be a threaded or flare fitting on one end, and a compression fitting for 5/8" copper pipe on the other. What does the outlet on your pump look like?

Can I ask why you want to use 1/2" copper?
The lines going to the Derale 15300 cooler are 1/2" AN fittings so you'll have to reduce down to connect up to it.
 
OP
T

TdK71

Well-known member
Joined
Apr 10, 2014
Messages
69
I've also had to change things up a bit , because the the Harbor Freight compressor kit just isn't doing it on this compressor.
Automatic Compressor Drain Kit

I've decided to go with this instead for multiple reasons, Less plumbing and easier cleanout being two of them.
QWORK Automatic Timed Condensate Drain Valve

I think this is the better way to go on a bigger compressor, I have one of the HFT units mounted on the old Sears compressor and it works just fine for a lower PSI application, so f you have a smaller compressor I'd say use the HFT one if you can find it.
 

GeoBruin

Well-known member
Joined
May 5, 2018
Messages
3,750
I've also had to change things up a bit , because the the Harbor Freight compressor kit just isn't doing it on this compressor.
Automatic Compressor Drain Kit

I've decided to go with this instead for multiple reasons, Less plumbing and easier cleanout being two of them.
QWORK Automatic Timed Condensate Drain Valve

I think this is the better way to go on a bigger compressor, I have one of the HFT units mounted on the old Sears compressor and it works just fine for a lower PSI application, so f you have a smaller compressor I'd say use the HFT one if you can find it.
I wasn't able to get the HF auto drain to work with my compressor either. I tried two of them, and kept blowing rings. I even got an oring kit with various durometer and experimented with that and it just wasn't happening.
 

Motofixxer

Well-known member
Joined
Oct 10, 2009
Messages
681
Just picked up one of these yesterday, Can I ask what you used to make the connections coming off the pump into the 5/8 copper.
Mine seemed to be a 3/4 NPT, so anything you can adapt to will work. I used a 3/4" water heater hose copper flexible line, removed rubber washer and with some pipe dope seemed to seal right up no problem. There's a 3/4 FIP to 1/2 OD flare you can buy and use. Then it's regular 1/2" copper.
 
To avoid these ads, REGISTER NOW!
Top Bottom