To avoid these ads, REGISTER NOW!

My Bass Boat Project

MrSurly

Well-known member
Joined
Jan 15, 2014
Messages
1,671
Location
East Texas
I picked up an older aluminum boat from a buddy and am planning to fix it up and go fishing, again. It's an Aluma Weld XP50 17' with their 'padded Vee' hull design. The company changed their name from AlumaWeld to Xpress boats, many years ago; I'm not sure why. It's the same boat. I always admired the way this boat was built, all welded, no wood anywhere and with a hull design that is more similar to some ‘glas hulls than any ‘jon’ boat. Anyway, it’s old, it needs all the things...
here’s my progress so far
0D8D9605-21E6-4099-98BB-2EB4863613E7.jpegF3F27761-CA47-49E5-8E7E-C330D9100FB7.jpeg7BEBCEB8-B1CF-4D45-B646-85E88D09852F.jpeg6120B4C1-0F45-4134-88EB-2826F5EA143E.jpeg
There HAVE been a few steps in between....
I’ll add some further down
 
Last edited:
To avoid these ads, REGISTER NOW!

steve308

Well-known member
Joined
Nov 20, 2011
Messages
2,073
Nice work but what are those three valves on the rear hatch cover do? Live wells?
 
OP
M

MrSurly

Well-known member
Joined
Jan 15, 2014
Messages
1,671
Location
East Texas
Nice work but what are those three valves on the rear hatch cover do? Live wells?
Fuel manifold. It has three portable tanks and getting in there to switch the hoses from tank to tank was a PITA so the guy built that so that he needed only to lift the lid and operate valves.
 

karoc

Well-known member
Joined
Dec 19, 2017
Messages
1,998
Location
Hemphill Tx
I like it, friend of mine just purchase a Bass Tracker which also has aluminum hull. No wood nor outdoor carpet, now they come with some kind of texture coating. But it also came with big price tag like all other boats which there's no way I can pull that off. So like you I will also be shopping for something similar once I retire and move up to TB, I want to get back into bass and crappie. What kind of paint did you use, it looks awesome
 
OP
M

MrSurly

Well-known member
Joined
Jan 15, 2014
Messages
1,671
Location
East Texas
The new carpet is light grey (they call it silver).
I need to back up and sort of get chronological with this...
But this is how it sits today, finally back on the trailer, vs the starting point. The trailer has gotten spiffy as well!
 

Attachments

  • 99E58076-951A-4049-A44F-8E036B62C587.jpeg
    99E58076-951A-4049-A44F-8E036B62C587.jpeg
    200.1 KB · Views: 150
  • 288F18CE-E63C-4538-A09C-79548C1C08E5.png
    288F18CE-E63C-4538-A09C-79548C1C08E5.png
    1.2 MB · Views: 151
OP
M

MrSurly

Well-known member
Joined
Jan 15, 2014
Messages
1,671
Location
East Texas
Starting out, a full resto was NOT the plan, just a functional refreshing and the most blatant appearance issue. Just get it able to fish, be reliable and make it presentable; ‘pretty’ is not required. Based on known issues, the first things that had to be addressed were the steering cable, the lower unit lube and of course, the rotted carpet. All sorts of ancillary items also would need repair or replacement, notably trailer bunks, winch, jack, lights (hey, the tires are good!) the anchormate, trolling motor, they ALL need work!
First order of business is determine the steering cable needed, order it.
Complications:
1. Gotta lift the outboard to pull the cable
2. Can’t find the oddball cable
3. Ordered new complete system (cable and “helm kit” )

Stripped out old carpet, amazed by how much sand is in/under it. Removed the
‘glas steering console (carpet access) removed all the compartment lids for carpeting removed batteries and tanks for the same reason.
2C4BA6B2-889B-4FFD-840C-F6A1276ECFC2.jpeg
As you can see, the hull is now temptingly close to stripped
 
Last edited:
OP
M

MrSurly

Well-known member
Joined
Jan 15, 2014
Messages
1,671
Location
East Texas
At this point, the only items still on the hull are the anchormate, trolling motor (which both require removal for repairs) and a couple of cleats and nav light sockets. That’s it.

annnnnnnnnnnnnnnnd, because I have an unfinished (never will finish) Dart convertible *project* in the shop, guess what ELSE I happen to have sitting around...
 
Last edited:
OP
M

MrSurly

Well-known member
Joined
Jan 15, 2014
Messages
1,671
Location
East Texas
A rotisserie! Just standing there, taking up a ton of room.
The boat needs a half hour of prep and by golly, I hate the Dark Anthracite Blue anyway, so here we go!
5A21D15C-1511-4BD6-B5BA-8714321F4CFB.jpeg
BDA194DA-C64E-4F8F-BBBE-638649A84775.jpeg

22AB572F-55B7-4487-BF6A-FA6F0EFD6E19.jpeg
 
  • Like
Reactions: 555
OP
M

MrSurly

Well-known member
Joined
Jan 15, 2014
Messages
1,671
Location
East Texas
So now that I’ve no more excuses, what am I going to paint it with..... and what color?
Well I automatically knew I wanted it to be red. Just plain old red could do.... but man, a metallic could be so much better.

My *preference* if nothing else mattered, would be the color of my neighbor’s Mazda.
it’s the prettiest “Candy Apple Red” I’ve seen of any factory paints (and there are many contenders today). But I know that THAT paint is going to be expensive and likely a tri-coat system but now I’ve just gotta know. That color is officially called Mazda “Soul Red Crystal 46V” and its hella beautiful. I went to the local pro body shop supply and priced the paint.
I really should have sat down.

approx 2qt of sprayable material per stage (including reducers, hardeners, for each of base coat, mid coat, clear coat)

$1622.00

Well guess what color I did NOT spray on the boat.

So then, for reference, I had them quote the equivalent in “Corvette red” non metallic (base coat/clear coat system) and that was over 600 bux.

I figured I would have to shop online just to compare and also that I would look at doing single-stage (Acrylic Enamel) to save money.

I have sprayed AE and also bc/cc before but it was soooooooo long ago.

I don’t even own a spray gun any more.
 
Last edited:
OP
M

MrSurly

Well-known member
Joined
Jan 15, 2014
Messages
1,671
Location
East Texas
Well if it gets really bad I can paint it with alkyd enamel (tractor paint) but let’s see what I can find online.
There are many online suppliers of paints, more than I had guessed. I ended up buying Restoration Shop paints distributed by TCP Global, but made my purchases thru Amazon for simplicity.
Acrylic Enamel single stage
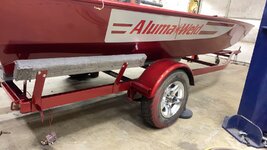
Firethorn Red Metallic___________165 gal
Moonlight Drive Blue metallic.—____ 62 qt
Mesa Grey. ______________________50 qt
Gray DTM high build primer_______143 gal

Well that’s fairly cheap comparatively. 165 a gallon for metallic red is quite a bargain.
The same color, same brand but in bc/cc urethane is $428.
I decided to go cheap, went with the single stage.
But wait, what’s the trade-off? What do you gain with bc/cc for the extra bux?

Damned good question. The major difference is durability. And gloss life. And application issues, especially with metallics.
So bc/cc is better in all those ways mainly because the clear used adds great UV protection. The AE paint will fade in two-three years and need buffing. EDIT to add: -----However, single stage with *metallic* does NOT take well to buffing and could be ruined. ----- The bc/cc system paints last for decades with little fade and also resist chipping better. ----because of the clearcoat, buffing is easy and pretty safe to do on bc/cc----
Spraying single stage metallic paints can leave you with “tiger stripes” and mottling of the metallics where bc/cc doesn’t have a real problem with this.

BUT.

Single stage is CHEAP, dammit!
So I went with cheap. But there’s more.
I was disappointed with the lack of gloss.... so disappointed that I then sprayed urethane clear over it at an additional cost of $150.
----note that the paint shops will usually have a very cheap clear urethane available (like $50) but don't be tempted(!) this is what the fly-by-nights and the shyster car dealers will use because it looks awesome for a while.... but has no UV protection in it so it doesn't last, but they don't care. Spend the bux for the good stuff.----
The clear saved my day! Now I have tremendous gloss AND I’ve gained UV protection!

So, in the end I still saved money vs bc/cc BUT if I were doing it again, I would DEFINITELY just shoot bc/cc and be done with it.

As an aside, I shot blue metallic AE on the outboard and it shines like a new penny, no clear needed. I can’t explain why the difference in outcomes other than my own unpracticed hand, but I can tell you that with bc/cc You don’t have the inconsistency.

edit to add: I needed a paint gun; while at the pro paint store I learned that their cheapest gun was out of my range, so back online I went. After watching too many you tube videos I decided to buy this well-recommended cheapie: Astro Euro HE105 $95 and I’m very happy with its performance with a 1.5 nozzle.
 
Last edited:
OP
M

MrSurly

Well-known member
Joined
Jan 15, 2014
Messages
1,671
Location
East Texas
Once I got it on the rotisserie I got started on the sanding. I wanted to merely “scuff” the old paint because it was certainly adhered well, I only needed to adhere to IT. Bare metal was unavoidable, of course and a good bit was already bare. I made sure to get a “Direct To Metal” primer to hopefully avoid adhesion problems later. Due to age and lots of river use, there are a *lot* of dents on the old boat. I made some effort to straighten some up top but elected to pretty much leave the hull alone as I didn’t want to take the chance of cracking the silly thing. Appearance wise, no one will (hopefully) be seeing the bottom(!) the worst dent on the hull was a particularly hideous one that was clearly made by a bolt. A bolt that was protruding, probably, from a concrete footing in an area that was flooded. This is the oilfield and there are literally hundreds of old derrick footings in river bottom areas that flood a few times a year, expanding one’s chances of hitting submerged structure.
Looking into the dent you can make out the threads..., but despite a tremendous amount of metal stretching, there is actually no leak! I had to test it of course, using an RTV silicone dam and acetone, I proved it was airtight.
What to do about it, though. Given that the metal was no doubt wafer-thin and given that Murphy says it will get hit again, I had to protect it. So i filled it... with JB Weld. Weak spot protected, I could quit worrying about that issue.CFC5DF88-5103-4E21-A36C-FEEEAC5FE1CE.jpeg0D7DA6E8-2841-47FE-992E-B52E1F0AAC06.jpeg
EA4861E9-360D-47D0-B4B6-6BA1EB50186F.jpeg
 
Last edited:
OP
M

MrSurly

Well-known member
Joined
Jan 15, 2014
Messages
1,671
Location
East Texas
To prep for paint, the next steps are sanding, sanding and sanding.
Then stripping off most of the old vinyl decals including the blue outlines, but retaining the name. Then spent way too much time masking and trimming to preserve them.
485374C6-6BAC-442E-9C10-4B1E419EBADD.jpeg19CFD39D-31DF-45D2-8D46-CDEB19BFC8B4.jpeg99203DE8-6088-410F-AE36-319AE137AE40.jpeg

5D4F25BE-7B3C-436D-B4BD-CF5C858BA7D2.jpegF00DC295-359B-4681-AAC3-5480FAD68A80.jpegDAE19345-EF07-4DCF-86A8-4C582CDB0EA1.jpeg
 
Last edited:
OP
M

MrSurly

Well-known member
Joined
Jan 15, 2014
Messages
1,671
Location
East Texas
Next, now that I’ve gathered a cheap spray gun, cheap primer and cheap paint, it stands to reason that I’ll need to create a cheap paint booth...

96FDD1AE-1CE4-41CA-9000-1CCF582E097E.jpeg29C34785-EB50-4ABC-820E-21CF0D8BA393.jpeg7EC9112C-8AFE-4D33-A32F-CF4FBD8F427E.jpeg539C17F9-67FD-4C1C-9B45-ED719B7CEE48.jpegA91BD5AA-C7FA-4774-B6D6-C7C785BF0FB2.jpeg

I cut the plastic at 50', put one piece atop the other (and atop the boat) then duct taped the sides together for most of the length. This made a tube about 15' diameter and fifty foot long. I tied a couple of ropes up in the shop to the loft, ran them inside the tube, made holes in the tube on each side near the garage door. I looped the ropes out at these holes a bit then continued inside the tube with both ropes and attached them to the cherry picker which was trying to roll down the hill, thus applying a little tension.

Inside the shop i took two of the rope cleats that had come off the boat and screwed them to the frame of the door, up high. Attached other ropes to the rope loops on the tube, ran them over the cleats, so I had adjustable tension on each rope from the loft to the door.
This let me maintain the ceiling height in the tube independent of the garage door position. To lower the door I had to move the engine hoist up the hill to slack the outside ropes, lower the door as needed then let the hoist pull the ropes to maintain the exhaust tunnel.
Then i set up three AC filters inside the thing right under the garage door, creating a 'filter box'.
Out near the exit, I placed two more AC filters. NOT a super efficient setup, but it worked, and the asphalt is not a new color(!)

D9CF178A-25B7-4E49-83B1-239DD78A6981.jpeg
 
Last edited:
To avoid these ads, REGISTER NOW!
OP
M

MrSurly

Well-known member
Joined
Jan 15, 2014
Messages
1,671
Location
East Texas
After closing off the inside end of the tube and adding a drum fan, I now have an *inflatable* paint booth!! There’s a lot more room inśide and I proceded to sand the primer (a bunch more than before), wipe it down and get ready to make it WET! After what seems like a LOT of days I’ve finally started putting color in the boat.
The color is just what I wanted but the shine isn’t quite there.D3553608-1C89-41C8-A431-6DC401134217.jpeg
The first color Is grey for the side panels.
then I taped over that to shoot the red.
8EA89147-0F17-4F57-B6C9-B312CB19841C.jpeg
06D85C7B-8095-4533-9CAA-4271BCA87401.jpegCD3D7B7E-5CDE-4202-BF9A-E458D8D8479F.jpeg
 
Last edited:

Dan in Pasadena

Well-known member
Joined
Feb 18, 2009
Messages
13,131
Location
Pasadena, CA
Very nice work, you will be a fishing mad man :)
Yeah AND he'll look fabulous while he's doing it. No-one truly goes to this level of effort unless he cares about how it looks. OP, I think you're a closeted perfectionist. It's ok a lot of us here are OCD afflicted. Ha ha.
 
OP
M

MrSurly

Well-known member
Joined
Jan 15, 2014
Messages
1,671
Location
East Texas
Got the first piece of carpet in. Should have done much more but had a bit of a snafu with the shipping of the carpet glue. The glue is Henry 663 in a plastic pail. Yes, I SHOULD have bought it locally but it was convenient from the carpet place, ships free....
Opened the cardboard box it was shipped in. Found a large HEAVY grade grey plastic bag. It had been tightly twisted closed and then taped. You could tell it had a pail inside but you couldn’t miss the fact that there was glue in the bag.... that was NOT in the pail. Looking closer, I think I rec’d most of the glue I ordered. But the pail was split like a watermelon and the glue was about equally in and out of the pail. The pail was in a (torn) clear bag and that whole hot mess was in the grey bag. What a friggin mess. But it was glue, it was preserved well by the heavy bag (I would really like to know if the big bag was added to the shipment after the damage) so I donned the nitrile gloves and started scooping! It added a bunch of time as I had to swap gloves a lot but tomorrow I’ll get some more glue and try to make progress..FC48E8F0-CCE8-4E01-B369-7F332C2FF037.jpeg
 
Last edited:
OP
M

MrSurly

Well-known member
Joined
Jan 15, 2014
Messages
1,671
Location
East Texas
Between painting sessions I detoured to do repairs on the outboard. Pulled the lower unit and stripped it down to make a weld repair. The rear of the skeg has a big chunk missing like PAC-MAN took a bite of it. Not a real function issue but looks goofy, so I must address it. I was going to do a full seal and pump job on the LU anyway.
72A56743-BBFB-4323-8C0D-5FBA2BC68C0D.jpegA96D3809-36E8-4717-A26E-A49E128197B2.jpeg29838E6D-E211-40A2-A0A0-3809AD4435F2.jpegBC91B105-F824-4F84-AE23-206E037E06A9.jpeg61332D26-2FEC-4D15-80E3-5B2FDEF72D4B.jpeg3AD992A8-519D-42F1-B48F-9EE0FE63FE03.jpeg

To weld this I needed to add a cheap spool gun to my ESAB 252i.... turns out that a cheap one is not offered for this machine (natch). So, I bought a cheap spool gun made for a Lincoln and ‘hacked’ it to fit the ESAB. But that’s for another thread.

changed the water pump ‘deluxe kit’ with the new housing Plus all the seals. All the hard parts appear in good shape.
A wad of monofilament was in the prop shaft seal.

welded in a little patch, put her back together. Time for some engine paint!
 

Attachments

  • E8D511F1-DF3E-412C-8D1F-3569B2916211.jpeg
    E8D511F1-DF3E-412C-8D1F-3569B2916211.jpeg
    344.8 KB · Views: 38
  • 80C3936D-F6BF-416A-8201-C883D89B7706.jpeg
    80C3936D-F6BF-416A-8201-C883D89B7706.jpeg
    116.2 KB · Views: 29
  • 6798788C-B240-43BE-8C96-C55B942EDB1E.jpeg
    6798788C-B240-43BE-8C96-C55B942EDB1E.jpeg
    101.4 KB · Views: 33
Last edited:
OP
M

MrSurly

Well-known member
Joined
Jan 15, 2014
Messages
1,671
Location
East Texas
I’ve managed to get about half of the carpet installed (what a pita) hopefully I’ll complete the carpet, engine and wiring this weekend(?)
One change I’ve made to the plan is that instead of carpeting the storage areas, I’ve costed them with white Flex Seal. This stuff impresses me with its softness and quieting ability as well as it’s ‘clean-ability’. I initially put it in the tank well because that’s proven a terrible place for carpet.
I liked the effect enough that I decided to put it everywhere.
The other feature of Flex Seal is that it’s white so being able to SEE in the storage wells will be greatly improved (I’m also adding LED lights everywhere).
What I don’t know is how durable the stuff is, but I’ll find out. I can always add the carpet later.DFA70EAE-5182-42C8-8C7E-7D26E9E875A0.jpeg640EBA79-CF87-4178-B8BB-4AC55B909D15.jpeg09CDD520-9E00-49D9-9E13-70A5C4F7F714.jpeg8A555293-D456-43B7-9FE2-6A3B1A5C0357.jpeg
 
Last edited:

FMB4

Well-known member
Joined
Jan 19, 2017
Messages
2,926
Your boat is looking so good that fish are going jump into it just for a chance at a publicity photo.

Seriously, that's some very fine workmanship.
 
OP
M

MrSurly

Well-known member
Joined
Jan 15, 2014
Messages
1,671
Location
East Texas
I can't seem to find a way to rotate these pictures in our new format. Any pointers? The 'rotate' button at the bottom of each post will let me rotate *MY* view, but only temporarily and it doesn't perform an edit of the post.(?)
 
OP
M

MrSurly

Well-known member
Joined
Jan 15, 2014
Messages
1,671
Location
East Texas
Thanks for the compliments! I can't WAIT to get it on the water!

I'm wondering if anyone here has used Flex Seal in a similar way, and what your thoughts are on its durability.

The boat had carpet in the tank area originally (common in bass boats) but I can't figure how anyone ever thought that was a great idea. I was going to place some sheet rubber in there but struck on the Flex product idea. I expanded its use to the rod box, etc and I have high hopes. The only difficulty so far is application of the stuff on vertical surfaces. I'm wondering if anyone has tried spraying this stuff? I mean the bulk product, not their crazy-expensive aerosols. I have an airless.....

If I had been actually *smart* I would've done the Flex while the hull was on the rotisserie!


BTW: I think the boat will run around 50MPH though I've never actually been IN it. I've been in another boat running wide open while my buddy in this boat flew by us...
 

snyder

Well-known member
Joined
Dec 18, 2008
Messages
545
Location
Baltimore md.
The blue color on your engine looks a lot lighter than tcp's color chip on-line.
Were you surprised at the difference?
 

FMB4

Well-known member
Joined
Jan 19, 2017
Messages
2,926
I used Flex Seal on my '06 Nissan Titan along the roof seams that were leaking just a bit. It actually worked for the couple years that owned the thing (seams weren't leaking when I sold it). Felt like wearing sunglasses when I bought the stuff at Lowe's. But hey, it was available in a small container that wasn't at all expensive. Maybe I should've produced a Flex Seal commercial...
 
OP
M

MrSurly

Well-known member
Joined
Jan 15, 2014
Messages
1,671
Location
East Texas
The blue color on your engine looks a lot lighter than tcp's color chip on-line.
Were you surprised at the difference?
I was, as I was hoping to get *close* to the Evinrude color which was DARK metallic blue. Fortunately I was not actually needing to —match—- anything. If I was needing to match I would’ve bought locally.
TCP has a disclaimer when you order that spells it out.
They don’t offer any matching paint codes or paint names as factory offerings.
I think actual color matching with online paint would be a **** shoot.
When I first put the motor near the boat I thought the blue seemed almost cartoonish with the red, maybe even garish. Once I got the engine decals on, though, I think it looks sweet.
I LIKE the color.... but it is several shades lighter.
 
Last edited:
OP
M

MrSurly

Well-known member
Joined
Jan 15, 2014
Messages
1,671
Location
East Texas
Maybe I should've produced a Flex Seal commercial...

I know what you mean. I feel like I should hide the containers so the neighbors don’t shun me. But then I have used it on a couple of projects, waterproofing a small area like a water heater closet or similar. I’m impressed by the fact that it’s claimed to be non-toxic and non/flammable which makes it far easier to use for indoor projects than, say, polyurethanes. I’ve not used it for its impact-absorbing and abrasion resistance properties before.
 
OP
M

MrSurly

Well-known member
Joined
Jan 15, 2014
Messages
1,671
Location
East Texas
To address the Line-X and other bed liner coatings: they are rugged, durable and great for hauling cargo but not for people. Hard as a brick, loud with any movement, abrasive to the skin and super HOT in the sunlight. Not a comfortable boat,
 
OP
M

MrSurly

Well-known member
Joined
Jan 15, 2014
Messages
1,671
Location
East Texas
The color on the engine seemed a bit out of place until I put the decals on. They really made an amazing difference629EE39E-17B0-482F-9B9B-A3184EE95CE2.jpeg
 
OP
M

MrSurly

Well-known member
Joined
Jan 15, 2014
Messages
1,671
Location
East Texas
Rolled it outside today to put the muffs on and run it for a bit. Discovered that the starter is toast, ended up rope starting it. I got the carpet installed except for the compartment lids. I kinda stalled out while working on the electrical. I was repairing, rerouting, sorting out the accessory wiring and got so frustrated with finding a ridiculous number of splices and undersized wire and jury-rigging I finally just ripped it all out. Found that the steering cable (complete helm kit) that the local dealer ordered was a foot too long. I even explored the possibility of relocating the steering console/seat to accommodate the cable length, since everything was out and disconnected anyway. It wouldn't work out like that so had them re-order a one-foot-shorter unit today.
 
Last edited:
To avoid these ads, REGISTER NOW!
Top Bottom