

You are using an out of date browser. It may not display this or other websites correctly.
You should upgrade or use an alternative browser.
You should upgrade or use an alternative browser.
My Epoxy-Coat Arrived Today!
- Thread starter dd564
- Start date
xrdad
Well-known member

Please post many pics!!

csp
Well-known member
Planning on installation of two kits tomorrow. Last night was spent pressure washing and tonight will be spent etching/neutralizing/more pressure wash so it's dry tomorrow morning. Hoping my research and planning leads to a painless installation!
Edger
Well-known member
Planning on installation of two kits tomorrow. Last night was spent pressure washing and tonight will be spent etching/neutralizing/more pressure wash so it's dry tomorrow morning. Hoping my research and planning leads to a painless installation!
That sounds like good prep, very good start. Good luck.
Make sure it's good and dry, 48 hours isn't much dry time - mine took a week after pressure washing.
Wow What time of year did you do yours?
I washed my floor for instal tomorow It was almost dry by the time I came in the house tonight.

Edger
Well-known member
Wow What time of year did you do yours?
I washed my floor for instal tomorow It was almost dry by the time I came in the house tonight.
Regarding moisture, I am going back a few years, but at that time manufacturers of 100% solids epoxy used to tell me that epoxy was compatible with moist concrete, not wet, but damp was OK.
I used to coat big factory floors for forklift traffic and guarantee adhesion for life. We used to pressure wash with a big rotary floor cleaner at 6,000 psi (if you stopped for longer than a second the jets dug grooves into the concrete floor), then alkaline washed the floor, rinsed twice and vacuumed up all water. The next day we would use very strong detergent on the oil spots, 2 rinses and vacuum dry, then paint immediately it was dry which took less than an hour.
I can tell you with no BS that we never had an adhesion problem due to water and hardly ever had any adhesion problems. These were oily floors that had been like that for 60+ years.
I doubt you will have any moisture adhesion problems after overnight drying unless the product data sheet says it is not compatible with damp concrete.
About 3 weeks ago. Kept getting a slight halo of moisture at the saw cuts. Did you try the plastic wrap taped to the floor trick for 12 hours to see if you have any condensation show up on it? Christine has been pretty adamant the floor has to be bone dry for good adhesion.Wow What time of year did you do yours?
I washed my floor for instal tomorow It was almost dry by the time I came in the house tonight.
Texas is hotter and probably lower humidity than Iowa though this time of year, we've had rain about every other day around here for weeks.
Last edited:
I hired out the floor grinding, which to me was some of the best money I ever spent. That's simply not a job I'm detailed oriented enough to do.
After about 4 hours of grinding and vacuuming, they were done, and I started with the epoxy-coat.
Today is polyurea day. (I've taken a few pictures which I'll show when I'm done).
A couple tips....
1. Buy heavy rubber gloves.
2. Check your kit the day before for any leakage. I had some acid etch leak in both containers. I had to first carefully wash both kits before starting.
3. I thought the stuff sets up pretty fast. I would definitely only mix a single batch on your first batch or two until you figure out your strategy.
4. Upgrade to 18" rollers and a wider squeegee by going to your local home improvement store. I used an 18" squeeg and an 18" roller and I felt like that saved a lot of time.
5. Wear heavy rubber gloves.
6. Once flakes are on the ground, they won't blow anywhere. (I have a couple areas where while flaking, I spilled some on the floor (as I pulled my hand out from grabbing some) and once they are down, they are down. Leaf flower won't flow them).
7. I used the antiskid everywhere. The floor looked really slick, and I'm putting a clear over it today, so I'm hoping I'll still have a non-skid surface that isn't too sharp.
After about 4 hours of grinding and vacuuming, they were done, and I started with the epoxy-coat.
Today is polyurea day. (I've taken a few pictures which I'll show when I'm done).
A couple tips....
1. Buy heavy rubber gloves.
2. Check your kit the day before for any leakage. I had some acid etch leak in both containers. I had to first carefully wash both kits before starting.
3. I thought the stuff sets up pretty fast. I would definitely only mix a single batch on your first batch or two until you figure out your strategy.
4. Upgrade to 18" rollers and a wider squeegee by going to your local home improvement store. I used an 18" squeeg and an 18" roller and I felt like that saved a lot of time.
5. Wear heavy rubber gloves.
6. Once flakes are on the ground, they won't blow anywhere. (I have a couple areas where while flaking, I spilled some on the floor (as I pulled my hand out from grabbing some) and once they are down, they are down. Leaf flower won't flow them).
7. I used the antiskid everywhere. The floor looked really slick, and I'm putting a clear over it today, so I'm hoping I'll still have a non-skid surface that isn't too sharp.
csp
Well-known member
I didn't see a need for the 18" roller on ours. We had no problem with it setting up too fast or not being workable with a 9" roller.
I bought extra roller covers just in case, and only used one cover for two kits. Our square footage was 864 and it took just under two hours for both kits.
In regards to dry time, it depends highly on where you live. We call a day with 30% humidity "sticky", so no problem with the concrete drying overnight. I also used a leaf blower on my expansion joint cuts and a 4' diameter shop fan to move the water out.
My problem with flakes was grabbing too many and not throwing them high or far enough to disperse. I have a couple of spots where they are quite thick. I added seven pounds of flake to what the kits include.
We got by with several pairs of surgical gloves, which are not a lot thicker than the ones the kits include.
I bought extra roller covers just in case, and only used one cover for two kits. Our square footage was 864 and it took just under two hours for both kits.
In regards to dry time, it depends highly on where you live. We call a day with 30% humidity "sticky", so no problem with the concrete drying overnight. I also used a leaf blower on my expansion joint cuts and a 4' diameter shop fan to move the water out.
My problem with flakes was grabbing too many and not throwing them high or far enough to disperse. I have a couple of spots where they are quite thick. I added seven pounds of flake to what the kits include.
We got by with several pairs of surgical gloves, which are not a lot thicker than the ones the kits include.
I didn't see a need for the 18" roller on ours. We had no problem with it setting up too fast or not being workable with a 9" roller.
I bought extra roller covers just in case, and only used one cover for two kits. Our square footage was 864 and it took just under two hours for both kits.
In regards to dry time, it depends highly on where you live. We call a day with 30% humidity "sticky", so no problem with the concrete drying overnight. I also used a leaf blower on my expansion joint cuts and a 4' diameter shop fan to move the water out.
My problem with flakes was grabbing too many and not throwing them high or far enough to disperse. I have a couple of spots where they are quite thick. I added seven pounds of flake to what the kits include.
We got by with several pairs of surgical gloves, which are not a lot thicker than the ones the kits include.
Were you one person or two?
I was one and it took about 3-4 hours for about 850 sq ft.
Having three people would be ideal.
One person could just mix and pour.
Person two could just squeegee.
Person three could back roll.
Then person one could come back and flake it.


csp
Well-known member
Two people. My wife mixed the batches, did the pour/squeegee/cut in and I backrolled and threw the flakes. We weren't rushed at all.
This was yesterday afternoon, about 29 hours after the install. No plans for clear coat on ours. Glad to have this part done as moving forward on other plans was being held up by the floor being complete.
This was yesterday afternoon, about 29 hours after the install. No plans for clear coat on ours. Glad to have this part done as moving forward on other plans was being held up by the floor being complete.
Attachments
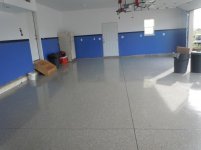
Two people. My wife mixed the batches, did the pour/squeegee/cut in and I backrolled and threw the flakes. We weren't rushed at all.
This was yesterday afternoon, about 29 hours after the install. No plans for clear coat on ours. Glad to have this part done as moving forward on other plans was being held up by the floor being complete.
Nice job. (You could use black or blue outlet covers).
ssathre
Well-known member
floor looks good! thanks for the tips.
Last edited:
xrdad
Well-known member
Excellent job and thanks for the advice!!!