To avoid these ads, REGISTER NOW!

my Florida dream garage project

To avoid these ads, REGISTER NOW!
OP
L

LutzTD

Well-known member
Joined
Dec 31, 2011
Messages
3,673
Location
Lutz, Florida
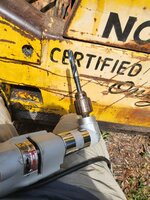
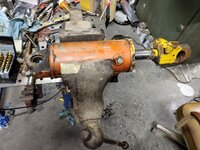
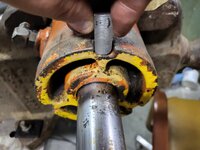
I started this morning but hit a new snag. I planned to use the hand pump I have for my HF hydraulic hole punch, but the fittings are quite a bit different. I ordered a fitting, but now I am not sure if the pump has the capacity to drive this larger ram, maybe it will be enough so I will give it a shot before spending another bunch of money for a pump. In the mean time I was able to drill and tap the pin and thread in some 1/2-13 threaded rod. If this breaks I will drill it out larger and go up a size. It should be ok to 5 tons and that is still way more than a sledge hammer. I drilled it first with a 1/4" drill since I bought a bulk pack of those for another project, then went up to the tap size. I would have liked to tap it a little more but got about 10 threads which should be enough, Last thing I want to do is break off a tap.
 

Attachments

  • 20220416_120804.jpg
    20220416_120804.jpg
    475.8 KB · Views: 114
  • 20220416_121020.jpg
    20220416_121020.jpg
    455 KB · Views: 57
  • 20220416_121814.jpg
    20220416_121814.jpg
    404.4 KB · Views: 60
OP
L

LutzTD

Well-known member
Joined
Dec 31, 2011
Messages
3,673
Location
Lutz, Florida
thanx Shorty, I bought the service manual and it is useless, no source has said which way, but now that I see the extraction method used on a similar pin it makes sense it is just a straight rod. they should have bushed it with bronze so it couldn't rust in, but I think the 3/4 rod will pull it, I will be able to get the full 30 tons. I will coat it liberally with never seize when I reinstall it.
 
OP
L

LutzTD

Well-known member
Joined
Dec 31, 2011
Messages
3,673
Location
Lutz, Florida
received a 1/2 shank tap drill for 5/8 and 3/4 as well as a grade 8 threaded rod for each. This gives me two tries, the 5/8 proof is between 27000 and 33000 lbf. so lets see how the pin does with that, if not I can drill it to 3/4. Unfortunately the 5/8 tap I had was really dull, so I have one ordered.

for drilling, my mag drill is too short, so I tried this method of using a long pipe on the 2nd handle. this worked pretty well and I got it drilled out for the 5/8 tap. being a little impatient, I tried to go ahead and go to 3/4 but the 2nd handle clamp was loose, I titghted it up and the cheap construction of the rigid handle failed, of course it did they tapped the plastic handle, no steel or brass insert. so if after I get the tap and the 5/8 fails, I will need to make a new 2nd handle grip from metal.
 

Attachments

  • 20220420_093310.jpg
    20220420_093310.jpg
    393.1 KB · Views: 48
  • 20220420_162556.jpg
    20220420_162556.jpg
    626.4 KB · Views: 56
OP
L

LutzTD

Well-known member
Joined
Dec 31, 2011
Messages
3,673
Location
Lutz, Florida
I didn't post this weekend, but I was able to drill out the pin to the 3/4 tap drill size. I forgot I had a 1/2 angle drill, that made short work of it. The drills I bought are good quality so they would take a big bite then stop the drill, but when I back it out and return it takes off the wings and keeps going, got it about 2" deep, I did have a middle size home depot drill, but it snapped off the first time it caught. unfortunately the tap I had was a fine thread and the threaded rod I bought was course. I didn't check it when I pulled it out to see what taps I had. So I went ahead and tapped it for the fine thread, should be better anyway. I got about 10 threads before the pucker factor made me stop. definitely don't want to beak off a tap. The fine thread rod will be delivered today but I am travelling so I wont be able to try it out until this weekend
 
OP
L

LutzTD

Well-known member
Joined
Dec 31, 2011
Messages
3,673
Location
Lutz, Florida
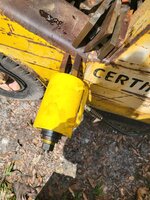
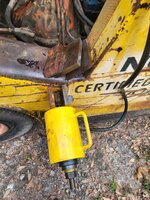
success! I got a chance to try this afternoon, the fine thread 3/4 ended up stripping, but I ordered a course tap while I was ordering the fine thread rod and nuts. I was able to tap it pretty well with the course tap, started pulling and took all the pump could give, finally popped really loud a couple times then hardly used any pressure on the pump the rest of the way out. now to see if I can get the one on the other side.
 

Attachments

  • 20220429_161148.jpg
    20220429_161148.jpg
    639.5 KB · Views: 41
  • 20220429_161152.jpg
    20220429_161152.jpg
    461.8 KB · Views: 41

jbmatth

Well-known member
Joined
Jun 3, 2013
Messages
5,692
Location
Northern Ok.
Why did you need to remove this pin again, it has been so long now I've forgotten? It is unfortunate when that happens though, problem, purchase, ship, not what was needed, purchase, ship, not what was needed, purchase, ship, problem solved...now what was I doing again?

JB
 
OP
L

LutzTD

Well-known member
Joined
Dec 31, 2011
Messages
3,673
Location
Lutz, Florida
this is to remove the pin, that holds the cylinder, that blocks the access to , the hydraulic line that broke...... 5 weeks ago
 

jbmatth

Well-known member
Joined
Jun 3, 2013
Messages
5,692
Location
Northern Ok.
And you needed the forklift to move the tree, or something else so you could install the lift you bought correct? Is this what is known as scope creep? :)

JB
 
OP
L

LutzTD

Well-known member
Joined
Dec 31, 2011
Messages
3,673
Location
Lutz, Florida
And you needed the forklift to move the tree, or something else so you could install the lift you bought correct? Is this what is known as scope creep? :)

JB
I forget now what I needed the fork lift for.... :), something to do with getting the lifts off my trailer...
 
OP
L

LutzTD

Well-known member
Joined
Dec 31, 2011
Messages
3,673
Location
Lutz, Florida
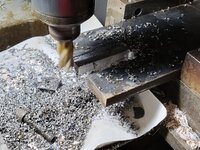
so I can at least prove that I learn from my "mistakes" maybe lets say "experience" with getting the first pin out. with all that and now the proper tooling, the second pin was removed in less than 2 hours, with some generous breaks. I could improve on that time with a mag drill that has a chuck, as mine is set up for annular drills. Anyway here are a series of pics to show my final process. here are the steps, pictures are as I went

1. center drill
2. 1/4" drill 3" deep with 1/2 drill
3. 1/2 tap drill with 1/2 drill
4. 5/8 tap drill with 1/2 angle drill
5. 3/4 tap drill with 1/2 angle drill
6. tap 3/4-11
7. add thread rod
8. mount cylinder and pressurize
9. add small spacers
10. medium spacers
11. large spacers and out
 

Attachments

  • 20220430_104013.jpg
    20220430_104013.jpg
    320 KB · Views: 28
  • 20220430_104419.jpg
    20220430_104419.jpg
    438.7 KB · Views: 20
  • 20220430_104554.jpg
    20220430_104554.jpg
    470.1 KB · Views: 21
  • 20220430_104939.jpg
    20220430_104939.jpg
    444.1 KB · Views: 21
  • 20220430_105211.jpg
    20220430_105211.jpg
    459.8 KB · Views: 21
  • 20220430_111513.jpg
    20220430_111513.jpg
    454.2 KB · Views: 23
  • 20220430_114100.jpg
    20220430_114100.jpg
    450.2 KB · Views: 24
  • 20220430_114636.jpg
    20220430_114636.jpg
    435.1 KB · Views: 25
  • 20220430_114952.jpg
    20220430_114952.jpg
    591.6 KB · Views: 24
OP
L

LutzTD

Well-known member
Joined
Dec 31, 2011
Messages
3,673
Location
Lutz, Florida
more
 

Attachments

  • 20220430_115212.jpg
    20220430_115212.jpg
    430.4 KB · Views: 24
  • 20220430_115703.jpg
    20220430_115703.jpg
    575 KB · Views: 22
  • 20220430_115832.jpg
    20220430_115832.jpg
    500 KB · Views: 22
  • 20220430_120004.jpg
    20220430_120004.jpg
    787 KB · Views: 28
  • 20220430_160841.jpg
    20220430_160841.jpg
    721.9 KB · Views: 35

shortykorte

Well-known member
Joined
Sep 1, 2014
Messages
8,039
Location
Tallahassee, Fl
I think I heard once “You learn from your mistakes not successes” guess I better stop succeeding 🤪
So was the pin rusted in place or just a tight fit? Glad you can move forward now.
 
OP
L

LutzTD

Well-known member
Joined
Dec 31, 2011
Messages
3,673
Location
Lutz, Florida
they were completely rusted in on the inboard side. I will put them in the lathe and sand them down some to get them back in, along with a liberal coating of never seize. the fronts have zerks so they did not rust and came out with very little force.
 
OP
L

LutzTD

Well-known member
Joined
Dec 31, 2011
Messages
3,673
Location
Lutz, Florida
got a quote back for rebuilding the two cylinders with shafts and new lines, only $1500! I only paid $900 for the whole machine. So it looks like I am going to just rebuild these myself. I went to the local hydraulics guy and they are building the 4 lines. They only had enough fittings for 3, so I will get those next Monday. I also found the rebuild seal kits online. they may also have shafts, but if I cant get shafts I think I will just clean up the old ones best I can, its not a production machine by any stretch. the chrome is gone on one side, but they seem smooth enough to work for a while. In the end it wont be hard to replace them later if they don't work, the pins will be easy to get out next time. I think its worth a shot to try them.
 
To avoid these ads, REGISTER NOW!
OP
L

LutzTD

Well-known member
Joined
Dec 31, 2011
Messages
3,673
Location
Lutz, Florida
rebuild kits arrived today, I didn't get the adjustable pin wrench though. I will see if my big pipe wrench fits. I would like to get a rod out to see if i can figure out if one of the shafts listed on ebay is correct. wont get the lines until monday or tuesday so i wont be gettng it all back together this weekend, but looking good for next weekend.
 
OP
L

LutzTD

Well-known member
Joined
Dec 31, 2011
Messages
3,673
Location
Lutz, Florida
yep these home owned heavy equipment problems are fun for ALL :) I did get the wrench today in the afternoon mail, so I can try the right tool to get the cylinder caps off. probably tomorrow unless the wife decides to go out for mothers day.
 

Attachments

  • 20220507_215326.jpg
    20220507_215326.jpg
    323.8 KB · Views: 24
OP
L

LutzTD

Well-known member
Joined
Dec 31, 2011
Messages
3,673
Location
Lutz, Florida
new lines were finished and picked up today, haven't got the cap off of the first cylinder but I have some ideas
 

Attachments

  • 20220510_123253.jpg
    20220510_123253.jpg
    363.2 KB · Views: 27
OP
L

LutzTD

Well-known member
Joined
Dec 31, 2011
Messages
3,673
Location
Lutz, Florida
my "too big" vise seems to be adequate for the holding, but the wrench is not enough so far without heat. I think I am going to turn the vise 90 degrees and I will need to get out the torch or make a better wrench, but this cap is coming off!
 

Attachments

  • 20220510_182010.jpg
    20220510_182010.jpg
    341.7 KB · Views: 32
OP
L

LutzTD

Well-known member
Joined
Dec 31, 2011
Messages
3,673
Location
Lutz, Florida
I finally found some shafts, retail on these is $500ea, the guy said he would sell them for $325ea. I guess $850 for 2 rebuilt cylinders with new shafts was not so out of line.... anyway, these are going together with "smoothed as best I can shafts" then the rebuild is $54 ea. that is IF I can get the caps off.
 
OP
L

LutzTD

Well-known member
Joined
Dec 31, 2011
Messages
3,673
Location
Lutz, Florida
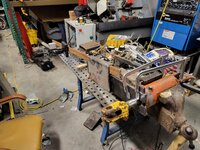
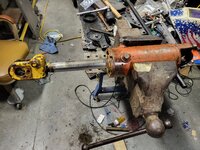
so this weekend was dedicated to getting this cylinder cap off. I tried flame, no go. So the last plan was to make a sturdy wrench for the cap. I found a 5 inch wide 1/2 inch thick plate and cut a slot to for around the shaft, then I made three keys to fit into the cap notches. i welded these on, and then added a small piece to reinforce the the key close to the edge on the top. Still couldn't get it to move with braces added to reinforce the forces under the vise as well as a wrecker bar to keep it from turning. So I added clamps to keep it in place and found a rectangle tube that fit with another long bar. finally got it to turn, I think this took around 800-1000ftlbs to move with me leaning on a 7 foot long bar. with it off I cleaned everything up inside, but the cylinder piston has a lock and I am unfamiliar with this design. I tapped it with a hammer and screw driver but it didnt move so I am not sure how to remove it. Hopefully someone out these has seen this and can clue me in.
 

Attachments

  • 20220514_105510.jpg
    20220514_105510.jpg
    480.5 KB · Views: 20
  • 20220514_114012.jpg
    20220514_114012.jpg
    510.2 KB · Views: 20
  • 20220514_155232.jpg
    20220514_155232.jpg
    310.4 KB · Views: 19
  • 20220514_163541.jpg
    20220514_163541.jpg
    418 KB · Views: 19
  • 20220514_164538.jpg
    20220514_164538.jpg
    369.3 KB · Views: 18
  • 20220514_165051.jpg
    20220514_165051.jpg
    316.3 KB · Views: 19
  • 20220514_165512.jpg
    20220514_165512.jpg
    381.7 KB · Views: 19
  • 20220515_124008.jpg
    20220515_124008.jpg
    326.6 KB · Views: 20
  • 20220515_131741.jpg
    20220515_131741.jpg
    349.7 KB · Views: 22
  • 20220515_132852.jpg
    20220515_132852.jpg
    389.8 KB · Views: 22
OP
L

LutzTD

Well-known member
Joined
Dec 31, 2011
Messages
3,673
Location
Lutz, Florida
couple images didn't load, here is a second try, note the rusty 6ft bar, I was putting my considerable weight on the end of that before the cap popped and turned.
 

Attachments

  • 20220514_164937.jpg
    20220514_164937.jpg
    260.5 KB · Views: 23
  • 20220515_131501.jpg
    20220515_131501.jpg
    461.4 KB · Views: 26
Last edited:
OP
L

LutzTD

Well-known member
Joined
Dec 31, 2011
Messages
3,673
Location
Lutz, Florida
looks like maybe its just a nut with slots in it and not a separate locking part. I will try to just turn it off first.
 

Attachments

  • locknut.JPG
    locknut.JPG
    57.5 KB · Views: 33

Lotusnut

Well-known member
Joined
Aug 23, 2012
Messages
114
Location
Cambridge Ontario, Canada
looks like maybe its just a nut with slots in it and not a separate locking part. I will try to just turn it off first.
That is just a high temp mechanical lock nut. The top of the nut is swagged down after the slots are cut to cause an interference or squeezing of the shaft as the nut is installed to lock it from coming undone. It should just undo like any nut with a slight drag torque due to the locking feature. Just undo it nothing special.
 
OP
L

LutzTD

Well-known member
Joined
Dec 31, 2011
Messages
3,673
Location
Lutz, Florida
Wow, this is turning into quite the project.
yes, I am happy to say this hobby is teaching me loads of patience
May just be the understatement of the year.........scope creep like a rocket.... but new tools for the win.
always happens, its all about infrastructure.........


and the good news is that the socket showed up today and i was able to get the pistons off no problem. I got the first one rebuilt and went and had dinner.
 

Attachments

  • 20220518_154606.jpg
    20220518_154606.jpg
    419 KB · Views: 14
  • 20220518_155134.jpg
    20220518_155134.jpg
    423.1 KB · Views: 13
  • 20220518_162152.jpg
    20220518_162152.jpg
    474.7 KB · Views: 16
OP
L

LutzTD

Well-known member
Joined
Dec 31, 2011
Messages
3,673
Location
Lutz, Florida
its been a long row to hoe, but here's the second one which took about an hour and a half with all of my new tools and "expertise". sadly I dropped the piston and chipped one of the seal ridges. It is on the "push" side so I decided I don't care if it leaks a little since the tilt operation is only really weighted on the pull side. Pisses me off though, don't drop these pistons!
 

Attachments

  • 20220518_183231.jpg
    20220518_183231.jpg
    395 KB · Views: 13
  • 20220518_183526.jpg
    20220518_183526.jpg
    421.2 KB · Views: 14
  • 20220518_192500.jpg
    20220518_192500.jpg
    357.8 KB · Views: 23

Chrisb62

Well-known member
Joined
Jul 30, 2019
Messages
1,093
Location
southwest fl
its been a long row to hoe, but here's the second one which took about an hour and a half with all of my new tools and "expertise". sadly I dropped the piston and chipped one of the seal ridges. It is on the "push" side so I decided I don't care if it leaks a little since the tilt operation is only really weighted on the pull side. Pisses me off though, don't drop these pistons!
And this proves with proper tools and knowledge everything is easy.. :spit:
Joking aside...... great to hear its been figured out and now your ready for reassembly .
 
OP
L

LutzTD

Well-known member
Joined
Dec 31, 2011
Messages
3,673
Location
Lutz, Florida
thanx, yes I did have much less problem with the second one. the shafts are pretty bad, so it may end up leaking as before, but this was extra anyway as the main problem was the inaccessible hydraulic broken line which was terminal, the rebuild was a "while I'm there" endeavor but if they leak the forklift is still marginally functional.
 
OP
L

LutzTD

Well-known member
Joined
Dec 31, 2011
Messages
3,673
Location
Lutz, Florida
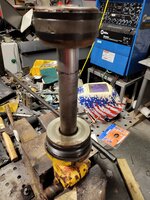
I think this is the last tool I will have to purchase for the tilt cylinder and tilt hydraulic lines. I would like to clean out the rusty pin holes so that the pin slides easy enough to need a retainer to keep it from working out on its own. i believe this is the design intent. I also got 5gals of AW46 hydraulic fluid at Advance, with online discount was way cheaper than at the hydraulics vendor.
 

Attachments

  • 20220519_213548.jpg
    20220519_213548.jpg
    411 KB · Views: 14
To avoid these ads, REGISTER NOW!
Top Bottom