To avoid these ads, REGISTER NOW!

My latest Stanley Bailey #4 restoration

MissileBear

Well-known member
Joined
Oct 3, 2016
Messages
339
Location
Western NY
I finished this plane yesterday afternoon for my recently engaged brother- it's a Stanley Bailey #4 Type 11. I found it in a box of old rusted tools at a flea market in pretty sad shape. After some haggling I got the box of junk with the plane and a couple of hammers for $50.

I put just shy of 40 hours into this one. All parts are original to the timeframe except the cutting iron; I salvaged a laminated post SW era cutting iron from a #5. The base & frog were re-japanned (yup, no paint here :rocker:) and the rosewood was refinished with a few coats of Shellac (mixed from flake, not a can). I don't use any power tools when refinishing these...it's all done with an assortment of files, sand paper, diamond stones, and other hand tools. I never remove more metal than needed, and any damaged parts are replaced with other originals. I also don't restore anything that doesn't need it. In the case of this plane, there wasn't a clean, unrusted part on the plane, so every part had to be cleaned and refinished. Since I was doing a lot of work anyways, I took the time to file/sand out most of the milling marks and areas of rough casting. It was a very time consuming ordeal but the end result was impressive.

Sorry for the poor pics...I'm not much of a photographer.
 

Attachments

  • stabley4.jpg
    stabley4.jpg
    32.1 KB · Views: 302
  • stanley4post.jpg
    stanley4post.jpg
    28.2 KB · Views: 383
Last edited:
To avoid these ads, REGISTER NOW!

LXCam

ALLIANCE MEMBER
Joined
Apr 23, 2013
Messages
19,124
Location
AZ
Wow that a very impressive restoration, she's gorgeous.
 

Farmer J.

Well-known member
Joined
Sep 18, 2016
Messages
1,995
Location
UK, Cornwall/Hertfordshire.
Your lack of photography skills can be forgiven considering the quality of work you did on this plane. Fantastic job!

Brian
I second that.

It looks a lovely restoration MissileBear. I have a Stanley No. 4 just like it, which I bought new many years ago.
Showed your restoration pics to my partner, sadly her grandfathers collection of planes were sold by relatives after he died... Seeing yours has brought joy, across the world!
 

Cope

Well-known member
Joined
Mar 8, 2013
Messages
2,067
Location
Houston, TX
You did a great job. Type 11 is early 1900s, correct? I have a 30s vintage #3C and 5C, and a 1950 vintage #4C.
 

SweetD

Well-known member
Joined
Feb 8, 2010
Messages
3,265
Location
Rhode Island
Beautiful - vintage wood planes come out so nicely when restored. They are such works of industrial art in many cases. Nice job!

:beer:

Dave
 

jimreed2160

Well-known member
Joined
Aug 7, 2016
Messages
3,589
Location
Tallahassee FL
Bear--Great job on the plane. I have done many and appreciate the amount of work you had to do to get it to that condition. Most collector/users think the type 11 planes are the best. I have to agree. Planes from 1910-1939 seem to have the highest quality. And kudos for using a laminated blade. Those were some of Stanley's best offerings. Most of their bench plane blades were made for carpenters. They are thin and soft so they can be sharpened easily on a job site. Cabinetmakers in a workshop really need something better. I made my own--they are 3/32 instead of 1/16. And they are hardened to RC 58-60. Most Stanley plane blades are probably RC 54-56.

Please take time to go over to the General Tools section and check out the Woodworking 101 thread. I post lots of projects there using handplanes. Welcome to GJ.
 

cajunfirehawk

Well-known member
Joined
Nov 29, 2011
Messages
2,566
Location
Ms Gulf Coast
Thats some awesome work, I have a #36 that needs some tlc, its on the list for restoration, one day...
 

Attachments

  • 20161218_183204.jpg
    20161218_183204.jpg
    147.4 KB · Views: 57

crackit

Well-known member
Joined
Feb 24, 2016
Messages
112
Location
North of Java
Wow, that's a really great looking restoration! I, too, would like to hear more about how you did the japanning.
 

jimreed2160

Well-known member
Joined
Aug 7, 2016
Messages
3,589
Location
Tallahassee FL
Cajun--When you get around to fixing up your transitional plane you will not be disappointed. They may be ugly but transitional planes are excellent users. Good luck making shavings with yours.
 
OP
M

MissileBear

Well-known member
Joined
Oct 3, 2016
Messages
339
Location
Western NY
Thanks for all the nice words - I'll try to address all the questions asked:

farmerj - I'm happy that this plane brought joy to somebody else - my brother loved it. My father was so impressed, I took his #5 Type 13 for a restore next.

paulm12 - Wish my Shellac healed Rosewood....I have a bag of about 25 broken totes and a near equal amount of split knobs.

cope - The Type 11 was made during 1910-1918. That said, Stanley used up whatever parts they still had available, so sometimes you see parts that bleed into other types. I have a #5 1/2 and a #7 that are both early Type 9s - they both have type 8 parts and frog/receiver of the old style, yet these are assuredly produced in the Type 9 years. This was the case for WWII as well....planes came out of production with whatever would fit it seems.

Tombell - Nickel plated cam levers didn't show up until about 1925. oddly enough....you did see some nickle plating done on frog surfaces much earlier. I think I have a Type 8 that has a nickle plated frog mating surface.

Jimreed - The type 11s are definitely the most sought after, but honestly I've found that the slightly later types seem to have thicker, cleaner castings. My own planes are pre-type 11 (just because I found some really gorgeous examples over the years) but that frog adjustment screw is such a nice feature. I will take a look at the woodworking 101 thread...not that I need any more projects :lol:

Cajun - My list of planes to restore is now about 12 deep. I really, really understand, but like Jim said, you won't be disappointed with the work in the end.

Crackit, Roberts, & Zeke - I literally wrote a short book for my brother as part of the restoration project. I will give you guys the cliffs notes here.

I start by disassembling the planes, scrubbing down all parts with brillo pads and stiff brushes. I look for cracks & damage. I also inspect all the threads....that cast iron is soft and I do come across bad threads from time to time. Any questionable/damaged parts are tossed and replaced with good parts from my bucket. I've amassed a large collection of parts over the years from many different planes/types. I make sure to keep the correct type parts labeled so I'm not mixing the wrong types.

The frog and bed go into the electrolysis vat while the other parts go into the Evaporust vat. Everything is then lightly cleaned and inspected again after soaking for 4 hours to 48 hours. I often find bad stuff after things have been cleaned. Sometimes the originally japanning has to be hit with paint stripper. It can be really stubborn.

The cutting iron is lapped on diamond plates (or sandpaper on plate glass if really bad) and then sharpened to 30* using a MKII jig. I have progressive diamond plates and usually finish at 1200. The mating surfaces on the chip breaker and lever cap are also checked and lapped as needed.

Screws and other hardware are cleaned and polished. If there is bad mushrooming on anything, I replace it.

The rosewood tote & knob are hand sanded to 220, wiped with Acetone, and then Shellac'd a few times. I finish the pieces with hand rubbed wax. The feel this imparts is great - it's smooth but gives a nice grip.

I use what I see referred to as the "Cold Mix" recipe for japanning as I do not initially heat the ingredients. Powdered Asphaltum is mixed with REAL Turpentine (not the BORG Gum Spirits garbage) and Linseed Oil. Turpentine acts as the solvent for the Asphaltum and the oil is the plasticizer. I let this mixture sit for about 5 days until it forms a thick, greasy paint like mixture. The bed and frog get 4 really thin coats, letting each coat dry for about 24 hours. After the fourth coat I do a sequential baking, starting at 250 and working my way up to 450 over the course of about 2 hours. When the pieces come out, the exposed metal has been slightly oxidized and has a light brown color. The japanning also has a tendency to run a bit so I then spend several hours cleaning up the japanning that has run/bleed onto non japanned areas.

The hardest part of the whole japanning process is the application. it's hard to work with and readily dissolves the previous coat(s) if you make too many brush strokes over the same area. A good hair brush is key; I use a soft boar brush and the $20 was well worth the reduced frustration. The coats need to be really thin....when this stuff gets too thick it bubbles and does not cook correctly.

After the base has been japanned I use the diamond stones (or again sandpaper on plate glass) and lightly lap the sole and sides of the bed. This can be really time consuming, but I also don't kill myself getting this part perfect. Paul Sellers discusses the flatness of the sole and especially on the larger planes; it's not a huge deal if there is some irregularity. I use a couple of squares to check my work as I go along and pay a lot of attention to how much metal I remove. Post assembly I will check the bed again as it can change slightly after everything is tightened. I rarely see much difference.

I do a final cleanup of the cast iron parts, and buff the exposed metal. The bed, frog, and hardware gets a light oiling. The iron, chip breaker, and lever cap are waxed to prevent sawdust from sticking to these parts.

If anyone has any questions about the japanning, please ask. The learning curve was interesting/frustrating, but the end result is just so nice.

***I'd also like to point out here that nowhere do I mention "dremel", "bench grinder" or "wire wheel" anywhere. Those tools have no place in this restoration process, IMO.
 
Last edited:

Cope

Well-known member
Joined
Mar 8, 2013
Messages
2,067
Location
Houston, TX
Thanks for all the nice words - I'll try to address all the questions asked:


cope - The Type 11 was made during 1910-1918. That said, Stanley used up whatever parts they still had available, so sometimes you see parts that bleed into other types. I have a #5 1/2 and a #7 that are both early Type 9s - they both have type 8 parts and frog/receiver of the old style, yet these are assuredly produced in the Type 9 years. This was the case for WWII as well....planes came out of production with whatever would fit it seems.

MissleBear, I think they did things like that all along. I know Chrysler does.
 
To avoid these ads, REGISTER NOW!

dirt_dobber

Well-known member
Joined
Jul 9, 2016
Messages
327
Location
Bee Cave, TX
***I'd also like to point out here that nowhere do I mention "dremel", "bench grinder" or "wire wheel" anywhere. Those tools have no place in this restoration process, IMO.
very much agree - as I have sadly taken all 3 of these shortcuts in the past and regretted it...
 

TMcCay

Well-known member
Joined
Jun 5, 2011
Messages
1,057
Location
SW. Oklahoma
Very nice write up MB. I have some older planes that I have been wanting to restore but since they are on the lower of the priority list I have been putting off. I will be saving your technique to try in the future.
And awesome job on the plane!
 
OP
M

MissileBear

Well-known member
Joined
Oct 3, 2016
Messages
339
Location
Western NY
wow, very thorough! Glad to see folks bringing these back to life

There are a lot of guys that are restoring these now - fleabay has a few sellers that sell the "Restored" (dunno why they put "restored" in quotes) planes. Nowhere do you ever see pictures of the initial plane or the process. A plane can look great in pictures but have a lot of secrets. Too often do you see substantial metal removed to wipe away the damage of the past.

I've purchased planes in the past with hairline cracks, damaged threads, JB repairs, shoddy attempts at repairing rosewood handles (or hardwood made to look like Rosewood), and planes that had so much metal removed the bed would flex, not to mention the extremely common Frankenplanes. Nearly all of these planes had been cleaned up/restored, and all the sellers claimed they knew nothing of the issues I encountered :/

I wanted to do better.
 

DadsTools

Well-known member
Joined
Jul 27, 2017
Messages
1,852
Very nice job!!!

I buy and sell old hand planes when I can find them in half-decent shape. All I ever do with them is clean them up just enough so someone can see what's really there, and free any stuck parts that prevent the plane from being disassembled for the components to be displayed. I never try to dress them up or fix anything, leaving that up to the buyer. Besides, the kind of work you need to put into these to restore them properly is a labor of love that, with the exception of a few rare and highly treasured gems, is far in excess of what you might recoup financially from the time and effort. More like a work of art to me.

It's kind of fun at times to think about what a plane will finally look like once the new owner gets started on it. I imagine some are simply cleaned up and trued enough just to use them effectively. I understand they DO make them like they used to, but only for big big bucks. For the rest, a properly tuned older plane will outperform the newer stuff. I've read where many feel the US-made planes started taking a nosedive during WWII and thereafter.

Anyway, that's my two-cents on it. I have a great admiration and respect for this kind of restoration work.
 

crguy

Well-known member
Joined
Jan 24, 2016
Messages
2,654
Location
SW Washington
Tombell - Nickel plated cam levers didn't show up until about 1925. oddly enough....you did see some nickle plating done on frog surfaces much earlier. I think I have a Type 8 that has a nickle plated frog mating surface.
.

Please post pics of the nickel plated frog surface. I've seen hundreds of planes, and seem to have missed that feature.
 

M_George

Well-known member
Joined
Sep 25, 2016
Messages
966
Location
Eastern Pa.
I have over 30 old Baily planes that I've been tossing whether to restore all the way, or leave them as is keeping the age old patina. I have a couple though the old finish is completely gone that I would like to restore all the way. Where did you get the Powdered Asphaltum? Also, any attempt I have made to refinish the rosewood totes has caused them to turn so dark the you can no longer see the grain. How have you been able to avoid this?
 

Sawdustmaker

Well-known member
Joined
Jan 15, 2017
Messages
928
Location
Placentia, Orange Co., California
Beautiful restoration. My planes are in my avatar. Belonged to my father. I'm pretty sure he had them before I was born (I'm 71) or at least from the late 40's early 50's. You have inspired me to do restorations. The one second from the left is a rabbet plane. Also attaching a better pic. Thanks for posting.
 

Attachments

  • IMG_1559.jpg
    IMG_1559.jpg
    139.4 KB · Views: 26
Last edited:

jimreed2160

Well-known member
Joined
Aug 7, 2016
Messages
3,589
Location
Tallahassee FL
Sawdust--Nice fleet and you cannot beat the history. High knobs were introduced in 1919, so yours all date from that time. I think the knob boss ring came in around 1942. So your planes are all probably from the 1920s or 1930s. That was the time that Stanley was making some of their highest quality planes.
 

DieselNut88

Well-known member
Joined
Dec 14, 2016
Messages
453
Location
Northern,IL
Does anyone know where I could get the stud and nut that holds the front knob on? I just restored one and they are missing.
 

hsvtoolfool

Well-known member
Joined
Jul 29, 2015
Messages
185
Location
Rocket City USA
You have inspired me to do restorations. The one second from the left is a rabbet plane.

To my eye, all those planes look perfect and ready to use.

No offense intended, but please don't "restore" that bench
rabbet if it's a Stanley #10 or #10 1/2 in good condition. The
rest of your planes are very nice, but they're common and I
think nobody will cry if they get an Extreme Makeover. But
solid, pre-1930s bench rabbets in original conditions are
rather sought after by collectors. A careful cleaning is never
a bad thing, but please don't strip it and repaint. Stripping
and painting old planes that aren't rusty and busted is like
throwing your best cornbread skillet in a dishwasher.

While not rare, bench rabbet planes were easily damaged in
that side "bridge" area over the cutter. Just one drop and they
were done for. I've seen many bad repairs in that area and
very few good ones. So you just don't good ones laying around
everywhere in flea markets like the other planes you have.
 

Sawdustmaker

Well-known member
Joined
Jan 15, 2017
Messages
928
Location
Placentia, Orange Co., California
Sawdust--Nice fleet and you cannot beat the history. High knobs were introduced in 1919, so yours all date from that time. I think the knob boss ring came in around 1942. So your planes are all probably from the 1920s or 1930s. That was the time that Stanley was making some of their highest quality planes.

Thank you. My mom told me that my dad would scour the pawn shops in the downtown Los Angeles area and pick up tools. He might have gotten one or two from my grandfather (mom's dad).
 

Sawdustmaker

Well-known member
Joined
Jan 15, 2017
Messages
928
Location
Placentia, Orange Co., California
To my eye, all those planes look perfect and ready to use.

No offense intended, but please don't "restore" that bench
rabbet if it's a Stanley #10 or #10 1/2 in good condition. The
rest of your planes are very nice, but they're common and I
think nobody will cry if they get an Extreme Makeover. But
solid, pre-1930s bench rabbets in original conditions are
rather sought after by collectors. A careful cleaning is never
a bad thing, but please don't strip it and repaint. Stripping
and painting old planes that aren't rusty and busted is like
throwing your best cornbread skillet in a dishwasher.

While not rare, bench rabbet planes were easily damaged in
that side "bridge" area over the cutter. Just one drop and they
were done for. I've seen many bad repairs in that area and
very few good ones. So you just don't good ones laying around
everywhere in flea markets like the other planes you have.

Thank you :bowdown: 
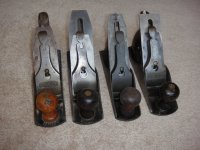
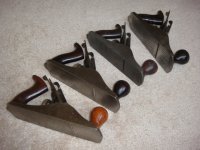
for the information and the tip concerning the rabbet plane, which is a Stanley #10 (13" long). You are correct, they are all usable and I do keep them sharp. After seeing restorations from start to finish I always was wondering whether to mess with anything other than a cleaning, which is what I am going to do. My dad never really said much about them except care and sharpening. He would give me h377 for the way they are sitting in the photo, but that was brief and for the photo only. All are kept in a clean drawer on their side. I also have his Stanley #39, 3/8", rabbet palne. The big boy in the photo is a Bailey #7, the bench plane is a Bailey #3. Front knob on the #3 has a couple of small chips in the base.

What is the best way to clean and polish the metal surfaces, short of e-vapo-rust, etc. I'm thinking a good quality cleaner and a scotch brite pad:headscrat. Fine steel wool to polish:headscrat
 

hsvtoolfool

Well-known member
Joined
Jul 29, 2015
Messages
185
Location
Rocket City USA
For cleaning, I use an old cotton t-shirt and mineral spirits, some
Gibbs penetrating oil where needed, and fine steel wool only on
rusty bare metal where needed. I never try to achieve bright,
shiny metal. Just scrub enough to remove the rust and grime.
Leave that 100-year patina. Preserve the original Japanning
and the hand-rubbed finish on the tote and knob.

Since I don't see much rust on your planes, I'd probably just
use a cotton cloth and stay away from the steel wool.

I'll let someone else comment on "polish" since I think that's a
very bad thing when it comes to antiques. They're only original
once. If the plane is a total dog and/or not collectible, then yeah,
go nuts and have fun with the buffing wheels and spray paint.
It can be done well (like the OP) or badly like a old man in my
town who ruins every plane he touches with a sandblaster,
a wire wheel, and sloppy, brushed Rustoleum. If you ever
wondered if highlighting the numbers cast into the body with
white paint might look good...um, it really doesn't.

At the other extreme, planes can be turned into real Folk Art.
I've seen a Stanley #5 where the sides were "engine turned",
the paint looked like liquid ink, and the cocobolo tote and knob
belonged on a fine guitar. Someday, I hope to try my hand at
metal engraving on some of my planes in the style of classic
firearms. I've seen engraved planes that are out of this world
gorgeous.
 

exmaxima1

Well-known member
Joined
Jun 25, 2011
Messages
6,341
Location
Midwest
I inherited a chest of old tools about 50 years, and still have many of them especially the planes. Many of the planes are non-Stanley (Revonoc, Miller Falls, some unmarked), but I grabbed a few of the Baileys and took some quick pics.

Left to right:
No. 4 Type 13
No. 4 Type 13
No. 3 Type 13
No. 4C Type 15 (my favorite w/Hock blade)

They aren't real purdy, but they work fine as is.
 

Attachments

  • DSC03936.JPG
    DSC03936.JPG
    141.2 KB · Views: 10
  • DSC03937.JPG
    DSC03937.JPG
    141.2 KB · Views: 10

Sawdustmaker

Well-known member
Joined
Jan 15, 2017
Messages
928
Location
Placentia, Orange Co., California
I inherited a chest of old tools about 50 years, and still have many of them especially the planes. Many of the planes are non-Stanley (Revonoc, Miller Falls, some unmarked), but I grabbed a few of the Baileys and took some quick pics.

Left to right:
No. 4 Type 13
No. 4 Type 13
No. 3 Type 13
No. 4C Type 15 (my favorite w/Hock blade)

They aren't real purdy, but they work fine as is.

Nice line up. I especially like the one on the far left (first one in line). Kind of like mine, not too pretty, but kept sharp and work well.:thumbup:
 
To avoid these ads, REGISTER NOW!
Top Bottom