To avoid these ads, REGISTER NOW!

My paver walkway project

The Lazy Destroyer

Well-known member
Joined
Jun 1, 2011
Messages
181
Location
Woodstock GA
So I've always hated using the side door to my detached outbuilding/workshop, it's just a random door that you have to walk through dirt and grass to get to. So I did a whole bunch of research and started my walkway project over the new years weekend. I didn't get crazy w/ it but I am totally new to this sort of thing so it was quite an experience.

Figured I would share some pics!

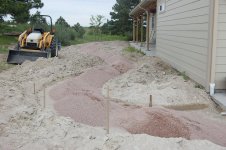
This is what I had to start with:

DSC01939-L.jpg


The area by the door and along the wall gets pretty soggy as the backyard slopes into the outbuilding. So along with a walkway I'll put in a french drain to help get some of the water out of the area and back to the undeveloped part of my backyard.

Day 2, managed to get the trench dug. I ended up about an inch deeper than I wanted, guess I got carried away with the shovel
:lol_hitti

DSC02682-L.jpg


DSC02685-L.jpg


Heidi was inspecting my work, however I think she was glad she didn't have any opposable thumbs so she didn't have to help

DSC02690-L.jpg


Also got the material delivered, no turning back now. One yard each of base material, sand, and rocks for the drain.

DSC02687-L.jpg


End of day two, put down some weed blocking sheets and some stakes. The stakes are marked about 2" and 2.5" so I have an idea how deep my base layer ends up. Also verified a little slope to make sure water gets carried away from the building and towards where the french drain will be.

DSC02696-L.jpg


Day 3 I didn't do much. I was tired so other than getting the pavers I was going to take a day off. Didn't realize my paver supplier was closed on Saturdays (oops) so I ended up just getting something at Home Depot instead. Yes, I broke the rule about not starting without having all your materials first, but everything worked out.

DSC02706-L.jpg


I had to rent the truck at Home Depot so I could get the pallet home. Obviously I didn't have a forklift so all 288 stones had to be unloaded by hand. :( How bad could it be I thought :dunno:

Pretty bad :lol_hitti but managed to get them all unloaded... eventually.

Also got material for the drain:

DSC02707-L.jpg
 
To avoid these ads, REGISTER NOW!

luvit

Well-known member
Joined
Jul 11, 2011
Messages
1,580
.
looking good.
you be sure to share what mistakes you made prior to correcting them, yes?
i need to learn from your mistakes, too ..lol.
.
 
OP
T

The Lazy Destroyer

Well-known member
Joined
Jun 1, 2011
Messages
181
Location
Woodstock GA
Next day I added the base material. Ended up using all of it but the thickness was good enough. I didn't rent a plate compactor so I tamped it all by hand, took forever and wore me out!

DSC02708-L.jpg


Forgot to mention the walkway is 3' wide by about 40+ ft long. Some of the pictures are a little deceiving.

Finally got to the fun part, started laying pavers down. Used some 1.25" OD PVC tube to screed the sand and started laying them down:

DSC02712-L.jpg


DSC02713-L.jpg


Took a break and also called my dad as I had to ask him some questions. Had to set up some lights so I could just work all night:

DSC02715-L.jpg


More progress:

DSC02719-L.jpg


The next day I started the real fun, I cut the end-pavers to length, I actually enjoyed this part more than everything else. My dad had mentioned he messed up one of his angle grinders cutting concrete once so I got a $10 Harbor Freight angle grinder and some masonry cutting disks, worked great!

Pounded them down by hand w/ a rubber mallet and spread some sand, done!

DSC02721-L.jpg


DSC02722-L.jpg


I still have to do the french drain but I strained a wrist muscle so I decided to do that another weekend, probably this coming weekend since I'll be in town.

I've already used the walkway a few times and it is such a nice improvement than walking thru the dirt!
 
OP
T

The Lazy Destroyer

Well-known member
Joined
Jun 1, 2011
Messages
181
Location
Woodstock GA
.
looking good.
you be sure to share what mistakes you made prior to correcting them, yes?
i need to learn from your mistakes, too ..lol.
.

So far, my mistakes:

Know exactly what you are going to do before starting! My walkway is a little lower than I estimated because I ended up having to go w/ Home Depot pavers, which were about an inch shorter than the other nicer ones I saw. Add to that when I accidentally dug the trench a little too deep. But it's not bad and I think I can compensate for it with extra material on top of the french drain. I broke the main rule: Dont start until you have all of your materials. Or if not... at least know when your paver supplier is going to be open and doing deliveries :lol_hitti

After all was said and done, it probably would have been easier to find a truck to borrow so I could rent a plate compactor. Only issue was I kinda needed it twice, after adding the base material and then after the pavers were done... so the rental may have gotten expensive.

If your wrist starts hurting, don't try and keep working thru it because my wrist was hurting for over a week. I think I just over-used it or used muscles I don't normally use. It feels ok now but was a bit swollen and bruised for a few days.

Verify rented truck load weight capacity. We set the over-weight alarm on the rented Home Depot truck while they were loading it. It ended up just being the guy who was helping load it that tipped it over the scale, but made me nervous the whole way home!

Also, we wrapped the heck out of the pallet of pavers and it still tipped over in the truck bed during the ride home (I was very careful while driving). No pavers ended up breaking but if I were to do it over again, if the stack of pavers is kinda wabbly... make them split it up onto two pallets so it's not too tall.

The actual process of paving went pretty straight-forward. I used a lot of helpful videos on YouTube (including the Lowes videos) and didn't have many surprises.

Also, make sure your trench is wide enough for the pavers plus the 3" or so of paver edging that you buy. Mine was a little tight but I made it work. I would probably add 5 inches to each side you need to use paver edging on, and just backfill any extra area you don't use.
 

larry_g

Well-known member
Joined
Apr 28, 2007
Messages
16,877
Location
oregon
I like it. You came up with a good looking walk way there. The only thing I would change is to move it a foot or two away from the building. I had a sidewalk that was close to the house and found that I was constantly bumping or rubbing the house when moving things down the walk.

lg
no neat sig line
 

JimVonBaden

Well-known member
Joined
Dec 2, 2011
Messages
15,716
Location
Northern Virginia
Great information and tips. I have a similar project coming up!

GarageDriveway05.jpg


The contractor neglected to pour a sidewalk to the man-door, and I wanted to do a paver patio in any case.

Jim :cool:
 
OP
T

The Lazy Destroyer

Well-known member
Joined
Jun 1, 2011
Messages
181
Location
Woodstock GA
I like it. You came up with a good looking walk way there. The only thing I would change is to move it a foot or two away from the building. I had a sidewalk that was close to the house and found that I was constantly bumping or rubbing the house when moving things down the walk.

lg
no neat sig line

I think that is what I would have preferred, to either do a wider walkway or have a ft or two away from the wall. Unfortunately there were two things going against me for doing it any wider:

-There is a old tree stump about 5 ft away from the wall (you can see it in some pictures) and I wanted to have a little clearance away from that. It is pretty old so probably easy to remove completely, but wasn't sure if it would have affected the walkway as it decomposed further

-The yard starts to incline about 3 ft away from the wall near the front of the building, and pretty steeply, so if the walkway was much wider I maybe had to do some type of retaining wall. This probably wouldn't have been too hard to do but I had to limit the amount of "learning" needed for a job like this, didn't want too many variables for me to screw up :lol:

I definitely wouldn't go any more narrow, as about 3 ft seems to be comfortable but certainly wouldn't want it any tighter.
 
Last edited:

Herb

Well-known member
Joined
Apr 15, 2006
Messages
739
Location
CT
"The area by the door and along the wall gets pretty soggy as the backyard slopes into the outbuilding. So along with a walkway I'll put in a french drain to help get some of the water out of the area and back to the undeveloped part of my backyard."

Ok, you have the right idea about why that area gets wet (runoff) but I think if you regrade the side hill so that the water comes down and then flows to the back of your property you won't need to install a french drain. You need to get the water away from your side walk, and it might work out better if you don't rely on a drain to absorb the water. Maybe make a small swale so that the walkway ends up being at the high point- and that would only have to be a couple of inches higher than the swale.
 

jasonreck71

Well-known member
Joined
Dec 30, 2011
Messages
129
Location
Newnan,GA
Nice work...Hoping to do a paver walk way this year, so thanks for the list of "mistakes", hopefully I can learn from them
 

JimVonBaden

Well-known member
Joined
Dec 2, 2011
Messages
15,716
Location
Northern Virginia
"The area by the door and along the wall gets pretty soggy as the backyard slopes into the outbuilding. So along with a walkway I'll put in a french drain to help get some of the water out of the area and back to the undeveloped part of my backyard."

Ok, you have the right idea about why that area gets wet (runoff) but I think if you regrade the side hill so that the water comes down and then flows to the back of your property you won't need to install a french drain. You need to get the water away from your side walk, and it might work out better if you don't rely on a drain to absorb the water. Maybe make a small swale so that the walkway ends up being at the high point- and that would only have to be a couple of inches higher than the swale.

Can you illustrate this idea? Mine is not that much different.

Jim :cool:
 

-Brent-

Well-known member
Joined
Dec 23, 2009
Messages
4,709
Location
Utah
It looks good. I'm planning on a patio this spring. After building them for other people for years, I've got some ideas I'd like to see incorporated into my own yard. One question regarding yours, did you install any paver edging? If not, I'd recommend it.
 

TurboBlog

Well-known member
Joined
Nov 14, 2011
Messages
145
Location
East Tennessee
Great work and thank you for all of the great tips and photos, as I have a similar project on the old to do list. This gives me some more confidence than I had. :beer:
 

jhelrey

Well-known member
Joined
Sep 15, 2010
Messages
7,247
Location
MN
I am a pro. landscaper.... People think it is easy to make things look perfect, etc... straight lines and so forth. It isn't at all! I've been on job sites where people give up and just pay me.
 
OP
T

The Lazy Destroyer

Well-known member
Joined
Jun 1, 2011
Messages
181
Location
Woodstock GA
One question regarding yours, did you install any paver edging? If not, I'd recommend it.

Yup, I put down some edging on the side, they came with ~10 inch spikes. Without them I would be paranoid the pavers would start spreading apart.

Great work and thank you for all of the great tips and photos, as I have a similar project on the old to do list. This gives me some more confidence than I had. :beer:

If I can do it, anyone can do it :beer:

I am a pro. landscaper.... People think it is easy to make things look perfect, etc... straight lines and so forth. It isn't at all! I've been on job sites where people give up and just pay me.

Yup I have a lot of respect for people who can do this for a living, I think the main reason mine looks halfway straight was that I had a wall for a guide. There are some videos on YouTube of paver driveway installations and man those guys work fast! I was a snail compared to that but mostly just wanted to make sure I was doing everything right


Looks beautiful. I put down 4200 pavers last spring. I appreciate what you've done.

4200 pavers :bowdown: 
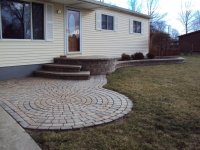
I ended up putting down maybe 240 or so and that was it for me!
 
To avoid these ads, REGISTER NOW!

csp

Well-known member
Joined
Mar 23, 2010
Messages
5,719
Location
Franktown, CO
Be glad you installed a straight walk. Mine has lots of curves in it and I don't care to even know how many hundreds of cuts I had to make along the edges. I don't have any pictures of the finished project with all of the landscaping done, unfortunately.
 

Attachments

  • DSC_1136.jpg
    DSC_1136.jpg
    147.7 KB · Views: 95
  • DSC_1146.jpg
    DSC_1146.jpg
    150.2 KB · Views: 93
  • DSC_1164.jpg
    DSC_1164.jpg
    147 KB · Views: 156

GirlnAgarage

Well-known member
Joined
Jan 21, 2011
Messages
4,668
Location
Texas
Hey LD, nice job on the pavers.

One thing did strike me though.

I think that is what I would have preferred, to either do a wider walkway or have a ft or two away from the wall. Unfortunately there were two things going against me for doing it any wider:

-There is a old tree stump about 5 ft away from the wall (you can see it in some pictures) and I wanted to have a little clearance away from that. It is pretty old so probably easy to remove completely, but wasn't sure if it would have affected the walkway as it decomposed further


You said you're installing a french drain and you didn't move the pavers away from the building because of the stump. Is the stump going to be in the way for the french drain? I'm thinking I hope your drain is going somewhere else. :confused:
 
OP
T

The Lazy Destroyer

Well-known member
Joined
Jun 1, 2011
Messages
181
Location
Woodstock GA
Drain is going to be beside the walkway, should be enough room, I have about a foot and a half at the moment between the edging of the pavers and the stump. But the stump is pretty composed already, only the very center of the stump is solid anymore. I'll tear out the stump but will probably not get a chance to do that until later.
 

GirlnAgarage

Well-known member
Joined
Jan 21, 2011
Messages
4,668
Location
Texas
Drain is going to be beside the walkway, should be enough room, I have about a foot and a half at the moment between the edging of the pavers and the stump. But the stump is pretty composed already, only the very center of the stump is solid anymore. I'll tear out the stump but will probably not get a chance to do that until later.


Oh good. My wrist were already starting to hurt thinking about the work you'd be doing to get it out. I've dug out too many stumps this past year without the help of my truck. No more!

Looking forward to the rest. I've got to get a french drain in our yard as well as it slopes from the street. It'll need to go in so we can get the tall retaining wall in. I've been fighting old root systems with my shovel. I don't like it one bit.

:beer:
 

Herb

Well-known member
Joined
Apr 15, 2006
Messages
739
Location
CT
Can you illustrate this idea? Mine is not that much different.

Jim :cool:
I don't have a picture here on my computer, but my house is 45 feet from the property line on one side that is almost all hill except for ten feet out from the house. The hill slopes down towards the house but I have graded the yard so that the ten foot area next to the house slopes down toward the hill, creating a small valley (swale) at the base of the hill. This area then is pitched down and towards the back yard. The heaviest rains or spring thaw have never even allowed any water to get near the foundation, and this area is never ever soggy. Maybe try this link for some pictures and a better explanation than I can provide.http://nemo.uconn.edu/tools/stormwater/swales.htm#Database
 

jhelrey

Well-known member
Joined
Sep 15, 2010
Messages
7,247
Location
MN
A big mistake I see people do is use galvanized spikes to hold back the snap edging. You gotta use plain jane steel spikes.
 

CreekRat

Well-known member
Joined
Mar 7, 2009
Messages
184
Location
Kansas
A big mistake I see people do is use galvanized spikes to hold back the snap edging. You gotta use plain jane steel spikes.

Why is that? I'm sure the big spikes I used a few years ago were galvanized, what kind of problems will this cause?
 

csp

Well-known member
Joined
Mar 23, 2010
Messages
5,719
Location
Franktown, CO
You want the spikes to rust/corrode as the rust keeps them in the ground. Frost will push a smooth spike out of the ground.
 

Even Steven

Banned
Joined
Jan 8, 2012
Messages
236
Location
New York
Be glad you installed a straight walk. Mine has lots of curves in it and I don't care to even know how many hundreds of cuts I had to make along the edges. I don't have any pictures of the finished project with all of the landscaping done, unfortunately.

Okay, someone has to ask:

Why did you decide on making your walkway curvy like that? You could have just as easily made it a straight run, which would have been easier and less costly to construct, not to mention easier to use.
 

csp

Well-known member
Joined
Mar 23, 2010
Messages
5,719
Location
Franktown, CO
Straight is boring.

I like landscaping to have some detail and something to look at, including the hardscape.

If I wanted cheap and easy it would be a plain-jane grey concrete sidewalk.

Here's a photo of the walk finished a couple of years ago. Several other projects have been done since then, but this shows the walkway completed.
 

Attachments

  • DSC_0269.jpg
    DSC_0269.jpg
    103.6 KB · Views: 94
Last edited:

AR-Trvlr

Well-known member
Joined
Oct 28, 2010
Messages
48
Location
Chamblee, GA
Where did you order the sand & gravel from? Cost? I'm in Chamblee, and will be doing a similar project one of these days...
 

RobSmith

Banned
Joined
Feb 5, 2009
Messages
562
Location
NSW Australia
Okay, someone has to ask:

Why did you decide on making your walkway curvy like that? You could have just as easily made it a straight run, which would have been easier and less costly to construct, not to mention easier to use.
Don't you know that after a session on the drink...that a straight path becomes un-navigational so a curvy path negates the wobbly and the walk home is safe and sound ! I've walked many curvy paths home....Thank goodness for wide 'rarely used' streets ...they could have been curvy paths !:beer:
 
OP
T

The Lazy Destroyer

Well-known member
Joined
Jun 1, 2011
Messages
181
Location
Woodstock GA
Where did you order the sand & gravel from? Cost? I'm in Chamblee, and will be doing a similar project one of these days...

I got it from a nursery/landscaping company down the street from me here in Woodstock. Each yard of material (3 total) was about $25-30 bucks each. Delivery was $50 bucks. I paid an extra $10/yard to have it delivered in canvas bags. I chose the bags so that I didn't have to deal with big piles on my backyard and so that they did not have to drive a dump truck of unknown weight on my backyard & driveway.

I think the total bill was $175. Pavers & edging was an additional $350 I think for about 144 square ft worth of stuff.

csp,

That whole area turned out great! Looks awesome!
 

glider

Well-known member
Joined
Mar 31, 2007
Messages
2,414
Location
Flint Michigan
Love the pavers, and a great job at that. How about sealing them? I have seen some stamped concrete work that looks wet with the gloss sealer. Over the years I have tried different sealers and never got what I was looking for. Any input on this? Here is the front of my house and no I did not do the work.
 

Attachments

  • DSC00886.jpg
    DSC00886.jpg
    143.8 KB · Views: 30
  • DSC00883.jpg
    DSC00883.jpg
    148.2 KB · Views: 32

Kevin54

MEMBER EMERITUS
Joined
Jan 12, 2005
Messages
29,341
Location
Urbana, Ohio
Okay, someone has to ask:

Why did you decide on making your walkway curvy like that? You could have just as easily made it a straight run, which would have been easier and less costly to construct, not to mention easier to use.

Straight is boring.

I like landscaping to have some detail and something to look at, including the hardscape.

If I wanted cheap and easy it would be a plain-jane grey concrete sidewalk.

Here's a photo of the walk finished a couple of years ago. Several other projects have been done since then, but this shows the walkway completed.

Yep, to me a straight sidewalk is boring. When we put ours in we used the sidewalk as the flowerbed edging. It does have a few straight runs but most of it is curved. I didn't use pavers but we used concrete instead.
 

Attachments

  • 026.jpg
    026.jpg
    148.1 KB · Views: 29
  • 042.jpg
    042.jpg
    151.3 KB · Views: 29
  • 043.jpg
    043.jpg
    149.9 KB · Views: 29
  • 044.jpg
    044.jpg
    153 KB · Views: 24
  • 046.jpg
    046.jpg
    152.6 KB · Views: 23

Even Steven

Banned
Joined
Jan 8, 2012
Messages
236
Location
New York
Don't you know that after a session on the drink...that a straight path becomes un-navigational so a curvy path negates the wobbly and the walk home is safe and sound ! I've walked many curvy paths home....Thank goodness for wide 'rarely used' streets ...they could have been curvy paths !:beer:

LOL...yeah, but it would drive me nuts to have to walk those curves every time I wasn't drunk. I'd probably just walk a straight line path, even if it meant walking on the grass. Or I'd hop over where the pavers are close to the concrete and just forget the path entirely.
 

volvo

Well-known member
Joined
Feb 19, 2006
Messages
1,304
Location
PNW 45th Parallel
..
Kevin54...... Nice looking wide walkways.....Appears to be lightly colored cement?....The perfect contrast and look.


>>>Yep, to me a straight sidewalk is boring. When we put ours in we used the sidewalk as the flowerbed edging. It does have a few straight runs but most of it is curved. I didn't use pavers but we used concrete instead.
>>>
 
To avoid these ads, REGISTER NOW!
Top Bottom