To avoid these ads, REGISTER NOW!

My polyurea saga

dls

Active member
Joined
Dec 9, 2020
Messages
34
Location
IL
I have always wanted resinous coating on my garage floor and after spending hours researching forums and data sheets decided to go with Nohr-S system.

I have applied water based epoxy in my basement a few years ago and I was confident that I could do this.

I am close to being OCD-type when it comes to quality of my work, and I tend to re-do things until they are perfect.

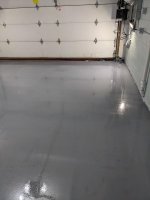
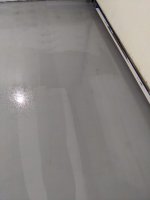
In my basement I have a full flake system with many polyurethane coats sanded in-between for flat finish with no texture. My wife does not like the look of flakes, so for garage we decided to go with solid gray. Light gray to be exact, since it tends to cover scratches better and I tend to to quite a bit of work on my car in the garage (think dropping ****** - level work).

This project is still in progress and I will be updating this thread with results.

My garage is 297 sq. ft. I've decided to go with 301-550 sq ft kit to be safe.

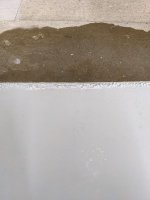
My garage had 20-year old rough broom finish slab with some light pitting from salt and freeze/thaw cycles by the door.

Unfortunately I don't have a picture of old floor before prep, but it was very rough, however I would consider it to be in good overall shape.

In my basement I have used acid etch method for prep. While I have not had any issues with my floor in the basement, my garage could see heavier use, so I've decided to grind the floor.

After researching the diamabrush vs edco grider, I've decided on renting the grinder from HD. I don't own a truck and the grinder is 150lbs. Luckily for me, my local HD is just a mile away from my house. I've rented the grinder for 24 hours and just rolled in to my house and back. Grinding was going slow initially, until I've added 45lbs bumper plate on top of the grinder. That increased the productivity and I've finished grinding in 4 hours total. I've used the dry method with a large shop vac and a duststopper bucket for dust collection. Don't attempt to do this with a smaller shopvac. The fine silica particles will clog the filter very quickly. I've used HEPA filter with regular dust bags in vacuum in addition to the dust bucket. I ended up using two bags in the vac. You should probably be using proper self-cleaning dust collector, but I don't have one.
When your vac suction drops, check the hose connections. Dust tends to accumulate in the ends of hoses and blocks the air flow. Clear the obstructions and you could continue without changing the bag/filter.

With my setup I did not have any dust in the air. I had some heavier leftover dust on the floor, but nothing like grinding without the vac. I've finished off the corners with 4-inch grinder with a cup on it and a dust shroud. Again, no dust in the air. Even though there was no dust in the air, I still used proper PPE to be safe. Judging by the fact that there was no dust on any other surfaces after grinding I can conclude that my dust collection method worked well.

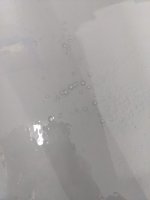
After grinding the floor and returning Edco grinder to HD, I've patched the holes and pitting in the floor with PC Products 72561 PC-Concrete Two-Part Epoxy Adhesive Paste and let it set overnight, followed by leveling it with my handheld grinder. This epoxy is super hard - it is much more difficult to grind than concrete.

Below is the pic of the prep work.
 

Attachments

  • prep.jpg
    prep.jpg
    70.7 KB · Views: 117
Last edited:
To avoid these ads, REGISTER NOW!
OP
D

dls

Active member
Joined
Dec 9, 2020
Messages
34
Location
IL
I should mention that I have ordered my Nohr-S kit back in July and have not had a chance to get to this project until late November.

I've read that Nohr-S is ok to apply in cold weather, but I did not realize that there are two types of Nohr-S colorprime primer - regular, shipped in summer, and cold weather, shipped in winter.

I've opened up the garage just a bit to allow coating of the threshold under the door, taped everything off and started with application of primer. I've allowed the primer to sit in the mixing bucket for 25 minutes at 74 degrees and started rolling.

I've used a small chip brush and 4-inch roller to cut the corners and rolled the primer with 18-inch roller. The primer was not difficult to apply, but it required a certain rolling technique to avoid lifting it on back-rolling. It is east to figure out if you have any experience rolling thicker paint. I was able to get good coverage without any holidays. My roller was shedding a bit, but nothing that could not be fixed later with a razor scraper.

Now comes the first sign of trouble. The primer did not set to tack-free finish in advertised time even though I cranked the heat in garage to 80 degrees. The slab may have been a lot cooler and I may have been applying it too thick, but it was slightly over 12 hours when it became tack-free to a point it could be walked on.

I've confirmed with Scotty, who was very responsive with his communication that it is okay to recoat past 12 hours if the primer was still tacky.

Attached is the picture of the primed floor
 

Attachments

  • PXL_20201129_153906616.jpg
    PXL_20201129_153906616.jpg
    49.6 KB · Views: 111
OP
D

dls

Active member
Joined
Dec 9, 2020
Messages
34
Location
IL
Next up was the color coat of Nohr-S. I found it slightly more difficult to apply because of surface tension. I had to back-roll multiple times to avoid holidays. Upon inspection later I found small holidays in two spots, but nothing that I would worry about - the color was very close to primer and I was sure it would not show through clear top coat.

The bigger issue for me was a high number of fish eyes in finish. Since I didn't go with flakes, they were very visible upon close inspection. They were all over the floor. Scotty suggested I sand the floor down and do another coat. Per his email it is a rare occasion and he has seen it in past when the polyurea was applied over tacky primer. To my surprise I've had bubbles even on a spot by the garage door where I did not have primer previously, but this could have been caused by my porous concrete.
Attached is the pic of the first color coat.
 

Attachments

  • 1.jpg
    1.jpg
    78.2 KB · Views: 115
OP
D

dls

Active member
Joined
Dec 9, 2020
Messages
34
Location
IL
A bit of a warning about Nohr-S polyurea and the likes. Read the SDS. The fumes are very intense and toxic. Wear PPE. Have a plan for ventilation. The fumes are not that bad when the product is being mixed and rolled, but are extremely intense when it is curing. Think carb cleaner intense. I live in a townhouse and have neighbors on both sides of my unit. One neighbor is behind firewall, another is behind regular twin double drywalled walls. Within an hour after the first coat I got an email from my neighbor behind drywall complaining about intense smell. I've opened the garage door two hours after application. It helped with smell in his unit, but my unit had intense smell for 3-4 days.

Do not repeat my mistake, do not do this without adequate ventilation, even for short periods. I was not able to air out the smell from my unit for days.

Since I was re-coating, I've decided to retrofit an exhaust fan to create negative air pressure in the garage. The pic is attached. It worked extremely well. I've used Samsung Zigbee switch to be able to schedule fan for periodic operation, so that my heaters could keep up with the fan. I was actually able to run 200cfm fan non-stop and keep garage temperature at 87 degrees, but more on it later.

With this setup I had absolutely no smell in my unit and no complaints from my neighbors. I highly recommend doing something similar if you are coating an attached garage, especially in winter when you can't have the door open.
 

Attachments

  • PXL_20201209_210137703.jpg
    PXL_20201209_210137703.jpg
    87.8 KB · Views: 137
Last edited:
OP
D

dls

Active member
Joined
Dec 9, 2020
Messages
34
Location
IL
Here is the picture of my floor prep that I have completed while waiting for another batch of color coat to arrive. Holiday season played a role in slower than usual delivery. While waiting for the product I have been working on prepping the floor for recoat.

I've used an orbital pole sander with 220-grit paper discs to scuff and de-gloss the surface. The low spots in orange peel did not get sanded, but per Scotty this looked good enough. Scotty was kind enough to provide a discount code for the extra coat.
 

Attachments

  • PXL_20201207_152448086.NIGHT.jpg
    PXL_20201207_152448086.NIGHT.jpg
    30.7 KB · Views: 131
Last edited:
To avoid these ads, REGISTER NOW!
OP
D

dls

Active member
Joined
Dec 9, 2020
Messages
34
Location
IL
Now in hindsight I should have just continued with a clear coat.
While wiping the floor with liberal amount of alcohol I have discovered immediate delamination along the garage threshold. I was applying another coat anyway, so I wasn't too concerned about it, but when stripping it with a paint stripper wheel on a cordless drill I have discovered that the primer below Nohr-S was still soft. Uncured primer and alcohol don't mix together. The temperatures outside were slightly above freezing and the slab was probably a lot colder by the door. I think it would still have cured over time, especially with warmer temperatures in spring if not for the denatured alcohol, but hindsight 20/20, and I was expecting to do another color coat anyway.

Use the proper primer for the weather. Don't order your kit in summer to work on this project in winter. At the time of the order I did not realize the cold weather primer existed, or I would have waited to order until I was ready to apply the coating.

The wet spot on concrete is alcohol. I did use more than needed, but Nohr-S delaminated within seconds, so I don't think less alcohol would have helped - I did not get issues anywhere else.
 

Attachments

  • PXL_20201207_063532521.jpg
    PXL_20201207_063532521.jpg
    69.7 KB · Views: 116
OP
D

dls

Active member
Joined
Dec 9, 2020
Messages
34
Location
IL
The next step should have been an easy one. Roll two more coats of Nohr-S. I decided to start with my old stock of the remaining two gallons of Nohr-S from my July order with the two quarts of tint I've just received.

I cut all the corners and started rolling with the 18-inch roller. By the second row I realized this coat was doomed, but it was too late to stop, so I kept on rolling. A few minutes after rolling a perfect row it began to show holidays on low glossy spots of previous coat. I kept on re-rolling the previous rows until they became so tacky I could not continue without using more material. To make matters worse the holidays were a lot lighter than the new coat. I was hoping the coat will become lighter when dry, but it did not - it became darker.
Despite all of my efforts when the coat dried enough to touch I found a few spots with very visible holidays on low spots - it looked like chickenpox. I did have some leftover Nohr-S with pigment, but not enough for 18-inch roller. I've decided to touch up with a 4-inch roller. This was about 3 hours after finishing the coat. Attached is the picture of how it looked before/during touch-up. You could see much lighter shade of Nohr-S showing through holidays of darker coat. I think I got gray with my latest order despite ordering light gray.

The spots patched with 4-inch roller are very visible. Attached are the pictures of the touch-up process and the finished look after the clear coat with 5 table spoons of fine non-skid per gallon of Nohr-S.

Unfortunately I still had fish eyes in the latest color coat of Nohr-S. Both color coats used Nohr-S from my July order. Not sure what caused the bubbles, the stated shelf life is 1 year in unopened cans.

I have applied clear coat while still within the recoat window. The clear from my latest, December order did not have any fisheyes. The clear finish is perfect. Unfortunately the spotty touch-up from 4-inch roller degreased WAF (wife acceptance factor) and resale value, so after consulting with Scotty I've decided to go for two more coats - another color coat of the proper Light Gray color followed by Clear.

Scotty was very kind to offer the replacement for the latest color coat.
I have ordered three more gallons of clear +1 qt pigment on top of that so that I have enough for two color coats and one clear.

Not sure if anyone has more Nohr-S coats than I am about to have - I already have primer and three thick coats. Two or three more are on the way.
 

Attachments

  • 2.jpg
    2.jpg
    26 KB · Views: 110
  • 3.jpg
    3.jpg
    54.8 KB · Views: 111
  • PXL_20201209_210123668.jpg
    PXL_20201209_210123668.jpg
    43.3 KB · Views: 113
OP
D

dls

Active member
Joined
Dec 9, 2020
Messages
34
Location
IL
I will post updates once I receive my additional material and finish applying the coats, but here are some lessons learned so far:

- Order your kit right before you are about to apply your polyurea system. This way you'll get fresh polyurea product and correct primer for the weather.
- Ventilation, Ventilation, Ventilation. I can't stress enough how important that is if you have an attached garage, or worse, a townhouse.
- Get Edco grinder if your floor does not have the proper profile. It is well worth it and is easy to use. Included dust control is very effective.
- Use leaf blower to get rid of dust after grinding. Vacuum is not very effective with concrete dust. I was able to remove a lot of dust with a leaf blower.
- Use a quality foam roller cover for 4-inch roller. I've used one I got from Sherwin Williams with the last coat. I regret not trying it earlier - it allowed me to skip the chip brush and blended very well with 18" roller.
- Ventilation. Again, better be safe than sorry. Make sure you have proper PPE that's rated for organic vapors.
- Use shoe covers to get over socks to walk over cured coat of polyurea without leaving shoe imprints. I ran out of covers with my last coat and just taped painters tape over my socks. That worked equally well. Wear a cap or a hat if you have hair.
- Have rags and acetone handy.
- Try to complete all coats within recoat windows. Polyurea is much easier to apply on freshly coated floor than on de-glossed surface.
- If budget is not an issue, hire someone to do this, with a written contract spelling out uniformity of color and permissible amount of defects/fish eyes per sq ft. Rolling the product is not a lot of work. Prep is the most labor-intensive part. It is very depressing to spend a lot of time on prep just to redo it later.
- If you are applying color coat, have a helper continuously mix it in the bucket while you are rolling the coat to avoid any streaks.
- If you are applying clear, attach work lights projecting at the floor from all directions, so you could see their reflection in the floor. I have read older reviews stating how difficult it is to tell where clear has been applied. I've prepared the lights ahead of time and was able to see the fresh coat of clear looking at light reflection, but I do agree that it is very difficult to see. If you don't have lights, plan out your sections and mark sections to be completed in each row with painters tape on walls so you could keep track of your progress.
- Polyurea is not fool-proof, as evident by my example. I could see how a perfect coat could be done with just two coats and no primer, the product definitely permits such an outcome. But things could go wrong for any number of reasons. This leads me to the next lesson learned.
- Order your polyurea from reputable source. Scotty from Legacy Industrial was extremely helpful and responsive, even over the weekend. You would want to have a vendor like this behind the product in case you need support.
 
Last edited:

SPaikmos

Active member
Joined
Jul 30, 2020
Messages
37
Location
Renton, WA
Nice series of posts! This info would have helped me a ton when I did my floor.

- Get Edco grinder if your floor does not have the proper profile. It is well worth it and is easy to use. Included dust control is very effective.
I would suggest the shot blaster instead. It creates less dust, leaves a more uniform finish, and is much faster than the grinder. I rented TWO EDCO grinders, and trust me, it's a no brainer to use shot blasting.

- Use leaf blower to get rid of dust after grinding. Vacuum is not very effective with concrete dust. I was able to remove a lot of dust with a leaf blower.
This worked well for me too. Some folks recommend using a mop, but I didn't like the idea of getting the floor wet, and then having to dry it again. The only drawback is that dust goes EVERYWHERE. I have a metal shop and there's a thin film of dust on all the insulation, as well as dust on the girts. It also blew a cloud of dust onto my house.

- Ventilation. Again, better be safe than sorry. Make sure you have proper PPE that's rated for organic vapors.
This is the most important. Buy this 3M Organic cartridge. Note that this cartridge does NOTHING for dust, so you need to use a N95 mask when grinding concrete.

- Have rags and acetone handy.
- Try to complete all coats within recoat windows. Polyurea is much easier to apply on freshly coated floor than on de-glossed surface.
- If you are applying clear, attach work lights projecting at the floor from all directions, so you could see their reflection in the floor. I have read older reviews stating how difficult it is to tell where clear has been applied. I've prepared the lights ahead of time and was able to see the fresh coat of clear looking at light reflection, but I do agree that it is very difficult to see. If you don't have lights, plan out your sections and mark sections to be completed in each row with painters tape on walls so you could keep track of your progress.
This can't be stressed enough. Stick to the recoat windows, otherwise you'll be doing more surface prep that could have been avoided. Using painters tape to mark the walls so you can finish the gloss coat in sections would help a lot; do not underestimate how hard it is to see the clear coat of polyurea. If you do not heed this warning, you're gonna have a bad time!

I knew about this after doing the first garage, and still goofed up on the second one. The worklights idea is a great suggestion, I wish I'd thought of it!
 
To avoid these ads, REGISTER NOW!
Top Bottom