To avoid these ads, REGISTER NOW!

My Shop AKA the obsession

e-tek

Well-known member
Joined
Dec 19, 2007
Messages
10,690
Location
Saskatoon, SK
Once your place is cleaned and organized it will rival some of the best! Any plans to get to that stage - or are you "just trying to keep up"! ;)
 
To avoid these ads, REGISTER NOW!

onewaydave

Well-known member
Joined
Sep 28, 2009
Messages
961
Location
Down the road from Dorothy and Toto
W-Cummins, great build. Like the Compressor, too. In your signature, you have 1987 Chevy 3500 24 valve Cummins, Nv4500, DD#2 injectors, Edge Comp. I'm curious about the motor and transmission mounts, radiator, fan an just general room in there. If it is a threat to this thread, send a PM to [email protected]. I'm doing a similar swap and would like to know your expierence. Dave
 
OP
W

W-Cummins

Well-known member
Joined
Jan 9, 2006
Messages
1,639
Location
Iowa
Wow.... This thread is unbelievable!!!
This has got to be the shop of shops!
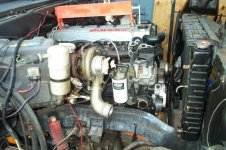
Thanks!

Damn, I see an RE5 :)

Sure is... do you need an extra one??? 9 motorcycles is a few too many for just me to ride. I do have a Z-50 for the kids but it will be a few more years before they get that one

Same here Eric, this is simply amazing. I can only dream of something on this scale, I'd be quite happy just having a garage of my own :p

Thanks for the epic thread William, hope everything's going well, looking forward to your next updates.

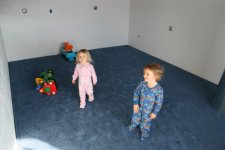
amazing build any updates i know the kids can keep you busy!! Are the plans for the house starting soon also? I cant believe all four of you are living in that space. how many actual bedrooms are there??

Thanks guys for the kind words and taking the time to check it out!!
As for updates I need to upload some more pictures of stuff but unfortunately I have been collecting more stuff to add to the "Clutter" As for the House construction it's on hold for a bit I'm not sure that I want to take on the debt to build it given the current state of the economy.... The question of bedrooms is a quandary.. lets just say there are two room "like" areas on the second floor:-( I have about 1400sq ft of living space but it sure dosn't seem like it. The one really big drawback is that I had no plans on closets as my shop office didn't need any....

William....
 

Attachments

  • IMG_4213.jpg
    IMG_4213.jpg
    76.7 KB · Views: 486
  • IMG_4217.jpg
    IMG_4217.jpg
    74.2 KB · Views: 705
Last edited:

DIYnotBUY

Active member
Joined
Nov 24, 2009
Messages
36
Location
Chapman, NE
man its awesome that you got some updates up wow i didnt realize the kids were that old i have a 3 year old and a 2 year old and even though the two year old is the only one that lives with us the idea of any less house for her to terrorize is unthinkable. Just keep truckin and working hard and it will pay off!! Would also love to see some of your storage solutions for spare wood and metal around the shop!!
 
OP
W

W-Cummins

Well-known member
Joined
Jan 9, 2006
Messages
1,639
Location
Iowa
Once your place is cleaned and organized it will rival some of the best! Any plans to get to that stage - or are you "just trying to keep up"! ;)

Well I wish I could tell you that is' all cleaned up and organized but that would be a fantasy :( I did find my second rotary hammer that I lost for 4 years the other day though, unfortunately not before buying another one, and spending over 20 hours looking for it over the four years!


W-Cummins, great build. Like the Compressor, too. In your signature, you have 1987 Chevy 3500 24 valve Cummins, Nv4500, DD#2 injectors, Edge Comp. I'm curious about the motor and transmission mounts, radiator, fan an just general room in there. If it is a threat to this thread, send a PM to [email protected]. I'm doing a similar swap and would like to know your expierence. Dave

Dave I made the mounts for the motor and also the new cross member for the frame under the engine. I was alll set to use the stock trany crossmember and in fact had the motor and ****** hung on it for a long time. That came back to bite me when I atached the transfer case to it and saw that there was no way to allow the front drive shaft to clear as it was constructed. So now I need to modify that some now. As for the postion the 24 valve fits well and clears most of the stuff nicely, But.... ya knew that was comming didn't you... there is a large bolt on the back of the head on the 24 valve that flows the return fuel to the tank. So I made a recess in the firewall to allow that to sit into it. I also didn't want to put in a 3" body lift so I made another boxed section for the upper ears of the motor to bellhousing plate to recess into. That way I had plenty of room to fit the stock 4 core radiator. The 2nd gen intercooler fits nicely turned upside down and the ports pass through the air intake holes in the radiator support. I also milled a bit off the AC compressor mount to gain a slight amout of clearance near the frame rail ( I had to relive the rail slightly too). I also installed the firewall sound deading pad from a diesel version of the chevy....

If you have more questions I can give you my phone # and I would be happy to discuss the swap with you.....

William....
 

Attachments

  • DCP_1422.jpg
    DCP_1422.jpg
    141.4 KB · Views: 307
  • motor mts1.jpg
    motor mts1.jpg
    105.8 KB · Views: 278
  • motor mts2.jpg
    motor mts2.jpg
    130.3 KB · Views: 269
  • motor mts3.jpg
    motor mts3.jpg
    134.6 KB · Views: 253
  • motor mts4.jpg
    motor mts4.jpg
    106 KB · Views: 266
  • DCP_1375.jpg
    DCP_1375.jpg
    147.8 KB · Views: 303
  • DCP_1384.jpg
    DCP_1384.jpg
    96.6 KB · Views: 267
Last edited:

onewaydave

Well-known member
Joined
Sep 28, 2009
Messages
961
Location
Down the road from Dorothy and Toto
William, thanks for the reminder. My old brain had forgotten that I asked. Well, your talent in the shop build shines in the Cummins swap. That cross member and the motor mounts are very nice. I'm using a 65 one ton 2wd for my swap. So there will be some differences. The comments on the room in the engine bay are reassuring. I knew it would fit but knowing ahead of time the corners to look out for help. I agree on not using a body lift.

Anyway, thanks for the reminder and the post. I'm just out of St. Joseph, MO in KS so I might take you up on the call. Too cold right now to get excited and start working though. Dave.
 

mkettles

New member
Joined
Jan 24, 2010
Messages
1
Neal, at the max output the compressor puts put 79 cfm and at 480V it pulls 28 FLA, it spikes without the VFD on start up to 135A for about a second. I'm going to run it on a 60 amp circuit as that's what the VFD manufacture recommends ( its rated @ 30-40hp) I like the way the machine runs at 2/3 speed ( about 1250 RPM) and I will normally run it at that speed. From now running several Baldor motors on VFD's I have noticed they are really noisy, the drive whine is louder than the compressor running when it's unloaded. I don't know if it's going to bother me enough to change it out but just some thing I have seen...

William...

William,

You could try to adjust the carrier frequency on your VFD to eliminate the squeeking noise. I have a 1 HP VFD and tried this, it seems to work fine. However, I don't pretend to know very much about the potential consequences of this or (if there are any). I did speak with someone at the VFD manufacturing company and he seemed to indicate that it will disrupt the RF band. I told him we have cable TV and that wasn't an issue. VFD's are almost as cool as your garage. Nice job.

Mike
 

Graymills - Craig

Well-known member
Joined
Jun 15, 2010
Messages
362
Location
Chicago, IL
Here are some pictures of the shop I built. I originally wanted to construct it all by myself, but in the end I had to sub out some of it (the site prep, concrete footings/walls and the slab {there is just no way one person can pour and finish large amounts of concrete} plus a few other things I will describe later). I guess it's what you would call a rather large garage/shop @ about 5400 sq ft of finished space ( 50'X100' floor space). So here are some of the pictures of the foundation. The machine dug a 5' wide trench for the footings, the frost walls, and piers for the red iron to attach to.

Man, my entire LOT is 25x125...

Jealous!
 
OP
W

W-Cummins

Well-known member
Joined
Jan 9, 2006
Messages
1,639
Location
Iowa
Anyway, thanks for the reminder and the post. I'm just out of St. Joseph, MO in KS so I might take you up on the call. Too cold right now to get excited and start working though. Dave.

Dave, It's warmed up how is the swap coming??


William,

You could try to adjust the carrier frequency on your VFD to eliminate the squeaking noise. I have a 1 HP VFD and tried this, it seems to work fine. However, I don't pretend to know very much about the potential consequences of this or (if there are any). I did speak with someone at the VFD manufacturing company and he seemed to indicate that it will disrupt the RF band. I told him we have cable TV and that wasn't an issue. VFD's are almost as cool as your garage. Nice job.

Mike


Mike, Funny you should mention the ole compressor project I'm currently working on it. I will look into programing the VFD for the motor frequency to see if I can adjust it. It would be great if it got the nasty whine to go away .... I'm getting ready to fab up and mount for the VFD and the 60 amp fused disconnect switch, and I think that I will also hang the filters for the compressor and regulator on it too.

IMG_0205a.jpg


I picked up a water separator and a few auto drains ( Wilkerson brand) as my machine did not have one after the after-cooler and it was dumping HUGE amounts of water into the receiver tank. I also got rid of the copper pipe on the outlet of the pump and replaced it with SS braided lines. I hope it can take the heat on the pre-after-cooler section...

IMG_0208.jpg


IMG_0209.jpg


IMG_0212.jpg


I also picked up a set of large Coalescing filters (M32-X0-F00) to run, and hopefully remove enough water so I don't need a refrigerated chiller....

IMG_0214.jpg


One is a 1.0 micron and the other is a .01 micron I will probably plumb them to share one auto drain.

William....
 
Last edited:
OP
W

W-Cummins

Well-known member
Joined
Jan 9, 2006
Messages
1,639
Location
Iowa
Got some more updates?


Well I guess that there have been a few. I have been adding to my machines and refurbishing a few too. Lets see... I have added these wood working machines,
Kindt-Collins Master oscillating Spindle sander, ( nice machine came from Boeing)
Tannawitz monster 42" bandsaw (over 9' tall), (Needed some work, newer bandwheel, newer table, newer tire, and installing a 10hp VFD)
SCMI 120c shaper and feeder, (Damaged in shipping so I made replacement parts)
Whirlwind 850 oscillating edge sander ( resurfaced/abrasive ground the tables and replaced the platen facing)

Picked up another Wellsaw bandsaw, a 1318 (its getting a total rebuild) to keep my 1016 company , A Pfaff 1245 Sewing machine (hated the K leg table so I made a custom stand table)
Total rebuild on my Powermatic 72 14" table saw.

Added a home gym area to the shop ( too fat/out of shape:) got a Bodysolid 3000 gym and found the 400lbs for the leg press was too low. Modified it with custom made 315lb weigh stack ( made from 1" plate and 30+ lbs of "Holes":) The leg press is a 2X setup, only problem is 630 lbs is still not enough weight:-(

If there is any interest I can post up some pictures of the above stuff......

William....
 
OP
W

W-Cummins

Well-known member
Joined
Jan 9, 2006
Messages
1,639
Location
Iowa
Here is a picture flood of the above stuff I will try to edit and distribute it in to messages later


Needed a spacer for my dust collector I'm building to allow the blower to mount on top. So I cut one out of 1" plate, cut the corners off and then made it round with the rotary table. Then I turned it on the lathe and removed the "center" to use in another project....

IMG_9391.jpg


bcab_dust_001.jpg


bllower005.jpg
bcab_dust_002.jpg


bcab_dust_003.jpg


Made another shaper table ring from the waste "core" from the spacer.

scmi_120c_001.jpg


scmi_120c_002.jpg


Needed a Painting "Tree" so I made one out of pipe it's SUPER useful


IMG_4866.jpg


Needed to make some sanding spindles for the sander Here is the 1.5" one made from drill rod


IMG_4874.jpg


IMG_4875.jpg


IMG_4880.jpg


IMG_4882.jpg


Here is the 1" plate the rings came out of and also the weight plates for the gym.

IMG_9388.jpg


IMG_9385.jpg


BTW that dam thing fell off the roller stand and on to my foot!!!!


Ever see a $300+ dollar extension cord well neither had I until I made one. It's made from all top shelf stuff, wood head boxes, hubbell plugs, recepticles and 10gauge SO cord 4 outlets at 480V

IMG_9389.jpg


Pfaff stand

IMG_9512.jpg


IMG_9519.jpg


IMG_9520a.jpg


IMG_9522a.jpg


IMG_9555.jpg


IMG_9559.jpg


IMG_9564.jpg


stand hanging from the paint tree

IMG_9523a.jpg


IMG_9526a.jpg


Damage to the Shaper power feeder

IMG_9434.jpg


IMG_9422a.jpg


More 1" plate

scmi_120c_003.jpg


scmi_120c_004.jpg


scmi_120c_006.jpg


scmi_120c_007.jpg


t120%20repaired.jpg


BurrKing part

IMG_9769.jpg


IMG_9812a.jpg


IMG_9814a.jpg


IMG_9821a.jpg


IMG_9829a.jpg


William....
 
Last edited:

patlalande123

Member
Joined
Jul 15, 2009
Messages
16
what about your house sir?
i hope once you start, you post on this thread as well!
i know its a lot to ask of us with the two k-kid units but i would sure love to hear , and or see what is happening with that!

another thing! i still smile about , the fact that you built your garage, BEFORE the house! oh how that makes me smile!
looking back to 06' holy **** thats a long time ago!!
 
To avoid these ads, REGISTER NOW!

BRONCONUT

Member
Joined
Feb 6, 2011
Messages
21
Location
Hartford,KY
Wow, very nice building you put up there. I wish I had one and the tools too. I would love to be able to do that kind of stuff in mine, I have a 30x40 pole barn.
 
OP
W

W-Cummins

Well-known member
Joined
Jan 9, 2006
Messages
1,639
Location
Iowa
what about your house sir?
i hope once you start, you post on this thread as well!
i know its a lot to ask of us with the two k-kid units but i would sure love to hear , and or see what is happening with that!

another thing! i still smile about , the fact that you built your garage, BEFORE the house! oh how that makes me smile!
looking back to 06' holy **** thats a long time ago!!

Well I'm still dreaming about the house, and when I do build it I will post about it too as it will also need a garage. :) I would like to have the house funded as a pay as ya go deal, but I may have to bite the bullet and just get a loan, but it is sure nice not to have one......

Beautiful work - as usual here! Thanks for continuing the thread - 5 years and counting!!


Thanks!
Dam that is a long time, must be longer than that though, as only a few more months and the kids will be 5. hummm well I see it's been a while sense I posted on this thread too like 5 months!! :shocking::shocking:

Wow, very nice building you put up there. I wish I had one and the tools too. I would love to be able to do that kind of stuff in mine, I have a 30x40 pole barn.

Sounds like you have a great building there with your 30X40! I know that for the 1st 25 years when I was working in the big sky garage, I would have been in heaven in a shop like yours!. I also look the work here that some guys turn out and I swear that they could build a space shuttle with a hammer and some iron ore. It's not the tools, but the craftsman that holds them that matters. BTW nice bronco!

William.....
 
OP
W

W-Cummins

Well-known member
Joined
Jan 9, 2006
Messages
1,639
Location
Iowa
So here are some more of the projects pictures

Here is the sander that goes with the spindle I made

IMG_4830a.jpg


This is a super sweet machine and top shelve stuff. I have wanted one of these machines ever sense I first saw one years ago. Sold mainly to pattern makers, these Kindt-Collins Master oscillating Spindle sander machines were the top of the line. When its previous owner (Boeing) purchased it they were almost $10k new!

IMG_4823a.jpg


This machine has a rather unique feature for setting the tilt of the spindle a vernier gage is observed from an illuminated "periscope" viewer in the table top

IMG_4835.jpg


Boeing needed to have the machine to have NEMA UL approved controls on it, so they paid a local company to make a custom UL field $$$ approved control box. This machine has a 2 speed motor that runs the spindle and a safety feature that only allows the spindle to run at high speed with the smaller diameter spindles installed on the machine. It does this via a paddle attached to a cable controlling a drum switch. When a smaller spindle is in place the paddle can move close to it, but when you place a larger than 2" spindle on the machine it will not insert w/o moving the paddle out of the way. So long story short these expert UL approved guy's had it hooked up so it would only run at high speed on the large spindle settings!! :shocking::shocking::shocking:

So when they decommissioned it they just cut all the wires from the sander to the control box, This of course made their reconnection "FUN"

IMG_4825a.jpg


William....
 
Last edited:

bmwpower

Super Moderator
Staff member
Joined
Apr 24, 2005
Messages
12,578
Location
NJ
I always thought those were cool, too. My Dad could definitely make good use of that.
 
OP
W

W-Cummins

Well-known member
Joined
Jan 9, 2006
Messages
1,639
Location
Iowa
I always thought those were cool, too. My Dad could definitely make good use of that.

It sure is a nice tool to use, I have been hacking away on another project with it, like I needed another one :scared::scared:

IMG_1007.jpg


William....
 
OP
W

W-Cummins

Well-known member
Joined
Jan 9, 2006
Messages
1,639
Location
Iowa
So like I mentioned in another message I'm working on the restoration of my Powermatic 72 14" tablesaw. I purchased the saw about 8 years ago on e-bay. When it arrived I was not happy to see that some hack had replaced the stock motor with a normal 7.5hp 184t framed motor. To do this they made a motor mount out of some 1/4" plate. The main problem with this was the mount moved the motor lower in the saw and when you tried to tilt the arbor and raise blade the motor/mount hit the saw frame.

I used the saw for many years but purchased the correct motor mount from Powermatic knowing that some day I would change it out.
Well Powermatic wanted about $700 for a new motor. I was talking to a tech rep at Powermatic and he told me that the stock motor was a 184tc framed motor so I set out to find one. New Baldor wanted about $475 for a new motor, but that was too much for my cheap ***.. So I started looking for one on e-bay. That motor is not a common motor so it took me several years to find a new one but I did get a new in the box motor for $170
So with the new motor in hand I went looking for the new mounting casting, Well long story short I couldn't find it in the mess..... Fast forward a year or so.... I found the mount, but now I had a new problem, The new motor will not fit on it!!! :headscrat:headscrat

So after a lot of teeth grinding and hair removal, it appears that the motor is not a 184tc put rather a 184c frame that Powermatic put on these saws ( the PM66 too). Now comes another "Problem" Baldor makes and sells a 5hp 184c motor but not a 7.5 hp model. It turns out that they make it (OEM) for Powermatic but don't sell it. IF I had the build spec # I could find out the parts used to make one but as you can imagine Powermatic is not forth coming with this information. As it turns out Baldor also claims that they have no way to look it up either :mad:

So now I get to dig through Baldor's documentation to try and figure out what they did to make that motor. Anyway I find out that I can get another end bell from another motor and adapt it to my motor and then change the pulley and shorten the rotor shaft. Baldor wants $140 for the motor end bell :( But they also offer the part as a bare casting for $38.00:):):) so I get one and start the process to turn the bare casting into a usable part. Baldor provided me with a print for the part so I had all the required dimensions to make it work. So I got busy machining it out. As you might expect they had some tight tolerances on it, ie. +- 0.0005 on an 8" dim for the mating flange to the stator frame!

IMG_0249.jpg


So I get it all machined out and moved on to tapping the as cast holes. The only thing is that as cast the mounting flange holes are WAY too large for the threads spec'ed on the print! Even using the worst class for the fit they are way too large and the bolts slop all over the place when threaded in..... So Baldor sent me another one for "Free" of course now I have to start over. :mad::mad::mad:


Anyway the new one is better on as cast holes but they are still way out of spec. So I machined it out and then got the idea to change the mounting "Plan" I decided to use studs in place of the bolts, well kinda, I used socket head bolts and threaded them in from the back side and set them in epoxy. Now I don't have to worry about the bad fit and in this application the "studs" work just fine...

IMG_0273.jpg


I decided to remove the flange on the face as the Powermatic mount didn't use it and it made the machining setup easier

IMG_0272.jpg


Rotor Shaft all shortened

IMG_0274.jpg


All bolted up it works!


IMG_0295.jpg


William.....
 
Last edited:
OP
W

W-Cummins

Well-known member
Joined
Jan 9, 2006
Messages
1,639
Location
Iowa
I absolutely love it when somebody skirts the OEM BS and comes up with a low cost solution!
BEEN THERE DID THAT (a few times) :bounce:
Great job!!

:beer:

Thanks I'm sure I wasted more time "fixing it" but some times my cheap side wins over my non-existent practical side!


pretty phenomenal thread here. Really glad you keep posting.

Sorry,
I keep missing the replies to the thread and so it seems to take me a long time to get back to it at times

nice work on the tablesaw mods and getting it done
:beer:

I need to post some more of the table saw rebuild, but I'm kinda pissed at myself about it. I took the table top into have it reground ( on a huge Blanchard grinder) and their work looked nice but it's not that flat! I should have in retrospect had them grind the main top and the 2 smaller wings bolted together, and the large side wing by its self. The place made an even larger mess out of the table for the 42" bandsaw but thats another story :mad:

WOW!!!!

that is HUGE!!!

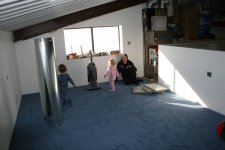
any more pics of the living area? whats left to do?

I will see if I have any more pics. As for what's left to do.... too much... one good thing, there is a new thing in my life, it's called KINDERGARTEN !!!! So now I will have time to get back to the task! :):)

William....
 

sberry

Banned
Joined
Jun 18, 2005
Messages
35,747
Location
Brethren, Michigan
I glanced thru this thread, I built 2 with rolled insulation and actually used number 14 steel fence wire to add stringers across the purlins to roll insulation out on to. Really helped getting it to lay straight.
 
To avoid these ads, REGISTER NOW!
Top Bottom