To avoid these ads, REGISTER NOW!

My small garage build thread...

Teej2012

Well-known member
Joined
Nov 3, 2012
Messages
91
Location
Gilbert, AZ
We built an Allen Edwin cookie cutter home 2007 an opted to not have the extra $6,000 bump out option because we were told by the realtor that we would have plenty of room. We also opted to not have the 2nd stall finished. Because of the design on the homes, the 2nd stall is recessed in almost 3 feet from the first stall, but the home backed wall of course is the same...leaving us with approx 21' x10'5" (main) and 17' x 10' 5" (2nd stall) garage.

Anyway, I decided to finish the 2nd stall as practice just in case I wanted to tackle the basement one day or just pay someone else to do it. Well, now a few years later, after buying the car of my dreams of 20+ years, I decided I really needed to finish FINISH the garage. I never considered myself much of a "DIY construction/builder" type, but I knew if I put my mind to something I could at least make a respectable effort.

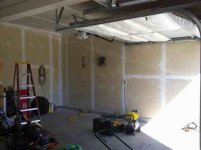
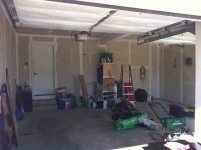
These first two photos are from this past summer 2012 as I started my project, after finishing up the walls. This was also the first time I did any mud work and ill probably never do that again either. The walls were not perfect but I decided that I was okay with that since my desired finished garage will have stuff all over the walls.


Sent from an underground bunker
 

Attachments

  • ImageUploadedByTapatalk HD1356106421.856239.jpg
    ImageUploadedByTapatalk HD1356106421.856239.jpg
    31.7 KB · Views: 488
  • ImageUploadedByTapatalk HD1356106472.488514.jpg
    ImageUploadedByTapatalk HD1356106472.488514.jpg
    33.2 KB · Views: 460
To avoid these ads, REGISTER NOW!
OP
T

Teej2012

Well-known member
Joined
Nov 3, 2012
Messages
91
Location
Gilbert, AZ
After spending a lot of time in elevators, I decided I wanted my garage walls to resemble an elevator with large metallic panels. A lot of research later into building materials, and knowing that I do not have disposable income, I decided it was probably best that perhaps I pursued another path with hopefully a similar result.

The cost of large metal panels, and the extreme difficulty involved with using garage walls as a functional space for cabinets played a heavy hand in my change of direction. After surfing craigslist for a while, I found someone close that was selling an overstock of black FRP panels.

Hmm...okay, I could paint the walls a two tone metal, and use black FRP as a 4'ft wall all around the garage... then I could slap a red stripe around the top as well, and paint the ceiling beam red. Needless to say, my wife did NOT see my vision. lol. But as I tell everyone, as long as you can imagine it, then the final result is very possible. It may not be perfect, but as long as you have something to go off of, then...well..(shrug). And with the garage, if the walls didnt turn out how I wanted, I could just repaint them.

ImageUploadedByTapatalk HD1356107216.119645.jpg ImageUploadedByTapatalk HD1356107277.431876.jpg ImageUploadedByTapatalk HD1356107306.265791.jpg

After reading up on the metallic paints, one suggested route for a two tone effect without buying two tones of metallic was to do an undercoat of black. Then throwing the metallic paint on top. My decision to make vertical stripes was a strategic one..I wanted to know where all my studs were for hanging cabinets, posters, etc...

After alternating between grey primer and black wall paint, I took a photo and played around in photoshop with the design...adding the black panels, red stripe around the walls and a red beam. At this point, I was still undecided on if I just wanted the side walls metallic and FRP'd or all around the garage..I had not yet purchased the FRP board to this point.

ImageUploadedByTapatalk HD1356107585.146956.jpg


Sent from an underground bunker
 
OP
T

Teej2012

Well-known member
Joined
Nov 3, 2012
Messages
91
Location
Gilbert, AZ
I was set on buying that Martha Stewart metallic essentials paint but opted for Rustoleum at the last second. I knew Rustoleum made a sure bet quality paint and I read many mixed reviews on the Martha Stewart stuff. But now I was concerned because my black and grey stripes were based off of some other suggestions for the pretty indoor metallic stuff..not the Rustoleum. For as thin as it was, it was also pretty opaque.

ImageUploadedByTapatalk HD1356109063.612810.jpg

My two tone idea turned out poorly on the first wall because I tried to get cute with the way I applied the paint (not pictured) . The 2nd wall turned out much better (pictured below)

ImageUploadedByTapatalk HD1356108782.914789.jpg

Also what i found when I removed the painters tape was it tore the primer off the wall and in some cases, tore the paper layer off the drywall. So now I had to double up on my layers, but after applying a new coat of primer..but the damage was done and you could see underneath the metallic paint anyway. At this point, the first stall looked better than before, but it was less obvious of the alternating vertical columns. I went ahead and applied a 2nd coat to both walls... the columns can be seen, but it was less obvious. Because the black paint below was so much thicker than the primer, it left its own vertical line which worked to my advantage. The vertical columns were now much less evident, yet still there. I also decided that only the side walls of the garage would be metallic... once I made this decision, I installed an elevator switch for my doors.

ImageUploadedByTapatalk HD1356109253.929889.jpg ImageUploadedByTapatalk HD1356109355.528295.jpg
ImageUploadedByTapatalk HD1356109441.677029.jpg


Sent from an underground bunker
 
OP
T

Teej2012

Well-known member
Joined
Nov 3, 2012
Messages
91
Location
Gilbert, AZ
I took my photos back to photoshop because I wanted to be sure the black FRP panels and red stripe is what I really wanted to go with. (photoshop photo shown below)
ImageUploadedByTapatalk HD1356109868.053657.jpg

After seeing the walls my wife started to kind of see my vision, but admitted after my photoshop rendering, it still wasnt really grabbing her attention. I didnt care though, it was my vision and my garage...(shrug)

A few weeks later, after purchasing the panels and waiting for the FRP trim to arrive in the mail, I started slapping the panels up on the wall. I did a lot of research on which adhesive, what temperatures, expansion, etc... the panels I used were not like the ones you get at Home Depot or Lowers. I purchased two thickness levels. The thicker of the two was still about 1/4 the thickness of traditional FRP panels. I used these only on the side walls. The front and back of the garage have even more thin panels. These are no thicker than your $.70 poster board your kid needs for their little collage project. I still gapped the panels for expansion/retraction while keeping the garage a good temperature while the panels cooled. I ended up using Liquid Nails FRP and an extension roller I purchased from a local builders supply shop. For my red stripe, instead of painting it on the walls, I purchased some of that red vinyl carbon fiber print tape off of eBay... took 9 rolls.

ImageUploadedByTapatalk HD1356110407.869374.jpg ImageUploadedByTapatalk HD1356110442.103554.jpg

The rest of the photos show the progress in no particular order. As of right now, all panels are up, the wall outlets have been replaced with matching black outlets and panel covers, and the red stripe goes all around the garage.

The main light switch cover has been replaced with a metal cover that matches the elevator panel and the garage door opener ceiling frames have been painted white to match the ceiling.


Sent from an underground bunker
 

Attachments

  • ImageUploadedByTapatalk HD1356110534.120918.jpg
    ImageUploadedByTapatalk HD1356110534.120918.jpg
    24.8 KB · Views: 421
  • ImageUploadedByTapatalk HD1356110566.798037.jpg
    ImageUploadedByTapatalk HD1356110566.798037.jpg
    15.4 KB · Views: 318
  • ImageUploadedByTapatalk HD1356110601.161678.jpg
    ImageUploadedByTapatalk HD1356110601.161678.jpg
    33.6 KB · Views: 365
  • ImageUploadedByTapatalk HD1356110628.393193.jpg
    ImageUploadedByTapatalk HD1356110628.393193.jpg
    29.2 KB · Views: 338
OP
T

Teej2012

Well-known member
Joined
Nov 3, 2012
Messages
91
Location
Gilbert, AZ
As of 12/21/12, I am at a stopping point until the spring time. I purchased some rubber 4" baseboard moulding that is self adhesive, but requires 70 degrees sustained temperature at minimum to fully cure.

I have also gone back and forth after reading this forum on what I want to do to my floor. I went from epoxy, floor paint, interlocking tiles, porcelain tile, ceramic tile... and now i'm back to interlocking tiles.

I went from wanting all solid bright white tiles, to grey tiles, and now I'm at bright white tiles, but with a black parking area w/red outline. So as of right now, thats what I will do in the spring time.

Other things to be added in the spring/summer:
Hanging cabinets (because of my limited space, I want as little on the floor as possible)
Possible wall mounted vacuum
new overhead lighting (this is a must)
a few nicely assembled car posters
various backlit display cases for memorabilia/collectibles
insulated garage doors
quiet drive garage door openers


Sent from an underground bunker
 
OP
T

Teej2012

Well-known member
Joined
Nov 3, 2012
Messages
91
Location
Gilbert, AZ
Huge transformation! So, is the Audi the car of 20 years worth of dreams? We can talk about cars here, they are part of a garage.

Haha.. no, this past summer I picked up a '97 NSX (shown in only one of the above photos). It's been in storage the last two months


Sent from an underground bunker
 

Higgins

Well-known member
Joined
Dec 25, 2009
Messages
1,924
Location
Shepheardsville, KY
Tee,

Your garage looks outstanding.....

A lot of thought and time go into a project like that. And like all projects, there is a learning curve when doing something outside the box!

I agree, take some time off till it warms up enough to complete your vision! Cheers!!

AL
 

HSpencer

ALLIANCE MEMBER
Joined
Nov 28, 2010
Messages
2,854
Location
South Central US
I am impressed that you are willing to go back and forth to get just what you want. I am doing the same, and sometimes it is the only way to be happy with the final result. Sometimes you just have to "do" it, and then change it until your satisfied with it. And, with paints, you can do that without breaking the bank. Good job.
 
OP
T

Teej2012

Well-known member
Joined
Nov 3, 2012
Messages
91
Location
Gilbert, AZ
Thanks everyone. This weekend my wife and I took a short road trip to IKEA. I picked up a couple of their hanging cabinets for the garage. Two of the cabinets I purchased were in the bathroom section.. I wanted something not too deep and tall enough for the squirt bottles of detailer, wax, etc.... I picked up a slightly larger hanging cabinet which will hold some of the larger items like the Craftsman drill set and drill bit boxes. I also picked up this black three decker plastic shoe holder that is about the same color as my FRP. This will be where my smaller power tools will go. I really want to get as much stuff off the floor as possible due to the smaller size garage.

My plans for the three cabinets is to purchase some vinyl wrap online and wrap the doors. I ordered some samples last night. This way, I could change it up at any time without spending a lot of money or a lot of time painting. The samples I requested are the CF red like my walls have, a brushed aluminum, and two silver CF weave patterns. I'll post pictures when I get the samples.


Sent from an underground bunker
 

55cadillacking

Well-known member
Joined
Apr 26, 2012
Messages
1,959
Location
Calgary
My plans for the three cabinets is to purchase some vinyl wrap online and wrap the doors. I ordered some samples last night. This way, I could change it up at any time without spending a lot of money or a lot of time painting. The samples I requested are the CF red like my walls have, a brushed aluminum, and two silver CF weave patterns. I'll post pictures when I get the samples.

That sounds like a very interesting project. I look forward to seeing the end result. Great garage. Quite a few elements similar to mine. Looking forward to seeing all your progress. Just need Spring to hurry up and arrive!
 

Omphaloskeptic

Well-known member
Joined
Oct 11, 2008
Messages
2,346
Location
Ultima Ratio, Wa.
Impressive design!

Could you possibly post your specific sources for the FRP and the graphite tape? Are you happy with the both as far as installation requirements and performance? What product (if any) did you choose to fill in the expansion gaps on the FRP? Please keep us posted on your progress. Will you finish your floor prior to installing the baseboard?
 
OP
T

Teej2012

Well-known member
Joined
Nov 3, 2012
Messages
91
Location
Gilbert, AZ
Impressive design!

Could you possibly post your specific sources for the FRP and the graphite tape? Are you happy with the both as far as installation requirements and performance? What product (if any) did you choose to fill in the expansion gaps on the FRP? Please keep us posted on your progress. Will you finish your floor prior to installing the baseboard?

Sure...sorry for the delay. The FRP I sourced from a local business in Cedar Springs MI. ( [email protected] ) He had 30 (I purchased 5) of the 1/16 black panels, and over 200 of the .03 panels (I purchased 3). For the vinyl 8"x100" carbon fiber print tape, I purchased that from eBay. After receiving my recent samples, I am going to go with metrorestyling.com for the cabinet doors.

Installation for both the FRP and vinyl was satisfactory, especially for someone who had not dealt with the material before. Application for the panels however was not traditional due to the thickness. I used a thin groove trowel and for the thicker panels, I covered the panels themselves as suggested by most online sources, then applied them to the walls...then used a panel roller to help flatten. With the thin FRP I had to get a little creative. I put adhesive on the wall but did not cover the entire 4x8 section. I ended up doing about a 3x8 section and then put adhesive on the panel itself with the remaining 1x8 section. Remember this stuff is about as thick as everyday craft board so it was large, flimsy, and creases easily. For the outer, inner, upper, and lower edge, I ended up custom ordering black FRP edging from Home Depot. Because of the thin panels, I still allowed for some expansion as suggested, but I was more comfortable in butting the edges up a little closer than the recommended 1/4". Because of the amount of adhesive and the sustained temperatures I allowed the panels to rest in for a few weeks, as well as conditioning the garage with a heater, I should not have to worry too much about expansion or extraction once the adhesive matures. And by now, its mature. I used clear silicone in the gaps, then finished up where needed with black caulk.

As far as the flooring vs base moulding, the temperature outside really dictates which will go down first. Also I plan to run the base moulding along the bottom of the FRP and not the concrete floor edging except for maybe the front wall where there is no 4" cement lift.


Sent from an underground bunker
 
OP
T

Teej2012

Well-known member
Joined
Nov 3, 2012
Messages
91
Location
Gilbert, AZ
Hey guys... as mentioned, I purchased a few items from IKEA recently in my quest to build the garage on a dime. Yesterday I put up a small stainless steel shelf in the corner as well as a shoe storage cabinet (but used for a few of my smaller power tools).

Both worked out great and provide an excellent (off the floor) way to store. The cabinet itself can be stacked or side by side, or even independently hung. Its a heavier duty plastic (as heavy duty as IKEA gets). Holds my angle grinder, air gun, jigsaw, hacksaw, misc tools...

Its called a TRONES Shoe/stoage cabinet and although the website says $40, I swear we bought them for $18.99.
http://www.ikea.com/us/en/catalog/products/30110832/


MoparTrucks

Well-known member
Joined
Aug 21, 2009
Messages
3,218
Location
Ozarks of Missouri
Your garage is looking great but there has to be a back story on "I've spent a lot of time in elevators". That kind of cracked me up, are you an Otis guy?
 
To avoid these ads, REGISTER NOW!
OP
T

Teej2012

Well-known member
Joined
Nov 3, 2012
Messages
91
Location
Gilbert, AZ
Your garage is looking great but there has to be a back story on "I've spent a lot of time in elevators". That kind of cracked me up, are you an Otis guy?

Haha..no. Just worked in a few hospitals, also used to be a courier, and now every elevator I get in, I start to look at the walls. Most are very nicely done, I dont think people just stop to look around because we cant wait to get off as soon as we get on. What I wouldnt give for those stainless steel panels on my wall... lol
 

MoparTrucks

Well-known member
Joined
Aug 21, 2009
Messages
3,218
Location
Ozarks of Missouri
Haha..no. Just worked in a few hospitals, also used to be a courier, and now every elevator I get in, I start to look at the walls. Most are very nicely done, I dont think people just stop to look around because we cant wait to get off as soon as we get on. What I wouldnt give for those stainless steel panels on my wall... lol
Interesting inspiration. I would never have thought of that but its cool you saw something you liked in an entirely different context and used it for your garage. Lots of talented people on this forum thats for sure.
 

red5

New member
Joined
Jan 13, 2013
Messages
1
Nice idea for a hall button. I just joined the form and saw your picture. Almost thought there was an other elevator guy here. Did you also hook up the bulbs?
 
OP
T

Teej2012

Well-known member
Joined
Nov 3, 2012
Messages
91
Location
Gilbert, AZ
Nice idea for a hall button. I just joined the form and saw your picture. Almost thought there was an other elevator guy here. Did you also hook up the bulbs?

I had one working because the Genie sent a different signal than the Craftsman opener. Next Spring I'll get another Genie and should be good to go. I could try a few other ways to get both buttons lit up but it's too cold to monkey around in the garage right now ImageUploadedByTapatalk1358128788.444298.jpg
 
OP
T

Teej2012

Well-known member
Joined
Nov 3, 2012
Messages
91
Location
Gilbert, AZ
Purchased about $400 worth of slatwall for $50 on Craig's list. Some come with reinforced inserts (which would make up the bulk of the value of course)...4 panels are grey, 1 panel is stainless faced with inserts.
ImageUploadedByTapatalk1358628224.347250.jpg
 
Last edited:
OP
T

Teej2012

Well-known member
Joined
Nov 3, 2012
Messages
91
Location
Gilbert, AZ
Okay, here's what I have come up with using MS Excel and a lot of patience. I know excel is NOT the most efficient way to design anything but it works for me while I am at work.

I played around with a few configurations for the four 2'x4' slat wall panels and the single odd shaped 3'x4' stainless faced panel. My wife and I decided that 'Config4' looked best. Because of this, I plan to buy some cabinet slat wall brackets for the IKEA cabinet I purchased a few weeks ago. The cabinet in the drawing has an Acura logo on it. I also used one of the smaller cabinets on my wifes wall (shown with the Audi logo).

90% of the wall graphics/posters/die cast cars in my drawing I do not currently own.

Although my garage will not be the most overall original in design decor, i believe its a choice that will work out great. I cannot wait for the motion light strips to arrive so I can test those out and I really cant wait for the overhead fixtures and my floor to be finished.

Enjoy my odd approach to designing with Excel.

ImageUploadedByTapatalk HD1358890546.045735.jpg
ImageUploadedByTapatalk HD1358890584.303716.jpg
ImageUploadedByTapatalk HD1358890618.399876.jpg


Sent from an underground bunker
 
OP
T

Teej2012

Well-known member
Joined
Nov 3, 2012
Messages
91
Location
Gilbert, AZ
Red carbon fiber weave vinyl trim update. My fears are starting to surface as there is more than one spot where the vinyl has bubbled up. It started on one section and I could just slap it back down with my forearm but with the fluctuating temperatures, it is happening more and more on all the walls.

I feel this has less to do with the temperature and more to do with a combination of two factors.

1. My choice of application method: Placed directly on the wall
In hindsight, I should have applied to another material such as chair railing, and then applied chair railing to the wall.

2. My choice of possibly an inferior vinyl product: eBay special
Cant go hindsight because at the time, I did not know about metrorestyling.com which sells many vinyl products including all the higher end 3M for about the same price as the eBay stuff. This is what I'll wrap my cabinets in.

ImageUploadedByTapatalk HD1359470584.854047.jpg

You can only see some of it on this photo but theres actually a large vertical bubble in the middle of the photo, just just the one to the far right.

The Bad:
What I cannot do is pull it off and start over because it will pull up the paint underneath. I know this because I had to do a reposition on one part upon initial application and it pulled up. Fortunately it was a small area.

The Good:
There are many possible solutions I could explore but most of them are quite costly. diamondlifegear.com sells chair railing in aluminum. I could go with an 8" tall red (same as my current vinyl) aluminum but this would cost $170 for just one of my walls, before their ridiculous shipping fees. This is my favorite visual option, least favorite financial option. Who wants to drop $500 worth of chair railing in a small garage? They also have red diamond plate 12"x12" tiles but that adds up as well and I'd rather have something smooth or CF pattern, not diamond.

I could also go with a black 6" band down the center which would still show some red, but it would cover up 90% of the bubbling. I'm sure I could source some sort of material that I could screw into the wall that would NOT come off unless unscrewed, and would hold the existing vinyl.

I could buy a higher quality vinyl, wrap it over several 8"x 48" x (?) boards and mount like the previous option.

Or I can just live with it for now, knowing its always going to drive me crazy until I fix it.


Sent from an underground bunker
 

Ajmckay

Well-known member
Joined
Nov 24, 2012
Messages
53
Location
Sterling Heights, MI
Nice garage! And nice car! I've always loved the NSX...

Anyways, sounds like your options for the stripe are expensive and require quite a bit of work. I can't tell how bad the bubbling is though.

Putting in a 6" stripe of black would look cool, but maybe get a little busy with all the other colors/patterns already on the walls. That and it will still show the bubbles unless you carefully cut them out of the red or something.

I agree with your reasons as to why the vinyl is bubbling though. Personally I would try to find another material to apply the vinyl to and then attach that to the wall. Could you get more FRP and cut that into strips? If the vinyl can be applied to that it would give you a nice "backer" while being low profile also. Another option would be some thin boards, like 1/8" hardboard/masonite. Covered with the vinyl it should stay fairly water proof (or you could paint it before hand).

Nice info, good luck! Also, I didn't realize there was an Ikea out there...
 
OP
T

Teej2012

Well-known member
Joined
Nov 3, 2012
Messages
91
Location
Gilbert, AZ
Yeah, right now I am leaning towards getting an 8" something or other and wrapping it... still will run me around $150 for the entire area, but thats better than $170 for just one wall. I mocked up the 6" black overlay yesterday and it looks pretty good. But yeah, eventually the edges of the red might start to bubble in places too and I'll walk away disappointed.

ImageUploadedByTapatalk HD1359482895.809585.jpg

No IKEA in west Michigan... we drove to Canton, MI.

Sent from an underground bunker
 
OP
T

Teej2012

Well-known member
Joined
Nov 3, 2012
Messages
91
Location
Gilbert, AZ
Last night I went to hang slat wall and noticed everything was damp (walls, surfaces, plastic tool boxes). Heavy condensation so I looked up and saw coin sized water spots on my ceiling and started to panic because I thought maybe we had some leaky shingles. I grabbed the ladder and opened the attic cover to find it was dry (thank goodness).

While still on top of the ladder, I started to look around at the ceiling and saw even more wet spots, also the entire back wall of the garage (driveway facing) was drenched... texted a buddy of mine who said I probably sealed the garage too much because of painting the ceilings and walls this past summer but didnt have a way for moisture to escape.

View attachment 236250 View attachment 236251
View attachment 236252 ImageUploadedByTapatalk HD1359561750.202836.jpg

This would explain why my red tape bubbled up so much.. the moisture caused the adhesive quality to retard (I think)... still crappy product but...

ImageUploadedByTapatalk HD1359561831.454327.jpg ImageUploadedByTapatalk HD1359561855.077743.jpg

I ended up leaving the attic access door open overnight to give the moisture a place to escape. In theory I thought this was a great idea but even if so, it seems pretty bush league to have to do it all the time. We park our snow covered vehicles in the garage which probably doesnt help but to be fair, we really didnt have this issue in years past, but I didnt have my walls painted and caulked up either.

After I hung one two of the 2x4 slat walls up last night, I decided to bite the bullet and start peeling away my red tape (not shown). Most of what I peeled away on the house facing wall came off with no problem but there were some pull spots that removed the paint. You can see the bubbling issue... If I dont figure out the condensation thing, Im sure many things inside could be ruined.

ImageUploadedByTapatalk HD1359562711.292034.jpg

ImageUploadedByTapatalk HD1359563092.281062.jpg


Sent from an underground bunker
 

Omphaloskeptic

Well-known member
Joined
Oct 11, 2008
Messages
2,346
Location
Ultima Ratio, Wa.
"While still on top of the ladder, I started to look around at the ceiling and saw even more wet spots, also the entire back wall of the garage (driveway facing) was drenched... texted a buddy of mine who said I probably sealed the garage too much because of painting the ceilings and walls this past summer but didnt have a way for moisture to escape. "


I'm going to have to disagree with your buddy's prognosis. I think you should stop doing any more improvements in the garage until you have this water/moisture problem solved. You need to get up close and personal with the underside of your roof and verify what the root problem is.

I speak from the experience of owning an older home (1956) with a full basement and water incursion problems. I thought it was simply a matter of ground water not being handled by a sump pump and also sediment clogged foundation drains. It was that, but also I had a roof valley fail from age and it didn't show up other than moisture accumulation in the basement, until I went crawling through the attic's recesses. The water penetrated the roof valley (old/cracked), ran along the structure, down inside the walls, behind wood paneling in the basement, and weeping up through the VCT flooring. By the time I discovered the additional problem, I had rot to deal with from the roof to the wall studs in the basement and everything in between. I had to demo the entry vestibule, rebuild both interior and exterior walls, ceilings, flooring, etc., etc., etc..

Although your house is relatively new, I would be suspicious of how your roof was engineered/built. It may even require some access holes be opened up in the walls, ceiling, and even the soffit to pinpoint the source of water coming in and jacking up your moisture to the point of bubbling/lifting paint and tape. I hope I'm wrong about your situation, but you'd better be safe than sorry. It's amazing how much damage water, time and temperature can do to a house structure.

P.S. - If you find any black mold in a cavity - STOP - and get suited up in anti-contamination gear. Really, that stuff is deadly!
 
OP
T

Teej2012

Well-known member
Joined
Nov 3, 2012
Messages
91
Location
Gilbert, AZ
Yeah, I haven't closed my investigation and thats why I posted in this thread so people with far more experience can chime in.

I do believe a strong contributing factor is the way I finished the garage combined with the insane temperature differences. One day both our vehicles are covered in snow, the next day its white out conditions because of the fog, followed by torrential rain, and then 20 degrees again today.

I could not pinpoint a water collection area on the floor, or the famous "stain circle" on the ceiling. The attic was bone dry and so far, the only thing that made sense was the moisture collected in the garage (like a sauna) had no where to go until I popped open the attic trap door. I put up a few rolls of insulation a couple of summers ago but made sure not to cover the roof vents at the end of the insulation. I definitely plan to keep looking around though. Maybe I need more rolled insulation in the attic space (attic only covers my side of garage) because I finally finished the garage..sort of.

Thoughts?


Sent from an underground bunker
 

55cadillacking

Well-known member
Joined
Apr 26, 2012
Messages
1,959
Location
Calgary
Yikes. Sounds like you have hit a major barrier. I have no expertise in this area, but I sure hope you can find the root of the problem. We have some pretty extreme temp fluctuations up here, too. I have yet to detect any issues and my garage is sealed up pretty tight also. Then again, our elevation and geographical location ensures we are pretty dry year round. It's hard to get wet when it rains. Best of luck as you move forward.
 
OP
T

Teej2012

Well-known member
Joined
Nov 3, 2012
Messages
91
Location
Gilbert, AZ
Yikes. Sounds like you have hit a major barrier. I have no expertise in this area, but I sure hope you can find the root of the problem. We have some pretty extreme temp fluctuations up here, too. I have yet to detect any issues and my garage is sealed up pretty tight also. Then again, our elevation and geographical location ensures we are pretty dry year round. It's hard to get wet when it rains. Best of luck as you move forward.

Yeah, I need to figure it out but on a positive note, I just got home from work and with the attic door open, the garage is dry. Cool of course, but the sweaty back wall and everything else is dry. Sounds like I just need to do some kind of air circulation, maybe as simple as installing a ceiling air vent like the kind we have inside our home. But I'm still going to keep a close eye on things... the next few days is teen temperatures like last week.
 
OP
T

Teej2012

Well-known member
Joined
Nov 3, 2012
Messages
91
Location
Gilbert, AZ
Finished putting up the slat wall finally.. not pictured is a smaller black slat wall panel against the black back wall. Now its time to hang a cabinet and some wheels...

84172BF0-3B0C-4149-A4B5-AC8AD142CDF9-4841-0000062B59F593AF_zpse5bfa96d.jpg


(edit Feb 14 update)
My wheel hangers arrived so I hung up two wheels just for effect. I still have to get the yellow spare de-boned and both wheels will move over closer to the wall once I assemble my cabinet and hang it. The shiny slat wall panel will be reserved for my 1:18 cars that I don't yet have.

9e6u7a9y.jpg
 
Last edited:

EMC2

Well-known member
Joined
Nov 25, 2012
Messages
229
Location
Georgia
Great transformation Tee. I like your color choices.
It's always interesting to see the use of different materials to achieve the desired effect. Very informative.
 
To avoid these ads, REGISTER NOW!
Top Bottom