To avoid these ads, REGISTER NOW!

My three car - Suggestions wanted - 56k beware

pwm72

Active member
Joined
Oct 5, 2005
Messages
43
Location
Elkton, MD
I have been in the house for three years now and I am finally getting around to doing the garage. First some specs. It is a tight three car at 28'w x 20' deep. The ceiling height is 10'9". I have an 8' door on the one side and a 16' door on the other. I have an old musclecar that I tinker around with, so it will be a working garage.

Plans are to put in a lift (undecided on a two-post or a four post) but that is probably a next year project. I did go ith a Liftmaster 3800 on the "big" side of the garage to accomodate the lift. For flooring I am going with RaceDeck. Was going to go black and white checkerboard but upon hearing how difficult the white is to keep clean, I may go with the dark gray/lt gray in a checkerboard pattern.

Anyway here are a few shots of the garage before:

BeforeEmptyPicture020.jpg

BeforePicture007.jpg

BeforePicture011ceiling.jpg


I wasn't too concerned with the perfection of the drywall taping - it is a garage afterall, so I sanded a bit and went with two coats of primer rolled on and a single top coat of semi gloss pure white on the walls and ceiling.

InProcessPrimerPicture016.jpg

InProcessPrimerPicture021.jpg


It was an awful lot of white in there when it was done, so I decided to add a little bit of color.

CompletedPicture036.jpg

CompletedPicture032.jpg

CompletedPicture031.jpg


I need to run additional electric out there I know. Probably going with a separate 100A panel. I want to run two 220 lines as well. (For lift and eventually a welder) I certainly need lights. Currently have two incandescent bulb fixtures and the light with the garage door openers. I will also be building a workbench and shelves.

So my questions are:

How should I configure my lights and what kind?

I plan on putting my lift in the "big" side of the garage (It's ok if I can only fit two cars in the garage when I am through) But what about suggestions on placement/size of workbench as well as placement of shelves?

I still have a bunch of stuff to put up on the walls and such, but I will get to that in the coming weeks.

Any suggestions are appreciated.
Thanks
Paul
 
Last edited:
To avoid these ads, REGISTER NOW!
OP
P

pwm72

Active member
Joined
Oct 5, 2005
Messages
43
Location
Elkton, MD
No suggestions? I have been mostly a lurker on this board for about a year now and have not known the participants to be shy about offering suggestions.

Please?
 

Damon L.

Well-known member
Joined
Mar 23, 2008
Messages
175
Location
SE Minnesota
More pictures/info on the Buick?

I would offer suggestions, but my garage is pretty unorganized right now. I got nothin'
 

rickairmedic

Well-known member
Joined
May 31, 2005
Messages
4,165
Location
louisville ,Ky
I agree we need more pics of the buford :D . I like 4 foot flourescents for lighting myself . I will also add if the garage is only 20' deep put your workbenches and cabinets along the side I learned this the hard way put cabinets along the back wall in my garage then bothered to measure only to realise I wouldnt be able to fit my 63 ford truck in the garage with them there so now I have to move all the lower cabinets to a side wall although I will leave the uppers where they are . I have more uppers for the side wall and you can never have to ma ny cabinets to stuff **** in :D. I also like your stripe I am gonna have to check with my local supplier and see if she can get me something like that in a blue :D.


Rick
 

bofus

Well-known member
Joined
Dec 8, 2007
Messages
45
Location
Washington State, USA
I prefer 8' high output fluorescents. Lots of em. My workbay is about the same size as your garage and I have one light in the center that is the light normally used. I then have 6 more lights on two switches (three lights each) so I can add more light if/when I need to, then I added another over the workbench. My lighting may be overkill, but I like lots of light...and besides, I can work on my tan.
:lol_hitti

If you look at my post #14, you can see what it looks like and judge for yourself.
http://www.garagejournal.com/forum/showthread.php?t=13700
 

bluesman2a

Well-known member
Joined
Aug 16, 2005
Messages
1,312
Location
Atlanta, Ga.
I like 4 foot flourescents for lighting myself.

:+1: extra 4' tubes store easier than 8's, and it's easier to handle/transport too.

On my bays, I have one row near the front of the vehilces, another about mid-bay, then as you get up near the door(s), I put a string on either outside edge of the door tracks.

Depending on your usage, you may consider mounting a couple on a separate switch on the ceiling above the door (in the open position) towards the rear of the vehicle. In my case these only really get used in the winter/weather when I work with the doors closed.
 
OP
P

pwm72

Active member
Joined
Oct 5, 2005
Messages
43
Location
Elkton, MD
Thanks for the input...I like the idea of the lights on separate switches, allows you to only use as much as you need.

Also thanks for the suggestion on the bench along the wall. 20" deep is not really deep when you like older cars. As it is now with the Buick in there I only have 2 ft. front and rear.

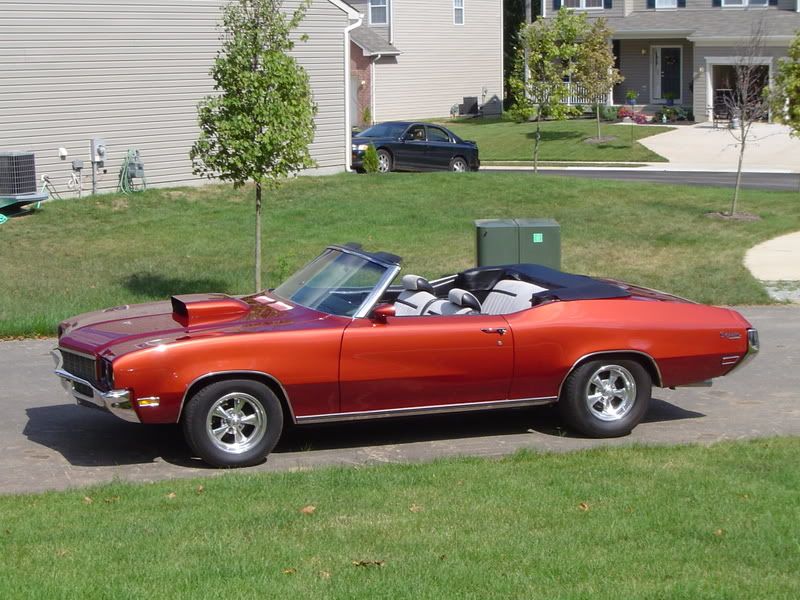
As for the Buick. It is a 72 Skylark convertible. Just a toy to keep me out of trouble. It has a 1970 Buick 455 (worked a little :D ), A little bit of cam, headers, 3" exhaust, TA SP1 intake with Holley 1000HP carb, a 12 bolt posi w/3.73 gears, some suspension work and a switch pitch 400 trans. It's a lot of fun.:thumbup:

Side.jpg


1.jpg
 

Craig Balzer

Well-known member
Joined
Sep 21, 2005
Messages
872
Location
Colorado Springs
Paul

You asked "I plan on putting my lift in the "big" side of the garage (It's ok if I can only fit two cars in the garage when I am through) But what about suggestions on placement/size of workbench as well as placement of shelves?" but you don't give enough detail for a fwellow to help out.

You said the garage is "at 28'w x 20' deep. The ceiling height is 10'9". I have an 8' door on the one side and a 16' door on the other." but that word picture is a bit short on details.

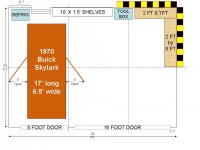
The pictures help some but don't allow the entore floor plan to be visualized. I attached asimple power point slide that is my best guess as to your garage's floor plan. Let me know how close I came.


The hard parts are:

Not knwowing the exact dimensions and locations of doors and windows

Not knowing what else you NEED to store in the garage (washer/dryer; bike(s); lawn care stuff; patio furniture; etc)

Not knowing what else, asdie from Buick wrenchin', is anticipated in there
 

Attachments

  • Slide2.JPG
    Slide2.JPG
    61 KB · Views: 157
OP
P

pwm72

Active member
Joined
Oct 5, 2005
Messages
43
Location
Elkton, MD
Craig, thanks for the thoughful post. I will post further details later this week. I actually just installed my Racedeck floor tonight. 3 guys, 560 sq ft in 2.5 hours and it looks awesome. It started to rain just as we finished so I had to rush to get all of the garage junk back inside, but I will empty it out this weekend and take pics.:thumbup:
 

autoist

MEMBER EMERITUS
Joined
Aug 20, 2005
Messages
1,107
Location
Gurley, Alabama
Something about that red paint & the flame wallpaper reminds me of a den a woman has decorated for the Fall season...initially, the flame wallpaper kinds looks like leaves or something along those lines....takes a few minutes to remember its a garage.
 

e-tek

Well-known member
Joined
Dec 19, 2007
Messages
10,690
Location
Saskatoon, SK
It's coming along nicely - but REALLY NEED to see pics of the floor-layout - and the racedeck! Q- Is it hard to roll things around on top of the racedeck? Not that anyone rolls that much stuff around, but....

As for the lighting - A) put MORE than you ever thing you need. Once you're polishing the side of that baby, or trying to see something under your lift, you'll thank me/you/whoever.
B) I put 4 foots at 4 foot spaces along both walls, 6 feet up. They are awesome (and now I wish I had more...). they don't glare in your eye as one would think, they just add light.
As well, put at least two outlets in the ceiling - for hanging worklights and pull-down extensions.
Good luck!
 
OP
P

pwm72

Active member
Joined
Oct 5, 2005
Messages
43
Location
Elkton, MD
Something about that red paint & the flame wallpaper reminds me of a den a woman has decorated for the Fall season...initially, the flame wallpaper kinds looks like leaves or something along those lines....takes a few minutes to remember its a garage.

Haha...a den decorated by a woman for the fall? Um...ok.

Seriously...it may just be the picture, but the paint is actually bright orange and while thee flames are stylized - leaves?? If you say so!

Anyway, it all looks great with the RaceDeck floor. I will clear the garage out this weekend and take more clear pictures (including the detail that you were looking for Craig - your powerpoint is pretty close)

E-Tek, the RaceDeck is AWESOME. I went with the diamondplate texture and frankly the bump are really not that high at all. I had samples of another brand of tile and they were far more pronounced than on the RaceDeck. I had no trouble moving my refrigerator, my toolbox or my engine hoist on the floor.
 
To avoid these ads, REGISTER NOW!

Impact9

Member
Joined
Sep 7, 2008
Messages
6
Have to say I love it so far, both the car and the garage. Where did you get that flame border at?
 
OP
P

pwm72

Active member
Joined
Oct 5, 2005
Messages
43
Location
Elkton, MD
Paul

The hard parts are:

Not knwowing the exact dimensions and locations of doors and windows

Not knowing what else you NEED to store in the garage (washer/dryer; bike(s); lawn care stuff; patio furniture; etc)

Not knowing what else, asdie from Buick wrenchin', is anticipated in there

Craig, perhaps these pictures will help. It is a three car attached. There are no windows to contend with.

From the front of the garage, here is wall 1
Finishedwfloorwall1.jpg


Wall 2 is the back wall, there is a doorway to the house with steps. They are 7 feet from wall 1.
Finishedwfloorwall21.jpg

Finishedwfloorwall22.jpg


Wall 3 is essentially the same as wall 1
Finishedwfloorwall3.jpg

Finishedwfloorwall31.jpg


and then wall 4 is the front wall with the small 8 ft door on the left and the 16 ft door on the right.
Finishedwfloorwall31.jpg


As far as what I have in there. I have a full size fridge, my MAC toolbox, a small HD workbench (for now). I have no lawn stuff, patio stuff, washer/dryer...just traditional garage stuff. As I said, it is just a hobby garage. Any help in laying out the garage would be appreciated. Including placement of outlets and lights. It's essentially a blank canvas.
 
OP
P

pwm72

Active member
Joined
Oct 5, 2005
Messages
43
Location
Elkton, MD
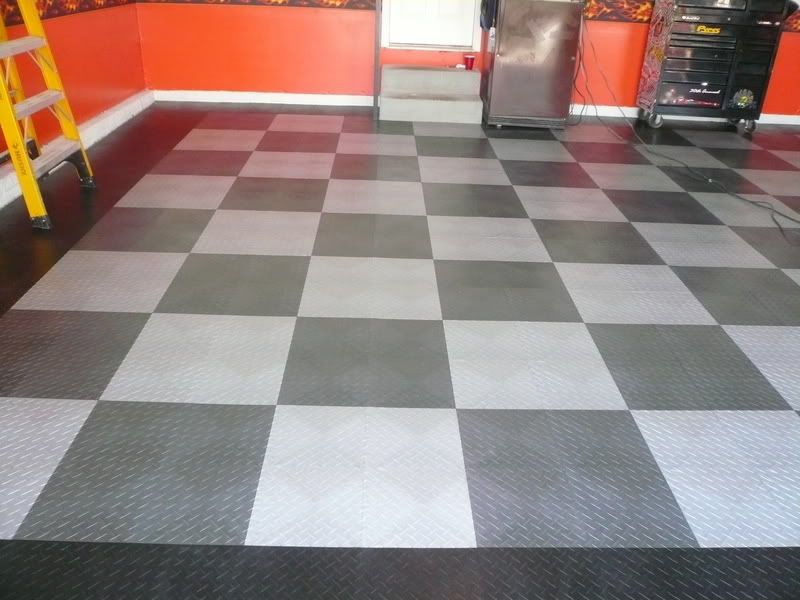
And as you can see, my RaceDeck floor arrived. I ordered Graphite, Black and Alloy tiles for my floor.

560 tiles worth...
RaceDeckdelivered.jpg

Graphitetile.jpg

Blacktile.jpg

Alloytile.jpg


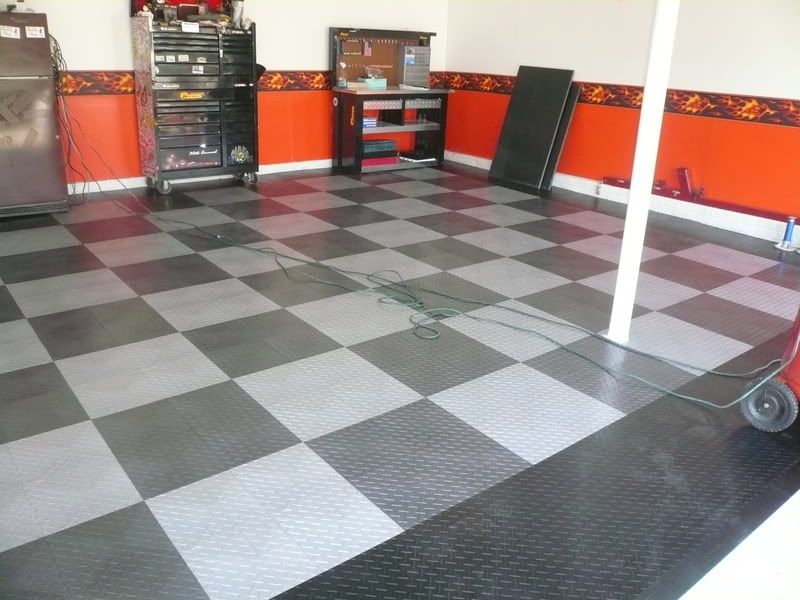
It went together in no time at all without any trouble too. I left 1/2 inch for expansion around the perimeter of the room.

I think it came out pretty darn good.
RaceDeck1.jpg

RaceDeck2.jpg


The Buick likes it's new home.
RaceDeckwBuick4.jpg

RaceDeckwBuick7.jpg
 
OP
P

pwm72

Active member
Joined
Oct 5, 2005
Messages
43
Location
Elkton, MD
Have to say I love it so far, both the car and the garage. Where did you get that flame border at?

Impact, my wife actually found it in a wallpaper book at Lowes. I wanted a little bit wider border and this fit the bill nicely.

Here is a detail shot of the border.

Borderdetail.jpg
 

Quasarcoupe

Member
Joined
Oct 5, 2008
Messages
16
Location
Pasadena md
looks great man, i love how the garage is coming along! far as outlets goes, as it looks like there isnt too many, if you dont have a way to get into the walls i would run conduit and boxes , prob about every 12ft. Far as lighting goes check out places being rehabbed, buildings and companies, I scored many of the 4x2 lighting fixtures for me and friends, and even 3 8ft shop style lights that i have going into each of my bays.

Other than that i think the buick takes up way to much room in the garage, you can drop it off anytime :fingersx:
 

Craig Balzer

Well-known member
Joined
Sep 21, 2005
Messages
872
Location
Colorado Springs
Paul

Well – there are good aspects of your garage and bad aspects. You know this. Let’s start positive:

Good Aspects
• No windows – totally blank walls. Security (+); a free hand in placement of items (+); semi-gloss white on the walls and ceiling – very reflective for lighting (+); but no natural light (-)
• Only one man-door – no competing architectural bits and bobs (+)
• You already have a compressor (but is it big enough for your future needs?) (+/-)
• An understanding wife who has placed all her “important things” elsewhere (+++)
• Truly a Blank Canvas (+++)
• Perhaps most importantly: A plan for future improvement (to put in a lift; a separate 100A panel; two 220 lines; (for lift and eventually a welder; lights; placement/size of workbench; placement of shelves) (+++)

The Bad Aspects – many of which you already know. Most can be solved with a liberal application of $$$. Staying positive, let’s start with easy (read that as cheap(er) fixes and move on to the expensive or unfixable:

• No electrical outlets aside from one or two between the overhead doors and a single duplex outlet near the man-door; you already know this. ($; covered in your plan)
• Two incandescent bulbs in ceiling ($$; covered in your plan)
• Limited size of the floor footprint (20 x 28) – no options here; ya gotta play the hand you are dealt. So long as you, the missus and the kids keep it that way the garage as a hobby work area, you should golden.
• The pole standing about 4 feet in from the overhead doors apparently centered on the gap between the doors – takes up some room. A small obstacle that has to be planned around. You didn’t mention or highlight this fact.
• The overhead beam traversing the garage a few feet into the garage. Bad juju; maybe bad enough to queer the plans for a lift in the garage. Ya never mentioned this little pitfall. A 16’ wide roll-up door would eliminate the overhead obstacle if you needed more room to allow maximum extension of the lift. Won’t be as pretty as the door there and would not match the 8 footer, but . . .

You can see from the attached a recommendation for utilization of your foot-print. Some comments:

1. POWER and LIGHT: Place more outlets than you think you need. If you plan short – with you current situation – it shouldn’t be too bad. Cause unless you want to rip out the newly painted walls to install wiring (as someone already commented) you gotta install conduit in the wall and outlet boxes on it. If you run the conduit along the flame trim and paint the conduit to match, it ought to blend in pretty good. Same applies whether you are talking 110 or 220. And for the ceiling lighting – conduit along the ceiling to get the power to the lamps.
 Plan for drop lights over the lift area to illuminate under the car when on the lift.
 Planning the placement of the 110 outlets can be as easy as placing them every 8 to 12 feet around the perimeter of the garage. But better is placing them where they are needed. This ought to the last aspect of your planning. You MUST get the placement of the benches and major work areas set FIRST. Then placing the 110 and 220 outlets becomes obvious. Placing a bench or other object over an existing outlet cover in the wall is no big deal; having to place the same object in front of conduit and a box attached the wall will push everything out into the floor. Yeah, it’s only a few inches. But you don’t have much to spare
 Same comment applies to the lighting
 You have learned how much fun extension cords are: always in the way or always in the wrong place. Tripping hazards. Enough outlets will eliminate these little horrors.

2. WORK BENCH: As previously mentioned by a previous poster, the benches almost gotta go long the side walls. The dimensions of the garage drive you to this placement. I placed a 10 foot work bench in the corner nearest the lift. Gives you work surface even when you are under the car. The tool box may fit nicely between the bench and man-door. Also places the tools near the lift for convenience. Use this large bench as a clean work area / assembly bench.

3. WELDING: I paced a smallish metal-topped bench in the opposite corner from the work area. This can double as a tear down/dirty work area. Keep the grime and grit away from the lift and car. I assumed that wall was an exterior wall.
 Welding areas need a hooded exhaust fan to the outside, right?
 Your nice new pretty Race Deck flooring will need protection in this corner or you may what to simply pull up the Race Deck and weld over bare floor.

4. COMPRESSED AIR LINES: do you really need them? Running them AND the conduit for the power distribution – without crossing one over the other -- will be a real trick

5. STORAGE: I placed shelving up front along the wall with the bench. This is gonna stick out into the garage and make pulling into the garage a challenge. You have virtually no room along the side walls. Usually the garage doors are set a foot or two away from the side wall; you don’t have that luxury. Careful here.
 You will need to avoid the inclination to put shelving and storage between the man-door and the future welding table. Just no room if you expect to walk around your car with out tripping over “things”.
 Another option for storage is above the bench and above the 8 foot overhead door. If you do choose this option, but sure to use cabinets as opposed to open shelving. That is a real unusual color on your Buick and would be a real pain to match IF something fell from the shelves on to the car. Not to mention the replacement of the convertible top.
 Cabinets above the work bench would give you a surface to mount task lighting to really light up the work surface. Place high intensity lights under the cabinet to illuminate and kill shadows on the bench.

6. SPACE: you just don’t have much. You knew that going in. Only you can decide if the expense (dollars and floor space) of a lift is justified. You have to determine just how much time you will use the lift. Yeah, of course: oil changes and tire rotations are made all the easier. But how often it that?
 I prefer 2 to 3 feet of “safe space” around the edges of work benches. You don’t have that.
 I set the lift footprint 4 feet away from the side wall: you have no buffer from the work bench otherwise. But that pushes the lift work area over close to the parking area by the 8 foot door.
 You are going to need to park very carefully once your garage gets filled. You will be negotiating past the pole and nudging up close to the welding table. If you stack “stuff” along the front wall – good luck. See the way I’m waving my hands?

I can’t think of anything else to add. Of course as soon as I post this I’ll think of two really good gems that should have been up front. Such are the vagaries of life.

Craig

PS -- Love the Buick! Really LOVE the plate!!!
My college graduation/birthday/commissioning gift from my folks in 1976 was a ‘71 GS Stage 1, four-speed. I sold it in 1984. Heavy sigh. It was 1 of 801 Stage 1’s made in 71. Really, really miss that car. Under NO CIRCUMSTANCES are you to reveal to me your address. You do so at your peril.
 

Attachments

  • Paul's Garage - GIF.jpg
    Paul's Garage - GIF.jpg
    30 KB · Views: 85
OP
P

pwm72

Active member
Joined
Oct 5, 2005
Messages
43
Location
Elkton, MD
Craig, what can I say? Great post...thank you very very much. Yes, I am aware that it has shortcomings, but coming from the narrow one car I had, this is downright roomy!
I did forget about the beam (it supports the master bedroom - above the garage) and the pole (supports the beam).
I really appreciate all of your insight regarding the design.
For electric, I was not planning on going into the walls but rather as suggested, running conduit. Outlets and lights will be plentiful. I love the rendering/design..thank you for that. It will be a slow process from this point forward...probably work on benches next and take your advice and position outlets/lighting from there. The lift will be about a year off. I do have a LiftMaster 3800 jackshaft opener and have raised the door tracks to tuck up to the beam on the big door, giving as much headroom as possible. I have a neighbor with a GN on his 4-post BYB lift in the same garage and seems to work out ok. Only major issue is that the damn steps to the man door into the house eat up 2 feet of depth on the big side.

Mmmmm 71 GS Stage 1 4 speed...sounds tasty. Anytime you are on the east coast, I owe you a beer and a ride in the Buick...
 

Craig Balzer

Well-known member
Joined
Sep 21, 2005
Messages
872
Location
Colorado Springs
Paul

Glad I was able to provide some useful ideas.

I have a bit of extra time on my hands. I am Defense Contractor working in Kabul. Not much in the way of night life; not the sort of night life an 'Merican would enjoy, in any event.

Good luck with your garage and take real good care of that Buick. If I'm ever on the east coast, I'll take you up on that ride.

Craig
 
To avoid these ads, REGISTER NOW!
Top Bottom