To avoid these ads, REGISTER NOW!

My Wilton C2

alan camby

Well-known member
Joined
Dec 3, 2011
Messages
1,566
Location
South of Indianapolis, Indiana
I picked up a Wilton C2 Vise today off of Craigslist.
I already posted a photo on the "vises of GJ" thread.

Created this to keep all my photos in one convenient place. I will post a photo on the vises of GJ thread when all is done.

The Vise was manufactured in May of 1995 and was installed on 8/10/95.
the company that owned the vise had it for years and decided that they no longer wanted it.
They threw the vise in the scrap bin. The employee who worked the station by the vise asked what happed to the vise. He was told that it was scrapped. He took it home and it sat in his storage barn for 10 years.
I took ownership on 1/17/15.

Here is the C2 when it first arrived at its new happy home. Here he is hanging out with my Wilton 1755. This picture is a excellent reason why you don't buy a Vise based on jaw size. Vises seem to be advertises by Jaw size and the common man would think the larger the number, the larger the vise. The C2 is a 5" size (jaw width) while the 1755 is a 5-1/2" vise. Jaw size does not indicate Vise size.
https://scontent-b-dfw.**.fbcdn.net/hphotos-xfp1/v/t1.0-9/10917333_622408501224412_6940080115562286211_n.jpg?oh=411a951ca8890fa5f5b4aecea6d6aa5e&oe=55347674

I noticed that one jaw was slightly wider than the other. I removed the jaws, cleaned, than wire wheeled with my Baldor bench grinder. As I suspected, the dynamic jaw is newer than the static jaw. The left jaw here (dynamic) has almost no wear.
10931264_622408441224418_6059626568084441259_n.jpg


Here is another example of the size of the C2. I did not have the standard 12oz coke/Pepsi can handy. Here is the common 12oz PB blaster can. BTW, The spindle screw has been removed from the vise in this picture.
10917333_622408481224414_5011922101149056855_n.jpg


At this point I think the Vise is in excellent condition and have no regrets in the purchase. No signs of abuse to the castings. I am pretty sure that the pipe jaws have never been used. Even the rubber bumpers are still on the spindle handle.

Things that still need fixed.
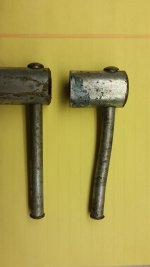
-One of the swivel lock down nuts has a bent handle. The other handle also shows signs/scratches of a cheater used to tighten them.
-the formed steel end cap has a dent in it.
-New SHCS's for the jaws.
-Drawings Show a dowel pin between the main casting and the inner ring. Inner ring meaning the piece that locks the swivel.

I think I have read here on GJ that a automotive bearing dust cover can be used for the formed steel end cap.

If anyone knows the size of the dowel, that information would be appreciated. I can measure the ID of the holes but not sure of the length.


More to come.
 
Last edited:
To avoid these ads, REGISTER NOW!

organ

Well-known member
Joined
Jan 22, 2014
Messages
955
Location
Atlanta
The real star of the show is that Ex-Lax thermometer in the background... although a barometer might have been more apropos...
 
OP
A

alan camby

Well-known member
Joined
Dec 3, 2011
Messages
1,566
Location
South of Indianapolis, Indiana
OP
A

alan camby

Well-known member
Joined
Dec 3, 2011
Messages
1,566
Location
South of Indianapolis, Indiana
"Reverend" Kevin Scott has all the things you need to "beautify" your C-2...:thumbup:

A long standing member of Garage Journal, Kevin's got the stuff you need...:beer::lol_hitti

www.wiltonviseparts.net

He has some nice looking items on that web site.
I am still debating on what I will do with the swivel handles that are bent.
These are pretty slick
http://www.wiltonviseparts.net/wilton-c2-1-inch-hex-swivel-clamps-5-8-11-threads/

I am confused by his comment on my Wilton 1755 on the "vises of GJ thread".
He indicated that my retainer (several people on GJ call it the horse shoe) has some kind of adjustment with spindle endplay. I have adjusted endplay with the shim size between the spindle screw and the dynamic housing. The retainer just keeps it all from coming apart. The retainer should only ride on the spindle screw on the back side.
 

oldldh

Well-known member
Joined
May 22, 2012
Messages
3,700
Location
Fairhope, AL
Brother Canby...

You "NEED" those new swivelers...:thumbup::thumbup:

And a set of "Smooth" jaws...;)

And....:evil:

You are balancing on the precipice of a very slippery slope...:beer:
 

drivesitfar

Well-known member
Joined
Oct 23, 2013
Messages
36,040
Location
Pacific Northwest
Alan: i'm betting Kevin has made more horseshoes (retainers) than all of us combined because those institutional Wilton vises that were sold in mass at auctions years ago had issues. the horseshoes are fairly soft metal and with daily over use by many students those horseshoes would wear along with the hub to create quite a bit of slop or even break.

some of the fixes were to make a thicker horseshoe and others just made new bronze horseshoe shims to put behind the original horseshoe to take out the slop.

since you already have your C2 apart can you tell me was your pin holding the vise nut hard to punch through or was it the 2 pin arrangement? i can tell you like quality so you might want to buy a new single or pair of jaws or what i would do and I also like quality is to buy a 6 inch pair of copper Wilton jaws from a seller on Ebay for $35.

you vise is awesome and i paid a lot more for mine, but i didn't have to drive 3 hours. Truly i think the C2 is Wilton's best vise with the Baby Bullet a close second.

good luck
 
OP
A

alan camby

Well-known member
Joined
Dec 3, 2011
Messages
1,566
Location
South of Indianapolis, Indiana
Alan: i'm betting Kevin has made more horseshoes (retainers) than all of us combined because those institutional Wilton vises that were sold in mass at auctions years ago had issues. the horseshoes are fairly soft metal and with daily over use by many students those horseshoes would wear along with the hub to create quite a bit of slop or even break.

some of the fixes were to make a thicker horseshoe and others just made new bronze horseshoe shims to put behind the original horseshoe to take out the slop.

since you already have your C2 apart can you tell me was your pin holding the vise nut hard to punch through or was it the 2 pin arrangement? i can tell you like quality so you might want to buy a new single or pair of jaws or what i would do and I also like quality is to buy a 6 inch pair of copper Wilton jaws from a seller on Ebay for $35.

you vise is awesome and i paid a lot more for mine, but i didn't have to drive 3 hours. Truly i think the C2 is Wilton's best vise with the Baby Bullet a close second.

good luck

I am no expert on Wiltons (or anything really :lol_hitti) but the spindle assembly seems very simple to me.

If the vise is lubed, taken care of, and used properly, the horseshoe should see little to no wear. The only use I see for it is to pull the dynamic casting out of the main casting. Now if the vise were allowed to rust, the horseshoe will not be happy. If someone tries to use a vise to pull, instead of clamp, the horseshoe will not be happy.

The shim does not go behind the horseshoe. The shim is installed down the length of the spindle screw where it will live between the screw and dynamic jaw casting.

As the vise is used, most of the wear in the assembly should take place where the spindle rides on the shim and the shim rides on the casting. This wear will lead to endplay.

IMO the thickness of the horseshoe is just aesthetics if over stock. A hardened or thicker horseshoe could lead to broken 10-32 screws. If a Wilton is thrown in reverse and resistance is encountered, a bending stock horseshoe is a sign to stop immediately. Something is bent, jammed, rusted, or the vise is being used as a expander.

As far as my pins that holds the tail casting in. Mine has 2 pins. Seems like a easy way for wilton to assemble but is a pain to take apart. The holes are not in alignment from each side which means, at least mine, could not be hammered out from one side. My only choose was to get the pins into the center and out of the main vise casting. Once the end casting and nut were out, I could work on getting the pins out.

I will look into the soft jaws. I find that I use flat (flipping a tradesman), aluminum, or brass over the stock jaw. Most of the time I want non marking.
I will always keep a vise or two with stock style for the really tough jobs.

thanks :thumbup:
 

drivesitfar

Well-known member
Joined
Oct 23, 2013
Messages
36,040
Location
Pacific Northwest
Alan: all your thoughts make sense, but since Wilton vises were made for a lot of schools they have experienced all kinds of use. I'm pretty sure Kevin showed one of the Wilton bullets he was restoring with a very worn out horseshoe and spindle so his fix if i remember correctly was to make a new thicker horseshoe. if he sees your new thread maybe he can chime in and show those pictures and describe the fix and mis use.

or check out the vise repair 101 thread and i'm almost positive he posted the information there.

I've yet to take apart a Wilton bullet myself, but I've paid pros in the past to restore them and the double pin situations were always getting them flustered a bit until they removed them.

it looks like you are well on your way to getting that wee beastie spiffed up. i don't have any affiliation with this Ebay seller, but I've bought maybe 20-30 jaws from them over the years and they are great.

http://www.ebay.com/itm/1-PAIR-OF-G...1?pt=BI_Tool_Work_Holding&hash=item5af3db3bb9
 
OP
A

alan camby

Well-known member
Joined
Dec 3, 2011
Messages
1,566
Location
South of Indianapolis, Indiana
To elaborate a little more on the end casting and nut. I did not have a 18" or however long that is needed brass drift to hammer this back casting out. So I grabbed a 24" or so section of 1/2" copper tubing.

After the pins are free from connecting the main vise casting from the end/tail casting(or whatever we want call it?) the end can be hammered out. At first I looked at it and wanted to hit the nut with a 6" or so brass drift. After thinking about it, that would transfer force from the nut to the tail and could bend the pins or damage the castings.
So this is where my really long copper tube came into play. It will fit between the nut and the main vise body casting. This way I could hit right on the end casting. Every hit I moved the tube punch over to the opposite side. The end was out in about 30 seconds.
 

drivesitfar

Well-known member
Joined
Oct 23, 2013
Messages
36,040
Location
Pacific Northwest
Alan: I've also seen a small wooden dowel used to push the dust covers out so you can see the vise nut when dealing with that 2 pin style holding it. i have a small aluminum one in my carry tool box for when i need to move those out when i start restoring mine and it also works getting stubborn bolts out of gym equipment if the bolt is stuck.

did you mention you are missing the dust cover? the auto stores have metal freeze plugs that might work, but they are flat. or Etrailer.com has some that work for the smaller bullets that are rounded. the links and sizes are in the vise repair 101 thread, but you might have to PM a couple guys that have restored their C2's to get sizes of ones that might work for yours.
 

KMScott

Well-known member
Joined
Feb 14, 2012
Messages
4,643
Location
Daufuskie Island, South Carolina
I am no expert on Wiltons (or anything really :lol_hitti) but the spindle assembly seems very simple to me.

If the vise is lubed, taken care of, and used properly, the horseshoe should see little to no wear. The only use I see for it is to pull the dynamic casting out of the main casting. Now if the vise were allowed to rust, the horseshoe will not be happy. If someone tries to use a vise to pull, instead of clamp, the horseshoe will not be happy.

The shim does not go behind the horseshoe. The shim is installed down the length of the spindle screw where it will live between the screw and dynamic jaw casting.

As the vise is used, most of the wear in the assembly should take place where the spindle rides on the shim and the shim rides on the casting. This wear will lead to endplay.

IMO the thickness of the horseshoe is just aesthetics if over stock. A hardened or thicker horseshoe could lead to broken 10-32 screws. If a Wilton is thrown in reverse and resistance is encountered, a bending stock horseshoe is a sign to stop immediately. Something is bent, jammed, rusted, or the vise is being used as a expander.

thanks :thumbup:

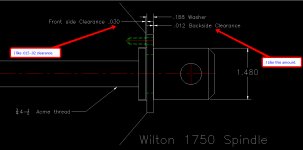
I did not mean to create a ruckus over your washer Alan, sorry, I just wanted to mention that there are two thickness on some washers. One is 3/16 and the other is 1/4 thick. It just looked like to me your 1755 had a pretty good gap in the picture, but I could be wrong.

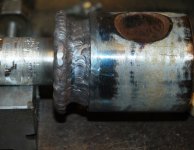
I have repaired several wore out washer grooves on Wilton spindles. I added a drawing of what Wilton likes as clearance's in the washer area and notes where I like to tighten up some clearance's. I agree all pressure closing a Wilton vise should be set up so the face of the spindle is bottoming out on the counter bore machined into the Dynamic jaw support. The washer should have about .030 minimum clearance in the front and .012-.015 per Wilton's spec:s. But if the backside of the washer groove has a gap of .02 or more then you will see more backlash when moving the dynamic jaw support.

I have a 6" Red Seal vise that has almost one whole turn before moving the Dynamic support and it drives me crazy. Eventually I'll fix it. I added a few pic's of repaired spindles. With a 4-1/2 pitch then one revelation is a gap of .220.

Sure like your C2. I'd be happy to shave drawings of your jaws if you need them.
 

Attachments

  • Wilton_1750_Spindle.jpg
    Wilton_1750_Spindle.jpg
    138 KB · Views: 55
  • Wilton Groove Repair (1).jpg
    Wilton Groove Repair (1).jpg
    133.3 KB · Views: 60
  • Wilton Groove Repair (7).jpg
    Wilton Groove Repair (7).jpg
    139.3 KB · Views: 56
  • Wilton Groove Repair (9).jpg
    Wilton Groove Repair (9).jpg
    135.9 KB · Views: 50
  • Spindle repair (4).jpg
    Spindle repair (4).jpg
    136 KB · Views: 63
To avoid these ads, REGISTER NOW!
OP
A

alan camby

Well-known member
Joined
Dec 3, 2011
Messages
1,566
Location
South of Indianapolis, Indiana
I did not mean to create a ruckus over your washer Alan, sorry, I just wanted to mention that there are two thickness on some washers. One is 3/16 and the other is 1/4 thick. It just looked like to me your 1755 had a pretty good gap in the picture, but I could be wrong.

I have repaired several wore out washer grooves on Wilton spindles. I added a drawing of what Wilton likes as clearance's in the washer area and notes where I like to tighten up some clearance's. I agree all pressure closing a Wilton vise should be set up so the face of the spindle is bottoming out on the counter bore machined into the Dynamic jaw support. The washer should have about .030 minimum clearance in the front and .012-.015 per Wilton's spec:s. But if the backside of the washer groove has a gap of .02 or more then you will see more backlash when moving the dynamic jaw support.

I have a 6" Red Seal vise that has almost one whole turn before moving the Dynamic support and it drives me crazy. Eventually I'll fix it. I added a few pic's of repaired spindles. With a 4-1/2 pitch then one revelation is a gap of .220.

Sure like your C2. I'd be happy to shave drawings of your jaws if you need them.

Thanks for the feedback.

One thing I have thought is odd about the retainer is the small bolt pattern compared to spindle OD. On my 500 and 1755 you are forced to use what is called a round head screw, if you stick with the factory setup.
Panhead, button, SHCS, and every other fastener I have seen has to large of a head. I took a closer look at the 1755 and those screws are very close to the spindle OD . I have the factory screws in there and if a thicker retainer was installed, the spindle would rub on the screws when the spindle moves slightly side to side.

I have thought about using flat head screws with the common 82 degree heads and countersinking the holes. I would still have to cut some of the OD off of the flat heads. Actually the factory screws rub on the spindle as tightened. If I went thicker on the retainer, I would have to use some kind of countersunk fastener. At the end of the day, the 1755 is working fine with very little endplay.

My point is that I don't see how a thicker retainer would help with endplay or any other function of the vise. Regardless how thick the retainer is, the backside, the business side, is flat, at least all the ones I have seen are. I guess if someone tried really hard they could somehow manage to make this, larger than standard gap, a finger pinch point. With round head screws, there is always a possibility of finger damage in this area.

Not trying to cause ruckus, just trying to figure it out. These vises are very simple tools. The parts have some precision to them but the theory of operation is fairly simple.

Thanks for the help.
 
Last edited:
OP
A

alan camby

Well-known member
Joined
Dec 3, 2011
Messages
1,566
Location
South of Indianapolis, Indiana
I am getting a list together for some stuff from Mcmaster. I did some measuring tonight of the dowel for the swivel lock down. The ID of the hole was .520"

When I add up the bore depth and the gap between the plate and the base of vise I am getting 1.1".

So my thinking was to use a .5" dowel x 1" long. Can anyone confirm this is the size Wilton uses?

Thanks
 
Last edited:
OP
A

alan camby

Well-known member
Joined
Dec 3, 2011
Messages
1,566
Location
South of Indianapolis, Indiana
Some pictures.

Spindle cleaned up really well. I am amazed how little wear is on it.
10929208_622933814505214_2728827111798406280_n.jpg


I put both of these parts in the bed of my truck and went thru the automatic carwash:lol_hitti. After that I went over to the coin wash area and cleaned them a little more. Went over the slide part of the vise with scotch brite style pads. Cleaned up well, very little wear.
10433159_622933844505211_6591688682366801114_n.jpg


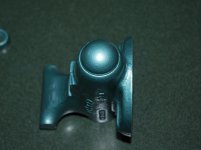
Here is the area I need the dowel pin for. The bottom center has a hole that aligns with the center of the lockdown plate, think Wilton calls it the inner ring.
See my last post. If anyone can help, please reply.
https://scontent-b-dfw.**.fbcdn.net/hphotos-xpa1/v/t1.0-9/10421363_622933861171876_5581021662631380587_n.jpg?oh=3ef139b23e042b16b819cc0af4da633d&oe=5523B7E8

This is one part of the vise that has been abused. Both handles are in rough shape. I think they over tighted them since the dowel pin was missing. The vise likes to float around the swivel base and I assume this is due to the lost dowel.
https://scontent-b-dfw.**.fbcdn.net/hphotos-xfp1/v/t1.0-9/1908489_622933887838540_5617290131617011612_n.jpg?oh=8a49ca6e3eec1e7ff151bd6e2c84b182&oe=552BFAE6
 
Last edited:

oldldh

Well-known member
Joined
May 22, 2012
Messages
3,700
Location
Fairhope, AL
Let me see---:sad:

No, don't rush me---

The right choice will come to me---:evil:

Sooner, or later---

It will---:thumbup::lol:
 

Attachments

  • C2_Swivel_Clamps_2__42703.1407853251.1280.1280.jpg
    C2_Swivel_Clamps_2__42703.1407853251.1280.1280.jpg
    91.9 KB · Views: 44
  • C2_Swivel_Clamps_1__83058.1407853254.1280.1280.jpg
    C2_Swivel_Clamps_1__83058.1407853254.1280.1280.jpg
    86.7 KB · Views: 52
  • c2swivel clamps.jpg
    c2swivel clamps.jpg
    40.2 KB · Views: 34
OP
A

alan camby

Well-known member
Joined
Dec 3, 2011
Messages
1,566
Location
South of Indianapolis, Indiana
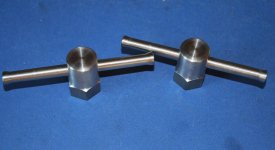
;)I made a replacement handle and plan to make a second to match. I also plan to make hex swivel nuts that go with the handles.

The replacement is a 3/8" grade 5 bolt shank with 10-32 internally threaded ends. The fastener in the end is a truss head 10-32x1/4" SS. I did some testing by putting the old handle and a new grade 5 bolt shank in a vise. I stuck the shafts out of the vise the same amount. Using a cheater pipe I tested the bend strength. Did not use a torque wrench but the grade 5 seemed much stronger. It does not really matter to me though, I plan to use a wrench if I need to crank them down.
https://scontent-a-dfw.**.fbcdn.net/hphotos-xpa1/v/t1.0-9/10931235_623830111082251_1679812053840979528_n.jpg?oh=9f159e476677407d64bd9245ab269260&oe=5525497E


I made the handle slightly longer than stock. It is 5" with the screw heads.
250524_623830127748916_1683162062744655256_n.jpg


Thanks for looking ;)
 

KMScott

Well-known member
Joined
Feb 14, 2012
Messages
4,643
Location
Daufuskie Island, South Carolina
Nice job on the swivel handles, in fact a great way to fix bent handles without owning a lathe. The 1/2 dowell pin is correct for your swivel base, the length is a easy check. Look forward to seeing the finished project. Nice thread Alan.
 
OP
A

alan camby

Well-known member
Joined
Dec 3, 2011
Messages
1,566
Location
South of Indianapolis, Indiana
Nice job on the swivel handles, in fact a great way to fix bent handles without owning a lathe. The 1/2 dowell pin is correct for your swivel base, the length is a easy check. Look forward to seeing the finished project. Nice thread Alan.

I ordered some 1/2"x 3/4" long and will see how they work out. autopts mentioned that he had a few that measured 3/4" length.

I did use a lathe to internally thread the 3/8" rod.

Anyone have advise on where to get a replacement stamped steel cap for the tail of this thing. Mine has a small dent and I am not all that great at hammering sheet metal. The exploded parts view I found at Mcmaster only shows a part # for everything in the tail. Plus the drawing is a newer style vise.

I stopped by carquest and did not find a automotive dust cap that matched.

Thanks;)
 

drivesitfar

Well-known member
Joined
Oct 23, 2013
Messages
36,040
Location
Pacific Northwest
Alan: Etrailer.com has solved a lot of Wilton bullet owner's need for a rounded dust cover, but not sure if they have one to fit your C2. i'm also not sure what the part is called or what they normally use them for. might be worth checking because the others were happy with their results. there are several posts on the vise repair 101 thread.

another idea is to round out a hole inside a piece of wood as sort of a pattern and hammer the old one back in shape.

good luck and it's cleaning up nicely so far.

can i ask what kind of grease you prefer to use on your vises?
 
OP
A

alan camby

Well-known member
Joined
Dec 3, 2011
Messages
1,566
Location
South of Indianapolis, Indiana
Alan: Etrailer.com has solved a lot of Wilton bullet owner's need for a rounded dust cover, but not sure if they have one to fit your C2. i'm also not sure what the part is called or what they normally use them for. might be worth checking because the others were happy with their results. there are several posts on the vise repair 101 thread.

another idea is to round out a hole inside a piece of wood as sort of a pattern and hammer the old one back in shape.

good luck and it's cleaning up nicely so far.

can i ask what kind of grease you prefer to use on your vises?

I have used Etrailer a few times for my truck and trailer. Thanks, I will have to look there.
Should be a dust cover for wheel bearings. All cars used to have them until hub bearings became popular with the manufactures.

I usually use a wheel bearing grease on the main spindle thread and a real light coat on rear of slide. I Spray a little wd-40 or other brand on the slide to keep rust at bay. Have not read much of the 101 thread. Probably doing it wrong. :eek:
I did use anti seize on the slide once and hated the way it looked and seems like I always get it on me. Don't care for that on a vise.

Worked on a hex nut. The hex is 1" with a 5/8-11 thread inside.
I kind of like the look of the hex without the round section. Plus it is a little faster to make :D
Guess I could have left the top a little taller over the handle for socket use. Pretty happy with it. Was going to polish it some but I kind of like the raw finish.

10685683_623899391075323_5504709877321694652_n.jpg


10922669_623899404408655_7866689132326393311_n.jpg


https://scontent-b-dfw.**.fbcdn.net/hphotos-xap1/v/t1.0-9/10624651_623901851075077_1219444250780345001_n.jpg?oh=107f7de5ddb43b42feec5a1c81a99b95&oe=555B8F38

Edit 1-21:
The second one is done.

10423708_624227894375806_5526369481679790144_n.jpg
 
Last edited:
OP
A

alan camby

Well-known member
Joined
Dec 3, 2011
Messages
1,566
Location
South of Indianapolis, Indiana
This is what I did this afternoon on the vise.

This is cut out of a 1-1/4" NPT pipe cap.
It is the new vise end cap.
Could not get the fitting to chuck up strait. Ended up chucking a pipe ****** and screwing the fitting on to it. Really worked out great. Cut the OD down to 2.165"
10930951_625165194282076_1698244479688121869_n.jpg


Cut the super thick forged fitting with a cutoff tool.
https://scontent-a-dfw.**.fbcdn.net/hphotos-xfp1/v/t1.0-9/10406685_625165217615407_7083555933003718764_n.jpg?oh=f5d40b06a95c7b3b950a6274c159e3c8&oe=5528F238

1513781_625165180948744_3323004932635336846_n.jpg


The 1/2" pin for the swivel was just to loose for my liking. the holes measured .524" in the vise base and inner ring.
This pin is turned out of a 9/16" LE (made in Indiana Lake Erie ;)) Grade 8 bolt.
It fits much better but is still loose enough to float when the hold downs are loosened.

The 9/16" bolt in the chuck and cut down to size.
https://scontent-b-dfw.**.fbcdn.net/hphotos-xpf1/v/t1.0-9/10896943_625165254282070_8226589412975473717_n.jpg?oh=1ba6735eedd7e85867ea393109d44ea1&oe=5568103D

10945535_625165240948738_9098926688789724_n.jpg
 
Last edited:
OP
A

alan camby

Well-known member
Joined
Dec 3, 2011
Messages
1,566
Location
South of Indianapolis, Indiana
I was really surprised how well the end cap stuck into the bore. My plan from the beginning of the new cap was to install a set screw, though I think a few drops of retaining compound would have been more than enough.

So here is the finished end cap, minus sandblast and paint.
It has a 10-32 set screw to help retain the cap in the bore. I drilled a 1/8" hole across from the screw that is closer to the face of the cap. Using a ball end Alan Wrench (Proper spelling :lol:) I can set the screw.
1509897_625587657573163_4148826831944015046_n.jpg
 

oldldh

Well-known member
Joined
May 22, 2012
Messages
3,700
Location
Fairhope, AL
Not too shabby, for an end cap!!!:drool::beer:

Ya Dun Gud, Bubba!!!!:thumbup:

I imagine, you could set up a small business selling those to GJ Wilton owners...:evil:
 

drivesitfar

Well-known member
Joined
Oct 23, 2013
Messages
36,040
Location
Pacific Northwest
Alan: since you are making an already great vise better you might want to thread those double pins that hold the vise nut in like a few members have done. It would make cleanings and re greasing the vise easier in the future. i can't remember the vise repair 101 post # where the members talk about it, but with your skills just mentioning it's a possibility is probably enough.

one of my clients that used to fabricate and work on hydros had his brand new Wilton bullet vise sandblasted and he left it naked because he didn't want any paint around his welding table. i think it looks pretty good naked, but your vise and your color is the rule.

good luck and looking good so far.

BTW
 

Attachments

  • 3Ed3G73J15I45K55H8d5v0b7e8838e56912d5.jpg
    3Ed3G73J15I45K55H8d5v0b7e8838e56912d5.jpg
    31.9 KB · Views: 45
  • 3Ee3Ic3Ja5If5Mb5J5d5vde6d70f50847195d.jpg
    3Ee3Ic3Ja5If5Mb5J5d5vde6d70f50847195d.jpg
    21 KB · Views: 45

KMScott

Well-known member
Joined
Feb 14, 2012
Messages
4,643
Location
Daufuskie Island, South Carolina
KM Scott,
The tail cap would be a good item for your machine shop.
Some might be interested in a turned aluminum/steel piece.

I might have to go this route.

Hey Alan
Nice work on your end cap, it would be way to much work for me to start making endcaps for the bullets, here is one I made for a baby I am trying to find time finishing up. I do not own a lathe so I have to make mine on a CNC, as you can see I step off the radius and attach it to a threaded rod so I can chuck it in my wood lathe where I file it to remove the steps. I added a step to the end cap, I like how it came out. There is no reason to make these as thin as the originals as long as the center hole is clearanced for the spindle. Some day I will have room for a lathe and it would drastically change the way I make vise parts. Great job on your restoration and enjoy your post.
 

Attachments

  • DSC_0013.jpg
    DSC_0013.jpg
    92.4 KB · Views: 42
  • DSC_0015.jpg
    DSC_0015.jpg
    81.2 KB · Views: 38
  • DSC_0016.jpg
    DSC_0016.jpg
    143 KB · Views: 40
  • DSC_0014.jpg
    DSC_0014.jpg
    87.9 KB · Views: 38
  • DSC_0008.jpg
    DSC_0008.jpg
    109.8 KB · Views: 47
To avoid these ads, REGISTER NOW!
Top Bottom