To avoid these ads, REGISTER NOW!

My Wolverine floor

67 455 Bird ragtop

Well-known member
Joined
Jan 2, 2006
Messages
330
Location
Melbourne, FL
Well I'm finally finished with coating my floor. It came out pretty good. I want to first say up front that any problems I write about were ALL of my doing. I got great support from Eric and the staff at Wolverine. The products are very nice and do a great job when mixed and applied PROPERLY. As with anything prep and proper mixing are key to a good result.

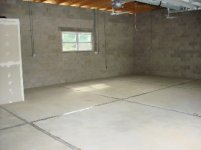
First my garage. It's a new structure. 30x40 with three bays. I also have a 12x6 ful bath in one corner that I recently decided to coat with the materials I still have left. I had my concrete guy leave the floor a litte roucgh so the coating would have a nice surface to bond with. If I had it to do over I would have gone one step further in the finishing of my concrete. I would have them stop just short of polishing the floor.

I prepped the floor in several steps. First, I needed to get rid of the fuzzies from the fiber in the concrete. I picked up a cheap blow toarch attachment from Harbor Frieght that connects to a propane tank. Did an excellent job. Also a pretty kewl toy ... :bounce:. Next I pressure washed the floor a couple of times to clean it as much as possible. Then I used the standard muriatic acid to etch the concrete. This was more to clean/remove the top layer of the floor than roughing up the surface since it was already rough. Before I started etching I put down a heavy layer of baking soda at the front of each door to neutralize the acid as it was washed out side so it wouldn't harm my drive. I pressure washed it a couple more times just to be safe. Once that was done I let it dry.
 
To avoid these ads, REGISTER NOW!
OP
6

67 455 Bird ragtop

Well-known member
Joined
Jan 2, 2006
Messages
330
Location
Melbourne, FL
The next step was to prep and apply thier Integra-Flex product to fill in the stress relief cuts. This stuff comes ina two gallon kit. One gallon of flex and one gallon of hardener. I still have a BUNCH left. May use it to fillin some cracks in my original driveway.

To prep I made sure all the cracks were clean when I etched and washed the floor. I then mixed up a small batch of their Bond-Tite clear bonding material. I used a paint brush and coated the inside and outside of all the cracks. This gives the integra flex something to bond too. I waited for the bond-tite to dry before I applied the integra-flex.

The integra-flex is a nice product. Mixes well and pours well. It took me a while to discover the best way to pour this stuff in the cracks. You can see in the attached pics what I consider the right and wrong way to pour this stuff. By holding the cup opening paralell with the crack you get a nice thin ribbon of material. And it flows into the crack nicely. If you have your cup the other way the stuff piles up on the crack and makes for a messy clean up.

This stuff mixes in a 1:1 ratio. Mix small batches. about 12-16 ounces is good. It also depends on how big your garage is. If it's small and you only have a little bit to fill this may be all you needed. It took me 6 batches to do my garage. And get some good knee pads if you have a lot to fill.

Here is what I consider the right and wrong way to pour this stuff.
 

Attachments

  • Flex1.jpg
    Flex1.jpg
    52.6 KB · Views: 299
  • Flex2.jpg
    Flex2.jpg
    52.6 KB · Views: 235
OP
6

67 455 Bird ragtop

Well-known member
Joined
Jan 2, 2006
Messages
330
Location
Melbourne, FL
Now here's where I ran into problems. This stuff is excellent filler material. You WILL have excess material to deal with on the floor. I waited untill it was "ALMOST" dry then used a big floor scraper with a razor blade. LIke th ey use to remove vinyl flooring adhesive. I then scraped off the execss. SInce this stuff wasn't hard yet it was pretty messy to scrape off.

If I was to do it again I'd make sure I poured the stuff in the crack the way I found works best. Try and get as little build up as possible and crape it off after it had hardend up. When I cleaned up my floor since it was still sofet left a small impression where the crack was. It eventually filled in most of the way with the other coatings so it's barley noticeable.

Here is the floor after clean up and before I started laying the main flor coating. The shiny part is the clear bond-tite I put down befoe the integra flex.
 

Attachments

  • flex3.JPG
    flex3.JPG
    40.2 KB · Views: 390
  • Flex4.JPG
    Flex4.JPG
    43.3 KB · Views: 316
OP
6

67 455 Bird ragtop

Well-known member
Joined
Jan 2, 2006
Messages
330
Location
Melbourne, FL
Here is where the fun and learning starts. I next applied the bond-tite to the floor. This stuff mixes pretty well. But you need to make sure you do mix it thourghly. I didn't in a cpl of batches and it took a few days to finally harden up. As I mentioned before I had some repair work to do after my first application. I mixed it properly and it hardened as it should.

As mentioned previously mix this stuff in small batches. But before you start mixing plan out how much you can coat per batch. What I mean is figure your square footage, then determine how much area 3 quarts will cover. Then mark out on the wall or someplace to indicate where to start and stop with each batch. This will ensure a nice even coat. It mixes 2:1. I found a 3 quart batch worked best. 2 quarts of resin and 1 quart of hardener.

My garage floor was poured in late December. I started coating in late February. If you have a brand new garage you may run into an issue I found. Due to the hydrostatic pressure under my garage I had air bubbles form in the bond tite. This was caused by air being forced up through the floor by the pressure underneath. I didn't notice this untill the floor had hardened. This left some nice bubbles of bond tite on my floor. They pop easily but do leave small craters where the bubble formed. What I have found out is there is a "spiked' roller youcan get to help pop these bubble as they form. YOu just need to check you floor periodically to see if any bubbles are forming. You can also use the spiked shoes Wolverine sells. They work well when you need to walk on a wet floor. Just remember to pick up your feet and don't drag the spikes. I would also order a little more than what you think you might need. Especially if you have a new rough floor. This stuff fills in all the little cracks when you spread it out. So you may need more than you figured you would compared to a fairly smooth floor. Also, since most of us use a roller to spread it out I would put down two thin coats. I discovered it's hard to get a good even thick coat with a roller. Maybe Im just not that good with the roller but if I had a second project I would do two thin coats. But this stuff sticks to ANYTHING and does a good job. When mixed properly I flound it hardened in about 8 hours in my area of east central florida at this time of year.

Next the color coat. Lots of fun and learning how NOT to mix this stuf.
 
OP
6

67 455 Bird ragtop

Well-known member
Joined
Jan 2, 2006
Messages
330
Location
Melbourne, FL
Ok now for the fun part. Once the Bond-tite had set up I started to prep for putting down the color. Since I was planning on doing a two tone effect I had to tape off the areas to be painted. I first put down some 3M blue painters tape. I tried to get it to stick as best as it could to the bond tite to lessen the bleed under factor. I then put a couple of layers of good old duct tape on top. I did this to help build a "dam" of sorts of the first color to give the second color a place to spread to and lessen the bleed under factor of the second color. I measured my area and computed my batch size and started to mix.

From my conversations with Eric at Wolverine the two colors I picked are some of the thickest epoxies they sell. This should have been a flag to me right there. The first color came in four gallon bucket with two gallons of color and a one gallon can of hardener. I mixed the full three gallon mix at once. I used a standard drill and paint mixer. I mixed it for 3-4 minutes which should have been sufficient. Then spread each mixture out over the entire area. This stuff spreads pretty well also. But as with the bond tite if I was doing an area as large as this again I would do two coats to get a better result. The next day I came out to check my floor and discovered that some areas had not hardened yet. They were stick but not totally soft. So I waited another day. The next day most of the areas had finaly completely hardened. But I had one large area, the first batch, and two small areas, from the last batch, that were still very soft. These never hardened up.

After a few calls to Eric and rethinking my mixing technique I determined that what I was using was just not good enough to mix it properly. So some clean up was in order. Now this stuff when soft is still pretty sticky. I used Methyl-Ethyl Ketone (MEK) to help soften it more and remove it. It was not an easy job but I was able to get 95% of it up. I then re-ordered some more color and bond-tite to fix my mistake. The rest of the floor that did harden looked great. So I knew if I did the repair job right I would have the floor I was looking for.

When my repair materials arrived I started getting ready to fix my problem. I mixed a SMALL batch of bondtite and coated the areas to be repaired. When that dried I mixed a few more small batched and recoated my entire floor since I planned to put a thin coat pf color back down after the floor war repaired. It was amazing how well this stuff hardened when mixed PROPERLY.

I then mixed a couple of small batches and filled in the areas that needed to be repaired. Since these areas had most or all of the color coat removed there was a big low spot that needed to be filed in first. So I filled in the low spots first and let them dry. They hardened nicely since I mixed it well in smaller batches. After the repair areas hardened I put a thin coat over the entire floor to maintain a uniform color. Once that coat dried I pulled up my tape and started to tape off the floor for the second color. There was a little bleed under but not too bad.

I then put down the second color. Since I had three bays and 9 3 quart kits I used three kits per bay. But I only used two kits on the first coat. I then used the remaining kit for a final thin coat. Once it was dry ai pulled up the tape. I still had a little bleed under which I started to repair bu mixing a very small batch of the first color and trying to paint over the bleed under. But I found this to no be worth the trouble and stopped.

Came out the next morning to make sure all was dry in order to put a final coat of the clear bond tite over the entire floor and found one of the local lizards had walked through the wet color and left footprints on teh dry second color. I decided to leave it as it was. Makes it sort of an "art gecko" floor :bounce:

The clear dried quickly. I found a couple of small areas I missed and recoated them. Dried well and looks good. Here are some pics I took last night of the final product. And one of some of the footprints.

I"ll follow up with a consolidation of tips and how to avoid problems.
 

Attachments

  • DSC00483.JPG
    DSC00483.JPG
    63.1 KB · Views: 824
  • DSC00484.JPG
    DSC00484.JPG
    66.7 KB · Views: 429
  • DSC00485.JPG
    DSC00485.JPG
    54.3 KB · Views: 443
  • gecko.JPG
    gecko.JPG
    50.6 KB · Views: 453

Brickout

Well-known member
Joined
Feb 15, 2008
Messages
82
Location
Chicago Area
That's a heck of a write up, thanks for all the info.

I'd love to do two colors as well. But my fear is the bleed under that you experienced. Anything less than perfect and I'd be upset.

The floor looks great though, hope you're happy with it.
 
Last edited:
OP
6

67 455 Bird ragtop

Well-known member
Joined
Jan 2, 2006
Messages
330
Location
Melbourne, FL
Ok now for tips/lessons learned.

1. Mix products thourghly. Use smaller batches if necessry . I found 3 quarts to be a good size to work with..

2. If you have a new garage check for bubbles inthe bond-tite for the first 4-5 hours after you spread it out. Used spiked shoes to pop them before they harden.

3. If working with a large garage put down two thinner coats instead of one thick coat. Calculate how much area you can cover with the amount you mixed and cover that area. If necessary put some tape marks on the walls or floor. Just remember to pull the tape up before you coat over it.

4. Make sure your garage doors are sealed well. This will keep out any bug, lizards, or dirt that can walk or get blown in. Especially here in Florida. I have some nice lizard tracks and a few "love bugs" entombed in my final clear coat.

5. Last but certainly not least. Take your time. Plan your floor. and ask all the questions you can.
 

FFPL

Well-known member
Joined
Oct 12, 2007
Messages
157
Location
Massachusetts
excellent post and worked out very nice in the end. Do you think you needed the clear coat ?

So what color are you using on the walls ?
 
OP
6

67 455 Bird ragtop

Well-known member
Joined
Jan 2, 2006
Messages
330
Location
Melbourne, FL
That's a heck of a write up, thanks for all the info.

I'd love to do two colors as well. But my rear is the bleed under that you experienced. Anything less than perfect and I'd be upset.

The floor looks great though, hope you're happy with it.

I'm happy with it. I think if I had let my concrete guy do one more finishing step it would have been a little smoother. And probaly not had as much or any bleed under. The bleed under that is there is not that bad. I think the overall appearence helps keep your eye from locking in on the bleed under spots. It's not 100% perfect. But I like it. And as my wife says.

"It's just a garage flloor"

I told her she can do the next one herself. Once my stuff is out of the current garage she wants it coated also. Along with the patio floor.

Thanks for the comments.
 
OP
6

67 455 Bird ragtop

Well-known member
Joined
Jan 2, 2006
Messages
330
Location
Melbourne, FL
excellent post and worked out very nice in the end. Do you think you needed the clear coat ?

So what color are you using on the walls ?


The extra clear was a 50-50 decission between Eric and myself. I liked the way the first coat looked after I put the clear over it. Eric suggested it as extra protection over the repair areas.

As for the walls. I had Home Depot color match the orage and blue. I took them some hardened samples from my mixing cups to use. I haven't bought any yet so I'm curious how well they matched it.

The wall are 18 rows high. The first 7 will be white. That takes it to the bottom of the window sill. The next two will be orange, then one green, two blue. These five rows cover the window. The last 6 will be white again. HOpe to have it painted my mid June.
 

Bojans

Well-known member
Joined
Mar 18, 2008
Messages
254
Looks great!
Did you add a grit to the clear coat to prevent slipping? Is is slippery when wet?
 
Last edited:
OP
6

67 455 Bird ragtop

Well-known member
Joined
Jan 2, 2006
Messages
330
Location
Melbourne, FL
No no grit added. No sure how slippery it will be when wet. I do know when I was barefooted powerwashing the color coat before the repair it was a little slick. Not sure about it yet with work shoes and a wet floor. But I'm not too worried about it . I don't plan on working toooften on a wet floor. And oil spills are slippery regardless of any grit. If I decide I do need some grit down I can always add another layer of clear with some grit added. Time will tell.
 

HiHoSilver

Well-known member
Joined
Mar 8, 2008
Messages
217
Location
Eleanor, WV
very nice...., good write up...:beer:
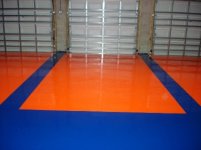
Boise State Bronco colors??

just noticed your location, colors must be Florida Gators, chomp, chomp... lol
 
Last edited:

AlphaGarage

Well-known member
Joined
Apr 16, 2008
Messages
1,298
Location
Every Garage, AnyTown, USA
That's a great looking floor and fantastic write up!

We've had a few people ask about coating perimeter walls. Wolverine Coatings has two solutions, first is an epoxy system that's designed to hold on walls, and second is an thickening additive that's mixed in with our standard LiquaTile. However we generally do not encourage their use, in fact we discourage it. Both are tricky to use.

Besides the application of the LiquaTile itself there the issue of the intersection where the vertical surface and the floor surface meet. That area is known as the "chime". The problem is that there's often movement of one plane relative to the other plane, the wall creeps, or the floor does, or they separate. Although there's some flex in our standard products, there's often not enough to deal with the amount of movement seen in the chime area.

One way to deal with that is to apply a small amount of our IntegraFlex in the chime. Being more flexible it can absorb more displacement so the top coats of LiquaTile and BondTite won't show any cracks. But, of course, even it has a limit to how much movement it can deal with.

67 455 Bird's method is the one we encourage, do the verticals with good quality off the shelf paint. It will be a far easier, and less expensive, process than any epoxy alternative.
 

Scorelow

Member
Joined
Jan 27, 2008
Messages
18
Location
MI
Floor looks great! for all that want to tackle redoing your floor I have seen Home Depot (with rental dept) renting commercial diamond grinders for like $50 a day!!!! the only way to go if you want to refinish your floor.

Other good source of products is www.originalcolorchips.com

Good Luck
Bob
 
To avoid these ads, REGISTER NOW!

Jaguar Fan

Well-known member
Joined
Mar 13, 2008
Messages
5,507
Location
Park City for Ski Season; Las Vegas for Poker Seas
Ok now for tips/lessons learned.

1. Mix products thourghly. Use smaller batches if necessry

Great write-up! :bowdown::beer:

I have a question on mixing smaller batches. You wrote about very small batches e.g. bondtite in the control joints before putting in integraflex. How did you mix these very small batches? It seems there isn't enough product in an ultra small batch to use a drill with a paint mixer. What did you do?

ALSO -- how difficult is it to measure out the correct quantities of the A and B parts?

thanks again!


oh - one other thing -- to get a tighter line between the two colors, did you consider cutting a groove in the concrete? I saw a garage done that way at an open house...
 
OP
6

67 455 Bird ragtop

Well-known member
Joined
Jan 2, 2006
Messages
330
Location
Melbourne, FL
Great write-up! :bowdown::beer:

I have a question on mixing smaller batches. You wrote about very small batches e.g. bondtite in the control joints before putting in integraflex. How did you mix these very small batches? It seems there isn't enough product in an ultra small batch to use a drill with a paint mixer. What did you do?

ALSO -- how difficult is it to measure out the correct quantities of the A and B parts?

thanks again!


oh - one other thing -- to get a tighter line between the two colors, did you consider cutting a groove in the concrete? I saw a garage done that way at an open house...


For mixing purposes I used various sizes of paint mixing buckets you can get at Lowe's or Home Depot. They get as big as 5 Gallons ans as small as 1 quart I believe. So I usually mixed it in easily divisible quantities. WHen I did the bond tite I think I mixed 24 ounces at a time. The stuff covers pretty well. I just mixed 16 ounces of resin the filled to 24 ounces. You getthe idea. FOr that small ammount I used a normal paint stir stick. That small amount is easy to mix by hand. For larger quanties like the 3 quarts I used a 5 quart bucket and the drill mixer worked well.

As for the groves in the concrete, that's a good idea. But I filled mine in. I think a smoother surface would woprk better. And rough concrete can be smoothed out with a little heavier layer of the bondtite whee you want the two colors to meet before you lay down the color. I thought of that after I started to coat.

Live and learn. But as I have said. I'm happy with the floor and have gotten some good comments from friends and family. It will look even better after I have my full lighting up and the walls painted.
 

Floorguy

Well-known member
Joined
Apr 14, 2007
Messages
132
Location
Austin, Texas
Great looking floor. If I might offer a bleed under option? Blue painters tape does not really stick well to concrete. One can try the standard tan color tape. If the concrete is really clean it will stick, if not I would suggest using the duct tape as it has great adhesive. The key is getting it up at the right time. Don't let it cure completely or you will never get any tape up. If you have the time to watch and peel it (any tape) at the right time it will leave a good line for you. DO NOT LEAVE IT ON TILL IT CURES!!!!

Again, Great looking floor. I would have choosen the 49er's colors but heck they $uck lately.
 

Jaguar Fan

Well-known member
Joined
Mar 13, 2008
Messages
5,507
Location
Park City for Ski Season; Las Vegas for Poker Seas
Well 1 1/2. I recently had rotator cuff surgery is what Eric is getting at.

:bowdown::bowdown::bowdown:

FanTAStic job!
(I did mine 1 1/2 legged) ... BEFORE:

leg-beforesurgery.jpg


AFTER:

Leg-aftersurgery2.jpg
 

DynoDave

Well-known member
Joined
Mar 25, 2005
Messages
1,685
Location
Michigan
That floor looks fantastic! Nice work.

By the way...after mixing the epoxy, how did you CLEAN off the drill mixer attachment? And how does one take the time to clean the attachment before it dries, while your epoxy is curing in a bucket? Is cleaning the mixer a good job for a helper?
 

AlphaGarage

Well-known member
Joined
Apr 16, 2008
Messages
1,298
Location
Every Garage, AnyTown, USA
MEK does the trick. It works pretty well, and quickly.

All this depends a bit on how comfortable you are with the process. Some products work best, in fact they require, that the mix stews in the bucket after mixing, our BondTite and LiquaTile don't. Mix them thoroughly, and they're good to go. In fact, you can extend the pot life by pouring out the mix asap.

If you have a bucket with MEK, you could probably pop the mixer in and give it a few seconds of spin, then leave it in there and attend to spreading out the mix. Should take less than a minute, so it's not like the mix on the floor will set in that time. Clean and dry mixer before using again.

Cleaning the mixer is an excellent chore for Igor. After that have him/her start on detailing the wire wheels and engine bay.

BTW. we find this type of mixing paddle does a good job without introducing air bubbles into the mix:

p2621751_l.jpg


A couple of good tips to remember:

-It's a good idea to premix the resin and the hardener by themselves before mixing them together.

-Our materials are mixed 2:1, and our kit containers are measured in that ratio (the 3 gallon kit has 2 gallons resin and 1 gallon hardener). If you don't want to mix the full kit - be sure to pre-measure the correct proportions in the 2:1 ratio!

-While we're dealing with resins and hardeners... mix the two, do not mix hardener with hardener and then apply, doesn't work. With the body coat it's easy to see that one container has resin and the other hardener, but with the primer and clear coat both parts look the same. Pay attention!

-Mix thoroughly, about 2 - 3 minutes - be sure to get the sides and bottom of the container.

-Avoid introducing air into the mix - keep the mixer fully submerged below the surface, don't use too high of a speed.

-Our stuff is great, great to the last drop, so it's understandable that you want to get that last drop of epoxy greatness on your floor, however... Do not take the mixing pail and turn in upside down on your floor in an attempt to use every drop! What happens is that some of the material on the sides of the container, that may not have been completely mixed, oozes out and will not fully cure!

This has happened on huge commercial jobs, and they end up with odd little circles on the coating every 200 feet or so, and it happens on small DIY jobs. Happened just the other week in fact. It's something that can usually be corrected, but it's far easier to avoid it.

-When you're calculating material needs, factor in about 10% - 15% waste - material stuck in the bucket, on the brushes etc.

-Spike shoes are optional, but make the job easier. They allow you to walk on the mix as it cures. If you're broadcasting chips, they are really, really helpful. Don't need to buy them from us, go find an old pair of golf shoes instead. But if you must, we'll gladly sell you a pair. Spikes that is - not old golf shoes.

floor_a.jpg
 
Last edited:

FFPL

Well-known member
Joined
Oct 12, 2007
Messages
157
Location
Massachusetts
-Our stuff is great, great to the last drop, so it's understandable that you want to get that last drop of epoxy greatness on your floor, however... Do not take the mixing pail and turn in upside down on your floor in an attempt to use every drop! What happens is that some of the material off the sides of the container, that may not have been completely mixed, oozes out and will not fully cure!
When I mixed up in the pails I used the drill mix but I also used a wooden paddle. I used the paddle to make sure I scrapped the mix on the sides and bottom (after/during using the drill mixer) so that the whole mixture would be blended correctly. I kept all of the containers with whatever excess was left over and made sure that they cured correctly.
-When you're calculating material needs, factor in about 10% - 15% waste - material stuck in the bucket, on the brushes etc.
The small mixes of bondtite that I had left over I just let harden in the buckets. They come in handy as I now have an assorted collection of drink coasters and door stops:)
 

Jaguar Fan

Well-known member
Joined
Mar 13, 2008
Messages
5,507
Location
Park City for Ski Season; Las Vegas for Poker Seas
That floor looks fantastic! Nice work.

By the way...after mixing the epoxy, how did you CLEAN off the drill mixer attachment? And how does one take the time to clean the attachment before it dries, while your epoxy is curing in a bucket? Is cleaning the mixer a good job for a helper?

As an alternative to the MEK soaking to clean off the mixer, I didn't clean it at all. (I didn't have a helper). It cured completely. Now my paint mixer has a nice protective epoxy covering :) , and I think is fully functional (although I haven't used it yet). I doubt pieces would chip off in the normal course of events.
 

04 Navi

Well-known member
Joined
Jul 13, 2005
Messages
269
Location
PNW
When I did my floor, I felt that the mixers were cheap enough to just by two of them and then through them away. The first mixer was for the bondtite and the second for the color coat. By the time i was ready to put the clearcoat on, the material was already hard from the primer coat so it worked out great.

As for mixing though, my only advice is to use a slow setting on the mixer. Many people I think use a cordless drill on the high speed setting and this will create a lot of bubbles. I personally used a 1/2 heavy duty drill that has a side handle so that you have greater leverage with the thick material. The greatest challenge was to not have the bucket turn on you.
 

FFPL

Well-known member
Joined
Oct 12, 2007
Messages
157
Location
Massachusetts
Like Navi said. Except I used 3 drill mixers since the resin and hardener should be mixed before they are combined. One for the resin, one for the hardener and one for the final mix (when the hardener was added to the resin).
I cleaned them when done (at the end of day) by using the drill to stir them in a small bucket of acetone.
 

AlphaGarage

Well-known member
Joined
Apr 16, 2008
Messages
1,298
Location
Every Garage, AnyTown, USA
When I mixed up in the pails I used the drill mix but I also used a wooden paddle. I used the paddle to make sure I scrapped the mix on the sides and bottom (after/during using the drill mixer) so that the whole mixture would be blended correctly.


I saw one guy who made a neat little tool. He took a long metal kitchen spatula, the type often used for cake icing, squared off the tip, and cut out a notch for the can rim. Probably too much hassle for most of us, but for those who do a lot of painting/coating it might make sense:

2538617661_f0fff3a7f0_o.jpg
 

AlphaGarage

Well-known member
Joined
Apr 16, 2008
Messages
1,298
Location
Every Garage, AnyTown, USA
I got in the habit of cleaning paint tools way back when after the handyman I wa helping introduced me to Purdy Brushes. Up until then I'd use cheap brushes and abuse them, but once I turned Purdy it was time to start showing a bit of respect.

However, unlike brushes, letting the epoxy cure on these mixing paddles won't affect future use, so there's really no need to meticuously clean them.

HarborFreight has these type mixers for $3.99 everyday, and for $1.99 on sale.
 

Dave88LX

Well-known member
Joined
Nov 25, 2006
Messages
664
Location
York, PA
Great write-up man! Thanks for all the tips, I'll be sure to incorporate them when I start my project.

I've got ~18+ gallons Wolverine product and then some sitting here waiting to be put down...life's, and weather, has just been getting in the way.

Looks great!!!!
 

DynoDave

Well-known member
Joined
Mar 25, 2005
Messages
1,685
Location
Michigan
I got in the habit of cleaning paint tools way back when after the handyman I wa helping introduced me to Purdy Brushes. Up until then I'd use cheap brushes and abuse them, but once I turned Purdy it was time to start showing a bit of respect.

However, unlike brushes, letting the epoxy cure on these mixing paddles won't affect future use, so there's really no need to meticuously clean them.

HarborFreight has these type mixers for $3.99 everyday, and for $1.99 on sale.

Thanks for all the replies, guys. Sounds like multiple mixers is the way to go, especially as cheap as they are. Just trying to think all these things through before I get there....

Not much of a fan of MEK. While the EPA puts it in "Group D", UAW won't allow it into their work areas up here. Not that I plan to bath in the stuff, but if it's that nasty, what am I going to do with a whole bucket of it when done?
 

AlphaGarage

Well-known member
Joined
Apr 16, 2008
Messages
1,298
Location
Every Garage, AnyTown, USA
MEK is nasty stuff. Here in Los Angeles I can get rid of it by bringing it to a county hazardous collection point. Fortunately for me there's one just a mile or two away. They told me that the collected MEK is incinerated.
 

WolverineCoatings

Well-known member
Joined
Oct 22, 2007
Messages
833
Location
Spartanburg, SC
Sometimes, when someone leaves the lid off of a bucket of MEK, the whole thing can evaporate in a few hours! So, be careful to keep a lid on it.

Personally, I wouldn't bother to clean the mixing blade. If you spin it off a little you'll have a nice coating on it for the next use.
 
To avoid these ads, REGISTER NOW!
Top Bottom