To avoid these ads, REGISTER NOW!

need some advise disassembling bench grinder

wolds

Member
Joined
Jan 19, 2020
Messages
17
Location
Johnstown, Ohio
Hello all,

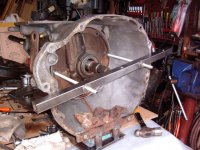
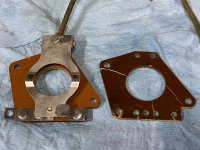
New to the forum but what I've read looking at some of the posts looks like a great place to hang out with like minded tinkerers. I'm in the process of going through my Craftsman 115.6842 7" bench grinder that I've owned for thirty years and purchased from my uncle who purchased it new. Looking at the ID plate I think it was built in 1946. What started out as simply wanting to replace the aging capacitor, on-off switch and power cord has expanded to a full disassemble due to the brittleness of the cloth covered wires leading back to the motor. I'm trying to get the inner wheel flanges to slide off the shafts but "no dice". They spin freely on the shaft but will only slide about an 1/16". shafts are free of nicks or dings and I though applying some heat with a heat gun might work but didn't. I'm thinking of using a puller on them but I'm not to keen on the idea. Any recommendations would be appreciated. Warren
 
To avoid these ads, REGISTER NOW!

torqueman2002

Well-known member
Joined
Jun 3, 2009
Messages
6,138
Location
SE Michigan
Hello Warren, and welcome to GJ. There is a big following of Craftsman grinders here. They are grouped into roughly 2 groups - Block and pre-Block motor styles.

Yours is most likely a pre-Block. Here are links to the respective threads.
let's see your craftsman block grinders - http://www.garagejournal.com/forum/showthread.php?t=157794
Pre-Block" Grinders--Where's the Love? - http://www.garagejournal.com/forum/showthread.php?t=339921&highlight=pre-Block
Also, see links in my signature line below for even more information.

My guess is there are 'ridges' or raised portions on the arbor shafts, keeping the inner flanges from being removed.

I have run into that on these Blocks before.

I have 'dressed' the arbors by using a fine file and emery paper.

Posting some pictures can aid in suggested solutions.

Best of luck. Let us know how you make out.
:thumbup:
 
OP
W

wolds

Member
Joined
Jan 19, 2020
Messages
17
Location
Johnstown, Ohio
bench grinder3.jpg

bench grinder2.jpg

bench grinder1.jpg

Here are a few pictures of the grinder. I've worked the the shafts with a fine file and emory cloth. Thoughts on using a three jaw puller?
 

lafester

Well-known member
Joined
Mar 1, 2017
Messages
2,191
Location
Northern CO
I have a couple slightly newer grinders with those same flanges. What a pain in the *** those are.

The first one came apart by pounding on the shaft with a rubber mallet. The second wouldn't budge and I couldn't get a puller on to try.

I would use a splitter rather then an arm puller if possible.

Sent from my Pixel 3 XL using Tapatalk
 

harley jim

Well-known member
Joined
Dec 6, 2013
Messages
11,401
Location
Cleveland Tn..........out in the sticks
I dont think those cast pieces would hold up to a three jaw puller. Like lafester said a split puller, or a bar behind it for pressure and tap the end of the shaft, put the nut back on the shaft first.
Sub.

Sent from my SM-A102U using Tapatalk
 
Last edited:

bmwrd0

Well-known member
Joined
Nov 7, 2010
Messages
5,447
Location
Beaver Fever Oregon
I have one of those, and if I remember right, I did need a puller. I think I used a two-jaw, but no matter. Just go slow, and if anything looks askew stop. Also, if they spin freely but don't come off, back them back into the central portion and see if there is anything blocking them. You might be looking at a blockage on the backside that you can't see.

Good luck, and I will keep an eye on this thread. Feel free to PM me with any questions.
 
OP
W

wolds

Member
Joined
Jan 19, 2020
Messages
17
Location
Johnstown, Ohio
The other issue is the capacitor. the original is a Aerovox 70-95 MFD 125 VAC. The closest one I can find is a Dayton 72-88MFD 125VAC. Are there other options or would this CAP be OK?
 

lilredex

Well-known member
Joined
Apr 29, 2006
Messages
5,956
Location
Toronto
Make up two notched flat stock pieces that can be bolted together behind that hub. Extend them beyond the flange for threaded rods to a cross bar out front. That should remove it damage free.

Something like that in the photo.
 

Attachments

  • DIY Puller.jpg
    DIY Puller.jpg
    160.1 KB · Views: 53
Last edited:
OP
W

wolds

Member
Joined
Jan 19, 2020
Messages
17
Location
Johnstown, Ohio
thought about that but the hub is recessed into the inner wheel housing and I don't have the room. worked on one side some more with emory cloth and was able to get it off. the other side is being stubborn.
 

exmaxima1

Well-known member
Joined
Jun 25, 2011
Messages
6,339
Location
Midwest
The other issue is the capacitor. the original is a Aerovox 70-95 MFD 125 VAC. The closest one I can find is a Dayton 72-88MFD 125VAC. Are there other options or would this CAP be OK?

Close enough. Well within the original tolerances.
 

torqueman2002

Well-known member
Joined
Jun 3, 2009
Messages
6,138
Location
SE Michigan
thought about that but the hub is recessed into the inner wheel housing and I don't have the room. worked on one side some more with emory cloth and was able to get it off. the other side is being stubborn.
That is good news. I'd guess the other side needs more work.

I agree on the cap.

I stand corrected on the style of your Craftsman grinder, it is a pre-pre-Block !. :thumbup:
 
OP
W

wolds

Member
Joined
Jan 19, 2020
Messages
17
Location
Johnstown, Ohio
stator.jpgso I finally got the other wheel flange off today. new problem: one of the reasons I was pulling the grinder apart was to clean and repack the bearings. the other item to replace the brittle cloth covered wires going to the stator. now that it's apart and I can get a good look at them I don't see a good way to replace them. I was thinking about sliding a piece of shrink tubing over each one and calling it a day. any thoughts one my scheme?
 

lilredex

Well-known member
Joined
Apr 29, 2006
Messages
5,956
Location
Toronto
If those actual wires are good, that is what I would do. Some times when you dig too deep, you only create further problems.
 
Last edited:
OP
W

wolds

Member
Joined
Jan 19, 2020
Messages
17
Location
Johnstown, Ohio
yes, I agree. the insulation under the cloth is brittle but I don't see any other way other than the shrink tube idea just to keep things safe. I'm also adding a grounded power cord for safety.
 
To avoid these ads, REGISTER NOW!

torqueman2002

Well-known member
Joined
Jun 3, 2009
Messages
6,138
Location
SE Michigan
I agree, shrink tubing should work.

Also, I've been able to replace old cracked wires like yours, by splicing and using shrink tubing at the splice.

The key is finding a spot on the old wires that can be cleaned and will accept solder.

A ground is an excellent idea. I have seen more than one old grinder where the power switch was wired to the neutral side of a polarized 2-prong cord.
 
Last edited:

cory52000

Well-known member
Joined
Jan 10, 2020
Messages
71
Location
southern oregon
I am assuming you got it off but if not I have used heat and cold. Heat the flange with a propane torch. Does not need to be red hot just hot and the flash freeze the shaft with dust spray. Turn the can upside down so you get liquid and spray the shaft. Should get you a few thousands

Sent from my LM-V405 using The Garage Journal mobile app
 

Fdxjetmech

Member
Joined
Dec 26, 2019
Messages
5
Location
Memphis TN
On my pre block grinder I took pictures of the three leads into each winding. I cut string loops to expose factory splice under paper insulation. Clipped the crusty wire off there. Then soldered new color coded wire and heat shrank the splice. Do this for all three leads. Then I referred back to pictures routed wire and tied off wire with cotton twine and superglued the knots and twine to harden up the string similar to the shellac that was used at factory. Hope this helps.
 

bmwrd0

Well-known member
Joined
Nov 7, 2010
Messages
5,447
Location
Beaver Fever Oregon
Somewhere on the forum is a good photo essay of an electric motor rebuild, all the way done to replacing the wiring, repainting the rotor and stator insulation and so on. But damned if I can find it right now. So, if you are very ambitious, yes you can replace the wiring at that level, but in most cases either shrink wrap or a splice is all you need to do.
 
OP
W

wolds

Member
Joined
Jan 19, 2020
Messages
17
Location
Johnstown, Ohio
On my pre block grinder I took pictures of the three leads into each winding. I cut string loops to expose factory splice under paper insulation. Clipped the crusty wire off there. Then soldered new color coded wire and heat shrank the splice. Do this for all three leads. Then I referred back to pictures routed wire and tied off wire with cotton twine and superglued the knots and twine to harden up the string similar to the shellac that was used at factory. Hope this helps.

excellent info, thanks
 
OP
W

wolds

Member
Joined
Jan 19, 2020
Messages
17
Location
Johnstown, Ohio
I am assuming you got it off but if not I have used heat and cold. Heat the flange with a propane torch. Does not need to be red hot just hot and the flash freeze the shaft with dust spray. Turn the can upside down so you get liquid and spray the shaft. Should get you a few thousands

Sent from my LM-V405 using The Garage Journal mobile app

yes, finally got it apart, now working on cleaning it up and getting it ready for paint.
 
OP
W

wolds

Member
Joined
Jan 19, 2020
Messages
17
Location
Johnstown, Ohio
so my next question is when I popped the bearings out along with the felt dust rings and three pronged tension springs I made two observations.

1) both three prong tensioners were stacked together and assembled on one shaft. the other shaft didn't have a tensioner. my gut tells me each side should have one each but I'm not sure.

2) the felt rings came out dry but I was thinking they have dried out and were originally oiled. Thoughts?

Thanks, Warren
 

FrankLee

Well-known member
Joined
Sep 13, 2010
Messages
3,568
Location
seMI, 48317
so my next question is when I popped the bearings out along with the felt dust rings and three pronged tension springs I made two observations.

1) both three prong tensioners were stacked together and assembled on one shaft. the other shaft didn't have a tensioner. my gut tells me each side should have one each but I'm not sure.

2) the felt rings came out dry but I was thinking they have dried out and were originally oiled. Thoughts?

Thanks, Warren

Spring washers only get installed on the fan side to push the rotor into the cent switch. They also act as spacers. I've seen two spring washers stacked before.

Felt washers should be dry, imo.
 

exmaxima1

Well-known member
Joined
Jun 25, 2011
Messages
6,339
Location
Midwest
Spring washers only get installed on the fan side to push the rotor into the cent switch. They also act as spacers. I've seen two spring washers stacked before.

Felt washers should be dry, imo.

Yep. I once installed a spring washer on both ends like the op suggested, and the shaft floated side-to-side during use. Not good.
 
OP
W

wolds

Member
Joined
Jan 19, 2020
Messages
17
Location
Johnstown, Ohio
getting close to completion. runs nice and quiet. had to make a new base plate for the cap start switch because I managed to snap the original in two during disassembly. I never had the safety shields or the quench pan so I'm looking for substitutes for those. found some Dewalt shields online. Not sure what I'll do for the pan. Any suggestions would be appreciated. Warren
 

Attachments

  • IMG_6206.jpg
    IMG_6206.jpg
    154.3 KB · Views: 34
  • IMG_6209.jpg
    IMG_6209.jpg
    151.5 KB · Views: 33
Last edited:

harley jim

Well-known member
Joined
Dec 6, 2013
Messages
11,401
Location
Cleveland Tn..........out in the sticks
Wold
The grinder looks great.
Dont know if it will help you but I was at hobby lobby with Pat the other day and they had a stack of tin pans, all different sizes and shapes. I found a small rectangular one looks like a small bread pan maybe 4" long. I'm making a ring to drop it in and mount it to my pedistal. Just a thought. Jim


Sent from my SM-A102U using Tapatalk
 
OP
W

wolds

Member
Joined
Jan 19, 2020
Messages
17
Location
Johnstown, Ohio
Wold
The grinder looks great.
Dont know if it will help you but I was at hobby lobby with Pat the other day and they had a stack of tin pans, all different sizes and shapes. I found a small rectangular one looks like a small bread pan maybe 4" long. I'm making a ring to drop it in and mount it to my pedistal. Just a thought. Jim


Sent from my SM-A102U using Tapatalk

that would work, I'll check HL out. thanks for the tip.
 

danandmelrod

Well-known member
Joined
Mar 31, 2017
Messages
117
Location
La Habra, CA.
Hi Wolds,

I’m just checking in to see how the progress is coming along on the bench grinder.

I too recently picked up a similar bench grinder and would like to restore it someday. I also happened to find another grinder on Craigslist that I believe is from the same time period but with a Packard name plate.

Thanks for the post,
Dan
 

Attachments

  • D0EC0BD7-BF5E-4CD0-B934-D64B37242B4A.jpg
    D0EC0BD7-BF5E-4CD0-B934-D64B37242B4A.jpg
    95.7 KB · Views: 21
  • 14D53442-A81B-4291-9FBA-137A1E1B4D23.jpg
    14D53442-A81B-4291-9FBA-137A1E1B4D23.jpg
    94.4 KB · Views: 20
  • 3FB43BE2-1DF6-4697-AB16-351115D352A0.jpg
    3FB43BE2-1DF6-4697-AB16-351115D352A0.jpg
    88.1 KB · Views: 24
  • F70B48E3-AA4F-45EA-B38E-ABC9B58178FE.jpg
    F70B48E3-AA4F-45EA-B38E-ABC9B58178FE.jpg
    104.8 KB · Views: 23

lafester

Well-known member
Joined
Mar 1, 2017
Messages
2,191
Location
Northern CO
Is that on the right side of the grinder? I'm working on getting mine apart and would rather not break it. Also where did you get the plate material? Oh, and you never explained how you got the second, more stubborn flange off. Mine are both solidly in place with no movement.

Thanks

getting close to completion. runs nice and quiet. had to make a new base plate for the cap start switch because I managed to snap the original in two during disassembly. I never had the safety shields or the quench pan so I'm looking for substitutes for those. found some Dewalt shields online. Not sure what I'll do for the pan. Any suggestions would be appreciated. Warren
 
To avoid these ads, REGISTER NOW!
Top Bottom