To avoid these ads, REGISTER NOW!

New attached 40x60 colonial garage

davesly

Well-known member
Joined
Jul 16, 2007
Messages
58
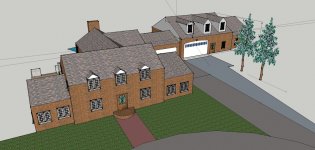
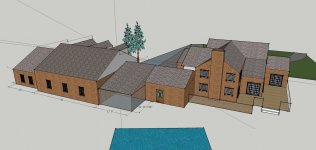
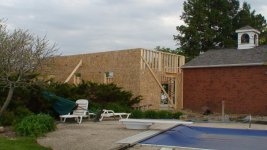
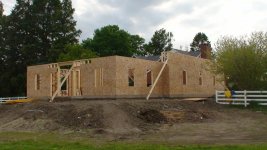
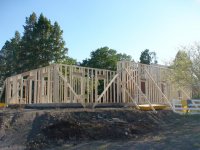
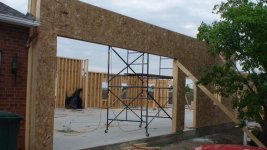
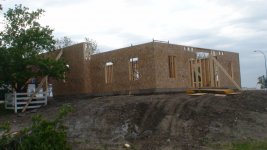
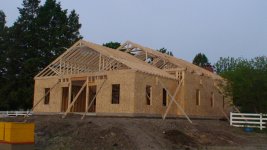
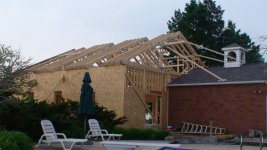
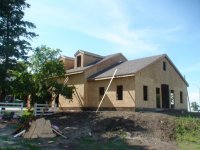
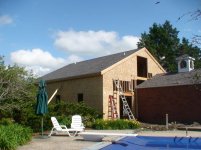
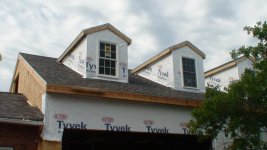
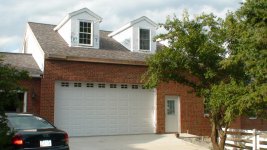
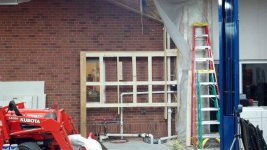
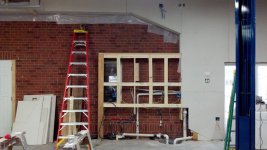
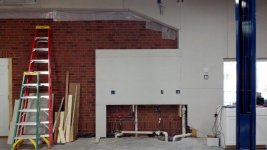
So the city won't let me put an outbuilding on my Acreage, which is located on the edge of town, so I've got to attach a 40x60 to my brick colonial house. I am making the attachment to the East side of my current attached garage.

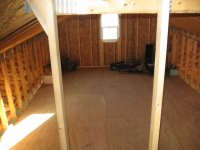
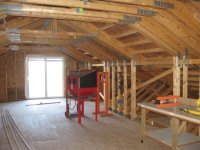
Given that the 40x60 is nearly as big as my house, I designed it to look very similar (2 story with dormers). This will give me a 12' ceiling height for both of my 2-post Rotary lifts, and also a lower ceiling area (9') for my display area. Then I'll have an upstairs workshop for small stuff (sandblasting, head/carb rebuilds, electrical work, small parts cleaning/painting, etc). I even spec'd attic trusses above the 9' ceiling for storage.

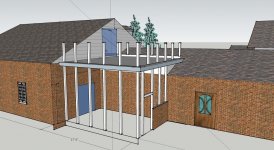
I attached some pics that I made in sketch-up of the house with the garage addition.

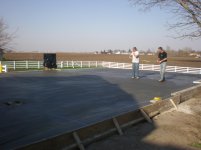
We just poured the floor today. I included pics of the lay-down of the PEX radiant heat tubes in the HVAC section of this site. Next step - Framing.
 

Attachments

  • house 40x60-corner NW.jpg
    house 40x60-corner NW.jpg
    150.4 KB · Views: 1,317
  • house 40x60-entire house.jpg
    house 40x60-entire house.jpg
    151.9 KB · Views: 1,334
  • house 40x60-back.jpg
    house 40x60-back.jpg
    146.4 KB · Views: 1,248
  • Photo[1].jpg
    Photo[1].jpg
    89 KB · Views: 1,138
  • ColorLot.JPG
    ColorLot.JPG
    62.3 KB · Views: 8,367
  • P4090004.jpg
    P4090004.jpg
    134.3 KB · Views: 1,124
  • Stairs garage tools.jpg
    Stairs garage tools.jpg
    141 KB · Views: 1,595
Last edited:
To avoid these ads, REGISTER NOW!

Kevin54

MEMBER EMERITUS
Joined
Jan 12, 2005
Messages
29,341
Location
Urbana, Ohio
attachment.php


That's going to be sweet when it's done. Looking forward to the upcoming pics!!

Did you do a partial roof at one time? It looks like the main house doesn't match the rest of the house? I can't complain though, at one time the aerial shot of our house showed about three or four different colors.
 
OP
D

davesly

Well-known member
Joined
Jul 16, 2007
Messages
58
Actually, this is a pic from our assessor website and it is a few years old. I replaced the roof on the entire house last summer (this way it will match the roof for my new garage expansion this summer). Overall it will be a very large amount of roof.

An interesting story on the house: My wife and I were planning to build on a lot we owned, and this house had been on the market for around $750K for several years. Well it eventually fell into foreclosure, and we were able to pick it up from the bank for only $290K early last Spring. Of course, it needed a new roof, appliances and a lot of TLC (i.e. lots of dead animals in the pool), but it cleaned up well. Since we made such a good buy on the house, I was able to afford my new Garag-Mahal and still be under what we were expecting to pay for just the house to be built on our old lot.
 
OP
D

davesly

Well-known member
Joined
Jul 16, 2007
Messages
58
The walls are going up (Finally!)

Construction is 2x6's on 1 foot centers. This was necessary due to the large attic space. The trusses should go up tomorrow!
 

Attachments

  • DSC00185.jpg
    DSC00185.jpg
    148.6 KB · Views: 477
  • DSC00184.jpg
    DSC00184.jpg
    148.9 KB · Views: 484
  • DSC00179.jpg
    DSC00179.jpg
    142.7 KB · Views: 513
  • DSC00182.jpg
    DSC00182.jpg
    148.7 KB · Views: 479
  • DSC00176.jpg
    DSC00176.jpg
    136.9 KB · Views: 486
  • DSC00183.jpg
    DSC00183.jpg
    141.9 KB · Views: 477
  • DSC00177.jpg
    DSC00177.jpg
    135.6 KB · Views: 528

51rider

Well-known member
Joined
Dec 21, 2009
Messages
502
Location
London, England.
Wow!
What a lovely home!
I think the city have done you a favour-your design blends seamlessly into the house & makes it look like it has always been there. That sir is the mark of a well thought out plan & I take my hat off to you. great design & the extension will really suit-you have designed it very well.
I am very impressed with the sketch-up renderings-how long did it take? I'm trying to use it for my garage plans & after about 12 hours of playing, mine is a pile of poo compared to yours:bowdown::)

Are you involved in design/construction at all? With the quality of the sketch-up pics & the blending in of the new addition, I'm thinking you must be!

Looking forward to the updates.

Subscribed!
 
OP
D

davesly

Well-known member
Joined
Jul 16, 2007
Messages
58
Thanks a lot for the comments. On one hand, I do like the idea of the attached garage, however the cost is over twice as much as a metal building located on the far corner of the field. The entire project will come in at around $120K.

I am not in the construction business, but I did ask an architect friend for some ideas (it cost me a $100 gift certificate to a local restaurant). Originally, I had a 40x60 rectangle that had 12' high sidewalls. I also had a lower brick wainscoting with white siding up the rest of the way.

His recommendation was to breakup the roofline by lowering 1/3 of the building to 9' and adding the dormers to mirror the original house (also makes the upstairs attic area more useful as a shop). He also recommended matching the mullin windows of the original house, and minimizing the siding (going with brick everywhere possible). The screen porch on the back was my idea. In the end, he still thought I was crazy to build such a big garage, however I think all of us on this board have heard that before. Luckily all of my neighbors have been very positive about it.

I spent a lot of time with learning Sketchup to do the layout, however, it was generally fairly easy. The trick is to save a lot, because sometimes you get a wall out of plane and I never could fix it. In those cases, I just went back to my last saved version and worked from there.
 
OP
D

davesly

Well-known member
Joined
Jul 16, 2007
Messages
58
FINALLY! the trusses are up. Next step is the sheeting. You can clearly see the size of the attic within the trusses. The lower 9' section will be storage only, and will be accessed via a pull down ladder from the ceiling. The larger 12' attic section will be a workshop that will have 3 dormers for light and will have a staircase entry.
 

Attachments

  • DSC00187.jpg
    DSC00187.jpg
    141.3 KB · Views: 520
  • DSC00188.jpg
    DSC00188.jpg
    144.8 KB · Views: 554
  • DSC00189.jpg
    DSC00189.jpg
    145.5 KB · Views: 548
OP
D

davesly

Well-known member
Joined
Jul 16, 2007
Messages
58
The Roof is now done. Next step is tyvek and windows. Then the brick.

I originally had a screen porch with a standard roof, that was next to the pool. I liked the view from the loft so much that I replaced the window with a sliding glass door and converted the screen porch roof into a 2nd story deck.

More progress soon... hopefully.
 

Attachments

  • DSC00261.jpg
    DSC00261.jpg
    137.7 KB · Views: 436
  • DSC00264.jpg
    DSC00264.jpg
    142.3 KB · Views: 414
OP
D

davesly

Well-known member
Joined
Jul 16, 2007
Messages
58
The windows and Tyvek only took a day. I'm guessing that the brick work will take a few weeks.
 

Attachments

  • DSC00270.jpg
    DSC00270.jpg
    139.8 KB · Views: 377
  • DSC00269.jpg
    DSC00269.jpg
    138.8 KB · Views: 339
  • DSC00268.jpg
    DSC00268.jpg
    144.8 KB · Views: 421
OP
D

davesly

Well-known member
Joined
Jul 16, 2007
Messages
58
We finally completed the brick (13,500 of them) and are now on to the trim and siding. I'll also be installing a screened-in porch on the poolside of the building. It will have a deck on top for the attic room walkout.

I'm about 1/3 done with the internal wiring (I'll take interior pics this weekend).
 

Attachments

  • overall porch.jpg
    overall porch.jpg
    153.3 KB · Views: 564
  • DSC00318.jpg
    DSC00318.jpg
    152.5 KB · Views: 663
  • DSC00315.jpg
    DSC00315.jpg
    148.2 KB · Views: 564
  • DSC00313.jpg
    DSC00313.jpg
    152 KB · Views: 555
To avoid these ads, REGISTER NOW!

bighammer

Well-known member
Joined
May 4, 2010
Messages
81
Location
Mt Olive MS
It appears you purchased the vacant lot to the right of your house and this addition actually crosses the fence over into that land. What's your plans for the rest of the lot?
 
OP
D

davesly

Well-known member
Joined
Jul 16, 2007
Messages
58
The cop cars were the best looking chevy surburbans available in the Google Sketchup graphics warehouse. I used Sketchup to create these drawings and check out the spacing for the placement of the lifts. I have a suburban and want to make sure that I can fit it on the lifts.
 
OP
D

davesly

Well-known member
Joined
Jul 16, 2007
Messages
58
Actually, the lot was included with the house purchase. The prior owners would keep horses in that lot (now I keep horse-power in the lot).

I am in some local car clubs, so I thought we could hold some of our events in the grass area, and use the garage and lifts for judging, tech sessions and a place to hang out (if it rains).
 

Motown 454

Well-known member
Joined
Sep 25, 2008
Messages
1,359
Awesome looking building. I think the brick was the right choice. It looks great.
 

mojo_13

Well-known member
Joined
May 30, 2010
Messages
268
Location
Iowa
Looks great, I look forward to some interior pictures of it. I saw in another post about how you are heating and cooling it. Sounds like it should hold up nicely to the cold Iowa winters.
 
OP
D

davesly

Well-known member
Joined
Jul 16, 2007
Messages
58
Interior pics

I've included pics of inside (finally). I am really happy with the 5 foot spacing of the can-lights in the display area (really make the cars look nice). You can also see some of my vintage shop equipment. (from left to right - Bear 4-wheel alignment machine, Matco toolbox, Sun Oscilloscope, Bear Engine Analyzer and Sun Distributor machine). You might also spot a Snap-On A/C machine in the insulation picture. The workbenches are from Sam's club and I really like them (very well built and very cheap). I still have lots to do, however my wife's car is needing some attention first.
 

Attachments

  • IMG_4822.JPG
    IMG_4822.JPG
    98.6 KB · Views: 777
  • IMG_4823.JPG
    IMG_4823.JPG
    122.2 KB · Views: 956
  • DSC00400.jpg
    DSC00400.jpg
    148.3 KB · Views: 1,152
  • DSC00404.jpg
    DSC00404.jpg
    150.4 KB · Views: 933
  • DSC00398.jpg
    DSC00398.jpg
    146.1 KB · Views: 957
  • DSC00397.jpg
    DSC00397.jpg
    151.7 KB · Views: 1,203
  • panel.jpg
    panel.jpg
    145.8 KB · Views: 826
OP
D

davesly

Well-known member
Joined
Jul 16, 2007
Messages
58
The lifts are now in

I purchased some old Rotary Asymmetric lifts from a GM dealer in Chicago that was going out of business. They were $1,500 each, but were scratched and rusty. I sanded them down, repainted them and purchased some new stickers. They seem to work great, and they look as good as new.

I mounted the one on the left (without the Vette) so that I could drive straight in for alignments, oil changes, and short term maintenance. I mounted the front of the posts 12' from the back wall.

The one of the right, is backwards (you back into it). This is so I can pull engines into the open space of the garage. This is a more long-term projects lift. The back of the posts are 15' from the wall, to make room for the back of the car, and to clear the stairway.

The two posts are mounted 4' from each other.
 

Attachments

  • DSC_0584.jpg
    DSC_0584.jpg
    143.5 KB · Views: 598
  • DSC_0588.jpg
    DSC_0588.jpg
    144.3 KB · Views: 704
OP
D

davesly

Well-known member
Joined
Jul 16, 2007
Messages
58
Outside of garage with all siding done

I finally finished the siding before it snowed. The outside is now completely done (except for the deck and landscaping).
 

Attachments

  • DSC_0582.jpg
    DSC_0582.jpg
    137.7 KB · Views: 410
OP
D

davesly

Well-known member
Joined
Jul 16, 2007
Messages
58
Insulation is finally done - now on to drywall.

Here are pics with the completed insulation. I am now ready to start on the drywall. These pics were taken at a recent NCRS Corvette club meeting.
 

Attachments

  • DSC_0589.jpg
    DSC_0589.jpg
    142.3 KB · Views: 577
  • DSC_0586.jpg
    DSC_0586.jpg
    143.2 KB · Views: 600
  • DSC_0585.jpg
    DSC_0585.jpg
    145.7 KB · Views: 578
  • DSC_0583.jpg
    DSC_0583.jpg
    145.6 KB · Views: 618
OP
D

davesly

Well-known member
Joined
Jul 16, 2007
Messages
58
Working on the Kitchenette

I just started on the kitchenette this weekend, as I try to finish up all of the drywall installation. These are pics of the progress so far. I'll be installing white particle-board cabinets with a gray counter top (Lowes).
 

Attachments

  • Kitchen Start.jpg
    Kitchen Start.jpg
    90.8 KB · Views: 210
  • Kitchen-Framed.jpg
    Kitchen-Framed.jpg
    103.3 KB · Views: 213
  • Kitchen-Frame-Elec.jpg
    Kitchen-Frame-Elec.jpg
    89.9 KB · Views: 213
  • kitchen-drywall.jpg
    kitchen-drywall.jpg
    74.6 KB · Views: 239

ejm1961Tbird

Well-known member
Joined
Oct 1, 2010
Messages
356
Location
Knoxville, TN
Congrats on a great plan and beautiful execution!

Could you please show me detailed pics of the stair and truss framing as the stairs pass through the attic trusses to the second floor, if you have them? Thanks.
 

rmckee

Well-known member
Joined
Jan 2, 2012
Messages
457
Location
Wake Forest, NC
Wow- what an original and well thought out garage! I think you need a little more room for the parking of your collection... seems kind of tight over in that corner.
 
OP
D

davesly

Well-known member
Joined
Jul 16, 2007
Messages
58
If you look at the pics in Post #31, you can see the stairs fairly well. I just built a platform as high as I could (head clearance below the joists), and then attached the stair frames to the platform. The upper stair frames are nailed to a board between the rafters. The rafters are spaced about 3 feet apart in the area of the stairs and dormers. In order to do this structurally, I have sandwiched 3 rafters together on each side and then cross braced between them. One side of the stairs is also next to the dormer, so I have 6 sandwiched rafters together (seems like a bit of overkill to me, but the structural engineer required it).

As such, the building structure was designed around the stairs (not something you could easily add later).

I'll have some new pics of the stairs soon, as I am building a storage area underneath them.

Dave
 

z385488

Well-known member
Joined
Jun 3, 2011
Messages
119
Location
Columbus, GA
Sweet :drool: 
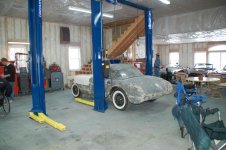
After installing the lifts how much room do you have for drywalling the ceiling? My shop has 12' ceilings also and I was wondering if I would be able to install a similar lift after the ceiling is finished.
 

ejm1961Tbird

Well-known member
Joined
Oct 1, 2010
Messages
356
Location
Knoxville, TN
Thanks for the information about the truss\stair framing. Six trusses to frame the top of the stairs does seem excessive, but I would do it too if it was required for the building design.
 
To avoid these ads, REGISTER NOW!
Top Bottom