To avoid these ads, REGISTER NOW!

New Craftsman 103.22450

Ranchermac

Member
Joined
Apr 25, 2018
Messages
7
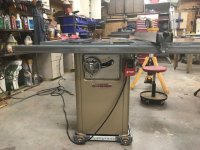
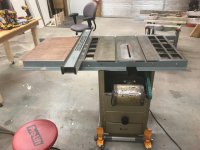
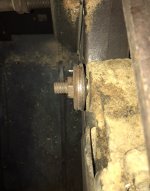
Hey guys, I’m new here and I’ll be fixing up my new to me 103.22450 table saw. Found it on Craigslist and pretty excited to have it. Only thing wrong right now that sticks out to me is the arbor shaft. The arbor shaft is very noisy when it runs and catches when I turn it by hand...hoping it’s just some bad bearings. Seems to be all original minus the switch and it will be a fun project that I plan to use around the garage. I’ve read the few other threads for these on here, but if you have any tips (especially regarding the arbor) let me know. It will be a couple months before I can dig into it but I look forward to sharing the process on here.

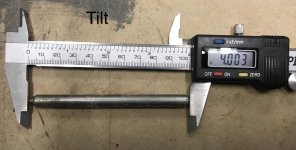
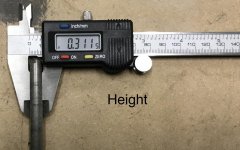
For whatever reason the picture wants to upload sideways. Sorry about that!
 

Attachments

  • CC09940C-BB78-4A3A-AA0A-A4EACCB87B8B.jpg
    CC09940C-BB78-4A3A-AA0A-A4EACCB87B8B.jpg
    147.2 KB · Views: 306
To avoid these ads, REGISTER NOW!

uberschall

Active member
Joined
Nov 14, 2011
Messages
36
Location
Just North of Detroit
Nice find! Do you have the rail for the fence? If not you should be able to adapt a newer fence system like a Vega.

Once you have it apart, the arbor bearings are usually pretty standard sizes - I was able to cross reference the bearings for my Delta and source high-quality replacements for substantially less than the "service parts" sites listed for my model.

I'd also recommend upgrading to a modern paddle-style switch if possible, I know they don't look very cool but they improve the safety of the unit.
 

95riosnake

Well-known member
Joined
Oct 26, 2013
Messages
394
Location
Pittsburgh, PA
OP
R

Ranchermac

Member
Joined
Apr 25, 2018
Messages
7
Thanks for the help and advice!

As far as the fence goes, I don't have the front rail. Not a biggie because I was planning on upgrading the the Vega like you mentioned. And also as you mentioned, I will install a paddle switch. As much as it might look tacky, I care more about being safe.

When it comes to the bearings, I hear that they are pressed on. 95roisnake, as far as those bearings go do you know if they are USA or outsourced? I was actually messaging that seller just last evening trying to find the correct one. How was the process replacing yours? I'm located out in Idaho. This is the first 50's floor model I've come across so I was excited to jump on it!

This is my first vintage tool rebuild so I will probably have many questions along the way.
 

95riosnake

Well-known member
Joined
Oct 26, 2013
Messages
394
Location
Pittsburgh, PA
When it comes to the bearings, I hear that they are pressed on. 95roisnake, as far as those bearings go do you know if they are USA or outsourced? I was actually messaging that seller just last evening trying to find the correct one. How was the process replacing yours? I'm located out in Idaho. This is the first 50's floor model I've come across so I was excited to jump on it!

This is my first vintage tool rebuild so I will probably have many questions along the way.

I will check tonight and see if the packages say the country of manufacture. I haven't gotten to the point of installing them but I did remove the old ones from the arbor shaft, you're correct they are pressed on. There are two internal retaining rings inside the arbor casting that have to be removed before pressing the bearings out of the bore. Currently I have mine completely disassembled and have stripped all the internal parts and repainted them. I still have a good bit more refinishing and a few repairs to do before I start reassembling.
 

rickhigginshtbr

Well-known member
Joined
Aug 7, 2012
Messages
1,551
Location
Lower Bucks, PA
Instead of the Vega, I went with the Craftsman Align-a-rip xrc on my '57. Works beautifully with only a tad bit of adjustment needed out of the box. Got mine off sears parts direct, but they pop on ebay or CL here and there.
 

exmaxima1

Well-known member
Joined
Jun 25, 2011
Messages
6,340
Location
Midwest
Nice find, and probably the only CM table saw I would ever consider owning again. Definitely worth the investment in a modern fence.
 
OP
R

Ranchermac

Member
Joined
Apr 25, 2018
Messages
7
I'm going to resurrect this post. Thank you for all the imput thus far. Finally got my saw in my garage today. Here are some pictures I just took of it. I know it is pretty rough, but I think it has good bones and will make for a fun project. Some areas they cut out some sheet metal, drove in some screws, etc. The good news: the knock that it had when I initially looked at it is gone. I have no clue what it was, but now it runs silent. This was with not a ton of pressure on the belt so I don't know if that is a reason.

Do any of you see any missing parts? Anything that is not as it should be? Any ideas as to what the knock might have been?
 

Attachments

  • IMG_5320.jpg
    IMG_5320.jpg
    106 KB · Views: 73
  • IMG_5319.jpg
    IMG_5319.jpg
    105.7 KB · Views: 67
  • IMG_5318.jpg
    IMG_5318.jpg
    138 KB · Views: 78
  • IMG_5317.jpg
    IMG_5317.jpg
    86.1 KB · Views: 67
  • IMG_5316.jpg
    IMG_5316.jpg
    105 KB · Views: 66
  • IMG_5315.jpg
    IMG_5315.jpg
    84.7 KB · Views: 71
  • IMG_5314.jpg
    IMG_5314.jpg
    137.9 KB · Views: 67

notlob

Well-known member
Joined
Aug 19, 2013
Messages
1,384
Location
norcal
Don't have any info, but here's a pic of your saw on the cover of the 1954 Craftsman Power Tools catalog:

attachment.php
 

Attachments

  • 1954 craftsman power tools cover.jpg
    1954 craftsman power tools cover.jpg
    94.8 KB · Views: 691
OP
R

Ranchermac

Member
Joined
Apr 25, 2018
Messages
7
Thanks for the help guys. SSDave, I sent you a pm. Thank you!

I just learned something that maybe you guys can help with. I should have checked this before, but found out the lock knobs on the wheels don't work. When I took them off I found the lock rods were missing along with one collar (not sure the collar is an issue right now though. Any ideas as to how I can replace them? I did some searching but came up empty.
 

CKS1955

Well-known member
Joined
Oct 12, 2014
Messages
489
Location
Michigan
...I just learned something that maybe you guys can help with. I should have checked this before, but found out the lock knobs on the wheels don't work. When I took them off I found the lock rods were missing along with one collar (not sure the collar is an issue right now though. Any ideas as to how I can replace them? ...

If interested I can get the dimensions of my locking rods. It should relatively easy to reproduce.

Jay
 
OP
R

Ranchermac

Member
Joined
Apr 25, 2018
Messages
7
That would be great CKS. I just made one that I found the dimensions on for the tilt. I just need to know the dimensions on the height adjustment knob.
 

CKS1955

Well-known member
Joined
Oct 12, 2014
Messages
489
Location
Michigan
Good evening,
I posted pictures for both.

Jay
 

Attachments

  • 9283A4FB-CF4E-46E2-81CB-5585FA6E071D.jpg
    9283A4FB-CF4E-46E2-81CB-5585FA6E071D.jpg
    140.4 KB · Views: 43
  • C3CC432E-752A-4306-884F-55D91ECE4F08.jpg
    C3CC432E-752A-4306-884F-55D91ECE4F08.jpg
    125.5 KB · Views: 38
  • 7D00DE8A-9970-4FF5-8460-C257A1ACA848.jpg
    7D00DE8A-9970-4FF5-8460-C257A1ACA848.jpg
    148.7 KB · Views: 40
  • FF80D0F8-E858-4647-957A-50A58D2236C2.jpg
    FF80D0F8-E858-4647-957A-50A58D2236C2.jpg
    152 KB · Views: 36
Joined
Jun 17, 2012
Messages
12
Location
land of the huskers
CKS1955 thank you so much ! One of my locking rods was missing as well ! Now I can fab one myself. I’m knee-deep in a full rebuild of my 103.22451 floor model. Also maybe you or one of the other fellas can help me. I’m really scratching my head on how to take apart the arbor Assembly. One of the ball bearings is making some noise so I decided to replace the arbor bearings but I am a little hesitant to go tear into it without having a step-by-step. I have the harbor freight bearing pulley kit that I was going to use. Any help is greatly appreciated!
 

gsprinkel

Member
Joined
Apr 13, 2019
Messages
13
Location
Texas
Good evening guys, and I'm really happy I found this site. I too am restoring an early 60's model Craftsman 103.22450 I was able to pick up at an estate sale store for $25.00. They had planned to sell it for scrap metal and I couldnt let that happen. Got it home today and plugged in the motor, which ran smooth and quiet.

My first need is the height adjustment handle, one is busted and doesnt turn easily. I intend to clean the saw thoroughly first, then work on the rest of the saw. Its missing several nuts and bolts, but everything else seems to be included. It even has the original fence which is a beast, and solid steel.

Looking forward to contributing as well. I'm an old Hilti and DeWalt guy so feel free to ask me anything about those two particular brands if you need help.

Thanks!
 

Attachments

  • 57714227470__EA38D2C7-4D99-416D-929B-5BD03B023EB0.JPG
    57714227470__EA38D2C7-4D99-416D-929B-5BD03B023EB0.JPG
    95.3 KB · Views: 53

exmaxima1

Well-known member
Joined
Jun 25, 2011
Messages
6,340
Location
Midwest
Good evening guys, and I'm really happy I found this site. I too am restoring an early 60's model Craftsman 103.22450 I was able to pick up at an estate sale store for $25.00. They had planned to sell it for scrap metal and I couldnt let that happen. Got it home today and plugged in the motor, which ran smooth and quiet.

My first need is the height adjustment handle, one is busted and doesnt turn easily. I intend to clean the saw thoroughly first, then work on the rest of the saw. Its missing several nuts and bolts, but everything else seems to be included. It even has the original fence which is a beast, and solid steel.

Looking forward to contributing as well. I'm an old Hilti and DeWalt guy so feel free to ask me anything about those two particular brands if you need help.

Thanks!

$25 ??!!
Major suckage
 

gsprinkel

Member
Joined
Apr 13, 2019
Messages
13
Location
Texas
Can't fault a guy for finding a good deal! :)

I honestly had no idea it was worth any more than that, and found this site giving me a heads up of the true value. It was valuable to me because under the rust and dings is a beautiful piece of equipment. I've been using a 70's model 113 Craftsman for over 25 years.

I've got an old Woodcraft Planer/Moulder if somebody out there needs parts. There's a guy on CL in my area selling one for $1450. (Well, he posted an ad several times, he still has it so it may be a bit overvalued.
)
 
To avoid these ads, REGISTER NOW!

gsprinkel

Member
Joined
Apr 13, 2019
Messages
13
Location
Texas
Would it make you guys feel better if I said I misplaced the decimal? (I didn't, but I'll say I did)

Got it torn down today into basically 3 sections. Hoping to get it cleaned well, lubricated, and back to well functioning.

I have seen a few posts on casters for this but most folks have fabricated a steel base instead of using casters through the bases existing feet. Are they just not sturdy enough for the saw weight? They would raise the height of the saw by about 3".

Has anyone ever used one of the mobile base kits on this saw? I like the way it works on my planer dropping the side down to level and not allowing for any movement of the planer when in use.

Thanks for any input!
 

Honest Bob

Well-known member
Joined
Jul 3, 2010
Messages
263
Location
Easton, PA
Yeah I took the factory wheels off mine and put it on a harbor freight mobile base. Works great after I got the dimensions all sorted out (took two tries).
 

gsprinkel

Member
Joined
Apr 13, 2019
Messages
13
Location
Texas
Thank you guys, I'll check that model and see if I can get the height right to stay with my existing outfeed tables.

I have scoured the OWWM boards and this one for the gold paint color, which I read in a post, but have been unable to find the post again. I remember the post containing several options including one from True Value. It gave the color code as well as the name. Anyone have that bookmarked?

What are your thoughts on keeping the original fence vs putting my 52" Biesemeyer on this since it will be my everyday saw? The original fence is in good shape, I'm just very trusting of my Biesemeyer. I am a bit concerned the plastic sliding pads on the BM will catch on the webbed wings on the 103. Anyone done this that has suggestions?

Appreciate all the help, this is my first restoration of anything this old.

Thank you.
 

CKS1955

Well-known member
Joined
Oct 12, 2014
Messages
489
Location
Michigan
I use the original fence and have been satisfied with it’s performance, I just make sure to push the head of the fence into the face of the cast iron top prior to engaging the locking mechanism.

Rustoleum Champagne Gold Mist is a good substitute for Craftsman Power Bronze.

Jay
 

gsprinkel

Member
Joined
Apr 13, 2019
Messages
13
Location
Texas
Thank you. I have an auto body buddy who has offered to paint for me, spraying the pieces in his paint booth if I supply the paint. I have only found the Champagne Mist in spray cans so far, is it available in quarts?

I can always try to get Sherwin Williams to match it with an Industrial Coating paint maybe?

I appreciate the help. I’ll reattach the original fence and see how it works before making a judgement on replacing with the Bies.
 

Honest Bob

Well-known member
Joined
Jul 3, 2010
Messages
263
Location
Easton, PA
Here are some pictures of my saw. I have a
Mule accusquare fence on mine. As long as the tables are lined up properly your fence should be just fine.

6c367f34217b6de87f3fca6d23a07114.jpg20deaf2af52fb497fa7e581150f93b60.jpg


Sent from my iPhone using Tapatalk
 

Attachments

  • 20deaf2af52fb497fa7e581150f93b60.jpg
    20deaf2af52fb497fa7e581150f93b60.jpg
    267.8 KB · Views: 11
  • 6c367f34217b6de87f3fca6d23a07114.jpg
    6c367f34217b6de87f3fca6d23a07114.jpg
    308.7 KB · Views: 9

gsprinkel

Member
Joined
Apr 13, 2019
Messages
13
Location
Texas
Very nice! Great job! I hope mine turns out that well. One thing I did yesterday was repair and shore up my hand wheels. After reading all of the threads about the difficulty in finding replacements I filled the back cavity with a clear epoxy from Devcon. One of mine was bent and cracked. I’ll post a couple of pictures of how they turned out if anyone is interested. It definitely beefed them up and you can’t tell from the front they were modified.

How often do you use the extra length on your left rails? I have learned to live with my shorter rails and do most of my plywood sizing with a track saw. It’s just easier for a one man shop and I get great results. Blades on my table saw last longer as well, and the smaller track saw blades are considerably cheaper to replace from the gummy buildup.
 

CKS1955

Well-known member
Joined
Oct 12, 2014
Messages
489
Location
Michigan
Please post pictures of your fix for the hand wheels. Both of mine are in perfect condition, however either on here or over at Owwm.org I posted on whether that filling the back would reinforce the hand wheel. It should make a quite an improvement, I’ve had a handful of these through my shop and if the hand wheel was broken it was always where the spokes attach to the outer circle.

Jay
 

rickhigginshtbr

Well-known member
Joined
Aug 7, 2012
Messages
1,551
Location
Lower Bucks, PA
Bob, how do you have the dust port hooked up on yours? I was debating plexi glass with a dust port down low in that big opening.

Edit: Second picture popped up after I posted this. Odd, lol
 

gsprinkel

Member
Joined
Apr 13, 2019
Messages
13
Location
Texas
I’ll post the photos Sunday when I get back to the house, they don’t seem to post from my phone! The filler seemed to significantly strengthen the handles.

Thanks!
 

Honest Bob

Well-known member
Joined
Jul 3, 2010
Messages
263
Location
Easton, PA
Very nice! Great job! I hope mine turns out that well. One thing I did yesterday was repair and shore up my hand wheels. After reading all of the threads about the difficulty in finding replacements I filled the back cavity with a clear epoxy from Devcon. One of mine was bent and cracked. I’ll post a couple of pictures of how they turned out if anyone is interested. It definitely beefed them up and you can’t tell from the front they were modified.

How often do you use the extra length on your left rails? I have learned to live with my shorter rails and do most of my plywood sizing with a track saw. It’s just easier for a one man shop and I get great results. Blades on my table saw last longer as well, and the smaller track saw blades are considerably cheaper to replace from the gummy buildup.

Thanks, I tore it all apart and put new bearings in it, I also replaced the original 1hp with a 2hp motor. As far as the space on the left I never thought about it before but I never use it.

Bob, how do you have the dust port hooked up on yours? I was debating plexi glass with a dust port down low in that big opening.

Edit: Second picture popped up after I posted this. Odd, lol

Its a simple friction fit panel. It works ok and I havent even sealed everything up.
 

gsprinkel

Member
Joined
Apr 13, 2019
Messages
13
Location
Texas
Happy Easter guys, I am posting the photos of the hand wheels after filling the back cavity with epoxy. Also a photo of the epoxy I used, which I got at the blue box store and have used for several projects before with good success.
 

Attachments

  • IMG_3600.jpg
    IMG_3600.jpg
    96.1 KB · Views: 39
  • IMG_3602.jpg
    IMG_3602.jpg
    85 KB · Views: 40
  • IMG_3598.jpg
    IMG_3598.jpg
    109.6 KB · Views: 40
  • IMG_3599.jpg
    IMG_3599.jpg
    102.8 KB · Views: 39
  • IMG_3601.jpg
    IMG_3601.jpg
    101.5 KB · Views: 42

gsprinkel

Member
Joined
Apr 13, 2019
Messages
13
Location
Texas
Okay I have another question I hope you can help me answer. On my saw the blade arbor seems to have an 1/8” play side to side. The play is in the back at the height adjustment pin which has a large retaining ring and washer on one side. My concern is that the blade would possibly move 1/8” and hit any zero clearance throat plate I used. Does the friction of the belts hold it in place? There does not seem to be any way to “tighten” it other than remove the retaining ring and add another washer. Any thoughts?
 

CKS1955

Well-known member
Joined
Oct 12, 2014
Messages
489
Location
Michigan
There should be no play side to side. I wonder if the a spring washer is missing or damaged.

Jay
 

gsprinkel

Member
Joined
Apr 13, 2019
Messages
13
Location
Texas
Thank you Jay. I’ll check the exploded parts lost vs what I see on my saw while it is still out of the cabinet.
 

gsprinkel

Member
Joined
Apr 13, 2019
Messages
13
Location
Texas
I completed and reassembled the saw this afternoon. Got the fence installed and have made a few cuts to check and adjust the square. I'm pretty pleased with the end results, and the saw is really a strong saw. Attached a few photos. I do still have the original fence if somebody out there is looking for one for parts.

Thank you to everyone who contributed here or in some other area of the site that I scoured for information and help!
 

Attachments

  • IMG_3633.jpg
    IMG_3633.jpg
    101.8 KB · Views: 60
  • IMG_3632.jpg
    IMG_3632.jpg
    100 KB · Views: 59
  • IMG_3634.jpg
    IMG_3634.jpg
    92.6 KB · Views: 64
To avoid these ads, REGISTER NOW!
Top Bottom