At the same time the kitchen was going in, I was putting a lot of energy towards the heating system in the basement. Because we refinished all the floors on the first level, the radiators had to all come out. We also wanted to convert the first floor to under floor radiant heat to eliminate the radiators all together. I was able to get rid of the mess of massive pipe work in the basement by doing this and not have something to hit my head on anymore.
This is the pile of piping I removed from the basement.

I also added radiant under the floor in the new second floor bath we added. I went the Nibco Heat transfer plates because they were the best price I could find and Menards has them in stock. Certainly not the best plates on the market but for the price and the ease of install made these a very good choice.
This is under the floor of the bathroom.

I also had to reroute a section of pipe to a radiator in the guest bedroom. Pex was the obvious choice, but didnt want to see the pex coming through the floor connecting to the radiator. I came up this little attachment so it still looks original through the floor.


The last room that was left in the basement had a drywall ceiling, and needed to be removed so I could have access to the under side of the floor. There was a mess of blown in insulation in there. Terrible terrible terrible mess.

The hardest part of the radiant was clearing the under side of the floor of all the nails coming through. Very time consumer process. I dont have any photos of all the pex up under the floor but you can take a guess that it looks very similar to the above photo of it under the bathroom on a larger scale.
I did make this little contraption for running the pex tubing. I would highly recommend something like it to keep the pex from binding up. worked like a charm.

I finally was able to turn the heat on to the whole house on saturday. Had the second floor on but was still running loops for the first floor. Here is the manifold setup I put together. Ended up going with Zone pumps instead of valves one for each floor. The Manifold is for the first floor and the larger 3/4 tubing is going to the second floor radiators. So far the first floor pex tubing is still uninsulated and the temp is 70 degrees. Very excited to see how much more efficient this will be.

This is a little bracket I made to support the expansion tank. Had a piece of rectangular tubing in the pile of scrap so I put this together.


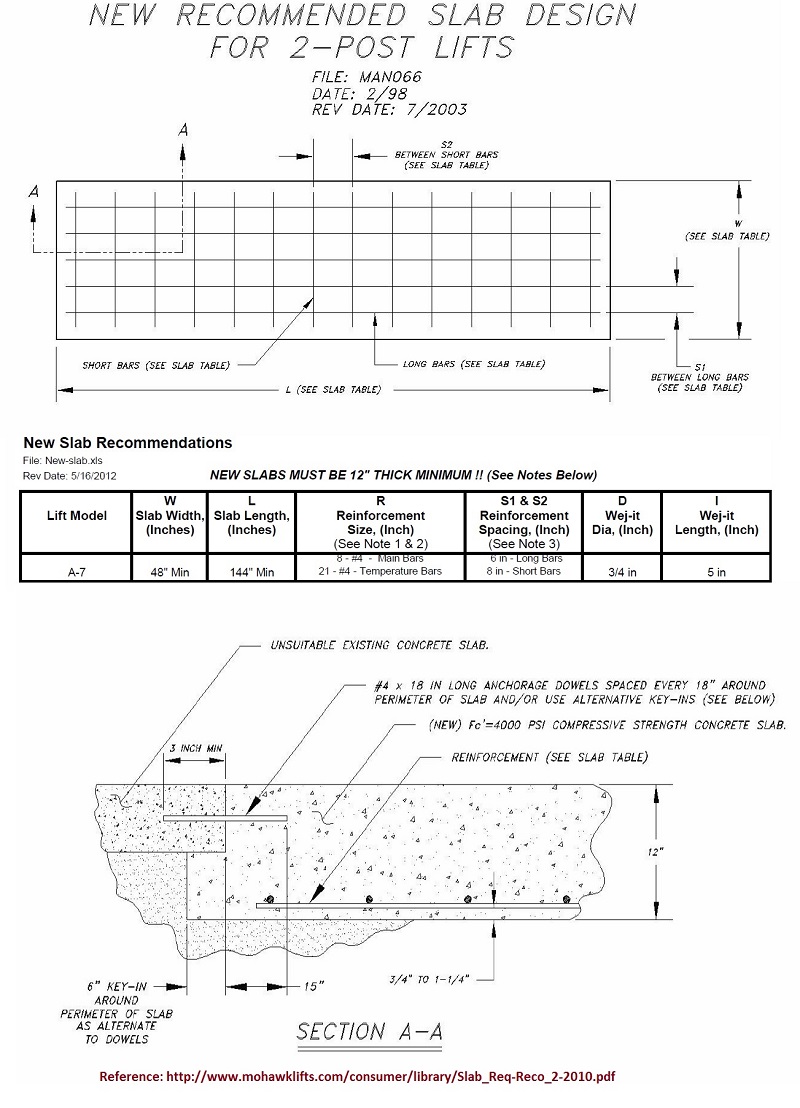
") . I'd encourage you to review this and compare your setup. When it comes to working under a car, i might be accused of going a bit excessive, but in my research, lift anchor/slab failures came up surprisingly frequent. If you went completely through both slabs with a 6" undercut, and rebar you're likely good. The image below is my edit of the Mohawk doc to include my own retro slab spec.
. I'd encourage you to review this and compare your setup. When it comes to working under a car, i might be accused of going a bit excessive, but in my research, lift anchor/slab failures came up surprisingly frequent. If you went completely through both slabs with a 6" undercut, and rebar you're likely good. The image below is my edit of the Mohawk doc to include my own retro slab spec.