To avoid these ads, REGISTER NOW!

New & Old Vise

MAYOR28

ALLIANCE MEMBER
Joined
Mar 22, 2010
Messages
786
Location
Southern MD
Inspired by the vise thread (which I probably wasted too much time on....), I began searching for my first bench vise. I wanted something with some heft to it, I like to work on old things, which tend to have a way of being stuck together, so I wanted something that I could really wrench on. I searched high and low at garage sales and CL with no avail....
I really wanted some good 'ol American Iron, something forged during my grandfathers infancy. I was beginning to think that I was going to have to search for a long long long time......BUT, this weekend I got a call from my father in law and he asked if I was still looking for a vise. I said yes, and he said "Good, 'cause I bought you one."

He pulled this out of a garage sale for $20!

Image0012.jpg


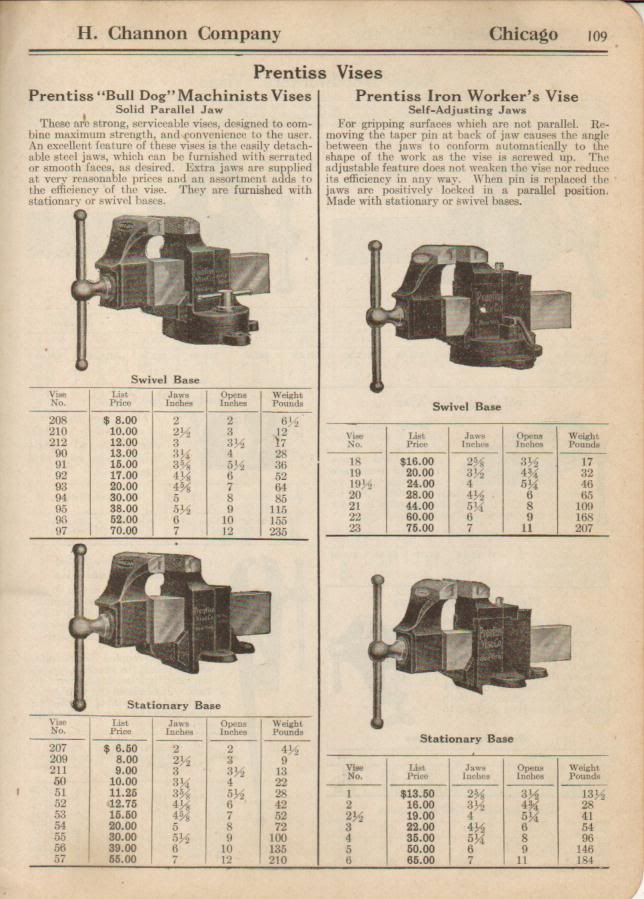
I think it is a Prentiss with a swivel jaw!!!!!! I am hoping one of the vise gurus (mjozefow, zrx61, autopts) will chime in to help me ID it. This is the only pic I have for right now, but I am picking it up this weekend and will probably start dismantling it next week!!

Anyone have any idea the original color of these? A lot of people seem to paint them black, I was thinking of gun bluing it (if its not too hard to do that is.....)

-Matt
 
To avoid these ads, REGISTER NOW!

Joe B.

Well-known member
Joined
Jan 2, 2007
Messages
2,752
How wide are the jaws and how much does it weigh? No matter what you got a great deal if there are not cracks or major damage. The only question is just how much you ****.
 

CD1

Well-known member
Joined
Nov 4, 2010
Messages
329
Krylon Fusion Graphite Textured Hammered finish.

Yes, this product is durable on metal finishes too.

:thumbup:
 

James Aiello

Well-known member
Joined
May 8, 2007
Messages
125
Location
50 miles West of Chicago IL
I have the same vise... I dumpster dived at my neighbors house, they were putting the father in a home and I was helping. Took a peak into the dumpster as I was passing it and saw this vise... ended up picking for about an hour.
Snap On sockets from the 1940-50s and a bunch of other tools...

I ended up painting it black... This was before I found this site... Now I would
go with something more original and would have sprayed it on. Still have to mount it. The lip does not work with my bench.


James
 

SweetD

Well-known member
Joined
Feb 8, 2010
Messages
3,265
Location
Rhode Island
Most definitely a Prentiss. If there are no markings on the side of the vise, it may be early enough that is has a logo / text on the top, behind the swivel jaw. Great deal at $20 for sure.

What is the jaw width, and can you weigh it? If you can get that info we may be able to pinpoint the age better from old advertisements.

There are a few threads on Prentiss restorations if you search here. Might take some elbow grease to free up that swivel jaw. Could end up being a really nice restoration project.

I'd guess that the original color was black. Can you get some more detailed pictures posted?

Dave
 
OP
M

MAYOR28

ALLIANCE MEMBER
Joined
Mar 22, 2010
Messages
786
Location
Southern MD
Most definitely a Prentiss. If there are no markings on the side of the vise, it may be early enough that is has a logo / text on the top, behind the swivel jaw. Great deal at $20 for sure.

That is exactly what I was thinking with the logo....

What is the jaw width, and can you weigh it? If you can get that info we may be able to pinpoint the age better from old advertisements.

I'd guess that the original color was black. Can you get some more detailed pictures posted?

I will get plenty of pics and measurements this weekend when I pick it up from my father in law. He said that it weighs 25 lbs, but I think that is a severe underestimate....It is sitting on the bumper of a utility body contractors truck for size reference....It must weigh at least 40 lbs.....
I plan on restoring it to original glory and getting another 100 yrs of service out of it!

Looks a lot like the one on the bottom right doesn't it?!?!

AA0158.jpg


:thumbup:
 
OP
M

MAYOR28

ALLIANCE MEMBER
Joined
Mar 22, 2010
Messages
786
Location
Southern MD
What should be my first step?

Here are the proposed steps, in no particular order:

Disassemble.
Strip all paint.
Wire brush or scotch-brite the entire vise.
Remove jaws.
Machine new/additional jaws (maybe...)
Electrolysis (is this necessary, a lot of vise rebuilds do this.....)
Mask and paint.
Re-assemble.
Re lube.

Questions:

What sort of lubricant should I use?

Who makes a good wet lube that includes graphite?

Can I buy scotch-brite pads (or similar) for a 4.5 grinder (or dremel, but this would take a lot longer....)? I do not have a die grinder.....do they make 90* chucks for dremels?
 

justanengineer

Well-known member
Joined
Apr 5, 2011
Messages
7,722
Location
Motor City
Vise restoration is a simple matter.

1. Disassemble
2. Attack vise with angle grinder that has wire wheel mounted
3. Paint with Rustoleum Rusty Red Primer then your favorite color
4. Reassemble

I would not use lube unless the vise squeaks/squeals, in which case I would apply your favorite detergent free 30w oil sparingly. Unnecessary lube attracts dirt which only accelerates wear. Machined cast iron also has some rather interesting lubrication/frictional properties as a meterial itself.
 

ZRX61

Well-known member
Joined
Aug 15, 2006
Messages
28,716
Location
Solar Blight Valley, SoCal
Drop by the local media blasting shop & have the paint stripped using plastic bead. They usually have a minimum charge, so ask for it to be "thrown in with someone elses stuff" ;)
 
OP
M

MAYOR28

ALLIANCE MEMBER
Joined
Mar 22, 2010
Messages
786
Location
Southern MD
Vise restoration is a simple matter.

1. Disassemble
2. Attack vise with angle grinder that has wire wheel mounted
3. Paint with Rustoleum Rusty Red Primer then your favorite color
4. Reassemble

I would not use lube unless the vise squeaks/squeals, in which case I would apply your favorite detergent free 30w oil sparingly. Unnecessary lube attracts dirt which only accelerates wear. Machined cast iron also has some rather interesting lubrication/frictional properties as a meterial itself.

Sounds good to me!
 

Catalyze

Well-known member
Joined
Feb 7, 2011
Messages
1,369
Location
New Mexico
After removing surface coatings from a few old vises (rust/paint/alien taco sauce), I no longer wade into it with a cup brush anymore. I like electrolysis after disassembling the vise. Plastic media blasting is great too if it is in your area....not so for my town. The only time I did not use electrolysis on a vise (100 year old Prentiss Gipsy), I had to work a lot harder. The old paint most likely had lead in it and so it was mask time. The paint stuck like epoxy and I never did get it all off...especially in small nooks. Electrolysis just makes it come of in sheets or fly off under the cup brush. Good luck and post photos!
Craig
 

Steven67fr

Well-known member
Joined
Sep 7, 2010
Messages
438
Location
Gilbert
On those Prentiss vises with the swiveling rear jaw (a great feature) The pin used to hold the jaws at center frequently seizes to the vise itself. I think the metals are really similar in composition and fused together easily. At least this is what it looked like when I machined mine out. It's a great vice. But as stated earlier the rear swivel jaw may be a chore to free... if it is seized. Electrolysis could help with the rear jaw. Also, lots of penetrating lube and elbow grease. Just be careful hitting the swivel jaw. The old cast iron can chip and split easily if overstressed.

We all definitely want to see pictures along the way.

A couple of similar Prentiss pictures:

http://www.garagejournal.com/forum/showthread.php?p=1547501#post1547501

http://garagejournal.com/forum/showthread.php?t=101547&highlight=Prentiss
 
OP
M

MAYOR28

ALLIANCE MEMBER
Joined
Mar 22, 2010
Messages
786
Location
Southern MD
I started to take apart my vise last night. Came apart pretty easy. The main screw seems to turn nice, and the dynamic jaw seems to have very little play. The main screw had a collar on it with a set screw that was broken, I was able to get it out, but will probably replace it with a hex set screw. It looks like maybe someone has welded the adjustable jaw pin inplace.......:mad:, I really hope not. There is also a strange piece located behind the threaded mount inside the body of the vise (see below):

IMAG0152.jpg


IMAG0151.jpg


IMAG0153.jpg


IMAG0149.jpg


IMAG0148.jpg
 
Last edited:
To avoid these ads, REGISTER NOW!

ZRX61

Well-known member
Joined
Aug 15, 2006
Messages
28,716
Location
Solar Blight Valley, SoCal
That "strange piece" is the pin that hold the nut in place. Should be able to see the other end of it by looking at the bottom of the vise. Easy to drive out with a 1/4in drift/punch etc. Your's looks quite bent, so ya may want to bend it back a bit so it doesn't hit the nut & damage it as you drive it out from the bottom.

Also:
You can take the play out of the screw by putting a washer or two between the collar & the vise body in that last pic... or make a new, wider collar if you have a lathe.
 
Last edited:

Catalyze

Well-known member
Joined
Feb 7, 2011
Messages
1,369
Location
New Mexico
Electrolysis would take all that paint and rust off. Then you could see what is needed for the main nut and the pin holding it in. Usually, you take a punch and tap (smack) it out from the bottom (base side) toward the top. You can also find a radiator shop and have them vat your vise parts. Banjosavestheday used to do that all the time and it worked well for him. Check the clearance (Clarence) on the lead screw collar to make sure you have the room for a hex head bolt to rotate. Good photos....keep up the good work!
Craig
 
OP
M

MAYOR28

ALLIANCE MEMBER
Joined
Mar 22, 2010
Messages
786
Location
Southern MD
Thanks for all of the help! I dont have a pin/punch set, so I may need to improvise, or find someone who has some punches.....

I talked to a friend and he said I could use his glass bead blaster this weekend. So I hope to clean up some of the gunk and grease and then get the jaw apart before I take it over to blast it :).

Check the clearance (Clarence) on the lead screw collar to make sure you have the room for a hex head bolt to rotate. Good photos....keep up the good work!
Craig

I meant a normal set screw with an internal hex drive, like this:
31PRQo6RgLL._AA280_.jpg
 
Last edited:
OP
M

MAYOR28

ALLIANCE MEMBER
Joined
Mar 22, 2010
Messages
786
Location
Southern MD
Thanks for all of the helpful comments. I couldn't wait to find someone with a punch set, so I made do with what I had in my box. I was able to drive the pin out with a punch from my air chisel set. Came out pretty easily, but the punch wasn't long enough so I had to use a hefty screw to finish it out:

IMAG0156.jpg


IMAG0157.jpg


IMAG0158.jpg


IMAG0159.jpg


And....It is official, it is a Prentiss!!!!!!!!!! I think it says 2 1/2.... Anyone have any idea on getting the pin for the adjustable jaw out??? I don't think it is welded in, but it is almost flush with the top of the vise. I was thinking (maybe) drill and blind tap it to intall some sort of machine screw that I could then use a bearing puller or something on. I don't know if I want to re-use the pin since it looks so chewed up already....but I don't really have the means to make a new tapered pin (that is if mine is tapered...)

IMAG0161.jpg
 
Last edited:

Catalyze

Well-known member
Joined
Feb 7, 2011
Messages
1,369
Location
New Mexico
Congratulations on great effort so far! As to your pin, the hole that it drops in goes completely through the vise body. If you turn your main body upside down, you will see the hole in the "roof" that it is sitting stuck. I am inclined to agree with you about removing the pin by drilling and tapping. It will probably take penetrating oil and heat also to get it out. Other folks who have more experience should help you out. It's a grand looking bit of history you have there!
Craig
 

Catalyze

Well-known member
Joined
Feb 7, 2011
Messages
1,369
Location
New Mexico
Make a thread about Vintage Prentiss Vise Jaw Removal over on the Fabrication section. Those guys live to build and take things apart. If it is stuck, they will know how to get it out. When you get it out....just post back here and continue on. Good Luck!
Craig
 

spongerich

Well-known member
Joined
Apr 17, 2010
Messages
2,339
Location
Monroe, NY
You might be able to get a nut welded onto that pin, then you can install a bolt and use a slide hammer to free it. If you're successful, you can leave the nut in place and reuse the pin.
 

reinhardt

Well-known member
Joined
Jun 2, 2010
Messages
384
at 40 lbs it seems small to me. my 6" wilton's machinist's vise weighs in at 180 lbs. not to brag, just scratching my head. either way, nice looking piece of history there.

ben
 
OP
M

MAYOR28

ALLIANCE MEMBER
Joined
Mar 22, 2010
Messages
786
Location
Southern MD
Try knocking out the 1/4in horizontal pin first....

edit: looks like yours may have 2 of them?

There are 2 recesses in the one side of the adjustable jaw.....
Will these drive all the way out the other side? I couldn't see any holes on the opposite side.....
 

Catalyze

Well-known member
Joined
Feb 7, 2011
Messages
1,369
Location
New Mexico
reinhardt - I would wager that it is a model 2 1/2 which is the stationary version of my 19 1/2 Prentiss. That is a 4" jaw width. I just checked my photos and my main nut has the same 19 marking on it. The model 2 1/2 weighs at 41 pounds in the catalog listing.

Those horizontal pins have nothing to do with the jaw holding in place. On a Parker, the swivel is totally different and you do have to remove the one pin that holds it in place. On a Reed, Prentiss, etc all you have to do is pivot the jaw until the tail clears the vise body. If it doesn't pivot that far, you can't possible get the jaw out. It slides from front towards the back and locks in with that tail piece.
View media item 9352This shows how the jaw is just a half circle and slides back into the vise body. No pins hold anything in place.

A Parker drops in like this from the top down. At the very front of the circular hole, you can see where its pin runs across and has to be removed.
View media item 8899
I like Spongerich's idea of welding and slide hammer. Shake up some acetone/trans fluid and let it soak in from the top and bottom (the pin hole goes all the way through the body) after you have welded your nut. Then slide hammer up and out... Good Luck!
Craig
 
OP
M

MAYOR28

ALLIANCE MEMBER
Joined
Mar 22, 2010
Messages
786
Location
Southern MD
at 40 lbs it seems small to me. my 6" wilton's machinist's vise weighs in at 180 lbs. not to brag, just scratching my head. either way, nice looking piece of history there.

ben

Well, beggers can't be choosers......for $20, I can't complain.
 
OP
M

MAYOR28

ALLIANCE MEMBER
Joined
Mar 22, 2010
Messages
786
Location
Southern MD
..........I like Spongerich's idea of welding and slide hammer. Shake up some acetone/trans fluid and let it soak in from the top and bottom (the pin hole goes all the way through the body) after you have welded your nut. Then slide hammer up and out... Good Luck!
Craig

I don't really have access to a welder right now....so I may need a different solution. I have some liquid wrench soaking on the pin as we speak (LW was on sale at Auto Zone ;)).

Catalyze - I read thru your threads on your Prentiss and a few others. Seems like a few people remade their pins.....does anyone have a pic of the original one? I am guessing it is not supposed to look like what mine does....:sad:
 
OP
M

MAYOR28

ALLIANCE MEMBER
Joined
Mar 22, 2010
Messages
786
Location
Southern MD
Okay, so, I lined up a time to use my friend's blast cabinet......

He has garnet (sp?) media, is this okay to use?

Also, does anyone have a picture of an original Prentiss Jaw Pin?
 

Catalyze

Well-known member
Joined
Feb 7, 2011
Messages
1,369
Location
New Mexico
Garnet and silica sand are about the same hardness for blasting and they are not a very aggressive media. They will remove metal if you just hold it on one spot but they aren't as bad as aluminum oxide and silicon carbide for causing damage to metal. You should be fine. Watch out on your lettering as it may be vulnerable since it is raised and thin. Stay away from the sliding surfaces, i.e. the part of the main body where the dynamic jaw slides....the slide surface of the dynamic jaw, and the lead screw entire length.

As to a pin photo...well.....hopefully someone has a good photo of one. I have some shots of Prentiss vises with original pins but they are inserted. All you can see is the top...sort of. Go to Google and search Prentiss Vise...then hit Images off to the side and you can see most of the shots available. It isn't like a Parker pin...they are rounded like a globe on top. The Prentiss one is "barrel" shaped or cylindrical shaped. It's just sort of a straight cylinder sitting on top of the tapered part. Best of Luck!
Craig
 
OP
M

MAYOR28

ALLIANCE MEMBER
Joined
Mar 22, 2010
Messages
786
Location
Southern MD
Stay away from the sliding surfaces, i.e. the part of the main body where the dynamic jaw slides....the slide surface of the dynamic jaw, and the lead screw entire length.

Can I just tape these areas off, or just make sure that when I am blasting it I do hit those areas? I was thinking of putting a little bit of blue painters tape on those areas just in case a little overspray hit them....I was planning on cleaning the sliding surfaces with a 3m pad on my orbital sander. Does that sound like a good idea?
 
To avoid these ads, REGISTER NOW!
Top Bottom