To avoid these ads, REGISTER NOW!

New to welding! looking for advice and help

young_buck

Well-known member
Joined
Jan 1, 2013
Messages
443
Location
Alberta, Canada
Well I finally bit the bullet and bought a welder, I have been wanting to learn for a couple years now and when looking through the canadian tire flyer i saw that their mig/flux core set up was only $225 on sale so I jumped in my truck and headed down town.

photo1_zpse6d38e0b.jpg


I also got the auto-darkening helmet for $60 on sale.

Anyways, I started making a few passes and as I went I could see the beads getting cleaner but they still aren't any where near where I want them to be. Or as nice as most of the ones i have seen on here :bowdown:

photo1_zps9835a39e.jpg

photo2_zps9931577b.jpg


I am using flux-core wire right now until I get some projects finished and out of the way so I can fit a cart and bottle in the shop. I know I need to work on my not so steady hand :eek: but what else can I do to get better looking welds?
 
To avoid these ads, REGISTER NOW!

Danish-welder

Active member
Joined
Dec 26, 2013
Messages
33
Location
Denmark
For a first timer it looks good, you Will get there :)
To get better looking welds you need to have a steady hand, the easist Way is to rest you arm on something :)
With that Said, the flux core innershield wire is ****.. Try using shield gas 82% argon 18 CO2, and normal wire, makes huge difference :)
 

Danguitarman

Well-known member
Joined
Nov 3, 2013
Messages
180
Location
Twin Cities, MN
Congrats on the new machine. Looks to me like you need to get your puddle a bit hotter. Crank up the heat or turn down the wire speed a bit. It's important to keep your movement at a steady rate also.
 
OP
Y

young_buck

Well-known member
Joined
Jan 1, 2013
Messages
443
Location
Alberta, Canada
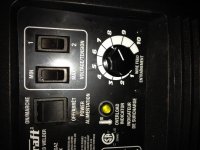
Thanks! The worst with it is there is only an actual adjustment for wire speed, voltage and tension are only a 2 speed setup.
 

Attachments

  • image.jpg
    image.jpg
    144.5 KB · Views: 50

Bobhdus

Well-known member
Joined
Oct 20, 2012
Messages
262
Location
Missouri
You may already know but Flux core runs better on a different polarity. I think its gun should be negative or maybe its the other way... You may experiment with switching the gun lead and ground cable hook ups. Crank up the power dial and turn the wire speed down. I use the smallest dia wire I can find for my little Mig 120. Usually .023 for flux core.
 
OP
Y

young_buck

Well-known member
Joined
Jan 1, 2013
Messages
443
Location
Alberta, Canada
It's supposed to run on a reverse polarity to what mig runs (or so I've been told) the wire speed seems awful slow on this unit, if I put it below 5 it burns the wire before it can feed enough to keep a steady bead. The steel I was practicing on is very thin so I can't run it on hot or it burns through... I'm gonna go scrap picking over the weekend to get so thicker mild steel
 
OP
Y

young_buck

Well-known member
Joined
Jan 1, 2013
Messages
443
Location
Alberta, Canada
Wow, looking on google at "bad flux core welds" I see that I am running it too cold, I'll crank the heat up and try again tomorrow after work, I appreciate the input
 

zkling

Well-known member
Joined
Jan 23, 2007
Messages
16,939
You are doing good. On the right track and it looks like taking the proper steps to ensure success. Congrats as you are doing what most don't.

Slow down a bit and or turn up the heat. Practice consistency and evenness in your travel. Are you using two hands on the gun? If not I would suggest you do. I usually use one hand on the trigger and then cup that hand with my other hand a bit further up to help steady the nozzle/tip. You may want to use a thicker leather glove for the 2nd bracing hand. That really helps to steady the gun and control your beads. Other than that, practice. :thumbup:
 
OP
Y

young_buck

Well-known member
Joined
Jan 1, 2013
Messages
443
Location
Alberta, Canada
I wasn't using a brace hand, I didn't trust the gloves I was wearing to protect me from the heat that close, but I got a thicker pair this morning. I'm still having a hard time with my hand speed control, I'll get one good section and then ruin it by finishing too fast. I turned the heat up last night and practiced some more and they are looking a little better. After work today I'm going to keep at it,
 

rockwithjason

Well-known member
Joined
Jan 8, 2006
Messages
2,633
Location
Las Vegas
use a count in your head to match your speed to. kinda like a song with the beats playing. draw some straight lines on the steel with a soap stone and try to follow the lines to improve your hand motion. fusion is muy importante so weld hot and fast. moving fast keeps the heat from soaking into the surrounding metal and running hot gives you enough heat at the weld to melt the parent material and the filler together. a lot of noobs move too slow. hell i still move too slow
 

MoonRise

Well-known member
Joined
Nov 5, 2010
Messages
4,031
Location
NJ
Couple o' things in no particular order.

To Bobhdus: Yes FCAW is (usually) a different polarity than solid-wire GMAW. Usual 'small-machine' FCAW runs DCEN, GMAW (aka MIG) runs DCEP. BUt I've never seen or heard of 0.023 FCAW wire. Smallest I know of is 0.030 FCAW wire.

To the OP,

Not horrible for some first welds. At least you brushed the slag off before posting the pics and asking for a critique. :beer:

They do look a bit too 'cold'. You would need to turn up the WFS (wire feed speed) a bit to get more heat/amps into the weld. Also, slow down your travel speed a bit.

Watch the puddle of molten metal, not the bright arc.

Watch the puddle, watch the puddle, watch the puddle.

(notice a pattern there? :D )

Watch the puddle of molten metal, while watching the arc melt 'into' the parent material and the wire/puddle fill in the molten 'crater'. As the arc melted 'into' the parent material and then the puddle fills it in, then you move forward with your travel movement.

To me, running a bead on a flat plate/sheet is not the 'best' way to see and practice a weld.

Go get some 1/8" thick (or the metric equiv, since you are up in Canada, ~3mm thick). Put two plates on top of one another so you can do a "lap joint" (look it up if you are not sure exactly what that is). Now you have an edge to follow and also you can watch the arc melt the edge from the top plate and the wire fill in the molten zone. The lap joint is also a bit more forgiving for a beginner with regards to 'instant melt-through' because you have two thicknesses of metal. You would set the weld parameters (voltage and WFS) for just one thickness of metal though (because that is the thickness you are welding).

Practice, practice, practice.

btw, that "tension" setting is just French for "voltage", in case you somehow didn't realize that.

Wire welding (FCAW and GMAW) parameters are the arc voltage and the WFS (machine settings). Also, the operator controls the "stick-out" and the travel speed. Set the voltage per the recommended settings on the machine (door chart or in the manual, usually) and then set the WFS as recommended. Adjust the WFS (if needed) to get a relatively smooth 'sizzling bacon' sound. Too low of a WFS (for that particular voltage setting) and the wire will burn back to the tip, too high a WFS (for that particular voltage setting) and the wire will 'stub' into the workpiece and push the gun back away from the work. Too high a voltage (for a particular WFS) and you get an unstable arc and excess spatter, too low a voltage (for a particular WFS) and the wire stubs into the workpiece and pushes the gun back.

The 'heat' of a wire-feed weld is mostly controlled by the WFS (controls the amperage of the weld).

Go check and read up some of the tons of information available on the Lincoln (http://www.lincolnelectric.com) and ESAB (http://www.esabna.com) websites.

Especially good info is there on the ESAB 'Welding University' site at http://www.esabna.com/us/en/education/index.cfm
http://www.esabna.com/us/en/education/esab-university.cfm
http://edgewh.esabna.com/EUWeb/MIG_handbook/592mig1_1.htm

Practice, practice, practice. :beer:
 
OP
Y

young_buck

Well-known member
Joined
Jan 1, 2013
Messages
443
Location
Alberta, Canada
I didn't realize the tension was French (imagine that, a Canuck that doesn't know French!) I thought that tension was a strange setting to have...

I was reading articles online on how to improve but decided to ask here as well so I could get answers and critiques personalized to my mistakes. As for the rest of your advice, thanks! Those are great points that I'm glad you cleared up for me, I knew about the soap stone but couldn't find any at the house so I picked some up today. Not looking at the arc is a good pointer.. I wish I had thought of it on my own, that will make it a lot easier haha.
 
To avoid these ads, REGISTER NOW!
OP
Y

young_buck

Well-known member
Joined
Jan 1, 2013
Messages
443
Location
Alberta, Canada
well, a little more heat and and a slower, steadier hand created this!

photo21_zps261c8ddd.jpg


This is it compared to a 1/4" extension

photo3_zpsa412e829.jpg


this is the other side of the steel, finally penetration!

photo11_zps96cb51f0.jpg


Now, if only i could control the splatter and make it more 'visually appealing' I'll be happy as a clam! haha
 

Zeke

Well-known member
Joined
Aug 13, 2009
Messages
17,176
Location
Long Beach CA, the sewer by the sea.
Move the torch in a few different patterns. The reason is to not concentrate the arc in the same place all the time. That way you can up the heat a little. Some of the patterns are up and back, side to side advancing as you go and circular advancing as you go. Many call the latter cursive e's. Look at the small letter e and see that you'd circle up and around to the other side of the puddle and then cut straight across, rinse and repeat. You can do this with a triangular motion when you don't want to spend any time in the center as in vertical welding.

Keep an arc length of 3/8ths inch, give or take a fraction. Watch the sides of the weld as much as anything. You want the same width and you can place the arc back and forth to establish the outer lines of the puddle. Seldom will you ever run a bead as small as the torch will lay down using a steady unvaried forward motion.

Hold the torch square to the weld and tipped back 15º and push the weld for now. This directs your gas (when you get it) towards where the arc is going. Actually you can push or pull the puddle especially using FCAW which is the process you are doing now.

You can't 'control' the splatter. It is what it is but you can get some anti splatter spray for your torch to keep bounce back off the tip.

More: make sure your ground is always real good and that the tip matches the wire size. Good conductivity is paramount.
 

MarkG

Well-known member
Joined
May 23, 2012
Messages
1,219
Location
Elgin, IL
I agree with what's already been said, but here's something else that helps ME a lot with consistency is 'torch manipulation'----like everything, each welder will have their own preferences, but a lot of guys will either do a 'weave' or a 'cursive e' type motion.

It serves as a metering tool to help keep you going steady but also can help keep the width consistent.

A quick search online will bring up tons of info on this topic, just like everything else online! :s What some refer to as the 'cursive e' motion for me works better as more of a cursive 'w' motion. There's less of a tenancy to cold-lap back into the bead, which is easy to do with cursive e's when you're learning.

In class, after the basic welds like you've done, we moved on to a lap joint which really helps teach you to watch the edges of your puddle. You just want to nip the edge.

You'll get it!

(EDIT: I must have been typing the same time as Zeke! Anyway----now you have confirmation.)
 
Last edited:

petawawarace

Well-known member
Joined
Sep 28, 2010
Messages
50
It's very hard to get straight good looking beads on flat steel. Start putting some pieces together, and the edge your welding will help guide you straight. Also, I know it's a little late, and better than nothing, but those mastercraft welders are know to be junk. After you get the hang of it with that, try a buddy's good welder(name brand) and you'll instantly see the difference. And flux core ***** too. I actually have a couple small bottles for sale on kijiji, but your a little to far away.
 
OP
Y

young_buck

Well-known member
Joined
Jan 1, 2013
Messages
443
Location
Alberta, Canada
yeah, I had her at the opposite extreme this time.. haha, I am running very low on steel, gonna have to find a new pile of scrap. I have been looking at different patterns and have tried the "cursive e" a couple times now but im all out of space :( I relly do appreciate all your guys input, its a huge help for me as a beginner to get critiqued by experienced members in the trade. I had a talk with the welder at work today and he suggested the same method.
 
OP
Y

young_buck

Well-known member
Joined
Jan 1, 2013
Messages
443
Location
Alberta, Canada
I know they are junky but for $200 i figured that learning to weld was worth that to me. The "sample" wire they send with it is kinda ****** too but it was free so i will use it up and then buy better wire. I have used a lincoln electric 140 and the quality of even my welds were better than they are now. The problem with getting steel here is that all companies treat scrap like its gold because they cant sell it to a recycling company so they just use it until its gone.
 
OP
Y

young_buck

Well-known member
Joined
Jan 1, 2013
Messages
443
Location
Alberta, Canada
Once I start getting some quality welds I am going buy either a lincoln electric 140 or a miller, I just wanted to get a cheap stepping stone to learn with to be sure it was something I was interested in doing
 

petawawarace

Well-known member
Joined
Sep 28, 2010
Messages
50
Understandable, just didn't want to see you get frustrated thinking it was you when it may be the equipment. The little 140 and 180 Lincoln's that canadian tire sells are awesome little welders.
 
OP
Y

young_buck

Well-known member
Joined
Jan 1, 2013
Messages
443
Location
Alberta, Canada
I was using the 140 at work today and it made a big difference, still not the best looking welds but if was getting good penetration and the stock I welded together stayed together
 

Bobhdus

Well-known member
Joined
Oct 20, 2012
Messages
262
Location
Missouri
Couple o' things in no particular order.


To Bobhdus: Yes FCAW is (usually) a different polarity than solid-wire GMAW. Usual 'small-machine' FCAW runs DCEN, GMAW (aka MIG) runs DCEP. BUt I've never seen or heard of 0.023 FCAW wire. Smallest I know of is 0.030 FCAW wire.


Yeah, sorry, I don't do flux core much. I have .023 in regular 70s-6. If I'm without gas, I stick weld it... I do have flux core (just in case) but I'm sure its the smallest dia I could have found... Don't even know where it is. The key here for using a small welder though is to use the smallest diameter wire you can get or weld on thinner material. In the OP case, he's able to burn thru so wire size is not his problem. My mig welder is just an HTP 120. It only gets used when I'm lazy...
 

trackwelder

Well-known member
Joined
Jun 22, 2005
Messages
2,608
Location
n.y
Once I start getting some quality welds I am going buy either a lincoln electric 140 or a miller, I just wanted to get a cheap stepping stone to learn with to be sure it was something I was interested in doing

Ok you asked. Take that welder back and get a refund. Save your money and buy at least a 140 class machine with gas. There are quite a few threads on this subject with a ton of info right here.
 

ZRX61

Well-known member
Joined
Aug 15, 2006
Messages
28,716
Location
Solar Blight Valley, SoCal
As that's a practice piece: No need to leave space between the beads, just lay them right next to each other. Stop when the piece of metal is 3x as thick as when you started.. then turn it over & start again :)
 

Engine

Well-known member
Joined
Jan 9, 2014
Messages
646
Location
Kentucky
Another great welding resource for learning (only second to GJ) is this. They are free to view on Youtube.

Review the intro video and see if you may benefit from his experience.

He shows videos with a wide variety of welding techniques, common problems, and ways to improve. There is no substitute for practice, but other than taking a formal welding class these seem to be the next best thing. Good luck.:thumbup:

Also, another excellent series of educational videos from Steve Bleile at WMC would be a great place to start your education. I suggest purchasing them from their company website, but you can also see some of them on Youtube if you search.
 
To avoid these ads, REGISTER NOW!
Top Bottom