
You are using an out of date browser. It may not display this or other websites correctly.
You should upgrade or use an alternative browser.
You should upgrade or use an alternative browser.
Between 265 & 485 SQ/FT Nick's Two-Car Detached Vdub Garage
- Thread starter nicholam77
- Start date
Workspaces sized between 265 and 485 squarefeet.
OP
nicholam77
Well-known member
very cool
Nick great updates. Sometimes the little things have a greater feeling of accomplishment than the big things.
Bret
Thanks, guys

Turns out my conversion to summer wheels was premature as it snowed heavily mid-last week. Everything got... quite dirty again.
View media item 91975
This weekend I tackled two things that have been on my list for awhile. One is a Spring Cleaning.
I got a Bagster from Home Depot and started to just throw our junk away. When we moved into the house we never really did a purge of our stuff and a lot of it just got packed away into closets in the insanity of moving. I hate having more stuff than I need, or stuff I don't use, or not knowing where stuff is. So a lot of it is going in the Bagster, some of it will be getting donated, and some of it will just be re-organized.
Part of that included our upstairs "attic" closet off the bedroom which has been home to leftovers from the previous owners' remodels, including extra kitchen parts, tile, boards, etc.
It was so full of **** you could barely walk through it. These pics are after I already cleaned the majority of it:
View media item 91972
View media item 91971
I want to better utilize the space for storage but that will come at a later date. For now it's just good to know there's not a huge mess behind the door.
Secondly, I've been meaning to organize my digital life for ages. I've badly been in need of a storage solution for photos and archival files for a long time, as my computer and my wife's computer are maxed out. Back in the day i've played with various home-brewed solutions like a linux server or Nas4Free, but I don't have time to trouble-shoot and do upkeep on projects like that anymore, even if they are cost effective.
So I broke down and ordered a Synology and 2x 4TB WD Red drives. They will be set up in a redundant array (raid 1).
View media item 91974
View media item 91973
I put the Synology in the basement closet where my NVR is. Out of sight and out of mind. You can see here the previous owner ran Cat 5e and co-axial cable to most rooms of the house. Very useful. Eventually I would like to build out this closet into a more official "equipment rack".
Ok now for the fun part. I messed around with my latest tool acquisition, a Makita Track Saw.
View media item 91978
I went back and forth a LOT on whether this would be useful to me, and I decided it would and sold some other stuff on eBay to make it happen. I have plans to build some built-ins, bookcases, and cabinets for the house - projects that require sheet goods, in the near future. Hopefully some this summer. I love my DeWalt table saw, but its so tiny it's basically impossible to crosscut sheet goods larger than 2'x2' safely and accurately. Also, I'm hoping to be able to use the track saw indoors during the winter or to be able to bring the tool closer to the project, if the dust collection and noise are acceptable.
Anyways I just took the time to set it up and test it so I could throw the rather large box away.
First I cut the splinter strip which was easy enough.
View media item 91980
Then I tried a test cut in MDF with no vac attached:
View media item 91982
As you can imagine there was a fair amount of dust, but it produced a very clean cut:
View media item 91983
When holding my 36" woodpecker rule against it (straightest thing I own) it appeared no gaps and didn't rock at all. Nice and straight.
View media item 91984
Next I tested with the vac and dust deputy.
View media item 91986
View media item 91987
I aligned the track near the edge of the MDF, to create a very dusty cut.
View media item 91985
The dust collection performed VERY well. Another thing I love about this saw is it is MUCH quieter than the table saw. I could see myself being able to use this indoors.
Splinter guard is also perfectly straight:
View media item 91989
Just in these brief tests I am very impressed with this saw. Expensive, yes. Can similar results be achieved with a circular saw and straight edge? I suppose with some effort. I've done that before with my circular saw and I can say that the Makita product is much easier to use and seems to be basically fool proof.
Now I've promised myself I'm not going to buy anymore tools for while until I actually make some projects

Trapps
ALLIANCE MEMBER
Thanks, guys
Turns out my conversion to summer wheels was premature as it snowed heavily mid-last week. Everything got... quite dirty again.
View media item 91975
This weekend I tackled two things that have been on my list for awhile. One is a Spring Cleaning.
I got a Bagster from Home Depot and started to just throw our junk away. When we moved into the house we never really did a purge of our stuff and a lot of it just got packed away into closets in the insanity of moving. I hate having more stuff than I need, or stuff I don't use, or not knowing where stuff is. So a lot of it is going in the Bagster, some of it will be getting donated, and some of it will just be re-organized.
Part of that included our upstairs "attic" closet off the bedroom which has been home to leftovers from the previous owners' remodels, including extra kitchen parts, tile, boards, etc.
It was so full of **** you could barely walk through it. These pics are after I already cleaned the majority of it:
View media item 91972
View media item 91971
I want to better utilize the space for storage but that will come at a later date. For now it's just good to know there's not a huge mess behind the door.
Secondly, I've been meaning to organize my digital life for ages. I've badly been in need of a storage solution for photos and archival files for a long time, as my computer and my wife's computer are maxed out. Back in the day i've played with various home-brewed solutions like a linux server or Nas4Free, but I don't have time to trouble-shoot and do upkeep on projects like that anymore, even if they are cost effective.
So I broke down and ordered a Synology and 2x 4TB WD Red drives. They will be set up in a redundant array (raid 1).
View media item 91974
View media item 91973
I put the Synology in the basement closet where my NVR is. Out of sight and out of mind. You can see here the previous owner ran Cat 5e and co-axial cable to most rooms of the house. Very useful. Eventually I would like to build out this closet into a more official "equipment rack".
Ok now for the fun part. I messed around with my latest tool acquisition, a Makita Track Saw.
View media item 91978
I went back and forth a LOT on whether this would be useful to me, and I decided it would and sold some other stuff on eBay to make it happen. I have plans to build some built-ins, bookcases, and cabinets for the house - projects that require sheet goods, in the near future. Hopefully some this summer. I love my DeWalt table saw, but its so tiny it's basically impossible to crosscut sheet goods larger than 2'x2' safely and accurately. Also, I'm hoping to be able to use the track saw indoors during the winter or to be able to bring the tool closer to the project, if the dust collection and noise are acceptable.
Anyways I just took the time to set it up and test it so I could throw the rather large box away.
First I cut the splinter strip which was easy enough.
View media item 91980
Then I tried a test cut in MDF with no vac attached:
View media item 91982
As you can imagine there was a fair amount of dust, but it produced a very clean cut:
View media item 91983
When holding my 36" woodpecker rule against it (straightest thing I own) it appeared no gaps and didn't rock at all. Nice and straight.
View media item 91984
Next I tested with the vac and dust deputy.
View media item 91986
View media item 91987
I aligned the track near the edge of the MDF, to create a very dusty cut.
View media item 91985
The dust collection performed VERY well. Another thing I love about this saw is it is MUCH quieter than the table saw. I could see myself being able to use this indoors.
Splinter guard is also perfectly straight:
View media item 91989
Just in these brief tests I am very impressed with this saw. Expensive, yes. Can similar results be achieved with a circular saw and straight edge? I suppose with some effort. I've done that before with my circular saw and I can say that the Makita product is much easier to use and seems to be basically fool proof.
Now I've promised myself I'm not going to buy anymore tools for while until I actually make some projects
How did you decide on the Makita. I want a track saw, and there are a few options including Festool ($$$$$$$$$$$$) and the soon to be released Bosch, also expensive. Plus the DeWalt and then the Kreg, Triton, Grizzly and ShopFox at the less expensive end.
Mark
OP
nicholam77
Well-known member
How did you decide on the Makita. I want a track saw, and there are a few options including Festool ($$$$$$$$$$$$) and the soon to be released Bosch, also expensive. Plus the DeWalt and then the Kreg, Triton, Grizzly and ShopFox at the less expensive end.
Mark
Hey Mark,
I did a fair amount of research and to me the Makita was the sweet spot in features, quality and price. I considered all of those options you mentioned.
If money were no object I'd probably go for the Festool, but I don't have any other Festool tools like their vacuum or dust hoses, etc. Their track is also twice the price. The saw itself does have some advantages like a riving knife and a splinter guard on both sides of the blade. But I don't do enough woodworking to justify that kind of cost (even the Makita was a stretch) and without the rest of the Festool ecosystem it seemed not worth it anyways.
The Dewalt was pretty well-reviewed, but I wasn't crazy about how it plunges forward instead of rotating on a single access. Their track is cheaper by comparison. But the overall saw package is slightly more than the Makita. This would have probably been my 2nd choice.
The Makita, like the Festool, has been around for a long time, and well-reviewed. The others are relatively new products. I like a product with a track record.
Kreg is interesting as a full package with their cutting table. Seems well thought out and uses Imperial measurements.
I've read the Triton is like a lesser Makita, and for the extra money I'd rather have the Makita. The Grizzly and Shop Fox I felt weren't worth it. In YouTube reviews people complained about the cut quality, power, and track quality, and dust collection. I'd rather just use a nice circular saw with good blade and a homemade guide at that price point.
The Makita has some additional nice features that the others don't. It comes in a systainer. It has a scoring feature for melamine and veneer plywood. It has a clip that locks it to the track so it won't tip over during bevel cuts.
The Makita is also compatible with the Festool quick clamps as well as other accessories targeted towards Festool like guide rail squares, parallel guides, etc. You can even use the Makita saw on a Festool rail if you want.
View media item 91977
Here's a pretty informative/fair review of the Makita:
He talks about issues with the rail extrusions, but mine seems to be perfectly straight and flat. Maybe I got lucky or maybe they fixed some production issues.
I also took into consideration Garage Journal user Denwood's thoughts on the Makita saw.
I ordered mine on Amazon, sight unseen, and initially it felt wrong that what is essentially a circular saw paired with an aluminum extrusion could be so expensive. But as soon as I opened the box and handled it, the first thing I thought was "wow, this is nice". And after using it briefly, I feel the same way and am excited to incorporate it on future projects.
sawduststeve
Well-known member
Nick, great buy with the Makita track saw, buy right, buy once.
They have a great reputation for quality products. It'll be a pleasure to use, every time you use it.
Have a good week
Steve
They have a great reputation for quality products. It'll be a pleasure to use, every time you use it.
Have a good week
Steve
OP
nicholam77
Well-known member
Nick, great buy with the Makita track saw, buy right, buy once.
They have a great reputation for quality products. It'll be a pleasure to use, every time you use it.
Have a good week
Steve
Thank you, Steve. I'm definitely a believer in paying for quality products. I try to do that not just with tools, but with all purchases. I think as long as it's well-researched and committed to, the upfront cost is often worth it. I'm hoping the track saw will be useful in a lot of different ways in my "small shop", and bring many years of functionality.
In a stroke of luck, I got off work early today and was able to spend about 3 hours in the garage. I decided to keep working on the router table.
A LONG time ago I had bought some t-track for attaching the future router table fence, so I thought I would install that, finally.
To start I did some layout:
View media item 92082
View media item 92081
At first I was worried this Woodpecker 12 inch T-square would be awkward. Too large for working with small boards, and too small for working with sheet goods. But so far it's been pretty useful. It's so easy to lay out perpendicular and parallel lines very precisely.
My plunge router wouldn't fit under the cabinet shelf so I had to take the table surface off to route the dados. Since I had it apart, I decided to fix an issue I had previously when installing the lag screw "hinges". One of the oak sides separated when putting the screw in, so I sanded down the surfaces and re-glued it.
View media item 92079
View media item 92078
Since I had to wait for the glue to cure, I randomly decided to make a screwdriver holder from a scrap piece of plywood. Normally my screwdrivers are in this drawer:
View media item 92067
I'd like to get another organizer piece, and put the screwdrivers on the wall where they are easily accessible and not rolling around in a drawer.
I cut the plywood on the table saw and then rounded the corners with a jigsaw and orbital sander.
View media item 92077
Then I glued a riser for the back row of drivers.
View media item 92068
Ok, back to the router table. With it back intact, I started routing the dados. Set the plunge to a hair deeper than the t-track.
View media item 92080
Then I used the t-track itself as a straight edge guide, pinned down by the Festool quick clamps.
View media item 92076
View media item 92075
View media item 92073
I've really come to like these clamps as they are very versatile.
View media item 92072
I overshot my line a bit. Oooops.

To square up the stop dados I had to do some chiseling with my crappy Home Depot chisels. I'm not very good at chiseling, and my chisels are cheap and NOT sharp, but I did watch a YouTube video recently and tried to improve my technnique. It's just something I've hardly ever had to do so I don't have much practice.
View media item 92071
View media item 92070
View media item 92069
Not horrible, I guess. Like a lot of shop projects I've made, it's functional, but not perfect aesthetically.
I cut the t-track on the miter saw and screwed it in. I have yet to make a proper fence, but here you can see the Festool clamps actually fit the t-track so I can just clamp a straight board in the meantime.
View media item 92066
View media item 92065
And here's a preview of the screwdriver holder:
View media item 92064
I brought both projects inside the house to apply some finish when I can get to it.
That's all for now...
OP
nicholam77
Well-known member
I finished the screwdriver holder today. I filled a few voids with wood filler and then did two coats of minwax clear wipe-on poly.


There’s some extra room for a few more drivers if needed. A very simple project but I really like how it turned out. I’m now inspired to make more tool holders and get stuff off my workbench. Even though I’m a person who really likes to be organized, I’ve put off organizing my workbench drawers or hanging stuff on the walls because I felt like I was still acquiring tools and didn’t know where to start. With the screwdriver holder I think I realized I just need to start somewhere, even without a complete plan in place, or it will never happen.
It’s not “messy”, but not really a useable surface right now either:

I need to get those sleds and jigs on a wall somewhere. I think ideally there would be nothing on the Craftsman bench, so it can be a surface to set things (like building materials) when I’m actually doing a project.
Sent from my iPhone using Garage Journal
There’s some extra room for a few more drivers if needed. A very simple project but I really like how it turned out. I’m now inspired to make more tool holders and get stuff off my workbench. Even though I’m a person who really likes to be organized, I’ve put off organizing my workbench drawers or hanging stuff on the walls because I felt like I was still acquiring tools and didn’t know where to start. With the screwdriver holder I think I realized I just need to start somewhere, even without a complete plan in place, or it will never happen.
It’s not “messy”, but not really a useable surface right now either:
I need to get those sleds and jigs on a wall somewhere. I think ideally there would be nothing on the Craftsman bench, so it can be a surface to set things (like building materials) when I’m actually doing a project.
Sent from my iPhone using Garage Journal
Attachments


Finallygotit
ALLIANCE MEMBER
......I think ideally there would be nothing on the Craftsman bench, so it can be a surface to set things (like building materials) when I’m actually doing a project.......
Hahahahahahaha......... wait....we're you serious? Nah....Hahahahaha......

FSD will always creep in there.
OP
nicholam77
Well-known member
Hahahahahahaha......... wait....we're you serious? Nah....Hahahahaha......
FSD will always creep in there.
Haha, yes, you're probably right
")
That screwdriver holder is inspirational! Put that on my build list.
Bret
Thanks! It's was obviously super simple to make but somehow very satisfying.
-------------------------
While I put the poly on the screwdriver holder, I also wiped a couple of coats on the router table surface. I wasn't sure if or how I should put a finish on this, but I'm glad I did.
View media item 92157
It looks really nice (in my opinion). In fact, it makes we wish I had bought nicer plywood for the cabinet / made it more aesthetically pleasing.
View media item 92156
I re-installed and just for fun laid a straight edge corner-to-corner both ways. I was pleased to find it's still pretty darn flat. Good enough for me, anyway.
I think I'm going to work on the fence next, as time allows. I was planning on making that from MDF as well, and I ordered some 12" sections of Woodpecker's Super Track for the sub-fences. We'll see how that goes.
In the meantime here's some more gratuitous pics of my progress:
View media item 92152
View media item 92155
View media item 92153
Kriesel
Well-known member
Wow.
Stumbled on this after seeing your screwdriver holder on the "what's on your wall" thread. Awesome work in the garage and home.
Are you on eurowerks? I'm on there, MK5 jetta...
Also, "hello from Minnesota" seems to be a trend.
Stumbled on this after seeing your screwdriver holder on the "what's on your wall" thread. Awesome work in the garage and home.
Are you on eurowerks? I'm on there, MK5 jetta...
Also, "hello from Minnesota" seems to be a trend.
Holt
Well-known member
Awesome Build. Followed you when your build first started and lost track.... and wow you have made some progress.
OP
nicholam77
Well-known member
Wow.
Stumbled on this after seeing your screwdriver holder on the "what's on your wall" thread. Awesome work in the garage and home.
Are you on eurowerks? I'm on there, MK5 jetta...
Also, "hello from Minnesota" seems to be a trend.
Thanks! Hopefully you survived the winter
I am not on eurowerks... although I have been to their summer car show a few times before. I remember checking out the forum a long time ago and it seemed like not too much activity, maybe I will give it another look. I mostly participate in Vortex and golfmk7. Got a build thread or anything for the Jetta?
Don't know if you go to Cars + Coffee but I usually go a handful of times over the summer. I don't really know anyone who goes but feel free to say hi if you do.
Some nice roads around Afton!
Awesome Build. Followed you when your build first started and lost track.... and wow you have made some progress.
Thank you. Yeah I guess I've gotten a few things done
Kind of got distracted from the garage by the house and shifted directions. Even though I only do "minor" wrenching and vehicle maintenance, I thought the garage would be more automotive geared at first. But since then I've become much more interested in woodworking and home improvement and I feel like that's mostly where it's headed.
Thanks for checking in!
Kriesel
Well-known member
Don't bother with the eurowerks forum... Its dead. The higher-ups there decided to move to facebook, so the forum literally has like one post a month it seems like. The way of the future they think...Thanks! Hopefully you survived the winter
I am not on eurowerks... although I have been to their summer car show a few times before. I remember checking out the forum a long time ago and it seemed like not too much activity, maybe I will give it another look. I mostly participate in Vortex and golfmk7. Got a build thread or anything for the Jetta?
Don't know if you go to Cars + Coffee but I usually go a handful of times over the summer. I don't really know anyone who goes but feel free to say hi if you do.
Some nice roads around Afton!
I don't have a build thread for my Jetta, it's mostly stock, and only a couple minor mods, and now it's 13 years old and starting to show it's age. I have a build thread for my duramax suburban though...
I went to C+C many many years ago. I never knew anyone all that well either.
Afton is sure a nice place to drive! I'm between afton and afton alps, in the heart of the hilly area. Good stuff.
Kind of got distracted from the garage by the house and shifted directions. Even though I only do "minor" wrenching and vehicle maintenance, I thought the garage would be more automotive geared at first. But since then I've become much more interested in woodworking and home improvement and I feel like that's mostly where it's headed.
Thanks for checking in!
This is exactly what happened to me in my first garage. Both of my cars where in the garage and car stuff everywhere. Next thing I knew both cars were in the driveway and their was wood stuffed in every crevice. I do still enjoy cars maintaining them and tweaking. I don't know what it is about woodworking it is just Nirvana for me. Glad to see it has happened to others.
Bret
OP
nicholam77
Well-known member
Today I spent 2.5 hours in the garage installing motor and trans mounts on the GTI. It's my 2nd aftermarket set, decided to go polyurethane bushings this time from Black Forest Industries. My previous ones were starting to wear out after just a year.
I quickly made a mess of things:
View media item 92232
View media item 92233
View media item 92234
Borrowed an extra floor jack from my dad so I could support both the engine and transmission side independently. Alignment is pretty important on these mounts and I wasn't 100% confident in my install last go around so I thought being able to loosen the bolts on both sides would give more leeway in getting things situated.
View media item 92231
The install itself was fairly easily especially having done it before, but as usual I managed to cut my soft hands a bunch
View media item 92229
View media item 92230
Marked the bolts after torquing them so I can keep an eye on them:
View media item 92228
The new engine mount:
View media item 92226
It's a good looking unit!
Also got some bits and pieces for the router fence in the mail, some Woodpecker aluminum extrusion and a dust collection port. Hopefully I can get back to that in the near future.
Hope everyone had a great weekend.
OP
nicholam77
Well-known member
Continued installing Blum soft-close hinges in the kitchen tonight.
View media item 92314
View media item 92310
View media item 92311
View media item 92312
Also installed this paper towel holder while I was at it.
View media item 92313
I'm kind of obsessed with soft-close, but in addition to that the old hinges on the kitchen cabinet doors were "self-close", which means the hinges have a plastic piece in them which helps them snap shut:
View media item 92308
A number of them broke somehow and some of the doors were having issues opening fully and also making a weird clicking noise. And slamming shut.
I feel like upgrading to soft-close is going to make a big difference in the perception of "quality" and reduction of excess noise.
This little Bosch pocket driver has been killer for tasks like this and I use it all the time for stuff around the house.
View media item 92309
The one thing I don't like is it doesn't hold quick-change bits perfectly solid so drilling is a challenge. I might pick up a Bosch 12v drill with standard chuck, no battery, to complement it eventually. Outside of heavy-duty construction, the 12v is perfect for most tasks, so much lighter, and can fit in smaller spaces. Absolutely love it for woodworking and around-the-house stuff.
I also discovered all the kitchen drawers have cutouts for Blum drawer slides and are dimensioned appropriately. Right now they have economy slides with no soft-close. I'd love to upgrade those eventually, too, but would be a larger investment than hinges so I think I'll do it slowly over time.
Jarch
Active member
Is that one of the bits that has the spot for the chuck to “hook” into? Looks a little short for the normal quick change.
On a kitchen note, how do you like the breville espresso machine?
Sent from my iPhone using The Garage Journal mobile app
On a kitchen note, how do you like the breville espresso machine?
Sent from my iPhone using The Garage Journal mobile app
OP
nicholam77
Well-known member
Is that one of the bits that has the spot for the chuck to “hook” into? Looks a little short for the normal quick change.
On a kitchen note, how do you like the breville espresso machine?
Sent from my iPhone using The Garage Journal mobile app
The small phillips bit in the previous post works fine. It has these tiny grooves that the clic-change mechanism grabs onto. It locks in well.
View media item 92334
It's the actual quick-change bits (like the drill bit on the right of the above image) that lock in loosely. Like... it won't fall out or anything, but there is lateral play. Totally fine for driving. Not so much for drilling, at least where precision matters.
It's just odd... because the tool even came with a quick-change magnetic bit holder, so Bosch clearly meant it to be used with that style. My impact driver from another brand has a similar quick-change connector and it grips this bits just fine. It's the only thing I'm disappointed about with this little driver. A LOT of bits out there use the quick-change system and it's odd to me that they don't lock in solid, there's a good 1/8" of wobble.
-------------------------------
The Breville works great. I love coffee and so does the wife and we are fortunate to have a lot of great, independent (non-commercial chain) coffee shops around us. Problem is espresso drinks are expensive. The Breville was some upfront cost but we have used it a ton in the past year to try and spend less money out on coffee, and as long as you have good, fresh beans, it makes a great latte, or whatever.
I'm no expert on coffee or espresso by any means, but it's pretty easy to achieve good results with minimal knowledge (at least by my standards!). If you're considering one, I'd definitely recommend a model with a pressure gauge so you at least have an idea of how the extraction goes.
As far as quality, we'll see long term, but it's been used almost daily and hasn't skipped a beat yet. Except for the day my wife poured the water into the burr grinder instead of the reservoir. Definitely spent a lot of dis-assembly and cleaning effort fixing that one...
Jarch
Active member
The small phillips bit in the previous post works fine. It has these tiny grooves that the clic-change mechanism grabs onto. It locks in well.
View media item 92334
It's the actual quick-change bits (like the drill bit on the right of the above image) that lock in loosely. Like... it won't fall out or anything, but there is lateral play. Totally fine for driving. Not so much for drilling, at least where precision matters.
It's just odd... because the tool even came with a quick-change magnetic bit holder, so Bosch clearly meant it to be used with that style. My impact driver from another brand has a similar quick-change connector and it grips this bits just fine. It's the only thing I'm disappointed about with this little driver. A LOT of bits out there use the quick-change system and it's odd to me that they don't lock in solid, there's a good 1/8" of wobble.
-------------------------------
The Breville works great. I love coffee and so does the wife and we are fortunate to have a lot of great, independent (non-commercial chain) coffee shops around us. Problem is espresso drinks are expensive. The Breville was some upfront cost but we have used it a ton in the past year to try and spend less money out on coffee, and as long as you have good, fresh beans, it makes a great latte, or whatever.
I'm no expert on coffee or espresso by any means, but it's pretty easy to achieve good results with minimal knowledge (at least by my standards!). If you're considering one, I'd definitely recommend a model with a pressure gauge so you at least have an idea of how the extraction goes.
As far as quality, we'll see long term, but it's been used almost daily and hasn't skipped a beat yet. Except for the day my wife poured the water into the burr grinder instead of the reservoir. Definitely spent a lot of dis-assembly and cleaning effort fixing that one...
Ya if I’m drilling I usually grab a regular drill/driver.. but I love my impact for anything with a bit. I’ve never had one lock in the drill bit type base tightly and I’ve had a few types.. but they are good for regular driving.
Ya I got into espresso when my wife and I went to Italy... me more than her but we don’t have the kitchen space for one just yet... I use a Moka pot for now, but good to know, I wouldn’t think a gauge was much more than “looks cool”
Sent from my iPhone using The Garage Journal mobile app
OP
nicholam77
Well-known member
Jarch, I've used the Moka pot style, too, they work pretty well. Italy is a wonderful place to enjoy a good coffee
I don't really know the science behind it but in the Breville instructions it said you want the pressure to be in a certain zone for a certain amount of time (20-30 seconds). A bunch of different variables affect this like grounds coarseness and tamping pressure. Without the pressure gauge it's hard to tell if it's doing an optimal extraction, which can lead to differences in quantity, taste, and crema. I've found the freshness of beans makes a huge difference, too.
It does take some counter space, but they also have versions without the grinder built in that are a bit smaller.
mweg
Active member
Great work! Just catching up on your build. Might be late to the party, but I wanted confirm: my old MKV GTI was amazing in snow here in South Dakota. Easy to drive and predictable even on all season tires.
OP
nicholam77
Well-known member
Great work! Just catching up on your build. Might be late to the party, but I wanted confirm: my old MKV GTI was amazing in snow here in South Dakota. Easy to drive and predictable even on all season tires.
Thanks! And thanks for checking out the thread. Wow, a lot of GTI owners out there! Nice to hear the MKV's are good in snow, too.
--------------------------------------------
In other news I ordered some goodies tonight to get the track saw up and running. It's still my goal to make some fireplace built-ins at some point this summer, and I'll need to rely on the track saw for some of it because they will be made of veneered plywood.
The track saw rail provides a very straight cut, but it's only as good as my marking and measuring, which I don't trust 100%. I want some repeatability and accuracy. There are a ton of accessories out there like parallel guides, rail squares, etc to help with this but most of them are very expensive $$$. I decided to copy this fence setup from Guy's Woodshop on YouTube instead:
It basically consists of an Incra TT+ fence and flip stop, using bench dogs to set square.
So I ordered a 48" Incra TT+, a flip stop, and some guide rail clips for the tall parf dogs. It was much more economical than some of the parallel guide and rail square options out there.
I'll throw it on my existing "MFT" for now:
View media item 87177
Although the long term plan is to build a new MFT that is larger with systainer storage and applicable assembly tool storage close at hand. Something like this (but with DIY MFT work surface):
View media item 92394
But I suspect that build is a ways out. I'd rather get some experience with the track saw first and see what works for me and what doesn't.
I'm also hoping I can take my existing MFT inside next winter and make some track saw projects like bookcases and such at my leisure. Instead of being dead in the water all winter. Dust collection and noise seem reasonable enough to work inside from time-to-time.
Unruh
Well-known member
So I am a big Makita fan as well. I’ve been checking out that track saw for a bit as well as the cordless router and sanders. Can that track saw be used without the track like just a regular circular saw? My circular saw has pretty bad dust collection and that Makita seems like a Festool, but less expensive.
OP
nicholam77
Well-known member
So I am a big Makita fan as well. I’ve been checking out that track saw for a bit as well as the cordless router and sanders. Can that track saw be used without the track like just a regular circular saw? My circular saw has pretty bad dust collection and that Makita seems like a Festool, but less expensive.
Nice! The track saw is the only Makita tool I have, although I like their MakPac boxes for economical systainers. So far I'm impressed, though. I always kind of wish I had stayed with one tool brand to satisfy my OCD, but I've bounced around to whatever brand I thought was the best purchase for the specific tool, and the Makita seemed right in this instance.
It can be used without the track, and you can buy it without the track as well. The track is the main point of a track saw obviously, but due to the enclosed blade and vacuum port, the dust collection is VERY good. I used it again tonight on MDF and barely any dust escaped. I do think that the Makita is the closet thing to the Festool, and because the track extrusions are very similar pretty much all the 3rd party accessories are compatible with both.
OP
nicholam77
Well-known member
My mom wanted to watch the little one for a few hours this afternoon so I said SURE! and got some garage time in. Gotta take it when I can get it because it can be few and far between these days!
Continuing on the router table build... the fence. I had made some quick designs in Sketchup awhile ago:
View media item 92435
View media item 92436
To start I ripped some 1/2" MDF for the front and bottom.
I had a piece in the shed with wonky edges on two sides. Must have broken it down freehand with the circular saw. Well, the track saw is coming in handy already! This would not be a good candidate for the table saw due to its size and that neither edge was straight so there was no good reference edge for the fence. But a track saw doesn't need a fence. I roughly squared the track off a factory edge with a cheap speed square and trimmed one edge straight.
View media item 92405
Then ripped my pieces on the table saw.
Next I did some layout for the cutaway for the router bits. I made it 3 1/2" wide, which is way larger than my largest bit, but I wanted to future proof.
Making use of the center scale:
View media item 92406
Scribing a parallel line for the top of the cutout:
View media item 92408
View media item 92407
Drilled some starter holes for the jigsaw with a Forstner bit:
View media item 92409
My first attempt with the jigsaw freehand was not that straight, so I tried clamping a straight edge helper block and using an oscillating multi-tool instead. This worked better, but I was still a little sloppy cutting the top line.
View media item 92410
View media item 92411
I was running out of time so I forgot to take pics of the gussets, glue up, and dust port creation. But here are some pics of where I ended up, with the aluminum extrusions and dust port laid in place:
View media item 92420
View media item 92418
View media item 92421
View media item 92422
I checked with a small machinist square and it's pretty much dead 90 degrees to the table as far as I can tell.
I still need to sand it, apply a finish, and drill holes for the t-bolts to attach the aluminum fences and to the table.
Because the aluminum extrusions are Woodpeckers brand I can add their featherboard extrusions and flip stop at a later date if I want. But for now featherboards or subfences can be attached directly to the t-slots in the extrustions. I'm excited to have an operational router table in the near future.
--------------------------------------------------------
Another semi-garage related update, I spent the evening hours digging, raking, and grading the soil on the alley side of the garage. Every summer it becomes overgrown with weeds and looks bad. Rampant growth. The wife wanted to plant some raspberry bushes to mitigate this so I tried to prep the soil a bit.
Here's a fun throwback photo of the area in question from when we first moved in:
View media item 92423
I had dug those big bushes out the first year. Here it is today afer some digging:
View media item 92413
And a little more progress:
View media item 92415
View media item 92416
That's all for now...
OP
nicholam77
Well-known member
Small router fence update:
I got some bits and pieces in the mail to secure the aluminum extrusions to the MDF. Some 1" 1/4 20 hex bolts and some 1/4 20 knurled knobs.
I also sanded and put some wipe on poly on the MDF portion, as well as glued the dust port on with CA glue.
Hex bolts that the extrusions feed on to:
View media item 92544
The back side:
View media item 92545
View media item 92547
View media item 92548
It's more or less square with the table. I'm not sure if it's perfect everywhere, but pretty close and probably good enough for my needs:
View media item 92549
So technically I have an operational router table + fence now! I'll probably add some accessories in the future like a flip-stop, bit guard, featherboards, etc.
I also want to spruce up the cabinet carcass somehow, maybe with some paint, a better shelf/storage, a nice face frame, but that's all cosmetic and can be done whenever.
Unruh
Well-known member
Wow, that is nice! I built mine onto my table saw and I’m happy with it, but the dust collection is awful.
OP
nicholam77
Well-known member
Wow, that is nice! I built mine onto my table saw and I’m happy with it, but the dust collection is awful.
Thanks! Yeah, I think a table saw router wing makes a lot of sense. I just don't have a stationary table saw of course. If you're using the table saw fence as the router fence, you could always make an auxiliary fence that sits on top of the table saw fence and build in a vacuum dust port.
OP
nicholam77
Well-known member
So I got an hour in the garage today.
As I've been making the router table I've long had the idea to copy Garage Journal user Lilscorpion's "router buddies" (although with much poorer execution than Lilscorpion ). Basically, the idea is interchangeable insert plates and tools that utilize the same worksurface and fence. It makes so much sense to me in my limited space to have one setup that can encompass multiple tools. And I like the modularity of it.
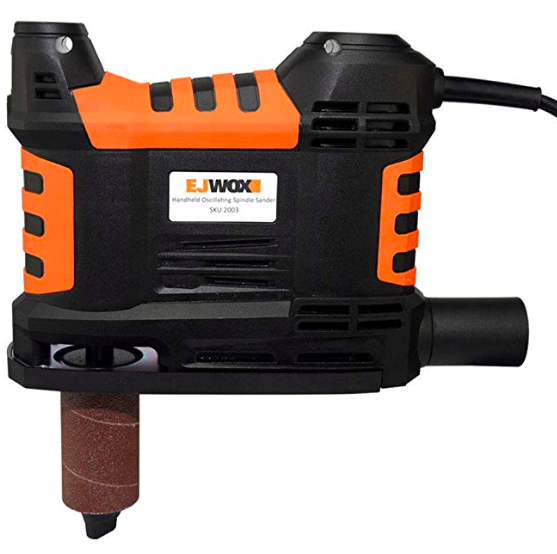
The other tools I'd like to incorporate are an inverted jigsaw and an oscillating spindle sander.
For the router itself I'm using a Rockler phenolic plate as I'm sure you've seen. These go for about $50 a pop, and since they are made for routers, would have to be modified for other tools, anyways. I thought I would try making my own insert plate out of MDF both to save money and have a custom solution.
So I traced the Rockler one on a piece of 1/2" MDF, and cut it slightly oversized with the track saw:
View media item 92570
I could have easily done this on the table saw, but the track saw is easier to take out and set up, and has better dust collection on the MDF.
View media item 92571
Then I clamped the Rockler plate to the MDF as a template, and flush trimmed it with a pattern bit. Because I was using my only insert plate as the template, I had to do this handheld instead of in the table. But future plates will be easier to replicate.
View media item 92572
View media item 92573
It's a tight fit!
View media item 92575
View media item 92574
The Rockler plate thickness is in-between 1/4" and 1/2" stock so I used 1/2" MDF for strength which is why it's sitting a bit proud of the surface. I don't want to have to adjust the plate leveling screws when swapping plates, so I'm going to remove some material from the underside of the corners to get it flush.
Seeing as I don't have an oscillating spindle sander, this one will be for the jigsaw.
As I've been making the router table I've long had the idea to copy Garage Journal user Lilscorpion's "router buddies" (although with much poorer execution than Lilscorpion
). Basically, the idea is interchangeable insert plates and tools that utilize the same worksurface and fence. It makes so much sense to me in my limited space to have one setup that can encompass multiple tools. And I like the modularity of it.The other tools I'd like to incorporate are an inverted jigsaw and an oscillating spindle sander.
For the router itself I'm using a Rockler phenolic plate as I'm sure you've seen. These go for about $50 a pop, and since they are made for routers, would have to be modified for other tools, anyways. I thought I would try making my own insert plate out of MDF both to save money and have a custom solution.
So I traced the Rockler one on a piece of 1/2" MDF, and cut it slightly oversized with the track saw:
View media item 92570
I could have easily done this on the table saw, but the track saw is easier to take out and set up, and has better dust collection on the MDF.
View media item 92571
Then I clamped the Rockler plate to the MDF as a template, and flush trimmed it with a pattern bit. Because I was using my only insert plate as the template, I had to do this handheld instead of in the table. But future plates will be easier to replicate.
View media item 92572
View media item 92573
It's a tight fit!
View media item 92575
View media item 92574
The Rockler plate thickness is in-between 1/4" and 1/2" stock so I used 1/2" MDF for strength which is why it's sitting a bit proud of the surface. I don't want to have to adjust the plate leveling screws when swapping plates, so I'm going to remove some material from the underside of the corners to get it flush.
Seeing as I don't have an oscillating spindle sander, this one will be for the jigsaw.
OP
nicholam77
Well-known member
Another router station build update...
But first I had to fix something with my MFT table. I had never affixed the top to the base. On one hand, it was useful because I could orient the top different ways. But not very stable. I wanted a way to attach it sturdily, but also be able to remove it when needed.
Easy enough, I cut a plywood stretcher and pocket hole'd it to the base. Drilled a couple holes and now the top fastens with T bolts and knobs, accessible through the Paulk framework:
View media item 92658
View media item 92659
I need to cut the bolts down but that's all I had around.
One goof... I centered the top on the base... because OCD, but this somehow means my table saw no longer fits on it's attachment shelf. So I had to use the table saw on the floor today.
It's ok, I'm planning on a new MFT build and new table saw cart build in the future. Version 2.0.
On to the important stuff. Continuing on the inverted jigsaw insert, I did some layout on the bottom of the new plate, and cut some pine strips to frame the jigsaw base in place.
View media item 92657
Then I glued and clamped it. Clamp city!
View media item 92656
While that dried, I worked on my other agenda for the day: beautifying the router cabinet. After I finished the table surface, I felt like the plywood cabinet didn't live up to it aesthetically. And the middle shelf was sagging. So I decided to cover the backer board with some 1/4" project panels, and rip out the shelf and make a new one.
View media item 92655
Because the cabinet is lag screwed to the studs, I ripped some 1/4" oak plywood furring strips and glued and brad nailed them in place.
View media item 92654
View media item 92653
Then I ripped the project panels with the track saw.
View media item 92652
Not 100% necessary, but I'm really liking the track saw for handling sheet goods.
First panel in. So much cleaner looking than the plywood behind it.
View media item 92651
Second panel in, and some maple cleats to properly support the new shelf.
View media item 92650
Ripped the new 3/4" ply shelf to size and here is the result:
View media item 92649
View media item 92648
View media item 92647
I think this looks quite a bit better, and will be even better with a coat of poly. The shelf will also have a red oak edge banding to match the router surface surrounds.
The bottom cavity will store the fence when folded, and the top will be divided into a few sections, including storage for both router bases, wrenches, bits, and other accessories.
And here's the current status of the jigsaw plate:
View media item 92646
View media item 92645
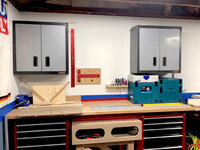
Overall pic of the shop:
View media item 92644
More to come when I can get to it!
But first I had to fix something with my MFT table. I had never affixed the top to the base. On one hand, it was useful because I could orient the top different ways. But not very stable. I wanted a way to attach it sturdily, but also be able to remove it when needed.
Easy enough, I cut a plywood stretcher and pocket hole'd it to the base. Drilled a couple holes and now the top fastens with T bolts and knobs, accessible through the Paulk framework:
View media item 92658
View media item 92659
I need to cut the bolts down but that's all I had around.
One goof... I centered the top on the base... because OCD, but this somehow means my table saw no longer fits on it's attachment shelf. So I had to use the table saw on the floor today.
It's ok, I'm planning on a new MFT build and new table saw cart build in the future. Version 2.0.
On to the important stuff. Continuing on the inverted jigsaw insert, I did some layout on the bottom of the new plate, and cut some pine strips to frame the jigsaw base in place.
View media item 92657
Then I glued and clamped it. Clamp city!
View media item 92656
While that dried, I worked on my other agenda for the day: beautifying the router cabinet. After I finished the table surface, I felt like the plywood cabinet didn't live up to it aesthetically. And the middle shelf was sagging. So I decided to cover the backer board with some 1/4" project panels, and rip out the shelf and make a new one.
View media item 92655
Because the cabinet is lag screwed to the studs, I ripped some 1/4" oak plywood furring strips and glued and brad nailed them in place.
View media item 92654
View media item 92653
Then I ripped the project panels with the track saw.
View media item 92652
Not 100% necessary, but I'm really liking the track saw for handling sheet goods.
First panel in. So much cleaner looking than the plywood behind it.
View media item 92651
Second panel in, and some maple cleats to properly support the new shelf.
View media item 92650
Ripped the new 3/4" ply shelf to size and here is the result:
View media item 92649
View media item 92648
View media item 92647
I think this looks quite a bit better, and will be even better with a coat of poly. The shelf will also have a red oak edge banding to match the router surface surrounds.
The bottom cavity will store the fence when folded, and the top will be divided into a few sections, including storage for both router bases, wrenches, bits, and other accessories.
And here's the current status of the jigsaw plate:
View media item 92646
View media item 92645
Overall pic of the shop:
View media item 92644
More to come when I can get to it!
OP
nicholam77
Well-known member
So apparently Garage Journal has a 1,000 count image hosting limit I've somehow reached 
I use Imgur for other forums but doesn't work well on here so I'm trying something else. Hopefully it doesn't get wonky.
As part of Spring maintenance I cleaned out the garage gutters yesterday. Didn't have an opportunity last fall and we're getting into the rainy stormy season here.

There was was an inch-thick blanket of organic matter on the foam gutter guards, but they seemed to do their job well.
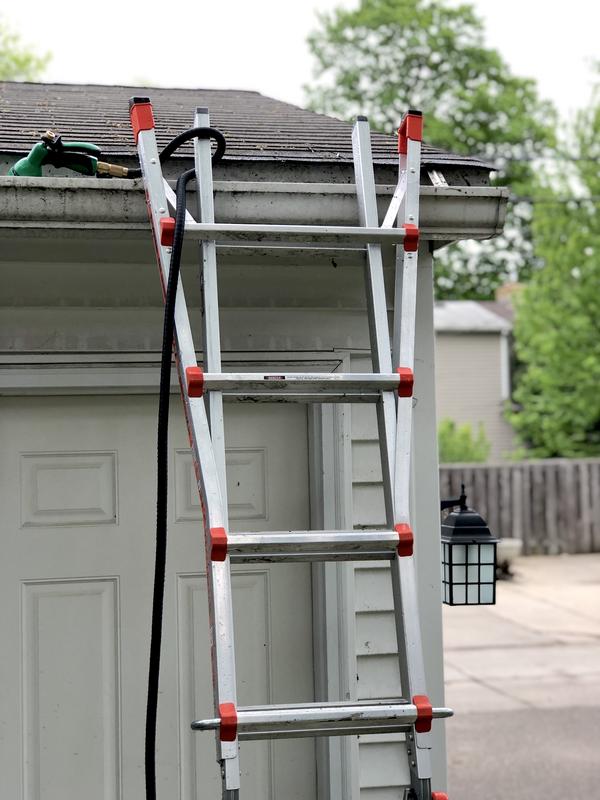
I cleared everything, washed out with hose, and then ran the hose in the gutter to make sure water was flowing well.

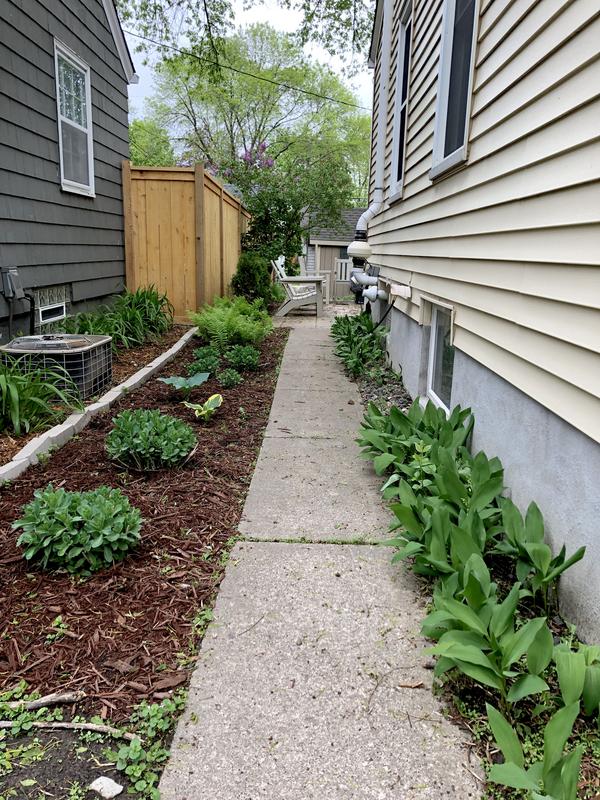
Got the raspberry bushes planted on the alley side of the garage a few weeks ago:

And the wife's been working on the gardens, moving some plants around. Here you can see our little shed where I store yard tools and other random bits that don't have a home inside the garage.
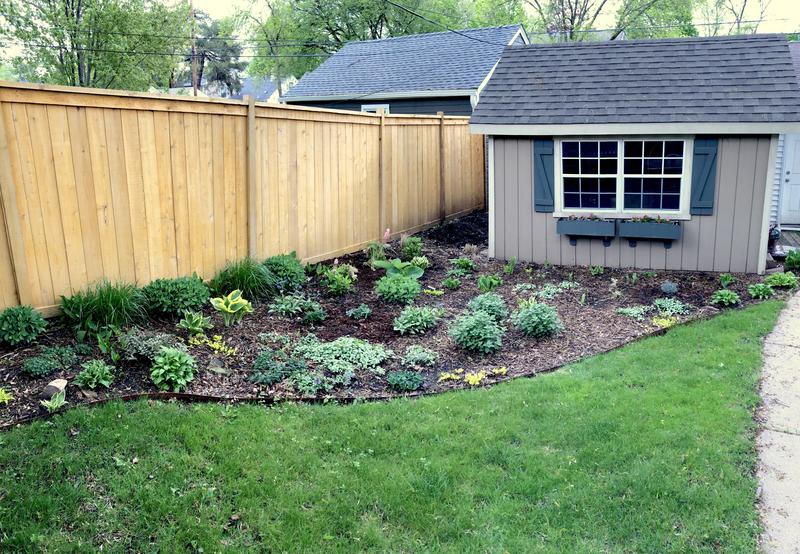
It's nice to actually see green things and not snow!
I use Imgur for other forums but doesn't work well on here so I'm trying something else. Hopefully it doesn't get wonky.
As part of Spring maintenance I cleaned out the garage gutters yesterday. Didn't have an opportunity last fall and we're getting into the rainy stormy season here.
There was was an inch-thick blanket of organic matter on the foam gutter guards, but they seemed to do their job well.
I cleared everything, washed out with hose, and then ran the hose in the gutter to make sure water was flowing well.
Got the raspberry bushes planted on the alley side of the garage a few weeks ago:
And the wife's been working on the gardens, moving some plants around. Here you can see our little shed where I store yard tools and other random bits that don't have a home inside the garage.
It's nice to actually see green things and not snow!
So apparently Garage Journal has a 1,000 count image hosting limit I've somehow reached...
Not sure if I should congratulate you, or???
Kriesel
Well-known member
So apparently Garage Journal has a 1,000 count image hosting limit I've somehow reached
I use flickr currently, but they also have a 1000 limit on their free accounts... I'm almost there.
TurboEuro88
Well-known member
I use flickr currently, but they also have a 1000 limit on their free accounts... I'm almost there.
Imgur.com is a great alternative, but I prefer Flickr for its control over the image size that I hotlink.
OP
nicholam77
Well-known member
Outside yard looks good!
Bret
Thanks Bret!
Not sure if I should congratulate you, or???
Ha! Yeah, it seems like a lot of images. I guess I like pic-heavy posts.
I use flickr currently, but they also have a 1000 limit on their free accounts... I'm almost there.
Imgur.com is a great alternative, but I prefer Flickr for its control over the image size that I hotlink.
I used to use Flickr back in the day, and still have an account. Kinda lame that they ditched the 1TB storage for free users, though.
I like Imgur, too, and you can set the size of direct links (albeit from preset sizes 'small', 'medium', 'large' etc). Maybe Flickr offers custom sizing, I can't remember. But Imgur just doesn't seem to like the Garage Journal forum in my experience (or vice versa).
The service I am trying is called "PostImage". So far seems to work well, is free, and can resize images and provide hotlinks / direct links. It seems to be geared specifically towards forum image hosting. I like it so far.
sawduststeve
Well-known member
Nick,nice work with the gardens, it all looks good.
The router table/box has come along a treat, jigsaws are not my most favourite tool,I'm looking forward to see how that works out.
I think what you really need is a nice little spindle moulder (shaper?) with maybe a sliding table, so you can scribe on it.
Have a good week.
Steve
The router table/box has come along a treat, jigsaws are not my most favourite tool,I'm looking forward to see how that works out.
I think what you really need is a nice little spindle moulder (shaper?) with maybe a sliding table, so you can scribe on it.
Have a good week.
Steve
OP
nicholam77
Well-known member
Nick,nice work with the gardens, it all looks good.
The router table/box has come along a treat, jigsaws are not my most favourite tool,I'm looking forward to see how that works out.
I think what you really need is a nice little spindle moulder (shaper?) with maybe a sliding table, so you can scribe on it.
Have a good week.
Steve
Thanks, Steve! Although I have to give credit to my wife for the gardens, it's almost entirely her project.
I don't love jigsaws either
Maybe it's my technique, but the blade often bends when I make cuts, don't always follow my line, and sometimes it's hard to support the workpiece.
I'm hoping inverting it in a table will solve some of that. I'm also intending to use a homemade blade guide, like a bandsaw in a way. See below screenshots (or hit the YouTube links if you're curious) to see what I mean:
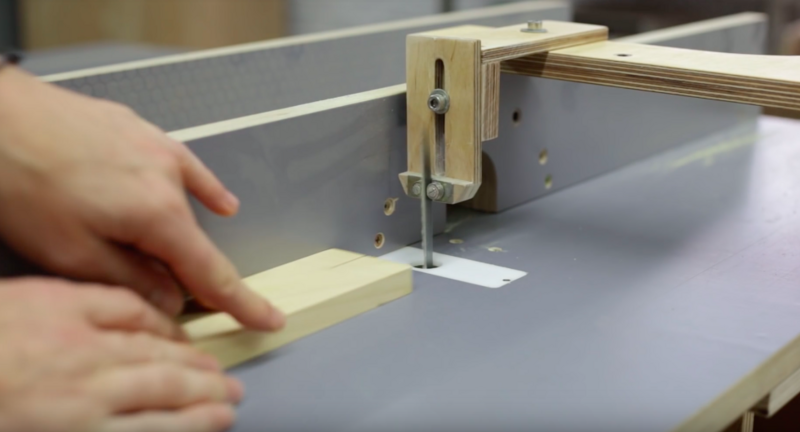
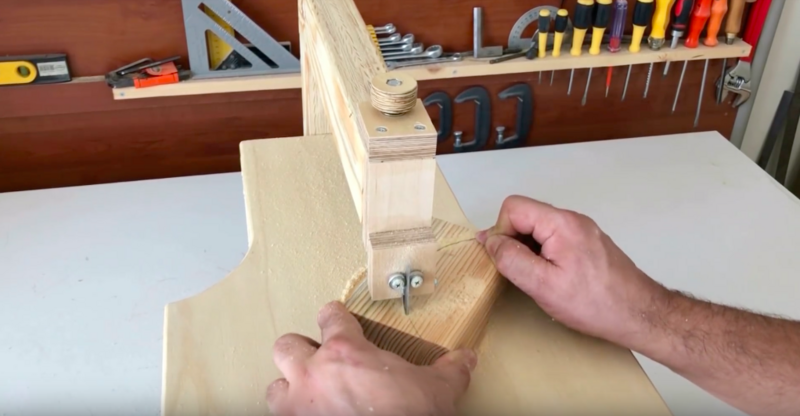
I don't know how well it will work, but that's the idea, since I don't have a bandsaw and it would be nice to make better, curved cuts sometimes. I have a particular project in mind for it.
Could you elaborate on the spindle moulder/shaper? Is that the same thing as an oscillating spindle sander? I was thinking of getting one of these handheld units to mount upside down in the table, too:
What would the purpose of the sliding table be? Funny you mention scribing... I also have another future project that will require some scribing to walls, which I've never done before. Not sure if that would work for this, but I'm interested.
Appreciate your posts as always.