

You are using an out of date browser. It may not display this or other websites correctly.
You should upgrade or use an alternative browser.
You should upgrade or use an alternative browser.
Official Gladiator Showoff Thread
- Thread starter nathank
- Start date
plain2car
Well-known member
mnchevyss,
those pics look great! i was wondering how you attached your vacum to the wall?? i presume that it is removable? what kind of "mounting" system are you using to hang the kids rides to the wall??
thanks for the time!!
plain2car
those pics look great! i was wondering how you attached your vacum to the wall?? i presume that it is removable? what kind of "mounting" system are you using to hang the kids rides to the wall??
thanks for the time!!
plain2car
Where in OK did you find some. I have found none on sale in Tulsa area. JoeI just got home with mine a few minutes ago! I'm going to assemble them this weekend sometime and put them up. I bought three for me.
plain2car,
http://beta.sears.com/shc/s/p_10153_12605_00917925000P?keyword=shopvac#desc
is a link to the vacum I have, I got it a few months back for $49 during a craftsman sale at Sears, it comes with the bracket and everything you need to mount it, it's got fair power for its size, detaches easily and has like a 20 foot hose which is handy.
The mounting system is Rubbermaid, I considered both Gladiator and Rubbermaid, in the end I thought Rubbermaid would work a little better, plus you can get a kit with like 8 different types of hooks and the rail at Menards for about $50, I have 3 of them and I'm happy with em.
I know this is a Gladiator thread and I don't mean to hi jack it. But check out the cool new gizmo I just put up from northern hydralics, motion activated laser pointers. Kinda gimicky, but for the last week, it's kept the wife from pulling about 8 feet to far into the garage. We just picked a spot on her dash, aimed the beam at it, when she sees the light she stops and avoids practically putting the car through the wall in front of her.
Attachments


plain2car
Well-known member
mnchevyss,
thanks for the reply. i too was looking at the rubbermaid stuff as well. i decided to go with the gladiator series for the the same reasons. i have a lowe's brand shop vac & am looking into ways of storing it when not in use. i will check the gladiator web site for ideas too.
thanks again!
plain2car
ovilla
Well-known member
Here is a look at mine.
Pretty expensive but I really like em.
Sully...........
Where did you get the under counter Gladiator fridge? My neighbor bought one about 3 years ago but it looks like they no longer carry the mini, just the regular size fridge/freezer. If that's not the Gladiator one, I'd appreciate knowing what brand it is as the front facia matches the cabinets really well. Thanks
cwolfley
Well-known member
cant believe there are no more pics and updates.sooooo many purchased there should be more cool pics and ideas out there...
chad pickens
Well-known member
Heres some of mine I still have 4 to hang but haven't decided where yet.Sorry for the poor pic and the mess

Last edited:
Kevin54
MEMBER EMERITUS
Well, I already had an extra rail available. The problem I have is that if I did put just a 3/4" rail at the bottom, it wouldn't be level - it would still be slightly forward-slanted.
Once I have a chance, I'll come up with an alternative setup - likely utilizing French cleats. I'm just still annoyed at how even the bracket doesn't line up as it should.
Stuey...are you sure you have the mounting bracket on correctly. It mounts a few inches down from the top so the back of the cabinet sits on the rail and the bracket drops into the slot. With a 3/4" board at the bottom it will let the cabinet sit parallel to the wall. If you get a chance, can you post a pic? If I remember when I get home, I'll snap a pic of how mine is mounted.
firebird1999us
Well-known member
- Joined
- Apr 24, 2009
- Messages
- 174
Here is a look at mine.
Pretty expensive but I really like em.
Sully...........
I'm dying to get one of those mini-fridge's that Gladiator makes. But they quit selling them

Kevin54
MEMBER EMERITUS
Bump to the top to bring the thread back from the dead. I'm interested to how others have used theirs. Quite a bit got sold during that week or so spurt so there should be some more pics. Also did everyone use all of theirs or did some end up selling some off?
hguerrero
Well-known member
mine are still sitting in the garage boxed....
Stargeezer
Well-known member
Had this post misplced in the 42 cab build thread earlier today...sorry, so I moved it here:
Back during the madness of G3 (Great Gladiator Grab) I snagged 13 units myself. Been watching this thread, of course; and dreading the day I would actually apply myself to the task of assembling and mounting them in the new garage. I have read about what a pain in the *** they are to assemble. Also-I see some of these put together out-of-square; which gave me even more reservations about starting. I wanted these to look good: with doors even etc.
Finally started the deed and the first one was not fun. I did it alone-on the floor. It took a while.Pressing onwards though, right now "we" (The wife helped a bunch) have eight (8) assembled and four (4) of those mounted. We have it down to 20 minutes now for assembly and get them assembled with the doors square. We are mounting the cabs directly to the walls-no tracks.
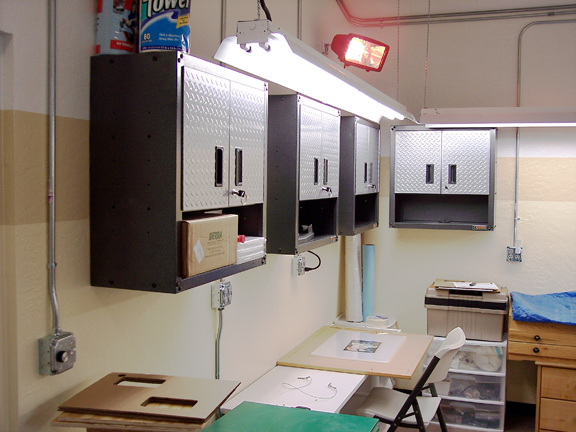
Above is a shot of the work in progress. I had the 8 foot T8 light fixtures installed 1 foot out from the walls in this part of the garage specifically to acccommodate the Gladiator cabinets. This is a partitioned-off room in the 30X40 metal garage and it will be a hobby room. The walls were painted with semi-gloss and with light colors to reflect the light. The cabinets don't seem to block too much light beneath them. Also had the electrical drops spaced to allow cabinet placement. This all was done 5 months ago! Bout Time to hang em.
Also note that you can see the Costco Infrared garage heater going above the one cabinet in the corner. Works well to warm up the benches and tools while the baseboard heater and downdraft ceiling fan get going and warmed up a bit. Then I usually turn off the IR.
Anyways-what I have learned and will suggest for those big chickens like me is: Work on a table or bench. Easly to flip and turn the cabs that way. Use a nut driver, a powered driver/bits and have a long handled screw driver on-hand for getting the doors on. Fastest/Easiest way to get the corners square is to get the three fasteners near that corner fairly snug- and then use a dead blow hammer to knock them into the obvious & flush alignment. Then cinch them good with the power driver.
Lastly-fully assembled they are not really heavy. I used a few lumber blocks on a short ladder plus some shims to get them in position before fastening. I'll post more pics as we get this finished up. Hopefully others will now get going. What are you waiting for? Ha Ha............
Back during the madness of G3 (Great Gladiator Grab) I snagged 13 units myself. Been watching this thread, of course; and dreading the day I would actually apply myself to the task of assembling and mounting them in the new garage. I have read about what a pain in the *** they are to assemble. Also-I see some of these put together out-of-square; which gave me even more reservations about starting. I wanted these to look good: with doors even etc.
Finally started the deed and the first one was not fun. I did it alone-on the floor. It took a while.Pressing onwards though, right now "we" (The wife helped a bunch) have eight (8) assembled and four (4) of those mounted. We have it down to 20 minutes now for assembly and get them assembled with the doors square. We are mounting the cabs directly to the walls-no tracks.
Above is a shot of the work in progress. I had the 8 foot T8 light fixtures installed 1 foot out from the walls in this part of the garage specifically to acccommodate the Gladiator cabinets. This is a partitioned-off room in the 30X40 metal garage and it will be a hobby room. The walls were painted with semi-gloss and with light colors to reflect the light. The cabinets don't seem to block too much light beneath them. Also had the electrical drops spaced to allow cabinet placement. This all was done 5 months ago! Bout Time to hang em.
Also note that you can see the Costco Infrared garage heater going above the one cabinet in the corner. Works well to warm up the benches and tools while the baseboard heater and downdraft ceiling fan get going and warmed up a bit. Then I usually turn off the IR.
Anyways-what I have learned and will suggest for those big chickens like me is: Work on a table or bench. Easly to flip and turn the cabs that way. Use a nut driver, a powered driver/bits and have a long handled screw driver on-hand for getting the doors on. Fastest/Easiest way to get the corners square is to get the three fasteners near that corner fairly snug- and then use a dead blow hammer to knock them into the obvious & flush alignment. Then cinch them good with the power driver.
Lastly-fully assembled they are not really heavy. I used a few lumber blocks on a short ladder plus some shims to get them in position before fastening. I'll post more pics as we get this finished up. Hopefully others will now get going. What are you waiting for? Ha Ha............
MN BIANCHI
Well-known member
These are the ones I have in my home garage. Someday I will take a few pics of the ones at the toy shed.


PoPo
Active member
I missed out on the sale also. Maybe we can start another sale for the spring of 2010! Like around tax return time lol.
I have been walking the aisles of Lowes for months starting at these bad boys. I think I am just going to get the 48 wide cabinet soon and mount it on the wall so I can put some stuff away from my move.
I have been walking the aisles of Lowes for months starting at these bad boys. I think I am just going to get the 48 wide cabinet soon and mount it on the wall so I can put some stuff away from my move.
Did they discontinue this style? Is that why they were on sale in Feb? Last Feb at Home Depot I got the Porter Cable air compresser with two nail guns on sale for $79. and an electric fireplace for half price (180.) so maybe it was a seasonal clearance? I will be haunting Lowes in Feb this year!
MN BIANCHI
Well-known member
Did they discontinue this style? Is that why they were on sale in Feb? Last Feb at Home Depot I got the Porter Cable air compresser with two nail guns on sale for $79. and an electric fireplace for half price (180.) so maybe it was a seasonal clearance? I will be haunting Lowes in Feb this year!
The model that everybody got the hot deal on was a discontinued model. The replacement model is GAWB28KDSG. This is what the new model looks like:

You can not tell the difference between the old model and the new model by looking at the picture. I suspect there was some minor change that caused them to issue a new model number. I also noticed there is a new model GAWG28KDWG scheduled to be introduced in Feb 2010. I do not have a picture of the new model, but the description is identical. That does not mean there will be another blow out, but you never know.
Kevin54
MEMBER EMERITUS
Wow!!!!! I can't believe that it was back in '09 that everyone jumped on the sale. Time sure does fly anymore. I moved mine around and in a 24' spot and bolting a few together I was able to squeeze in 10 cabinets. I have been adding some corrugated tin on my walls, and there was room between the tin and the cabinet to mount some rope lighting. It's something different and adds a little "ambiance" at night. Sounds classy, huh!!! 
Anyways here's the pics. Glad to see the thread bob back up to the top. It's been a while.
Anyways here's the pics. Glad to see the thread bob back up to the top. It's been a while.
Attachments


Last edited:
Man it would be awesome to have another go round with these going on clearance. I only picked up 2 but it's still better than none. I'm actually surprised they haven't ditched the line all together at Lowes and stuck with their Kobalt brand.
Silvercbr
Well-known member
You have to just jump on Gladiator's site frequently because they do run sales. I jumped on their sale last Fall and another for President's Day. I got the tall cabinets with casters for $150 each (50% off) and free shipping to my door both times. They do limit the sale (at least at 50% off) to specific cabinets and wall cabinets. Couldn't beat $150.
I already had the smaller floor cabinets and wall cabinets but have noticed them on sale too. Right now they are running an Earth Day sale but it is not that great when compared to their other sales.
I already had the smaller floor cabinets and wall cabinets but have noticed them on sale too. Right now they are running an Earth Day sale but it is not that great when compared to their other sales.
Attachments

pmason0
Well-known member
Here is mine.

Here's my bench build. Hopefully I'll get around to part 3 someday soon.
Build thread part 1:
http://www.garagejournal.com/forum/showthread.php?t=31704
Build Thread part 2:
http://www.garagejournal.com/forum/showthread.php?t=181626

Build thread part 1:
http://www.garagejournal.com/forum/showthread.php?t=31704
Build Thread part 2:
http://www.garagejournal.com/forum/showthread.php?t=181626