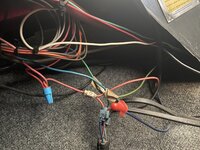
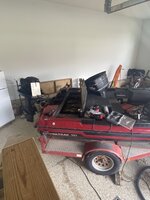
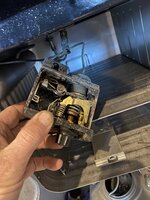
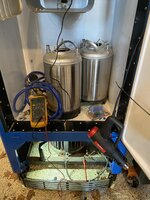
I worked on my son’s boat. We mounted the motor to the Jack plate and connected the wiring temporarily just to be able to raise the motor from the floor. My sons went to trim it up………nothing. I jumped it out to get it up and we put things up. I looked at the trim switch and found some really bad wiring. Scotch locks and a wire nut, I wish people would just stay away from wiring sometimes! I cut the **** out and cleaned it up. Soldering Vs Crimping has been discussed ad nauseam, I prefer soldering on a boat. I soldered and shrink wrapped the wires and then secured them. Last picture is of his boat and my work area.

You are using an out of date browser. It may not display this or other websites correctly.
You should upgrade or use an alternative browser.
You should upgrade or use an alternative browser.
Ohm’s shenanigans
- Thread starter Ohmthis
- Start date


MP&C
Well-known member
I think I know who did that wiring job... 
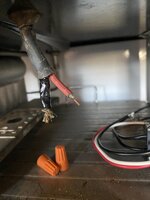
Well the wiring bandit strikes again!!! We finished up the engine and we’re ready to crank it over. This is what the battery area looked like. Holy Grounds Batman!!! It didn’t end there. Wire nuts, more extension cord (WTF!), wires spliced multiple times, and changing from gray, to green, then back to gray. I decided to just rip it all out, ok not really! I did take everything apart and figure out what was the person thinking that f’d would his all up. I ran some new wired and cleaned things up. There was a deustch plug that was molested so I replaced that. Here are some pictures.
Attachments
-
 D02659F7-2BD7-4343-9B3F-D13F37B3B15A.jpeg1 MB · Views: 51
 -
 12C8FC36-0D8D-4EF6-BE6E-537E45D0B222.jpeg972.2 KB · Views: 46
 -
 D767ACE4-92E3-48E6-9F56-842588EF6F6E.jpeg716.1 KB · Views: 43
 -
 3BE98C5D-7F67-4C87-999B-43AB5BD3D5C9.jpeg634.2 KB · Views: 43
 -
 935A29DA-275E-480F-B367-40AC976F3AE0.jpeg669.3 KB · Views: 41
 -
 584F3818-8BBB-4F2B-AEDE-F8762ECBFCE5.jpeg693.2 KB · Views: 44
I found out why the positive wires were so melted. The main positive cable was corroded to the point only a very portion of the wire existed anymore. That got cut out and a new lug crimped on. Here’s one more of the battery area. I added some pictures after the cleanup too. Hope you guys enjoy.
Attachments
-
 E9442428-8F6A-4785-ABB3-118F176FC66B.jpeg684.2 KB · Views: 41
 -
 F86CD9A3-2E65-4E21-9E3A-32B32AF64A5C.jpeg1 MB · Views: 38
 -
 DF1748BF-DB76-4896-AA80-A0ECBB91CC1A.jpeg1.2 MB · Views: 37
 -
 EDF271A3-816F-4466-9258-5544C2162707.jpeg481.3 KB · Views: 38
 -
 42BD07E4-22E4-4BF8-A9E1-876615D4CFE3.jpeg885.1 KB · Views: 38
 -
 04D9C10F-1427-4E12-9FD6-4380C1422997.jpeg322 KB · Views: 39
 -
 7F73B5BE-CDB9-41DC-94BB-EEC7F5F56BD4.jpeg489.8 KB · Views: 44
Last edited:
I know it’s been a little while, work this time of the year is crazy busy for me and I was sick on top of that. But, I was still busy in the shop.
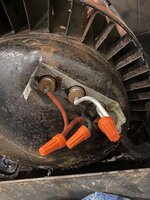
I got an old fridge (1940 GE Imperial. I may do a little thread specifically for it when I’m ready) that was converted into a kegerator from my brother in law. He used it for awhile but complained about it tripping the GFI every so often. Eventually it stopped working and his brother and him “attempted to fix it. I got it home and started looking it over. In their attempt to repair it I found wires just hanging out in space. After finding an old schematic the relay/overload was missing. That’s where the wires went to. I ohmed out the windings of the compressor to make sure it wasn’t shorted. I then ohmed the wires to the temp control (essentially a mechanical thermostat) and found that it wouldn’t change states. I opened the temp control and determined it was bad. So I have ordered the temp control and a modern relay/overload. The insulation is in terribly bad shape. That is my guess as to why it would trip the GFI. So I’ll be running new cables also. I’ve added pictures of the wires and their condition as well as the temp control.
I got an old fridge (1940 GE Imperial. I may do a little thread specifically for it when I’m ready) that was converted into a kegerator from my brother in law. He used it for awhile but complained about it tripping the GFI every so often. Eventually it stopped working and his brother and him “attempted to fix it. I got it home and started looking it over. In their attempt to repair it I found wires just hanging out in space. After finding an old schematic the relay/overload was missing. That’s where the wires went to. I ohmed out the windings of the compressor to make sure it wasn’t shorted. I then ohmed the wires to the temp control (essentially a mechanical thermostat) and found that it wouldn’t change states. I opened the temp control and determined it was bad. So I have ordered the temp control and a modern relay/overload. The insulation is in terribly bad shape. That is my guess as to why it would trip the GFI. So I’ll be running new cables also. I’ve added pictures of the wires and their condition as well as the temp control.
Attachments


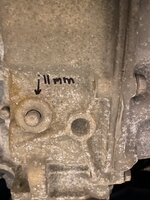
My in laws lost a car to the hurricane in Florida this past fall. They bought another one and my free labor was put to work. They bought a nice Ford Edge (I’d really love to keep it for myself, but they know where I live) that needs some maintenance items taken care of and a couple little repairs done. I threw it on the lift and did a drain/fill of the transmission fluid and flushed the brake fluid. I have a vacuum brake bleeder that makes this job pretty easy. The only drawback I see is that I have to put Teflon tape on the bleeder screws to keep air from being pulled in. I checked the brake pads while I had it up also. The underside got a nice once over as well. I like to mark the size of the drain plugs on all the vehicles I maintain. It makes having the correct socket a breeze. I’ll also mark the plastic above the radiator with a grease pencil too.
Attachments


stinkity stoink
Well-known member
Which brake bleeder do you have and do you like it ? I’m thinking about picking one up.
thanks
thanks
It’s a capri branded vacuum style bleeder. Yes I like it a lot. The one thing that I wish was different (and this may be something all vacuum style have) is that I have to wrap the bleeder screws with Teflon tape (I have read that people have used heavy grease instead) to keep the bleeder from pulling air in.Which brake bleeder do you have and do you like it ? I’m thinking about picking one up.
thanks
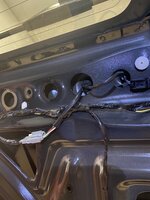
So the backup camera on the edge was upside down and apparently reverse won’t work without it according to my mother in law  . So I did some research and got to work. I got my interior tools out and took the rear panel off. Unbolted the rear trim and got to the camera and its wiring. I was looking for a damaged wire or corroded plug. Once I didn’t find that I figured it was the camera. I took the rear trim piece that held the camera off the lift gate. I removed the fasteners. There is one torx screw that held the bracket for the camera. I swapped out the camera and reversed the process. Plugged it all back together and…….. the car can now go backwards. My pictures aren’t in order, but hopefully you get the idea.
. So I did some research and got to work. I got my interior tools out and took the rear panel off. Unbolted the rear trim and got to the camera and its wiring. I was looking for a damaged wire or corroded plug. Once I didn’t find that I figured it was the camera. I took the rear trim piece that held the camera off the lift gate. I removed the fasteners. There is one torx screw that held the bracket for the camera. I swapped out the camera and reversed the process. Plugged it all back together and…….. the car can now go backwards. My pictures aren’t in order, but hopefully you get the idea.Attachments
-
 02A88511-29DF-443F-8204-231780EE9A72.jpeg718.2 KB · Views: 26
 -
 11FA48CE-9A4B-497E-92A2-0950C0810E0D.jpeg831.8 KB · Views: 25
 -
 A6E16D27-869C-42D8-B185-E17B243F51C3.jpeg858.5 KB · Views: 22
 -
 BE28D8D7-F3E1-405F-AB4A-8B7B59EFC51B.jpeg768.5 KB · Views: 23
 -
 36956AEC-5D9D-4271-915D-3D6F7AB9E95A.jpeg712.5 KB · Views: 23
 -
 65A3DC31-B9A0-4154-BA3F-BAD5B2D07B49.jpeg894.5 KB · Views: 24
 -
 5B7D14D8-DC25-431E-A3B5-37D717D18B61.jpeg485.4 KB · Views: 36
I worked on my old kegerator. I’m debating giving it its own thread. So a little background. My brother in law has had this fridge (1940 GE Imperial) for a decade or more. He tried his hand at brewing beer and used it for the brewing/serving of his own beer. He said that it tripped the GFI several times and finally stopped working. It’s been sitting for awhile and he wanted to get it out of his way. I’ve always loved it and quickly snapped it up.
Attachments


There were parts missing and they are pretty important. The start relay/overload was gone and the schematic (usually on the inside of the access panel) was nowhere to be found. So I grabbed my meter and some colored tape and started making notes. The insulation just crumbled off of the wires and I quickly surmised that was the reason for the tripping GFI.
Attachments


'nuff said...My Brother in law...


To help with later troubleshooting (even if that’s not me doing it). I color coded the wires. Whether it be a stigma that every green wire is a ground (even though I know electricity doesn’t care what color the wire is) or just that I don’t like it. I put red shrink wrap on the green wire(s). I will also add labels to the cables in the bottom to help prevent confusion later. Here are the wires with new terminals for the temp control.
Attachments


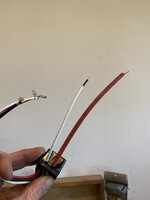
I ran a new cable to the compressor. I was a little disappointed to see soldered connections at the compressor. Get these too hot and I take the chance of melting the winding insulation. I decided instead to clean the old insulation off of the existing wiring and use several layers of colored heat shrink to insulate. After ohming the windings to find the common, start, and run I needed to change the colors a bit as seen in the last picture. Before closing up the terminal box, I wrapped super 33 tape on the wires and wire nuts. (I didn’t get a picture of that, sorry).
Attachments


I had to lay the fridge on its back to rewire things. It’s not a good idea to stand it right back up and plug them in. The oil used in the refrigerant system has had time to pool and move to where gravity wants to take it. I left it upright overnight and let gravity do its thing. I plugged it in, set the temp control, and…………….. Success………..for a little bit. As I was inspecting things the relay is pretty damn hot. It’s rated to 1/3 hp. A lot of the compressor nameplate is faded. It does have the model number. Using my Google Fu I find out it is indeed a 1/2 hp compressor. So I pulled the plug. I have called the supply house and there is a larger relay/overload. I will be picking that up and I think I’ll clean up the wiring and use a terminal block. Picture below is with the door open and the light on, if it doesn’t show up. I’m happy with it and have plans to possibly change the colors. Thanks for following along.
Attachments
My BIL is a great guy as well, but he could f-up an anvil with a rubber hammerHaHaHaHa! He’s a great guy, I won’t hold this against him. I do like the fact that he threw something away and I was able to wave my magic wand over it and bring it back to life.
Monza Harry
Well-known member
Ohm's, I love the styling of your "Vintage" refrigerator, things back then just had more style! As for your wiring job, [related tangent] I recently added an external plug and also a remote control to my "SuperWinch" S4500" So with a little "Google Fu" I found wiring diagrams of all associated parts [P.S. there are a few different colour schematics for the HF/Badlands remote [so yes I had to re-wire a few times & 1 pending as I have it directionally reversed I will repair when I fix the release handle that just gave up and subsequent sandblast & paint/powder coat], but when finished I made a chart and added it to the wiring diagrams, and printed them and they reside where/with I store the winch and accessories as my memory is GREAT! I remember to write the particulars down and try to attach them to said device! I also kept a digital copy. This may come in handy in your future or at least the devices future. Harry
P.S. mogandaves final remarks had me in stiches! TY!
P.S. mogandaves final remarks had me in stiches!
TY!Yes sir, I printed off the drawing that I found and color coded the wires as well as the labels on the cables. One thing I have left to do write down the part# on the new parts I have used. Thanks for commenting. I agree the styling is what I fell in love with. I like old beautiful things. I just can’t say that to my wife thoughOhm's, I love the styling of your "Vintage" refrigerator, things back then just had more style! As for your wiring job, [related tangent] I recently added an external plug and also a remote control to my "SuperWinch" S4500" So with a little "Google Fu" I found wiring diagrams of all associated parts [P.S. there are a few different colour schematics for the HF/Badlands remote [so yes I had to re-wire a few times & 1 pending as I have it directionally reversed I will repair when I fix the release handle that just gave up and subsequent sandblast & paint/powder coat], but when finished I made a chart and added it to the wiring diagrams, and printed them and they reside where/with I store the winch and accessories as my memory is GREAT! I remember to write the particulars down and try to attach them to said device! I also kept a digital copy. This may come in handy in your future or at least the devices future. Harry
P.S. mogandaves final remarks had me in stiches!
. Not only would it get me in trouble, she’s 4years younger so that makes me old too!
Monza Harry
Well-known member
Sure you can just prep the couch/dog house and or wear a cup. Don't live in fear embrace the wild beasts, and hide the sharp objects/propelled projectiles. HarryYes sir, I printed off the drawing that I found and color coded the wires as well as the labels on the cables. One thing I have left to do write down the part# on the new parts I have used. Thanks for commenting. I agree the styling is what I fell in love with. I like old beautiful things. I just can’t say that to my wife though
Not only would it get me in trouble, she’s 4years younger so that makes me old too!
OutlawDrifter
Well-known member
In for the CV front end swap on the '66 F100. My FIL has a LWB '66 F100 with Ranger trim, we have discussed doing this same swap but using a 4.6l mod motor instead.
Outlaw, I’m collecting parts right now and hopefully will be starting that at the beginning of the year. I am going through the process of organizing the job so I don’t waste time when I get started. I think I’m going to start a new thread on the truck and add highlights here. It seems like there will be a lot of info. I have a YouTube channel (Ohmthis) where I strip the factory 5.0 HO EFI harness down and build it as a stand alone harness. That will be used as well as an M5odR2 5 speed from the F150. I think the T5 is a superior transmission, but I hate where the shifter placement is in the cab with it.In for the CV front end swap on the '66 F100. My FIL has a LWB '66 F100 with Ranger trim, we have discussed doing this same swap but using a 4.6l mod motor instead.
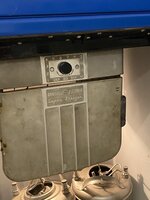
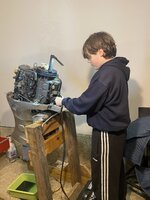
It’s been awhile since I added anything new. I work for UPS and Christmas season (we call it Peak) is always crazy. Add to that, I hurt my knee at work and I’m coming back around to feeling better. I’ve got plans, but right now I’m behind on jobs. My son wants to earn money like dad does working on other’s equipment. I got him a “side job” tuning up a 50hp Honda outboard that a client bought to replace a well worn mercury. He’s doing the work with my supervision and earning the cash. He’s 14 and I told him he’ll have more work if he’s fair on his price, does a good job, does the work in a timely fashion, and stands behind his work.
Attachments

So latest project is a feature wall in my wife’s office. She has been asking me to do this for about a year. I love spoiling her, but she has a lot of items on my honey do list and this one was down towards the bottom. So yesterday she informed me that her and a friend would be tackling this project. My wife is a hard worker, but her and tools aren’t very………………I was told if you can’t say anything nice don’t say anything at all.I helped lay out the pattern and her and I ripped the wood and cut an angled bevel on the long vertical pieces. The ladies used a level, Brad nailer, and construction adhesive to mount them. I went off to do another of my projects (I’m framing our basement) when they brought me measurements. Ummmm 4 and 4 lines is??? So I measured their pieces and cut them on the miter saw. Here’s where they left off (my wife and I finished it later tonight) they did a pretty good job!
Attachments


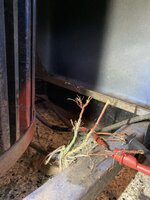
It’s been a little while, with material prices falling some we decided to go ahead and finish our basement. So I’ve been framing, pulling wire and cable, running rectangular duct and all of the branches, and roughing in the plumbing. I haven’t had much time for any other “jobs”. They are hanging and finishing drywall this week so I need to catch up on some things. My wife volunteered me for some mechanic work. One of her nurses needed a new catalytic converter and I have the lift, the tools, and ability so…….I started off by raising it up and spraying Kroil on all of the fasteners. I let it sit a day and creep in. I used a breaker bar and twisted the fasteners back and forth being careful not to twist too hard and break the bolts. After about 5-6 twist each the nuts loosened up and I was able take them off with my Milwaukee impact.
Attachments


Once the fasteners were off it was just a twisting and finagling to get the old one out. It sounded like it was full of gravel as I’m guessing the catalyst had broken up. The new converter is in, but I need to change the oil since it’s up on the lift. Then I’ll clear the code and give it a good test drive.