To avoid these ads, REGISTER NOW!

One Car Garage

wizdawg

Member
Joined
Sep 21, 2010
Messages
22
I just finished remodeling my 10'x19' garage and thought I would share some pictures. My intentions were to make the best use of my limited space in hopes to create a working garage that I could possible use one day to restore a vintage Mustang. I gave much thought into space savings and tool storage ideas, as well as lighting and electrical layout. Hopefully this could help others with 1 car garages.

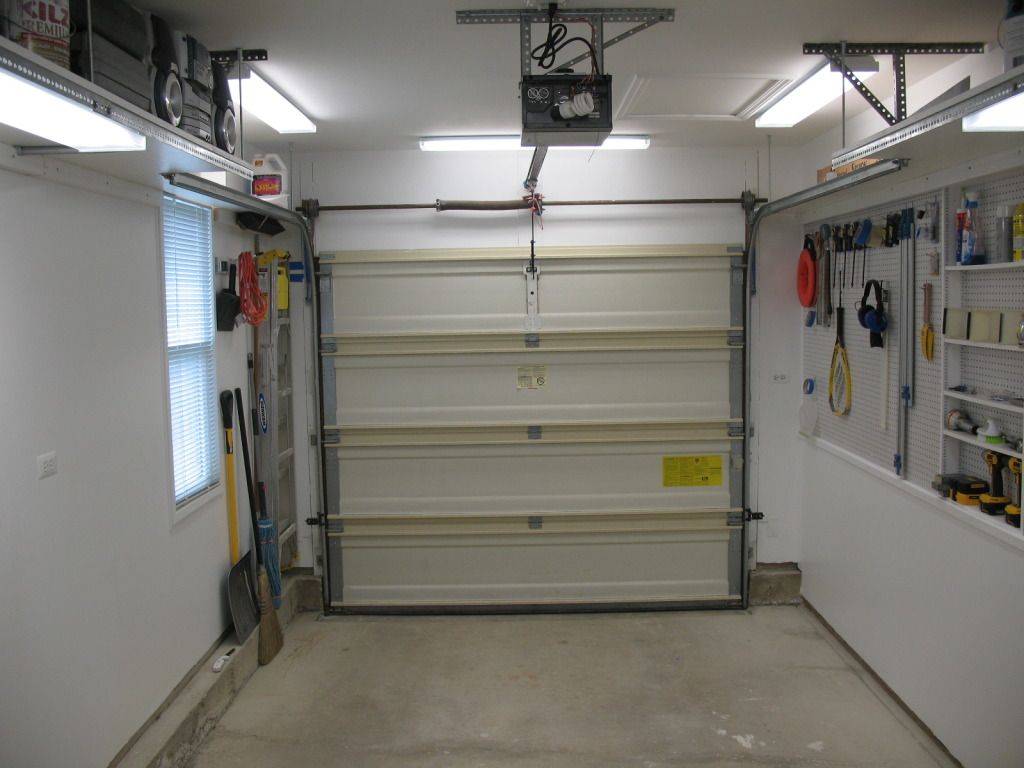
All drywall was torn down. Electrical outlets put in all 4 corners and in the middle of the 19' walls. Six 48" T8 light fixtures were installed around the perimeter of the garage. Garage door opener light remains in the center. An attic hatch was added as well as flooring and lighting in the attic. Being that the garage is only 10' wide, I did not want much on the side walls eating into workable space. Pegboard went on one side and the other side just drywall. A single, shallow, built-in shelving unit was added to the pegboard wall. Shelves that runs the length of the garage, on both sides, were installed suspended from the ceiling so people can easily walk under them without hitting their head on any shelf brackets. All outside walls were insulated. Then new drywall and all white paint to illude a bigger look. All that's missing is the vintage Mustang, :).

Before & Afters:

1a.jpg


1b.jpg


2a.jpg


2b.jpg


3a.jpg


3b.jpg


4a.jpg


4c.jpg


5a.jpg


5b.jpg


6a.jpg


6b.jpg


7a.jpg


7b.jpg


8a.jpg


8b.jpg
 
To avoid these ads, REGISTER NOW!

shopnut

Well-known member
Joined
Feb 22, 2006
Messages
4,237
Location
Florida
Great before and after shots! That white paint really brightened it up. Very nice. Do you find it more inviting to work out there now? (I know I would!)
 

UN4GTBL

Well-known member
Joined
Oct 26, 2007
Messages
434
Wow!!

Thats awesome! Gives me some inspiration to finally paint my garage!
 

Fast914

Well-known member
Joined
Jul 15, 2010
Messages
188
Location
Dartmouth, Nova Scotia Canada
Great job with the soffet storage (if that is what we call it). Really nice place to work. I plan to get some pictures up of my single car....it is still in a pretty sad state but, posts like yours give me hope. I have been lurking forever and really should become more active re pics etc. I really like how you integrated the lower wall / peg board and the chair rail....looks really clean. Grant
 

DrBobOh

Member
Joined
Sep 22, 2011
Messages
19
Excellent work. I really like how tidy and organized it all is. I wouldn't feel cramped in there at all.
 

Dan in Pasadena

Well-known member
Joined
Feb 18, 2009
Messages
13,126
Location
Pasadena, CA
Wow Wizdawg, I'm impressed. VERY nice.

I am in the middle of a total reset myself and your shelves have me wondering what you anchored that all-thread rod to above the ceiling? Is it going directly to the ceiling joists that were already there? Did you mount angle iron or something to the joists or just drill through the 3-1/2" dimension of the 2x4's?
 

Amazzen

Well-known member
Joined
Nov 24, 2011
Messages
168
Location
Southern Ontario, Canada
Very nice work.

Isn't it odd that it takes work to make a workroom? I mean with all the other rooms, the prefix is performed post build?!?

Sorry, its the meds.....
 
OP
W

wizdawg

Member
Joined
Sep 21, 2010
Messages
22
looks awesome. any plans to put a finish on the floor?

Thanks! Even thought I said I was done I do still want to add some type of baseboard. I am thinking just a black vinyl wall base as it is inexpensive and will not absorb water. As far as the floor I am undecided on finishing it. The main reason is I have some concrete issues to address 1st and I am unsure how to fix them. The foundation on the right side wall in the 1st 2 pics is chipping away, as is the area of the floor slab that meets up to it. Every time I sweep the floor or slightly bump the foundation, more small pieces crack off. Why is it doing this? Any ideas how to stop it?

20120402_211202.jpg


20120402_211306.jpg


20120402_211327.jpg
 
OP
W

wizdawg

Member
Joined
Sep 21, 2010
Messages
22
Wow Wizdawg, I'm impressed. VERY nice.

I am in the middle of a total reset myself and your shelves have me wondering what you anchored that all-thread rod to above the ceiling? Is it going directly to the ceiling joists that were already there? Did you mount angle iron or something to the joists or just drill through the 3-1/2" dimension of the 2x4's?

I used 3/8" diameter hanger bolts that I screwed directly into the ceiling joists. For the most part, the ceiling joists fell in convenient spots. But there were 1 or 2 places I added 2x4 wood, while the drywall was down, so that I would have a place to screw the anchor bolts to. I then used a coupler nut to attach the theaded rod to the machine thread half of the anchor bolt.

Metric-Hanger-Bolts2.jpg


20120211_170029.jpg


20120211_170149.jpg


20120219_133527.jpg
 

Dan in Pasadena

Well-known member
Joined
Feb 18, 2009
Messages
13,126
Location
Pasadena, CA
Wizdawg, Thanks for the nice detailed photos. I'm sure those anchor bolts are plenty strong, but then your joists are only spanning 10-12 ft, right? Not sure how I'd feel about using that approach on my 18 ft long joists. I imagine you could sit on those shelves and they would hold a 200 lb man with no problem at all.

RE: Your concrete issues. At work (I am Metro's Construction Quality Manager on the I-405 Sepulveda Pass project) we'd say that is a result of the concrete paste leaking out of the forms and leaving a rock pocket. In your case, I suspect its water damage from years and years of weather. Either way, I'd say get in there and knock all off the loose stuff you can. There are many repair products you can use. Looks for Sika products - Home Depot carries some but I'm not sure which. Another (not better, but cheaper) is to make a repair of two parts sand to one part straight cement and use a bonding agent (again Home Depot will have one). It won't last FOREVER, but it'll wok fine unless you hit it hard with car tires repetitively. Make sure you post pix of what you do!
 
Last edited:
OP
W

wizdawg

Member
Joined
Sep 21, 2010
Messages
22
Wizdawg, Thanks for the nice detailed photos. I'm sure those anchor bolts are plenty strong, but then your joists are only spanning 10-12 ft, right? Not sure how I'd feel about using that approach on my 18 ft long joists. I imagine you could sit on those shelves and they would hold a 200 lb man with no problem at all.

RE: Your concrete issues. At work (I am Metro's Construction Quality Manager on the I-405 Sepulveda Pass project) we'd say that is a result of the concrete paste leaking out of the forms and leaving a rock pocket. In your case, I suspect its water damage from years and years of weather. Either way, I'd say get in there and knock all off the loose stuff you can. There are many repair products you can use. Looks for Sika products - Home Depot carries some but I'm not sure which. Another (not better, but cheaper) is to make a repair of two parts sand to one part straight cement and use a bonding agent (again Home Depot will have one). It won't last FOREVER, but it'll wok fine unless you hit it hard with car tires repetitively. Make sure you post pix of what you do!

Yes, at the maximum, they span 10'. While I have not hung on them, they seem pretty rock solid.
 
To avoid these ads, REGISTER NOW!

Weekend_warrior

Well-known member
Joined
Feb 4, 2005
Messages
320
Location
Hearland (Forney), Tx
As for the foor.... If your going to go with paint you can get all the loose stuff around the chips and go with a quickcrete patch and then paint over it. The cracks in the curb you can chip it out a little and put a bonding agent and use an patch mix or finner sand mix.

You might have a look around quickcretes website and look for options. Once its fixed you may just want to stain and polish (cheap) or something like U coat it.
 

info2x

Well-known member
Joined
May 2, 2011
Messages
715
Location
Berkley, MI
Looks great. I must say that there are so many creative solutions in these smaller garages.

I like the pocket for the drills in the Peg board.
 

Dan in Pasadena

Well-known member
Joined
Feb 18, 2009
Messages
13,126
Location
Pasadena, CA

Wizdawg,
I continue to study your photos and noticed the shelf you ran behind the door track. Nice touch. Did you just bolt an angle iron to the backside of the track? I ask because it looks like that but I can't see any bolt heads or nuts on the visible side of the track. Any info? Closeups?
 
OP
W

wizdawg

Member
Joined
Sep 21, 2010
Messages
22
Dan in Pasadena,

It is really just like the deeper front shelves. There is a perforated angle iron screwed to the bottom of the shelf. Being that is was only about 12" deep, I only fastened the front edge to the ceiling on the 2 ends. The end nearest the garage door you can see the threaded rod to the ceiling. On the other end, I attached it with a bolt through the door track, I think right below where the door track is attached to the garage door track angle iron. It's hard to explain. There is wood available to add a threaded rod in the middle shall it start sagging, but I think it will hold up fine as is. I'll post some pics soon.
 

Mmfh

MEMBER EMERITUS
Joined
Oct 8, 2011
Messages
1,423
Location
Portland Oregon
Talk about an extreme difference, you did a great job on fixing up that garage. It was said earlier but I also really like the shelf idea in your pegboard. Nice way to get a little deeper space!

Mm
 

NewShockerGuy

Well-known member
Joined
Oct 12, 2010
Messages
2,481
Location
Northern Virginia / DC
With those anchors that you used that are double threaded, what tool did you use to actually thread them into the joist itself? I can't imaging doing that by hand as it would shred your fingers...

Garage looks freaking awesome!

Thanks,
-Nigel
 

bRIZZAd

Well-known member
Joined
Jul 18, 2011
Messages
69
Excellent use of space. The overhead shelving looks great & will certainly allow you to work on a car there without tripping over things.

With the amount of hours you'll spend in the garage fixing up a vintage mustang, you'll be glad you made this a nice space to be in. Some may argue, that is not required for working on cars - but I tend to disagree. It is the first thing you see when arriving home, and you'll be staring at those walls a lot when working on your car.
 
OP
W

wizdawg

Member
Joined
Sep 21, 2010
Messages
22
With those anchors that you used that are double threaded, what tool did you use to actually thread them into the joist itself? I can't imaging doing that by hand as it would shred your fingers...

Garage looks freaking awesome!

Thanks,
-Nigel

I used a hanger bolt driver. Like this..
165HBM6_70942.gif
 

Derrickwade

Well-known member
Joined
Jun 16, 2012
Messages
612
Location
Illinois
Ive got a quick question for ya wizdawg. How tall is your ceiling and what is the measurement between your shelves and the ceilings? Thanks
 

55cadillacking

Well-known member
Joined
Apr 26, 2012
Messages
1,959
Location
Calgary
Spectacular looking garage Wizdawg. I am most impressed with your painting talent. It looks very professionally finished. You can tell that you really took your time and did it right. Congrats.
 

alpinewhite

Well-known member
Joined
Aug 4, 2012
Messages
1,315
Location
Orange County, California, USA
Wizdawg, great-looking garage. I'm gonna copy your shelves above the tracks. Have you thought about sliding doors for them? How about some 1x3's to trim the bottom so the tracks aren't as conspicuous?

Great job.
 
To avoid these ads, REGISTER NOW!
Top Bottom