To avoid these ads, REGISTER NOW!

One man's garage project from Finland..

drivesitfar

Well-known member
Joined
Oct 23, 2013
Messages
36,037
Location
Pacific Northwest
Joni: that was far from my best cement work and my wife does the finishes so i totally understand you smiling when i questioned yours. i do like the finish and top blocks you put on your little wall. again nice job and i in no way was trying to show you up.

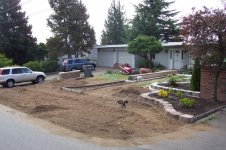
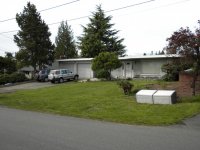
in case you might want to do curves in your walls I found that buying the composite decking in long 16 foot pieces of 1 x 6 enabled me to put in curves with my stakes. i had to do a 3 day bend on one to get it to curve close to a 90 degree bend and busted a couple boards trying to do it quicker than that. here's my big front yard project that took me 2 summers by myself and no power tools to complete. still not trying to show you up and hoping to give you a few ideas that might help you.

your garage, deck and yard look awesome and i hope it warms up a bit. what temps do you usually get in summer months?

cheers
 

Attachments

  • from street southwest.jpg
    from street southwest.jpg
    156.2 KB · Views: 88
  • pergola from street.jpg
    pergola from street.jpg
    152.1 KB · Views: 92
  • August 15th progress dirt parking strip.jpg
    August 15th progress dirt parking strip.jpg
    153 KB · Views: 84
  • Front before 3.jpg
    Front before 3.jpg
    143.8 KB · Views: 71
To avoid these ads, REGISTER NOW!
OP
J

JoniH

Well-known member
Joined
Oct 23, 2012
Messages
236
Location
Finland
Don't worry, i didn't take it like that. :) Front yard looks very nice, i might steal some ideas from those pics. I managed to find decent priced soil, so i'm expecting to make some progress after next week.
 
OP
J

JoniH

Well-known member
Joined
Oct 23, 2012
Messages
236
Location
Finland
Today's task was to finish the space behind the garage to store junk.. i mean.. things i will need some day. I have collected a bunch of leftover materials, lumber, tarps etc. by the woodshed, and those could be somewhere a little more out of sight.

So, first we need some filter fabric, because the soil near the bushes gets a bit muddy after hard rain.


And next, 47 t of 0-32mm gravel and one 50 years old Nuffield tractor


Gravel is spread and finished with a plate compactor.


It's not perfectly flat, it has some depressions here and there but for a outside storage area, it's perfect. In the future i'm planning to build some cold storage here.
 

drivesitfar

Well-known member
Joined
Oct 23, 2013
Messages
36,037
Location
Pacific Northwest
Joni: nice work on the extra storage area and hopefully that will also take care of any weeding that would have been an issue. if you still get weeds in your gravel which might be inevitable I use salt on my gravel areas instead of chemicals.

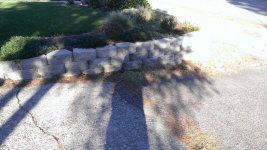
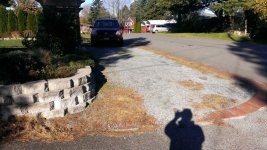
i get 25 pound bags of salt and spread it like fertilizer and here's a picture of a trouble spot i have that i no longer have to pull out weeds from. of course don't have your water run off from the gravel area go to an area like a garden or planting areas.

always fun to see what you've been up to and you seem to have the right tools for the right job too.

Cheers
 

Attachments

  • WP_20141116_004.jpg
    WP_20141116_004.jpg
    149.2 KB · Views: 75
  • WP_20141116_005.jpg
    WP_20141116_005.jpg
    152.2 KB · Views: 73

75CrewDeutz

Well-known member
Joined
May 19, 2015
Messages
78
Location
Flagstaff AZ
Joni,
Thanks for posting all the pictures and sharing your garage build with us! My ancestors as well as one sister in law and my nephews wife come from Finland. I hear explanations of the differences of building here in the states vs Finland so the pictures are very intriguing to me.

Keep up the great work. Your garage build was very nicely done, looks clean as well as quality craftsmanship.
 
OP
J

JoniH

Well-known member
Joined
Oct 23, 2012
Messages
236
Location
Finland
Thanks for the comments!

Yesterday the soil was delivered, total of 100 cubic meters. Something that has kept me busy for these two days..

I borrowed a tractor with a front loader from my friend, hoping it would ease things getting the soil up near the terrace. The lift axle was broken on the truck and hoping not to be stuck with it, he had to empty the soil so that the back wheels were on gravel. That limited the places to empty the truck, so i had to make some room for the next load.

First push..


Well, that's nice..


Time to fire up the old tractor..

Some filling up


Terrace surrounding starting to take shape, no need to go to the gym..


Finished the first round raking stones away, tomorrow i'll give it a round with the roll weight, and i'm hoping that it will be ready for planting grass seeds by monday.
 

drivesitfar

Well-known member
Joined
Oct 23, 2013
Messages
36,037
Location
Pacific Northwest
Joni: sorry i haven't checked in on your thread for a couple weeks. the yard looks great so far. have you put down the grass seed yet?

we have to either hydroseed or put some peat or light topping of top soil on top of our grass seeds to keep the birds from eating it.

good luck and keep up the great work and pictures.

cheers
 
OP
J

JoniH

Well-known member
Joined
Oct 23, 2012
Messages
236
Location
Finland
No worries, nothing much has happened in these past two weeks, other activities and we had a little vacation with the family. I did plant the seeds before the roadtrip, and it's starting to show a little growth.

Small progress in the garage today, as the sun was not shining and i needed to do some work in the attic. There's a glulam beam that is laying on top of the wall structure, so that i can lift things if needed. Originally those two points were meant to be made out of steel around the beam, but i bought a couple of 2t straps for making those lifting points.


Measured and marked the right spot with a small drillbit from the attic, bigger holes already done here..


Lifting straps in place, around the beam


And for a cleaner look, some plywood to hide those holes..


One thing to cross off from the To do-list..
 

drivesitfar

Well-known member
Joined
Oct 23, 2013
Messages
36,037
Location
Pacific Northwest
Joni: make sure there is plenty of padding on that if you little girl is going to be playing on it. or maybe you already have a plan and i'll keep quiet and just watch. how's the grass growing coming along? any pictures?

everything you do is really good quality and you seem to have some great friends with nice power tools to borrow too.

cheers
 
OP
J

JoniH

Well-known member
Joined
Oct 23, 2012
Messages
236
Location
Finland
Grass is growing.. slowly. :) i understood that it's a variety (?) that takes time to start growing, there's patches here and there. I'll post some pics when it starts to look a little better. Excavator is finished, thou the test drive is still undone.

On saturday i had some time for myself, and did a plan change when i discovered that i had no paint for the window and door frames.So, i finally got work started on the Datsun. Nothing special, just some body filler in the engine bay and sanding it, but it was a start.


This should really be done outside, or even better; by someone else..
 
OP
J

JoniH

Well-known member
Joined
Oct 23, 2012
Messages
236
Location
Finland
Something small i got done today, cleaned the garage and installed the tube lights. 9 pieces of 2x36w lights. These lights are decent priced, a little under 30e each, including the 36w tubes.


Hopefully i'll have some pics for garages at night-topic in a few weeks, when my electrician has the time to finish the wiring for them. They are wired in 3 separate rows, the sides and the center ones behind own switches.
 
OP
J

JoniH

Well-known member
Joined
Oct 23, 2012
Messages
236
Location
Finland
Weekend is near, and i'll have it all for myself! Rest of the family is heading for a few days at a cabin, so i bought something to keep me busy for those days.


My girlfriend said that when i turn 50 years old, i can buy a motorcycle. Nice!

So i have 16 years to get this lift built, better to get started then.. I'm not that sure if i'll have that much use for this, but it's more of the need to build something. This could be used as a extra working table, for welding, or just to pile up things on..

When finished, it should (hopefully) look something like this:


If someone is interested in a lift like this, there's a pdf-file you can download from here with all the measurements and parts needed. These are written in German, sorry about that.

http://www.lkw-kelkheim.de/downloads/file/4-motorradhebebuehne.html
 

Denwood

Well-known member
Joined
Sep 22, 2014
Messages
4,192
Location
Thunder Bay, Ontario, Canada
The lift straps are a great idea Joni. Your shop is shaping up very nicely indeed.

If I understood that last post correctly you are going to build your own lift? Very interested in how this works for you :)
 
OP
J

JoniH

Well-known member
Joined
Oct 23, 2012
Messages
236
Location
Finland
Denwood, that's my plan. :)

Bib Overalls, those are for the chimney sweeper, he visits once a year, and are required by building codes, depending of the hight or roof angle.
 

drivesitfar

Well-known member
Joined
Oct 23, 2013
Messages
36,037
Location
Pacific Northwest
Joni; you do awesome work. might i suggest using hex bolts instead of carriage bolts since you don't have square holes? or were you just sticking the bolt in the hole for a measurement?

great idea and i really like that is doubles as a welding table when you don't need it as a lift.

i missed the ladder, but sounds like Finland might have had a few homes burn down to put a "LAW" in place about chimney sweepers. i can't say we've had our chimneys swept more than once or twice in 30 years, but we don't use them much since we have gas heat.

keep up the great work and posting your great pictures. also if you want to post any pictures of Finland i'm sure nobody would complain either.

cheers
 
To avoid these ads, REGISTER NOW!
OP
J

JoniH

Well-known member
Joined
Oct 23, 2012
Messages
236
Location
Finland
Thanks motofool33!

Bib Overalls, i'd like to see him try to get in that way.. :)

Hi Drivesitfar, thanks! The hex was just for measurement use, normal bolts are already in place. Sweeping the chimneys has to do with home insurance also. But it's not that bad, costs about 40 euros when the sweeper does the job.

I'll have to get back on those pics from here, when i have some to post. :thumbup:

Here's something i got done today


Well, that didn't work.. there's a few brackets already missing in this pic, took them out so i could get the frame down.


I need to figure out the moving radius for the car jack, something i didn't take attention to? I got the base lined right and most of the pictures that i have seen, the car jack has been bolted solid to the frame. So the wheels have to go back on the car jack so it can move, or i'll have to change the jack for a hydraulic ram.


So back to the drawing board.. Might change the jack for a little bigger one, i have to modify the structure anyway.


While thinking of a solution for that, i made some parts ready for welding to tomorrow.
 
Last edited:

crab

Well-known member
Joined
Jan 8, 2015
Messages
940
I made a lift several years ago, first time I used it the base bent. Really didn't expect that, the arms and everything else were fine. I replaced the base with heavier angle and all was fine. It was smaller than what you're doing, actually I guess it was a motorcycle jack. Guy I did a bike for wanted it so I let him have it. I have an electric handy lift now and love it, it's a scissor lift and I also have a smaller scissor jack. If I were to build another it would be a scissor design.
 
OP
J

JoniH

Well-known member
Joined
Oct 23, 2012
Messages
236
Location
Finland
Denwood, thanks, i do have days that i don't get anything done.. :) It might be a better solution with the longer air/hydraulic ram, i could change the lifting point more near the worktop.

Hello crab, thanks for the info. I'll need to cut the tubing and change it for a stronger one, in my version it seems that the car jack needs to have some room to move forward when i lift the table. It works fine, for the first 20cm.. Now, a cup of coffee and back to work.
 
OP
J

JoniH

Well-known member
Joined
Oct 23, 2012
Messages
236
Location
Finland
A few pics from today..


Not happy how these caster mounts look, and noticed that i welded this one a little bit tilting downwards..


First test on the lifting point.. :)


As i mentioned, i hate the looks of those two caster mounts, so i decided to make the front a little different. Height is now at the lowest 23 cm and on the front end 25 cm, so it's a little bit tilted now, but i don't mind. At least it looks better now..


Did a weight test while it was on the lower setting, i'm about 90 kg and the other end didn't rise, so it seems to be firm.


At lowest, it's about 25 cm from the floor, next height is 48 cm and highest setting at 60 cm.


Making the ramp end, filling some gaps..


and done.


And a coat of semi gloss black to hide my welds.. still need to weld some supports for the table top and make the brackets for the ram.


As fun as it was to spend some time at the garage, i have about 21 hours now on this project, to be honest, i'm starting to get enough of welding.. :)
 
OP
J

JoniH

Well-known member
Joined
Oct 23, 2012
Messages
236
Location
Finland
Bought this..


..but not sure i i'll use it. Might still try to do it with the car jack. I need to keep it on it's wheels so it moves during the lift. Either way, some cutting is needed for the frame..

Found some pics of a similar lift, during the build the front legs had to be lowered a bit from the original position. It changes the angle for the legs so they should lift up easier when they won't have to be pulled up from near 2-4 degrees.

Here's a awesome drawing of what i mean.. ;)


Grizz1963

Well-known member
Joined
Jan 7, 2010
Messages
12,033
Location
Rochester, KENT. UK
Really like your place and the work you have put into it.

Space is at such a premium in the UK, so seeing what you have makes me smile a lot.

Also like the Nissan/Datsun.
 
OP
J

JoniH

Well-known member
Joined
Oct 23, 2012
Messages
236
Location
Finland
Thanks for the nice comments! I was hoping to get the Datsun painted before winter so i could concentrate on putting it back together, but at this moment that doesn't look like it's going to happen..

Still need to

-paint the floor
-buy and install electric radiators for heating
-one window is still missing from the storage room
-more insulation at the attic
-more lights
-buy the lift
-etc..
 
OP
J

JoniH

Well-known member
Joined
Oct 23, 2012
Messages
236
Location
Finland
Like i said, this got a little bit out of control.

More tubing..


I think i'll use the top frame from the old one, to keep the top a little bit lighter. But the base and legs will be done again from thicker tubing, 40x40x3mm. Like i said in a older post, i just hate the looks of it. Thicker tubing should help me to keep the frame much simpler, and now that i got the pneumatic cylinder, it would be a shame to install it on the old one.

Sometimes it's just simpler to start from the beginning.
 
OP
J

JoniH

Well-known member
Joined
Oct 23, 2012
Messages
236
Location
Finland
Started on building the frame today, a few pics from that


I think i'll weld the leg hinges below the frame, there's room and i can get the leg angle little bit bigger..

 
Last edited:

Grizz1963

Well-known member
Joined
Jan 7, 2010
Messages
12,033
Location
Rochester, KENT. UK
Joni, I am sorry, but I do not think I picked up what your day job is through your thread? I know you are about 34 and have been moving mountains in and around your home, but looking at your welding and planning of these lifts etc, I just wondered what your background is?

Thanks for the comments on my thread too, I guess there is a lot going on there :scared::D:rocker:
 
OP
J

JoniH

Well-known member
Joined
Oct 23, 2012
Messages
236
Location
Finland
No problem, i work as a longshoreman, since 2003. A few years old pic from the docks.


Prescool
Vocational scool as a car mechanic

Been around the garage from young age, thanks to my uncle.
 
OP
J

JoniH

Well-known member
Joined
Oct 23, 2012
Messages
236
Location
Finland
Some progress today, i had a free evening from babysitting.. :)

Leg mounts made and lined up..


Awesome welds! :D


I might have to cut one side open and make this a bit narrower, should have put washers between the frame and legs before welding the ram mounting piece on. If nothing else, it would save the paint from coming off while using the lift.. It works just fine like this, but knowing myself, it will annoy me every time i use it..


Support parts still missing from the bottom, and wrong bolts for the bracket


And i had to try it out, this test is done with 2 bar pressure.. Too small bolts at the legs, i have to get some longer ones tomorrow. But hey, it seems to work, for now.. by the weekend i should know will it still do that with the table mounted on it.

VIDEO

 
OP
J

JoniH

Well-known member
Joined
Oct 23, 2012
Messages
236
Location
Finland
Work and a flu have kept me busy these last days. Yesterday all i managed to do was to change the valve cover gaskets for my car. They leaked a bit oil into the spark plug holes. Took me 2 hours and a couple cups of coffee while doing it and that got me so tired.. so i had to lay down for the rest of the day.


Today i was feeling a little better, so i wandered off to the garage to continue on the lift table. First i narrowed the legs with the ram mount, added washers between the frame before welding it back together. Then started on with the supporting legs..


Some detailing along the build, looks more finished to me with no open ends.. :)


Caster mounts


I think i'll add some lenght to the top at the front end, maybe about 20-30 cm. Now when it's lifted up, it looks too short, and i can get the weight more towards the front when i have a bike on it.


Stoppers to prevent the leg support going backwards


These stop the lift from going too far up


And folded down, the height is now 23cm at lowest, and rises from 55cm up to 70 cm. Without the stoppers it would go up to 78 cm, but i don't think that's necessary.


But as i thought, the air ram don't have enough force to lift the table up anymore without a little help. As i don't have a bike yet, and this will serve as a worktable until that, the air ram will do for now. So it's time to switch over to hydraulics, with a hand pump or a separate power pack like this:


The amount of money that i have spent on this.. i might have bought a factory made version, but where's the fun in that? :)

Tomorrow i'll start on the ramp build, add some lashing points to the frame and maybe give it a coat of paint.
 
Last edited:
OP
J

JoniH

Well-known member
Joined
Oct 23, 2012
Messages
236
Location
Finland
Welded support brackets for the ram, changed the table end and added lashing points. Frame painted and assembled, still need to build the ramp.


drivesitfar

Well-known member
Joined
Oct 23, 2013
Messages
36,037
Location
Pacific Northwest
Joni: do you like the new modification with the hydraulic arm? also the green pipe that drops in to hold the table in position does it have to be that long? i see an ankle or tripping point or maybe just trim it?

You do great work and always interesting to stop in and see what you've been up to. grass growing or is that a spring project?

cheers
 
To avoid these ads, REGISTER NOW!
Top Bottom