To avoid these ads, REGISTER NOW!

One Wall at a Time Garage Renovation

Daniel Dudley

Well-known member
Joined
Sep 4, 2009
Messages
3,546
I think washing the wall with a little **** & span would have helped, then priming, taping and repriming. Looks like some kind of glossy original paint in the pictures. Gotta get the grease out, and mud sticks to flat paint better than glossy.

Seems like overkill maybe, but a problem wall will get me to do the proper prep. Also consider looking for a ''troubleshooter'' primer, or something like insulX. That stuff does not go on very painterly, but it sure sticks.
 
To avoid these ads, REGISTER NOW!
OP
Z

z28snksknr

Well-known member
Joined
Jul 8, 2009
Messages
1,827
Location
Turnersville, NJ
I think washing the wall with a little **** & span would have helped, then priming, taping and repriming. Looks like some kind of glossy original paint in the pictures. Gotta get the grease out, and mud sticks to flat paint better than glossy.

Seems like overkill maybe, but a problem wall will get me to do the proper prep. Also consider looking for a ''troubleshooter'' primer, or something like insulX. That stuff does not go on very painterly, but it sure sticks.

Thanks for the insight.:thumbup: I will definately be cleaning the last remaining wall section as well as the ceiling. You are correct the existing wall paint was glossy (although a bit muted with age and dirt I guess). Since the other wall was new plywood, I didn't have these problems. Unfortunately, since I'm now married to the tintable primer i used on the first two walls, I'll just have to prep really well on the last wall. Thanks again
 
Last edited:

Scotto

Well-known member
Joined
Apr 8, 2008
Messages
1,001
Location
South Jersey
How long you let the primer dry before you put tape on top of it? I've also found there's a big difference in quality of primers.

Looking good man :thumbup:
 
OP
Z

z28snksknr

Well-known member
Joined
Jul 8, 2009
Messages
1,827
Location
Turnersville, NJ
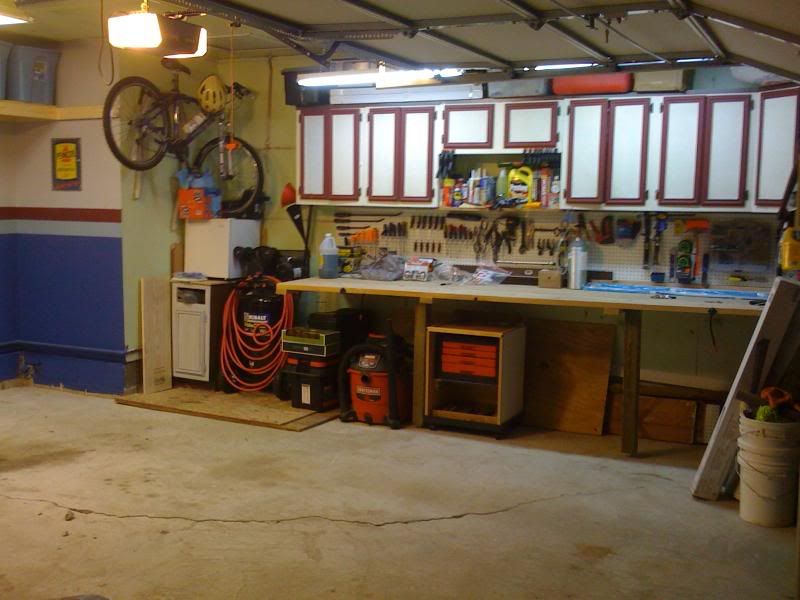
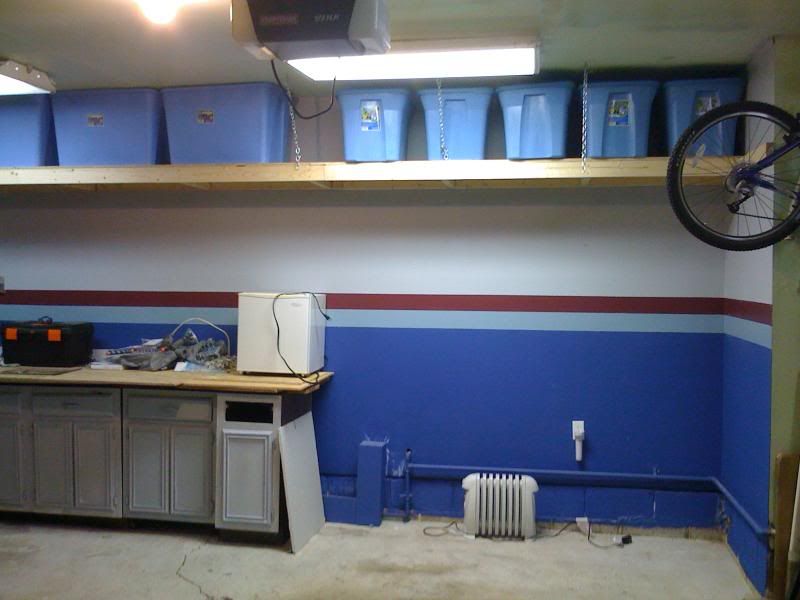
I haven't updated in a while, so here are some new pics of my progress. I added a shelf along the last wall I painted to store seasonal decorations, camping equipment, my pool supplies and equipment, and other stuff. I need to label the containers, but I am really pleased with how it turned out:
IMG_0329.jpg


IMG_0330.jpg


One of those cabinets completely disentigrated when I tried to move it (I'm talking complete de-construction), so they are on borrowed time. I'm planning on building my own soon.

I also bought some pegboard for above the workbench and got my tools out of the 5 toolboxes and onto their new home. This is the first time since building the workbench that I was able to let it fold down, so I snapped a pic:

IMG_0334.jpg


Here it is with the pegboard / tools up (the last wall I need to tackle). I should have cleaned up the bench first, but.....:
IMG_0379.jpg


I added more lighting as well, although I still need about another 4 fixtures on another circuit before I can call it "done". Here is how it looks today (right after I was told by the wife to get inside and spend time with her since it spent the entire day in the garage:lol_hitti:

IMG_0378.jpg


IMG_0380.jpg
 
OP
Z

z28snksknr

Well-known member
Joined
Jul 8, 2009
Messages
1,827
Location
Turnersville, NJ
Forgot to post costs:

Shelf lumber + totes = roughly $120.

I priced the "heavy duty" wire shelving systems and they were easily 2x the price and had a 300 lb. load limit. I can't say what mine is, but with all the totes loaded up, I can jump and hang on the shelf and it doesn't move or make a sound.

Pegboard @ Lowes = $12 / 4x8 sheet. With the accessories, spacers, and screws, I probably spent ~$75 total.

To recap, I'm into the garage renovation for about $600. I am fairly happy with my return on investment so far.

:thumbup:
 

laketrash

Well-known member
Joined
Dec 17, 2009
Messages
71
Location
Lago Vista, TX
Very impressive, that's a nice garage and for just $600 too! Very well done. Gives me hope on my ideas, right now I'm watching craigslist like a hawk for someone else doing a kitchen remodel that needs help with demo and 'haul away'. I guess I should start with a post there that says 'will work for cabinets'. :)
 

keflaman

Well-known member
Joined
Jan 22, 2006
Messages
229
Location
Waynesboro, VA
The perfect example of how you eat an elephant...one bite at a time. It inspires me to get out to the garage and get to work!

After I take my nap.
 
OP
Z

z28snksknr

Well-known member
Joined
Jul 8, 2009
Messages
1,827
Location
Turnersville, NJ
hey whats the rundown on the Camaro?

It's a '94 Z-28 with the SS hood / air box. I've bought it in 1999 (my senior year in HS) from a Secret Service agent.

It has over 260k miles on the car (130k on a NEW motor). Lots of mods, all bolt-on stuff- computer, exhaust, etc. (I've never taken the valve covers off), alot of tubular suspension pieces. Just gave the ****** a hi-po rebuild. Runs like brand new and it's more reliable than my wife's Civic. It even has (no lie) the ORIGINAL hoses! Ran 13.4 sec in 1/4 mile 3 years ago before the suspension and exhaust upgrades.

I have plans for a new engine build once I get the cash. I'll have that car for the rest of my life unless I crash it. :thumbup:
 

GregPGH

Member
Joined
Jan 1, 2010
Messages
18
Location
Butler, PA
Very nice transformation - you did a lot with little (funds that is) and the results look great. What kind of chain did you use for the overhead shelf support? I have 14' ceilings and want to build similar shelves to keep the floor underneath them free, but I also really like the "library" style ladder on a track - just not sure the two should go hand in hand if you know what I mean. If anyone has any suggestions as to whether or not that's a bad idea I'd appreciate it.

I like the "one wall at a time" approach." I stumbled across this site a few months ago and I've have been absorbing everything I can for an upcoming reorganization of my own. I'll definitely be using this approach, it helps making the project I have ahead easier to swallow (a two car garage had an adjoining 30x40 addition so I have 6 walls to tackle, less the two faced with garage doors). Once I get the ambition... there will be some posts, but for now thanks for sharing.
 
OP
Z

z28snksknr

Well-known member
Joined
Jul 8, 2009
Messages
1,827
Location
Turnersville, NJ
Thanks. I do have to say that taking it one wall at a time really makes you feel like the job is manageable and you really don't have to spend alot of money to really make a difference.

I look forward to seeing someone else try this approach on a different space.

As for the chain, I am not sure of the "size" of the chain, but I looked at the different sizes and went one step bigger than what I thought it needed. In reality, the weakest link is probably the new 2x4 lumber, not the chain since the bulk of the weight is on the wall, with the chain just holding the front edge level. For the weight I'm putting on that shelf (maybe 300 lbs max), it's pretty well overdesigned. I would be comfortable doubling the load without any issue.
 

luvmyhondas

Well-known member
Joined
Jan 8, 2010
Messages
71
Location
Cape Girardeau, MO
I finally found the time to upload pics of my workbench.

The whole thing cost me about $125 counting all hardware, soup to nuts and required maybe 8 cuts in total. It's really sturdy and doesn't even make a sound when I jump on it (200lbs). I'm pretty pleased with the design. The only thing I'm upset about is that I already filled underneath the bench with ****, so I couldn't fold it down to show you guys.

I WANT FEEDBACK!!.

I built mine to fold up and latch to the wall. I'll have to clear it off before I can take any pics, but it seemed that if I made it to fold down it would always hit whatever was underneath. Of course, now it's always got something on top, so it still never gets folded out of the way... :lol_hitti
 

SharkD

Well-known member
Joined
Apr 6, 2008
Messages
68
Location
Durham, NC
Totally OT, but your profile pic was taken at Pointe du Hoc, right?

Back on topic: what kind of fixtures are you using for overhead lighting? I too am doing a one-wall-at-a-time renovation of my single car attached garage, which currently is limping along with a single two-bulb T-12 unit.
 
OP
Z

z28snksknr

Well-known member
Joined
Jul 8, 2009
Messages
1,827
Location
Turnersville, NJ
Totally OT, but your profile pic was taken at Pointe du Hoc, right?

Back on topic: what kind of fixtures are you using for overhead lighting? I too am doing a one-wall-at-a-time renovation of my single car attached garage, which currently is limping along with a single two-bulb T-12 unit.

Yes it was. Can I ask how on earth you knew that? We were doing a tour of France and that was a stop before seeing where my grandfather was born in Le Havre.

Anyway, I bought some 4 bulb T-12 fixtures on Craigslist a while back and used two in the garage (the rest went to my basement). I have 2 other, 2 bulb T-12 fixtures from Lowe's ($9 each on sale) above my workbench. I plan on adding 4 more T-12 fixtures (2 in each "bay") on another switch so I can have general lighting and work surface lighting.

Hope that helps.
 

expatriated

Well-known member
Joined
Mar 22, 2009
Messages
1,571
Location
SE of Disorder
Just stumbled on this thread. Great job! I like to see these regular-sized garages like mine get redone and organized.

Nice colors, too. I remember the days of watching Mike Schmidt at the old Vet. :)
 
To avoid these ads, REGISTER NOW!

3bay

Well-known member
Joined
Dec 29, 2007
Messages
157
Location
Indiana
That flex dryer pipe makes me cringe! A friend of mine lost a 150K house and everything in it last year due to a little 3 foot piece of that pipe!
 

sams

Well-known member
Joined
Apr 7, 2010
Messages
266
Location
S.E Victoria, Australia!
Well I thought I would bring back this old thread, are you still planning on making your own cupboards?

While the stripped wall is not something I personally am into I do really like the storage shelf you made overhead. It's a great way to get a bulk amount of space in a small area that's normally wasted.
 
OP
Z

z28snksknr

Well-known member
Joined
Jul 8, 2009
Messages
1,827
Location
Turnersville, NJ
Well I thought I would bring back this old thread, are you still planning on making your own cupboards?

While the stripped wall is not something I personally am into I do really like the storage shelf you made overhead. It's a great way to get a bulk amount of space in a small area that's normally wasted.

Yeah, it's been a while since I could find the time to work on the garage. We are expecting our first born in a few months, so things got re-prioritized pretty quickly and the garage budget was the first to get axed. :( :mad:

The plan remains though - I want to replace those cabinets with plywood cabinets, finish the paint job on the walls, paint the ceiling, install a few more lights, and then build a shed to house all the stuff that's hanging on the wall. :beer:
 

Bull

Super Moderator
Joined
Dec 12, 2005
Messages
16,189
Location
MA
First of all, congrats on the baby! Ours is ten months old now. It's the greatest thing you will ever do, becoming a dad.

How is the mud holding up on the plywood joints? I am going to tackle my own barn one wall at a time this summer (at least part of it) and am leaning towards plywood/OSB for the walls instead of drywall.
 

ChristopherLutz

Well-known member
Joined
Jun 17, 2010
Messages
270
Location
Flower Mound, TX (DFW)
I'm fairly new to the GJ - really enjoyed the thread.

Your shelf with chains on the front...can you walk through the steps of how you attached the chains and kept it level?

I get that it's achored to the wall in the back, don't remember if you lagged or used a ledger board...just trying to figure out how you put the chains on?

Measure out from the ceiling with the eye hook into ceiling joists? Looks like it would be hard to keep it all level.

By the way, the garage looks great, and I like the way you hung the floor jacks and jackstands...any special hanging gear there?
 
OP
Z

z28snksknr

Well-known member
Joined
Jul 8, 2009
Messages
1,827
Location
Turnersville, NJ
First of all, congrats on the baby! Ours is ten months old now. It's the greatest thing you will ever do, becoming a dad.

How is the mud holding up on the plywood joints? I am going to tackle my own barn one wall at a time this summer (at least part of it) and am leaning towards plywood/OSB for the walls instead of drywall.

Thanks!! I'm looking forward to it - the wife is just starting to show now.

As for the walls, not a single crack in the mud at all. It has held up well so far.

I'm fairly new to the GJ - really enjoyed the thread.

Your shelf with chains on the front...can you walk through the steps of how you attached the chains and kept it level?

I get that it's achored to the wall in the back, don't remember if you lagged or used a ledger board...just trying to figure out how you put the chains on?

Measure out from the ceiling with the eye hook into ceiling joists? Looks like it would be hard to keep it all level.

By the way, the garage looks great, and I like the way you hung the floor jacks and jackstands...any special hanging gear there?

I used a ledger board to attach to the wall, assembled the frame of the shelf on the floor and then raised it up and attached it to the ledger (I had help). I had the eye hooks installed in the shelf ahead of time, and had the chains hanging from the ceiling from the eye hooks prior to lifting it into place. Once I got it up and the chains hooked, I put a level on the shelf and turned the eye hook in the ceiling until it was level. I did that with each of the 4 chains. Super easy and really strong. It's fully loaded up now and I'd not think twice about hanging off it.

Thanks for looking!:beer:
 

formek

Well-known member
Joined
Feb 1, 2011
Messages
519
Location
Wylie, TX
Here are pics of the finished plywood. The seams were pretty darn tight, although there was some edges and unevenness of the cuts (used a circular saw without a guide, just a line). It's all in how particular you get, but since I was painting the wall, I chose to mud the seams and screw holes.

What did you ues to to mud the plywood?

PS
looks great
 

V-10 Killer

Well-known member
Joined
Feb 11, 2007
Messages
1,011
Location
Midland, MI
Nice build man, it's good to see small budgets don't deter people from having fun :)
I've wondered in the past about how plywood would look if you skimcoated the whole sheet with drywall mud, that would hide almost all of the grain pattern.
And I know how you feel about the tape peeling the paint. I've had it happen on 3 seperate rooms in my house (blue 3M painters tape).
 
To avoid these ads, REGISTER NOW!
Top Bottom