You are using an out of date browser. It may not display this or other websites correctly.
You should upgrade or use an alternative browser.
You should upgrade or use an alternative browser.
One year later 40'x80'
- Thread starter fnieto
- Start date
zmotorsports
ALLIANCE MEMBER
Paco, now that you have had your RapidAir system installed for a while what is your impression? Do you like it or would you have done something different?
I have sweated copper in my current shop but have been thinking about the RapidAir system in my new shop when that time comes.
Thanks.
Mike.
I have sweated copper in my current shop but have been thinking about the RapidAir system in my new shop when that time comes.
Thanks.
Mike.
Hi Mike,
The Fast pipe has been in service for 2.5 years with no leak downs. I would use the system again in a heart beat. I would recommend using a quality QD though. I'v been using CEJN (Swedish made) one hand connection and they have worked flawlessly. A little pricy compared to many ($12-14), but worth it.
The fast pipe system is nicer than the rapid pipe sold in coils as are the fittings. The 1" rigid sections are easily manipulated with a conduit bender although I have never bent past 15*.
Attachments


gasgas17
Well-known member
I started replacing all our QD's at work and home with the same units you use. Nothing else available around here even compares. It's nice to just slide them together with ease.
zmotorsports
ALLIANCE MEMBER
Hi Mike,
The Fast pipe has been in service for 2.5 years with no leak downs. I would use the system again in a heart beat. I would recommend using a quality QD though. I'v been using CEJN (Swedish made) one hand connection and they have worked flawlessly. A little pricy compared to many ($12-14), but worth it.
The fast pipe system is nicer than the rapid pipe sold in coils as are the fittings. The 1" rigid sections are easily manipulated with a conduit bender although I have never bent past 15*.
Have you found 1" to be too large a line or not? I currently have 3/4" copper along the mains dropping down to 1/2" copper laterals which seem to work perfectly so I am just curious.
Thanks Paco.
Mike.
Mike,
The decision to use 1" was due to the size of the system (two kits) and the rigid pipe is only available in 1" min. The 1" adds another 9-10 gallons to the overall system and works well to provide volume to the farthest point where the plasma table is located. What kind of issues would one have with a larger diameter system?
Yea, I really like the QD's
zmotorsports
ALLIANCE MEMBER
Mike,
The decision to use 1" was due to the size of the system (two kits) and the rigid pipe is only available in 1" min. The 1" adds another 9-10 gallons to the overall system and works well to provide volume to the farthest point where the plasma table is located. What kind of issues would one have with a larger diameter system?
Yea, I really like the QD's
Thanks Paco. I'm just trying to get my ducks in a row for the new shop.
Mike.
shortykorte
Well-known member
Insulation.
R-30 wall and ceiling. wired in and scrim sheet finish.
Thermal break 2" tape was placed on red iron prior to securing roof sheets. This should prevent condensation between sheets and perlins.
3/4" plywood 8' up and along the entire perimeter was used for solid anchoring.
Taped, textured, primed and painted.
I have a similar building and I'm investigating insulation. I would appreciate more information on the insulation used in the ceiling and upper wall area. A closeup picture of how it is attached would be great also.
Just went through your thread. Wow!
Thanks
Last edited:
zmotorsports
ALLIANCE MEMBER
Just went through your thread. Wow!
Thanks
WOW is right Shorty. Paco's shop is freaking amazing.
Mike
Thanks Mike and Shorty,
As far as the insulation, its a 10" batt that comes in large rolls and stuffed into an 8" deep space providing R-30 rating. This was used on all areas including the lower portion of the walls that are covered by 3/4" BC plywood. Clips are driven into the edge of the red iron to secure the wire and firer reinforced scrim sheet.
As far as the insulation, its a 10" batt that comes in large rolls and stuffed into an 8" deep space providing R-30 rating. This was used on all areas including the lower portion of the walls that are covered by 3/4" BC plywood. Clips are driven into the edge of the red iron to secure the wire and firer reinforced scrim sheet.
Attachments


Last edited:
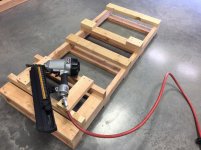
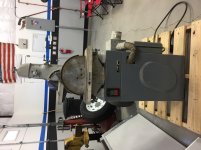
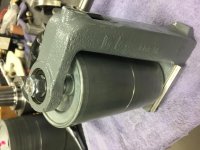
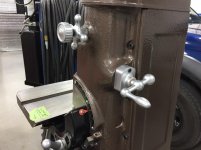
I finished this restoration a few months ago. Its a 1983 Rockwell/Delta that came out a local HS wood shop bought via online auction.
It had the typical groove damage found on these older finishing machines due to poor tracking. All bearings (motor included) replaced as well as new idler shaft (upper roller).
Its a 1.5HP 230 volt single phase unit.
Before:
It had the typical groove damage found on these older finishing machines due to poor tracking. All bearings (motor included) replaced as well as new idler shaft (upper roller).
Its a 1.5HP 230 volt single phase unit.
Before:
Attachments


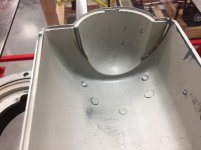
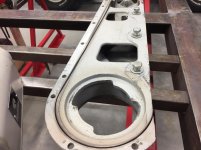
The damage found (typical). Deep groove in the main cast body, groove though part of the upper guard and worn upper idler shaft. Tore down entire machine presses out old bearing, reamed trunnions for smoother action and stripped all machine mating surfaces of factory paint.
Attachments


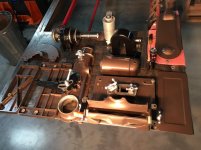
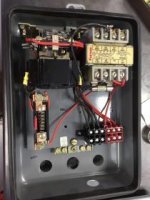
Curing under heat lamps gave me chance to tear into the motor and inspect and replace the bearings. I also worked on the electrical enclosure as well a lower cabinet. The lower cabinet was shot with silver hammer tone. The black components where shot with left over epoxy paint I used on a 70 GTO frame (a long time ago). This brings up a good shop tip, I have been using inert mig gas to purge paint cans prior to closing and storing on the shelf. The black paint was last used in 2005, yea, 12 years ago.
Attachments


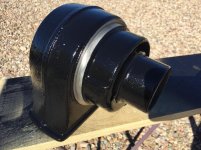
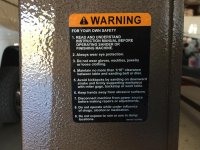
The enclosure and cabinet painted, also rebuilt the on/off switch prior to machine assembly. I was able to find a new warning label to complete the restoration.
A manual was down loaded and hard folder created as I do with all of my machines when purchased used. I service everything I own so manuals are important to and have a decent library consisting of binders.
A manual was down loaded and hard folder created as I do with all of my machines when purchased used. I service everything I own so manuals are important to and have a decent library consisting of binders.
Attachments


zmotorsports
ALLIANCE MEMBER
Turned out great Paco.
I have the same one but just a few years newer. I think the newer ones have the plastic top cap on the belt as well as plastic knobs. Mine is just old enough to still have the cast top cap and the cast aluminum handles and knobs. If memory serves it is early 90's, I purchased it new.
Great job on the restoration Paco.
Mike
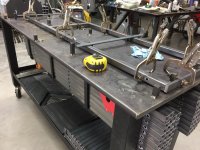
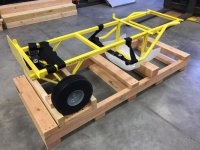
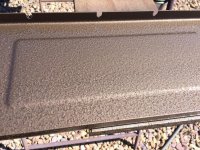
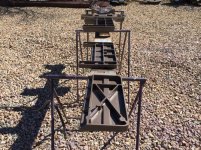
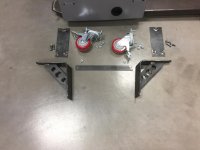
Next up, castors. I have most of my machines on castors with exception to machining equipment. This really helps in reconfiguring for different type of production runs of those odd ball size jobs as well as cleaning up.
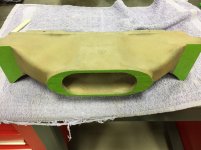
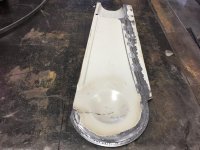
The rear of the machine cabinet tapers towards to top 15º,while the front of the machine is 90º. Used the iron worker to shear, notch and break the 1/4" flat bar into the desired brackets. Toe locking swivel castors where used and found on eBay for under $30. I used same ones on the heavier cold saw several years back and they are holding up great. Carful measurement where taken to ensure to keep the machine as close to the ground as possible as I din't wast to change the working hight of the machine. I also made some 1/8" thick backing plates with welded capture nuts to sandwich the cabinet preventing "oil canning". The cabinet is only 16 or 18 gauge. A 1" flat strap spreader was added to the rear castor mounts because of the large motor opening was creating a slight flex when rolling around.
The rear of the machine cabinet tapers towards to top 15º,while the front of the machine is 90º. Used the iron worker to shear, notch and break the 1/4" flat bar into the desired brackets. Toe locking swivel castors where used and found on eBay for under $30. I used same ones on the heavier cold saw several years back and they are holding up great. Carful measurement where taken to ensure to keep the machine as close to the ground as possible as I din't wast to change the working hight of the machine. I also made some 1/8" thick backing plates with welded capture nuts to sandwich the cabinet preventing "oil canning". The cabinet is only 16 or 18 gauge. A 1" flat strap spreader was added to the rear castor mounts because of the large motor opening was creating a slight flex when rolling around.
Attachments


Turned out great Paco.
I have the same one but just a few years newer. I think the newer ones have the plastic top cap on the belt as well as plastic knobs. Mine is just old enough to still have the cast top cap and the cast aluminum handles and knobs. If memory serves it is early 90's, I purchased it new.
Great job on the restoration Paco.
Mike
Thanks Mike,
I have been wanting one for a long time. They make quick work in finishing. I traced this machine's serial number to its origins, built in Canada with all SAE hardware. I'm working out a recovery system to keep thing cleaner when using, but working regular work week is killing me as the weekends are too short.
zmotorsports
ALLIANCE MEMBER
Thanks Mike,
I have been wanting one for a long time. They make quick work in finishing. I traced this machine's serial number to its origins, built in Canada with all SAE hardware. I'm working out a recovery system to keep thing cleaner when using, but working regular work week is killing me as the weekends are too short.
Agreed Paco. I would say it is probably one of the most used tools when a fabrication project is going on. Seems like there is always a burr that needs removing or a corner to be knocked down or rounded. I use the hell out of my combinations belt/disc sander.
Again, GREAT job Paco.
Mike
69bigblok
Well-known member
Wow love this build! My dream would be to have that kind of expansive space. I love the paint scheme. Well done sir!
Thanks man!
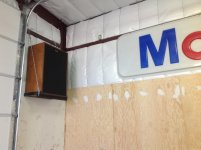
Its been a journey to say the least. The added space is very nice indeed. The paint scheme doesn't seem to get old and goes well with the machines. The 10" black line serves a purpose in hiding paw prints as its centered with all receptacles/plugs and switches.
Its going on three years and I still need to build shop items, never stops.
Thanks for looking and your comments are appreciated.
shortykorte
Well-known member
Thank you for the info on the insulation especially the use of the scrim material. I see a couple of uses for scrim.
The sander turned out awesome. The caster brackets have been filed. Thanks!
The sander turned out awesome. The caster brackets have been filed. Thanks!
Your very welcome Shorty,
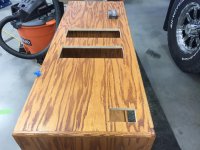
In an effort to keep the shop tunes running cooler, we added a some cooling fans to the lower portion of the cabinet (next to the amps). I use to leave a door open and point a fan when in use but this would result in dusting.
I found the AC Infinity site on eBay and purchased a basic fan kit with controller and picked up a second fan from a private seller (NIB) for well under MSRP.
The controller can support several fans and uses a sensing probe. The fans where disassembled and reversed to pull air in while the cabinet lower/middle rear vent holes where covered up only leaving the upper holes. The controller is programmable and very versatile. Heres a link, http://www.acinfinity.com
The components remain much cooler and cleaner now.
I considered painting the cabinet red and slapping a Snap-On badge on the front top left edge but my son talked me out of it. What say you guys?
Attachments


shortykorte
Well-known member
IMO, Keep cabinet as is.
Sent from my iPhone using Tapatalk
Sent from my iPhone using Tapatalk
LXCam,
Thanks for looking, I need to improve on posting more often. It seems I forget to take photos when working alone and after long days, I fail to follow through.
Thanks for the feedback Shorty. So far 2:1 in favor of living the cabinet as is.
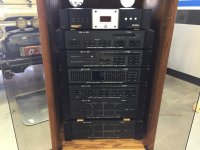
My taste for quality tunes started back in HS when a buddy's older brother had recently returned from Germany after serving in the Army. He had a beautiful sound system. I started collecting myself while serving in the Navy and still dabble in vintage systems.
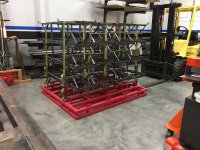
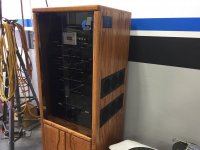
The speakers (82 Klipsch Cornwalls) where gifted to my in rough shape by a good friend who was on his way to the dump. His ex wife had many house cats as well as plants sitting on top of the cabinets. They where in such bad shape I almost turned them down but felt obligated to take them as he went out of his way to offer them to me. They sat in the corner of the old shop for almost seven years (airing out).
Once the new shop was "dried in", I began to restore them. This was the first project done in the new shop. The cabinets where sanded, stained and polyurethane coated. The grill fabric was found on line (OEM) as was a missing badge. The crossovers where fitted with updated capacitors and the new wall mounts fabricated. The horn tweeter, squawkers and base where in pristine condition. The serial numbers are two digits apart. The SAE rack system was traded for labor.
Thanks for looking, I need to improve on posting more often. It seems I forget to take photos when working alone and after long days, I fail to follow through.
Thanks for the feedback Shorty. So far 2:1 in favor of living the cabinet as is.
My taste for quality tunes started back in HS when a buddy's older brother had recently returned from Germany after serving in the Army. He had a beautiful sound system. I started collecting myself while serving in the Navy and still dabble in vintage systems.
The speakers (82 Klipsch Cornwalls) where gifted to my in rough shape by a good friend who was on his way to the dump. His ex wife had many house cats as well as plants sitting on top of the cabinets. They where in such bad shape I almost turned them down but felt obligated to take them as he went out of his way to offer them to me. They sat in the corner of the old shop for almost seven years (airing out).
Once the new shop was "dried in", I began to restore them. This was the first project done in the new shop. The cabinets where sanded, stained and polyurethane coated. The grill fabric was found on line (OEM) as was a missing badge. The crossovers where fitted with updated capacitors and the new wall mounts fabricated. The horn tweeter, squawkers and base where in pristine condition. The serial numbers are two digits apart. The SAE rack system was traded for labor.
Attachments


Last edited:
zmotorsports
ALLIANCE MEMBER
Holy **** Paco, I thought I had a pretty nice sound system. Nothing like yours.
Love it.
Mike
Love it.
Mike
BoilermakerFan
Well-known member
LXCam,
Thanks for looking, I need to improve on posting more often. It seems I forget to take photos when working alone and after long days, I fail to follow through.
Thanks for the feedback Shorty. So far 2:1 in favor of living the cabinet as is.
My taste for quality tunes started back in HS when a buddy's older brother had recently returned from Germany after serving in the Army. He had a beautiful sound system. I started collecting myself while serving in the Navy and still dabble in vintage systems.
The speakers (82 Klipsch Cornwalls) where gifted to my in rough shape by a good friend who was on his way to the dump. His ex wife had many house cats as well as plants sitting on top of the cabinets. They where in such bad shape I almost turned them down but felt obligated to take them as he went out of his way to offer them to me. They sat in the corner of the old shop for almost seven years (airing out).
Once the new shop was "dried in", I began to restore them. This was the first project done in the new shop. The cabinets where sanded, stained and polyurethane coated. The grill fabric was found on line (OEM) as was a missing badge. The crossovers where fitted with updated capacitors and the new wall mounts fabricated. The horn tweeter, squawkers and base where in pristine condition. The serial numbers are two digits apart. The SAE rack system was traded for labor.
Wow! Cornwalls... in a shop! Sweet!

Capt Chrysler
Well-known member
fnieto, how's the weather? A friend of mine lost the roof on his Arizona room.
Capt. Chrysler
Capt. Chrysler
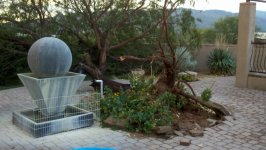
Monsoons have been visiting daily this past week. Sunday we got 2" in just under an hour with high wind and 3/8- 1/2" hail. The flip side is, temp drops to mid to high 80's after a storm. The wind is the most damaging, we can prepare for water but the wind effects are lasting. We lost this tree in our back yard doing a monsoon storm (micro burst) four years ago. Took me a month to clear out including stump. During that month I lost my grass and plants from the water line that was pulled by the rootball. I hope you friend has insurance at the very least.
Attachments

Capt Chrysler
Well-known member
He has good coverage, so far. As we all know. You never know how good till your done.
I also sent you a PM.
Capt. Chrysler
I also sent you a PM.
Capt. Chrysler
rattle_snake
Well-known member
Those original capacitors are giant (physical) sized! Assuming they are non polarized electrolytic (back to back), were they still functional? Do the expensive film caps sound any different?
Interesting the woofer is out of phase from the others for 2nd order filters.
They came out very nice.
How loud are the fans you installed in the audio equipment rack? My big amp (650/ch) is force cooled with a 2 speed fan system and makes a bunch of noise...
Interesting the woofer is out of phase from the others for 2nd order filters.
They came out very nice.
How loud are the fans you installed in the audio equipment rack? My big amp (650/ch) is force cooled with a 2 speed fan system and makes a bunch of noise...
Last edited:
Those original capacitors are giant (physical) sized! Assuming they are non polarized electrolytic (back to back), were they still functional? Do the expensive film caps sound any different?
Interesting the woofer is out of phase from the others for 2nd order filters.
They came out very nice.
How loud are the fans you installed in the audio equipment rack? My big amp (650/ch) is force cooled with a 2 speed fan system and makes a bunch of noise...
Yup, the original electrolytic caps where big. The speakers sounded pretty darn good but with the caps being 32 years old and speakers stored in a hot garage for seven years, I felt they might be on the dry side so I decided to replace them. They sound as good with the smaller film style caps as with the large wet caps.
The fans are very quiet and are also multi speed. If you check out the link I posted earlier, I'm sure they specify the db level.
Thanks for looking.
PLOWJEEP
Well-known member
Paco, I'm not envious of your shop, I'm envious of your skills. I could have a shop just like yours and still not be able to build what you do. Enjoy your shop in good health. I am sure that you worked hard to obtain , not only your shop , but your abilities.
Thanks for sharing , Brian
Thanks for sharing , Brian