To avoid these ads, REGISTER NOW!

One year later 40'x80'

OP
F

fnieto

Well-known member
Joined
Aug 27, 2013
Messages
1,401
Location
Tucson,Arizona
Great job Paco. I got a chuckle out of your hub cap driver, I made one about 15 years ago when I was working on a lot of snowmobile, ATV and race trailers for people. Mine is much smaller in diameter though.

Looks like you’re trying to wear that lathe out before the new one is set up. [emoji12]

Hey Mike, every time I serviced a trailer requiring those dust cover to be installed, I muck them up. I cant tell you how many over the years. I always tell my self I'm gonna make a cap driver after mushing one. Well finally did it. I suppose the new cap on the shelf will last me a while now.
Yeah, I like running that machine:bounce:
Your surge tank turned out beautiful:beer:
be well Mike
 
To avoid these ads, REGISTER NOW!
OP
F

fnieto

Well-known member
Joined
Aug 27, 2013
Messages
1,401
Location
Tucson,Arizona
Serviced the Dmax yesterday in preparation for the long haul on Thursday.
I changed out the two fuel filters and Allison filter as well as a detailed inspection. I also packaged up the machine for the return trip to Acra.

On the secondary fuel filter, I added this back when the truck was brand new. It sits atop of the engine where a second ac compressor could be ran and is plumbed pre OEM. I also added a brass T-valve where the bleed screws once lived. Nothing special about the T-valve, Its the same as you might find under the kitchen sink used to provide a water supply to say an ice maker. A bleed line makes it easy to keep diesel off the exhaust manifold when priming.
 

Attachments

  • IMG_2726.jpg
    IMG_2726.jpg
    138.7 KB · Views: 176
  • IMG_2737.jpg
    IMG_2737.jpg
    129.7 KB · Views: 122
  • fullsizeoutput_649.jpg
    fullsizeoutput_649.jpg
    13.1 KB · Views: 129
  • IMG_2735.jpg
    IMG_2735.jpg
    138.5 KB · Views: 149
  • fullsizeoutput_64c.jpg
    fullsizeoutput_64c.jpg
    18.4 KB · Views: 161
  • IMG_2733.jpg
    IMG_2733.jpg
    138.5 KB · Views: 175
  • IMG_2732.jpg
    IMG_2732.jpg
    140.7 KB · Views: 180
OP
F

fnieto

Well-known member
Joined
Aug 27, 2013
Messages
1,401
Location
Tucson,Arizona
Draped moving quilts over the original shrink wrap on each end and three more over the center, then tucked all the corners much like you would wrapping a box keeping everything neat and flat. A **** ton of shrink wrap kept it all in place, the the tarp was added dressed up to ensure the corners where tucked facing to the rear in a manner to keep the wind from lifting at highway speeds. Finally the tarp was secured using nylon soft strapping. I plan on packaging the replacement machine in the same manner for the return ride. All the pallet bolts where finger loose, so I tightened them all up. I suppose the wood shrunk a little after drying out resulting in loose bolts. I'll be checking the replacement machines pallet bolts prior to packaging.

Off to work now, thanks forsaking a peek.
Paco
 

Attachments

  • IMG_2746.jpg
    IMG_2746.jpg
    140.8 KB · Views: 96
  • IMG_2744.jpg
    IMG_2744.jpg
    137.2 KB · Views: 99
  • IMG_2743.jpg
    IMG_2743.jpg
    143.8 KB · Views: 108
  • IMG_2742.jpg
    IMG_2742.jpg
    137.4 KB · Views: 104
  • IMG_2741.jpg
    IMG_2741.jpg
    140.6 KB · Views: 108
  • IMG_2738.jpg
    IMG_2738.jpg
    141.1 KB · Views: 110
  • IMG_2701.jpg
    IMG_2701.jpg
    144.2 KB · Views: 116

zmotorsports

ALLIANCE MEMBER
Joined
Oct 20, 2009
Messages
21,338
Location
Northern Utah
Good luck on your drive/trip Paco. Hope all goes well and safe for ya.

Looking forward to seeing that huge lathe all set up and making chips.
 

LXCam

ALLIANCE MEMBER
Joined
Apr 23, 2013
Messages
19,092
Location
AZ
Dang paco, as always everything you got going on is very impressive. Hey I noticed you're headed out my direction in two days. If anything should go sideways and you need a hand don't hesitate to reach out. My shop is always open for emergencies;)

Good luck on your trip, Cam
 
OP
F

fnieto

Well-known member
Joined
Aug 27, 2013
Messages
1,401
Location
Tucson,Arizona
Dang paco, as always everything you got going on is very impressive. Hey I noticed you're headed out my direction in two days. If anything should go sideways and you need a hand don't hesitate to reach out. My shop is always open for emergencies;)

Good luck on your trip, Cam

Thanks so much Cam, Its nice to know I'm not completely on my own should I need help. Very kind of you sir.
Keep an eye out for a PM should I reach out.
Thanks again and by the same token, If your ever in Tucson, feel free to give me a holler.
Take care,
Paco
 
OP
F

fnieto

Well-known member
Joined
Aug 27, 2013
Messages
1,401
Location
Tucson,Arizona
Loaded and ready to head out in the early morning hours. Six 2" nylon heavy duty ratchet straps securing the load. Three through the timber and three over the machine. Two spare trailer tires and two spare rig tires among extra provisions. "Better to have it and not need it, than need it and not have it". I'll post back on Friday when I unload the new machine.
Take care fellas.
Paco
 

Attachments

  • IMG_0274.jpg
    IMG_0274.jpg
    137.3 KB · Views: 146
  • IMG_0273.jpg
    IMG_0273.jpg
    142.9 KB · Views: 141
  • IMG_0272.jpg
    IMG_0272.jpg
    142.7 KB · Views: 146
  • IMG_0271.jpg
    IMG_0271.jpg
    143.3 KB · Views: 158

zmotorsports

ALLIANCE MEMBER
Joined
Oct 20, 2009
Messages
21,338
Location
Northern Utah
Loaded and ready to head out in the early morning hours. Six 2" nylon heavy duty ratchet straps securing the load. Three through the timber and three over the machine. Two spare trailer tires and two spare rig tires among extra provisions. "Better to have it and not need it, than need it and not have it". I'll post back on Friday when I unload the new machine.
Take care fellas.
Paco

Travel safe Paco and looking forward to seeing the new lathe.
 
OP
F

fnieto

Well-known member
Joined
Aug 27, 2013
Messages
1,401
Location
Tucson,Arizona
I rolled in at 10:40pm. Took a shower and hit the hey. I actually slept in to 05:30 and feel better after a cup of mud. All I can say is some CA drivers are d**ks. Encountered three bad MVC on the way home including a fiery crash that claimed a large motor home and what looked like a bada$$ boat. It too was badly burned.
I departed at 2 am and stopped for fuel and one gas cap at Auto zone. Spent 2.5 hours at Acra packaging up the machine. I only ate the snacks Mrs.firestopper packed as she had instructed me to stop and eat.;)
I pushed my rig pretty hard over the steep passes with EGT reaching 12-1,300º requiring down shifting raising the RPM's 25-2,600 reducing the gas temps. She ran great pulling the heavy load.
Inside ACRA and some travel stats.
I averaged 14.6MPG but was pushing the rig a little.
Another long day today as I need to unload everything and unpack the machine.
More picture later.
Thanks for the well wishes and a special thanks to LXCam whom invited me to lunch and offered any assistance as he's close to the area. With the grace of God and time limited, I was back on the road without drama, but Cam offered a piece of mind none less.
In closing, I was able to work a discount on a taper attachment for the 1640.
Buy once, cry once......

Paco
 

Attachments

  • IMG_2757.jpg
    IMG_2757.jpg
    147.7 KB · Views: 264
  • IMG_2760.jpg
    IMG_2760.jpg
    142.1 KB · Views: 297
  • IMG_2765.jpg
    IMG_2765.jpg
    120.1 KB · Views: 188
  • IMG_2764.jpg
    IMG_2764.jpg
    122.4 KB · Views: 198
  • IMG_2762.jpg
    IMG_2762.jpg
    119.4 KB · Views: 220

zmotorsports

ALLIANCE MEMBER
Joined
Oct 20, 2009
Messages
21,338
Location
Northern Utah
Glad you made it back safely and got at least a little rest Paco.

Now get your *** to work setting up that lathe, we want to see more pictures.:rocker:
 

LXCam

ALLIANCE MEMBER
Joined
Apr 23, 2013
Messages
19,092
Location
AZ
Kickass paco, I'm glad you made thru the entire ordeal safe and sound. And your right about our traffic morons out here, there's an endless amount of them. Most days I average 200-300 miles of running around to various projects and one of these days there's a good chance I'll end up having my 15 minutes of fame :FIREdevil:rant:

Get some rest and let's see some pics!! :beer:
 
OP
F

fnieto

Well-known member
Joined
Aug 27, 2013
Messages
1,401
Location
Tucson,Arizona
Glad you made it back safely and got at least a little rest Paco.

Now get your *** to work setting up that lathe, we want to see more pictures.:rocker:

Thanks Mike, it was a long day.
After just a few hours of sleep, we walked the hell hounds and I unloaded the trailer and put the truck away. Unpacked the machine and have been in heaven ever since. What a nice quality machine.
I'll post up photos tomorrow morning, too tired after spending 12+ hours cleaning and inspecting. Short of the long is I'm very very happy.
Paco
 
OP
F

fnieto

Well-known member
Joined
Aug 27, 2013
Messages
1,401
Location
Tucson,Arizona
Kickass paco, I'm glad you made thru the entire ordeal safe and sound. And your right about our traffic morons out here, there's an endless amount of them. Most days I average 200-300 miles of running around to various projects and one of these days there's a good chance I'll end up having my 15 minutes of fame :FIREdevil:rant:

Get some rest and let's see some pics!! :beer:

Thank you Cam, White knuckle driving for sure, Funny thing is, I was very nervous driving up but relaxed on my way home. Probably due to the machine belonging to Acra on the way up and mine on the way home. If I wasn't hauling, I would have kept up with the whack jobs on the road.:3gears:
Thanks agin for your generous offer.
Take care,
Paco
 
OP
F

fnieto

Well-known member
Joined
Aug 27, 2013
Messages
1,401
Location
Tucson,Arizona
Ok, so far I have yet to find anything unimpressive about the machine. even the cosmoline was applied only where needed and not overdone making it much easier to clean. The backsplash,electrical cabinet and foot break are textured powder coat while the rest is some sort of enamel base paint. The quality of the paint is absolutely flawless and even. The inside of the castings is equally impressive and smooth protected with what looks to me red oxide primer. All the exposed machine surfaces have a beautiful smooth grind finish as does the 8" 3-jaw chuck. Didn't have time yesterday to open the 10" 4-jaw or the taper attachment, but I have a feeling I will like the quality. I think by now its clear I'm a particular individual that likes and appreciate quality, that said, I'm more than pleased with what I've seen and touched.

Question; I have never been able to post photos other than in a thumbnail format. This has always been a issue for me since I cant include detailed text between the grouped photos or between individual photos. I know there a way as many of you post in this manner. Can some one help a computer ignorant guy out? I have checked the setting without success. I really think some photos deserve detail explanation.
Once I get the help I need, I promise you won't be disappointed with the photos that will follow.
Thanks in advance.
Paco
 

Attachments

  • IMG_2771.jpg
    IMG_2771.jpg
    126.5 KB · Views: 147
  • IMG_2772.jpg
    IMG_2772.jpg
    129.1 KB · Views: 147
  • IMG_2768.jpg
    IMG_2768.jpg
    135.6 KB · Views: 155
  • IMG_2769.jpg
    IMG_2769.jpg
    131 KB · Views: 149

slodat

ALLIANCE MEMBER
Joined
Feb 6, 2010
Messages
3,679
Location
Central-ish, WA
Paco, I use Tapatalk on an iPhone/iPad for the forums these days. It makes both posting and reading so much easier. If you don’t have a smartphone or tablet, you can post photos inline by using the hyperlink to the photo from an online photo host like flikr.

The lathe looks great!!
 
OP
F

fnieto

Well-known member
Joined
Aug 27, 2013
Messages
1,401
Location
Tucson,Arizona
Paco, I use Tapatalk on an iPhone/iPad for the forums these days. It makes both posting and reading so much easier. If you don’t have a smartphone or tablet, you can post photos inline by using the hyperlink to the photo from an online photo host like flikr.

The lathe looks great!!

Thanks for the reply slodat,
I use Mac for both phone and laptop. So I assume the need to download Tapatalk? I'm extremely computer challenge my friend. Like I stated in a long previous post, I don't even like to draw out project and build as I go from my minds eye.That said, Its time to do my part and get this right as many details are lost in posting and only seven thumbnails are allowed per post.
Paco
 
To avoid these ads, REGISTER NOW!

jbmatth

Well-known member
Joined
Jun 3, 2013
Messages
5,681
Location
Northern Ok.
If you are fine just doing the 7 photos per reply but want them to be posted larger in the body of the message you can upload them just like you have been but drag and drop the link to the typing window. Then copy that text, click the little gray/yellow mountain, and paste it in there. I did a "Write-Up" in my thread that has another option on a way to upload them as well.

Lathe looks great by the way, and I enjoy reading about what you have going on.

JB
 
OP
F

fnieto

Well-known member
Joined
Aug 27, 2013
Messages
1,401
Location
Tucson,Arizona
If you are fine just doing the 7 photos per reply but want them to be posted larger in the body of the message you can upload them just like you have been but drag and drop the link to the typing window. Then copy that text, click the little gray/yellow mountain, and paste it in there. I did a "Write-Up" in my thread that has another option on a way to upload them as well.

Lathe looks great by the way, and I enjoy reading about what you have going on.

JB

Thanks for your reply jbmatth,
Gonna try the first option.
Well I got an error message stating "security token missing".
No go.
Back to the old way I suppose.
As far as Tapatalk, it would not come up when searched on the app store.
I'm telling you guys, I'm computer retarded.:headscrat
 
OP
F

fnieto

Well-known member
Joined
Aug 27, 2013
Messages
1,401
Location
Tucson,Arizona
More on the 1640TE,
The fit and finish is very nice. Just the right amount of cosmoline was applied making cleanup easy.

The head stock with a 8" 3 jaw chuck. The 10" 4 jaw is still in the box.
attachment.php


A generous amount of threading/feed options. This machine will also get a new custom control system prior to placing in service including a VFD with variable speed and proximity carriage stop.
attachment.php


The carriage apron has a single shot oil system (brass plunger) that lubricates the ways and crossfeed. The lower round knob will change feed direction on both the carriage and crossfeed on the fly. The threading dial can be completely rotated disengaging from the lead screw.
attachment.php


The dials have a roller that rotate 180º to expose a metric window or SAE window with a spring loaded ball indexer.
attachment.php


Beautiful ground finish and paint.
attachment.php


The tail stock takes a 4 M/T and equally smooth with deep visible graduations.
 

Attachments

  • IMG_2773.jpg
    IMG_2773.jpg
    135.2 KB · Views: 1,169
  • IMG_2774.jpg
    IMG_2774.jpg
    140 KB · Views: 1,168
  • IMG_2775.jpg
    IMG_2775.jpg
    132 KB · Views: 1,160
  • IMG_2776.jpg
    IMG_2776.jpg
    134.7 KB · Views: 1,156
  • IMG_2778.jpg
    IMG_2778.jpg
    143.6 KB · Views: 1,161
  • IMG_2780.jpg
    IMG_2780.jpg
    137.6 KB · Views: 65
  • IMG_2782.jpg
    IMG_2782.jpg
    122.6 KB · Views: 69
Last edited:
OP
F

fnieto

Well-known member
Joined
Aug 27, 2013
Messages
1,401
Location
Tucson,Arizona
More on the lathe.
The induction harden bed ways measure 10.125" wide.

attachment.php


The lead screw measures 1.125" diameter and terminates into a oil reservoir that also provides lubrication to the feed screw and switch rod.

attachment.php


The first modification was done replacing the hot halogen bulb with a much cooler, brighter LED bulb. The machine will also get a 52" LED strip light along the back splash to my tired eyes. Both will be 12DCV sharing the same power for the new Tachometer/SFPM readout.

attachment.php


The headstock measures 51" from the floor and overall machine is 7' long.

attachment.php


The follow rest has two slated mounting holes making it easy to install. Simply loosen the mounting bolts and rotate in place. The steady rest comes with roller bearings and adjustment is smooth as silk. The finish is the same quality as the rest of the machine.

attachment.php


The Taper attachment is still crated at the moment but it states its for a RML 1640. The same machine sold by Kent machinery. Both machines where built by Sun Master in Taiwan for different venders.

attachment.php


The micro carriage stop has also been modified for the proximity sensor.
A 3-axis touch screen DRO was ordered yesterday and should arrive Thur or Fri.

More on the machine later.
Thanks for the help with the larger photos. Not sure I'm sold on doing it this way as its time consuming and I rather be "turning and burning".

Paco
 

Attachments

  • IMG_2784.jpg
    IMG_2784.jpg
    125.2 KB · Views: 54
  • IMG_2790.jpg
    IMG_2790.jpg
    126.5 KB · Views: 1,151
  • IMG_2783.jpg
    IMG_2783.jpg
    129.8 KB · Views: 1,151
  • IMG_2787.jpg
    IMG_2787.jpg
    118.2 KB · Views: 1,139
  • IMG_2792.jpg
    IMG_2792.jpg
    141.7 KB · Views: 1,148
  • IMG_2794.jpg
    IMG_2794.jpg
    147.7 KB · Views: 1,139
  • IMG_2795.jpg
    IMG_2795.jpg
    139.4 KB · Views: 1,137
Last edited:
OP
F

fnieto

Well-known member
Joined
Aug 27, 2013
Messages
1,401
Location
Tucson,Arizona
Back on the finger brake progress.
After two failed attempts in removing the large pivot block bushings, I decided to try a different approach by threading a 3/4-16 H7 rod into the arbor I had made. I also made a sleeve to mount through the rod with a 3/4" CR back plate. Using anti-seize on the threads the bushings put up a fight but in the end came out without damage.

The 2.5" sch. 40 pipe was faced on both ends and a small portion of the weld seam was removed for the endplate.

attachment.php


The square endplate was drilled on center for a 1/2" bolt to use for chucking. A small 1/2" piece of copper tubing was split to protect the bison jaws. Indicated the best I could and turned the OD to match the pipes OD. Center drilled and used a inexpensive live center to help support the setup as I was taking .060-.080" DOC until I had a round profile. The shoulder was turned last to match the ID of the pipe for a nice fit. Knowing this was less than an ideal setup, the 1/2" bolt was used as I knew the center would be slightly off and would bore the end cap last to bring the center back in line with the finished cap.

attachment.php


attachment.php


attachment.php


At this point I tacked the end cap on with the TIG in three places to bore out the center and lastly face the outer face brining everything in alignment. The sleeve was then flipped and a large drill was used to deburr/chamfer the inside .752" bore.


attachment.php


attachment.php


The tool is ready for use.

attachment.php


Paco
 

Attachments

  • IMG_2804.jpg
    IMG_2804.jpg
    134.1 KB · Views: 1,126
  • fullsizeoutput_657.jpg
    fullsizeoutput_657.jpg
    19.1 KB · Views: 1,121
  • IMG_2810.jpg
    IMG_2810.jpg
    133.4 KB · Views: 1,122
  • IMG_2812.jpg
    IMG_2812.jpg
    137 KB · Views: 1,133
  • IMG_2816.jpg
    IMG_2816.jpg
    134.7 KB · Views: 1,123
  • IMG_2818.jpg
    IMG_2818.jpg
    137.3 KB · Views: 1,126
  • IMG_2819.jpg
    IMG_2819.jpg
    141 KB · Views: 1,127
Last edited:
OP
F

fnieto

Well-known member
Joined
Aug 27, 2013
Messages
1,401
Location
Tucson,Arizona
Tool in action.

The arbor slides in from the inside and the sleeve slips over the threaded rod from the outside. Some anti-seize applied to the threads to prevent galling and a large wrench used to draw out the bushings. I did have to apply a little heat to the right bushing with a hand held propane torch.

The setup from the inside.

attachment.php


Outside.

attachment.php


Overall.

attachment.php


Success! the old bushing pulled without deformation.

attachment.php


The components where pulled outside and a 2" 50 grit roll-loc was used to remove all weld spatter and blend in any nicks in preparation for paint.

attachment.php


attachment.php


attachment.php

The bushing bores where also cleaned up of any burrs and old grease.

Pressing new bushings to follow....

Paco
 

Attachments

  • IMG_2820.jpg
    IMG_2820.jpg
    148.3 KB · Views: 1,129
  • IMG_2821.jpg
    IMG_2821.jpg
    122.2 KB · Views: 1,121
  • IMG_2822.jpg
    IMG_2822.jpg
    128.5 KB · Views: 1,121
  • IMG_2823.jpg
    IMG_2823.jpg
    130.4 KB · Views: 1,121
  • IMG_2827.jpg
    IMG_2827.jpg
    144 KB · Views: 1,132
  • IMG_2832.jpg
    IMG_2832.jpg
    135.5 KB · Views: 1,124
  • IMG_2834.jpg
    IMG_2834.jpg
    139 KB · Views: 1,129
Last edited:
OP
F

fnieto

Well-known member
Joined
Aug 27, 2013
Messages
1,401
Location
Tucson,Arizona
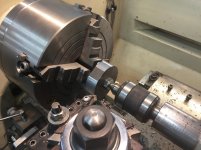
Pressing in was done with the help of 2 pound block of dry ice. While the Oilite bushings chilled, I removed the original ball oilers used to lubricate the original bronze bushing. The new Oilite are self lubricating but I want to have the ability to flush out any wear contaminants, so new ball oilers will be installed after painting. The new bushings will also be drilled to allow the oil to flush out the area between the bushings and pins. The drilling will be done using the same size drill bit as the hole to bark the center, then a .125" bit will be used to drill through the bushings.
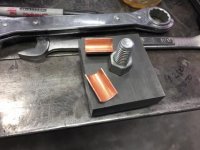
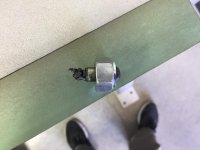
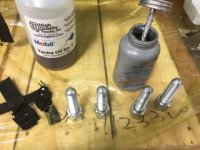
To remove the old ball oilers, I used a small punch to drive out the ball, then tapped to10-32. Using a 3/8" nut as a spacer and a washer, I screwed in the 10-32 screw and it pulled both oilers out easily. Cleaned and prepped the hole for the bushing install.

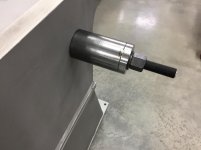
Chilling the bushings.
attachment.php


Drilled/taped to 10-32 after driving out the ball.
attachment.php


Used a 3/8 nut as a spacer and small washer to act as a puller when the screw was tightened.
attachment.php


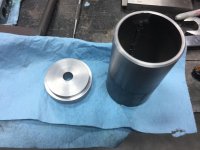
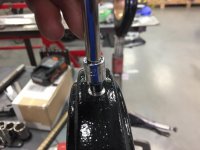
The bushing presses in with only light tapping required using the arbors turned to remove the old bushings.

attachment.php


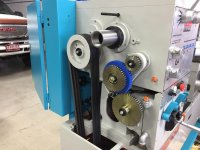
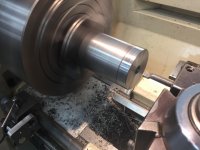
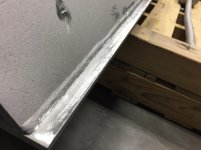
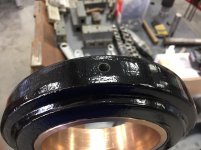
Here you can see the .125 oil journal drill after the bushing instal.

attachment.php


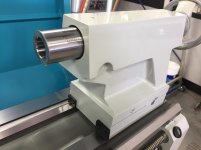
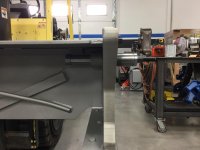
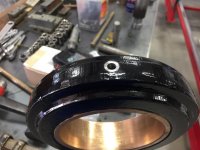
The pivot blocks fit and rotate nicely as do the apron leaf pivot pins.

attachment.php


A large 1.5" ID x 3" OD washer and snap ring secure the large pivot block from the inside.
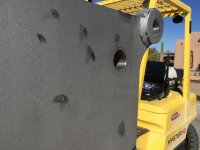
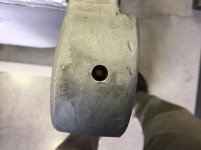
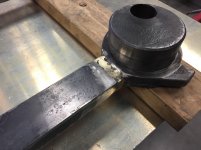
Notice the light rust from the condensation produced while heating the boss.

attachment.php


Ball oiler installation on the pivot link adjusters to follow.

Paco
 

Attachments

  • IMG_2838.jpg
    IMG_2838.jpg
    129 KB · Views: 1,106
  • IMG_2841.jpg
    IMG_2841.jpg
    132.8 KB · Views: 1,119
  • IMG_2843.jpg
    IMG_2843.jpg
    136.5 KB · Views: 1,121
  • IMG_2846.jpg
    IMG_2846.jpg
    138.7 KB · Views: 1,119
  • IMG_2848.jpg
    IMG_2848.jpg
    144.7 KB · Views: 1,122
  • IMG_2850.jpg
    IMG_2850.jpg
    125.5 KB · Views: 1,126
  • IMG_2851.jpg
    IMG_2851.jpg
    138.6 KB · Views: 1,125
Last edited:
OP
F

fnieto

Well-known member
Joined
Aug 27, 2013
Messages
1,401
Location
Tucson,Arizona
Pivot link adjuster ball oiler installation.
These large 4" bushings are also Oilite and again I wanted to have the ability to flush to enhance the life span of the bushings. I found some 3/16" ball oilers from a John Deere supply house. These oilers come with a felt wick to titrate the flow of oil.
I counter bored a slight flat landing for the oilers to rest flat as the large links are round. I did this by hand using a cordless drill.

attachment.php


The oil hole before.

attachment.php


After. Just enough for the oiler to press flat.

attachment.php


The oilers and felt wicks.

attachment.php


Used a 1/4" drive 8mm socket to tap in the new oilers.

attachment.php


attachment.php


The last of the hot work done was to weld leveling nuts on the base plate. Masked off and ready for paint.


attachment.php


This bring us unto date on the brake rebuild. Waiting for calm day to shoot some hammer tone.
Thanks for looking and thank you guys for helping with posting large photos.

Turn and Burn!

Paco
 

Attachments

  • IMG_2855.jpg
    IMG_2855.jpg
    127.5 KB · Views: 1,143
  • IMG_2856.jpg
    IMG_2856.jpg
    133.5 KB · Views: 1,139
  • IMG_2857.jpg
    IMG_2857.jpg
    132.7 KB · Views: 1,136
  • IMG_2860.jpg
    IMG_2860.jpg
    141.2 KB · Views: 1,139
  • IMG_2862.jpg
    IMG_2862.jpg
    123.6 KB · Views: 1,139
  • IMG_2863.jpg
    IMG_2863.jpg
    123.5 KB · Views: 1,141
  • IMG_2866.jpg
    IMG_2866.jpg
    134.8 KB · Views: 1,149
Last edited:

zmotorsports

ALLIANCE MEMBER
Joined
Oct 20, 2009
Messages
21,338
Location
Northern Utah
Great job Paco. Hell nice everything, new lathe and the shop is as amazing as always my friend.:bowdown:

Keep up the great work and thanks for sharing with us.
 
OP
F

fnieto

Well-known member
Joined
Aug 27, 2013
Messages
1,401
Location
Tucson,Arizona
Thanks Mike,
Appreciate your support. Ordered the 3-axis touch screen DRO, 52" LED light bar, hour meter and some electronics for the new machine. Got more done on the B&P brake as well. Need to get some paint on that soon. It would be nice to let it cure while working on the lathe. Just been too windy lately. If I want wind, all I need to do is mix paint heheh.
Take care,
Paco
 

jbmatth

Well-known member
Joined
Jun 3, 2013
Messages
5,681
Location
Northern Ok.
That is a very nice lathe, and makes me just a little jealous. :bowdown:

As for the photos, if you want them to show up big in the body of the text change the [url ] at the beginning and the end to [IMG ] at the beginning and [/IMG ] at the end without the spaces like this:


attachment.php


If you quote my reply you can see what it should look like. What I did was copy your photo ID text "https://www.garagejournal.com/forum/attachment.php?attachmentid=736373&stc=1&d=1518533884" and pasted it into the popup window that comes up when you click that gray and yellow mountain.

JB
 
OP
F

fnieto

Well-known member
Joined
Aug 27, 2013
Messages
1,401
Location
Tucson,Arizona
That is a very nice lathe, and makes me just a little jealous. :bowdown:

As for the photos, if you want them to show up big in the body of the text change the [url ] at the beginning and the end to [IMG ] at the beginning and [/IMG ] at the end without the spaces like this:


attachment.php


If you quote my reply you can see what it should look like. What I did was copy your photo ID text "https://www.garagejournal.com/forum/attachment.php?attachmentid=736373&stc=1&d=1518533884" and pasted it into the popup window that comes up when you click that gray and yellow mountain.

JB

Thanks jb,
I'll play with it some more, but I was getting an error when I had the settings changed to show the tool bar (grey/yellow mountain). Had to go back to no tool bar setting to get any pictures to load without an error message. Like I said, I'm computer retarded but will keep trying. Thanks for taking the time.

Paco

EDIT: I went back and edited the url to IMG and it worked! Thanks man. Now I just need to figure out how to do this from the get go without editing.
Thanks again jbmatth.
 
Last edited:
OP
F

fnieto

Well-known member
Joined
Aug 27, 2013
Messages
1,401
Location
Tucson,Arizona
Had a short day on the B&P brake as I had a roll cage modification on a FJ40 that took 1/2 the day but did manage to get the top clamp link adjustment levers primed and painted.

More evidence of previous abuse as both lever/handles had been repaired. The transitions on the cast iron brazed repairs where feathered and filler was used to blend in the low spots and corners.
attachment.php


The second lever was repaired about midpoint.
attachment.php


Some fillers used to fill in the low spots and blend in the transition a little.
attachment.php


Sanded/blended and shot primer/paint.
attachment.php


Shot in black to hide dirty paw prints and match the rest of the link pivot assembly.
attachment.php


Although a short day on the brake, every bit gets us closer to completion.

Thanks for looking.

Paco
 

Attachments

  • IMG_2868.jpg
    IMG_2868.jpg
    143.5 KB · Views: 1,118
  • IMG_2870.jpg
    IMG_2870.jpg
    137.8 KB · Views: 1,115
  • IMG_2871.jpg
    IMG_2871.jpg
    139.8 KB · Views: 1,115
  • IMG_2872.jpg
    IMG_2872.jpg
    139.8 KB · Views: 1,111
  • IMG_2873.jpg
    IMG_2873.jpg
    147 KB · Views: 1,115
Last edited:
OP
F

fnieto

Well-known member
Joined
Aug 27, 2013
Messages
1,401
Location
Tucson,Arizona
With three days of rain, I spent the day inside cleaning and inspecting the new machine as well as uncreating the taper attachment. The taper attachment required a complete teardown to clean off the cosmoline. used No.2 way oil to protect the surfaces and adjusted the gibbs.
The taper attachment is heavy and once mounted will only require the deadman clamp to be tightened for use.
attachment.php

Reassembled and lubed.
attachment.php

Glides really nice with the oil and gibb adjusted.
attachment.php

attachment.php

Pulled all six leveling bolts cleaned and applied anti-seize for leveling when the time comes.
attachment.php

attachment.php
 

Attachments

  • fullsizeoutput_65e.jpg
    fullsizeoutput_65e.jpg
    17 KB · Views: 994
  • IMG_2879.jpg
    IMG_2879.jpg
    142.3 KB · Views: 999
  • IMG_2880.jpg
    IMG_2880.jpg
    146.6 KB · Views: 998
  • IMG_2881.jpg
    IMG_2881.jpg
    146.8 KB · Views: 1,002
  • fullsizeoutput_65b.jpg
    fullsizeoutput_65b.jpg
    20.3 KB · Views: 987
  • IMG_2883.jpg
    IMG_2883.jpg
    122.2 KB · Views: 1,004
Last edited:
To avoid these ads, REGISTER NOW!
Top Bottom