To avoid these ads, REGISTER NOW!

One year later 40'x80'

OP
F

fnieto

Well-known member
Joined
Aug 27, 2013
Messages
1,401
Location
Tucson,Arizona
HelloCam!
Merry Christmas to you and yours bud.
A setback for sure but I keep reminding myself its better now than later.

No Andes but I did manage to spend time in Colorado this past September.
Drove to Durango and boarded the Durango/Silverton narrow gauge train and got dropped off at Needles trailhead. From there it was a 6 plus mile hump with a 50 pound pack with an elevation gain of over 3K'. At only 150 pounds myself it was some work but managed ok with a couple of breaks. Experienced some light rain during this time but by the time I set up my tent it had stopped so that's a big plus. Basecamp was at 10,500' and close to a running stream in the Chicago Basin.
The next morning around 05:00 was a cold 27º but with a few layers of gear I set out to conquer a 14er. The trek was amazing as I made my way through a debris field of downed trees from an apparent avalanche at some point. Eventually getting above the treeline into alpine country with prairie like grass and alpine lakes. As the climb continued a large boulder field was encountered and required carful navigation in some areas. The boulder field turned in to tailings with very loose and slippery footing then ice from the previous winter in large glacier like patches. I had my eye on North Eolus with an elevation of 14,090'. The challenging part of this was the fact that above 11.200' I would present with altitude sickness with a nagging headache and moderate dizziness. I had plenty of water and a filter pump so no rationing was needed. I also packed some blood pressure meds to combat the headache which I believe was due to elevated B/P. The last push was exciting for me requiring three point of contact as I had 3k' of exposures on either side.

Once at the summit, I was overcome by emotion by the beauty only seen from this vantage point. It was truly amazing feeling. The bonus was I had cell service up there! I made a call to my wife and sent some text photos trying to share the same feeling I was experiencing.
I spent a good 40 minutes taking in the 360º views before heading down to a nearby alpine lake for some lunch. The round trip from base camp was around 8-9 miles and took 8 hours.

That night I had a beautiful Buck cruise through camp as well as a family of grouse.
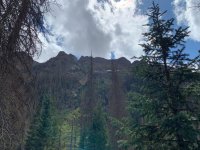
The next morning I headed out to Columbine Pass. Although not a 14er, it proved to be as beautiful as the view of North Eolus. Columbine Pass elevation was around 13k' and the trail takes you through old mining camps, alpine meadows and finally the rocky desert landscape with killer views. The exposures where nothing compared to the days prior hike but caution was still required. The next and final day was to break camp and hump it back to the Needles trailhead for the 3 pm train pick up. Overall an epic experience for me.

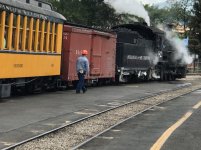
The Durango/Silverton narrow gauge train.
attachment.php


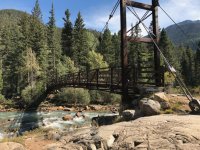
Needles trailhead. The pedestrian bridge takes you over the Animas River to the trailhead.
attachment.php


Basecamp View.
attachment.php


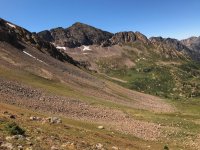
Above the tree line, alpines and larger boulder field towards the final push.
attachment.php


Final push.
attachment.php


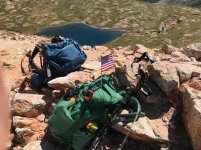
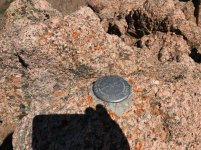
North Eolus survey marker!
attachment.php


The View from 14,090'
attachment.php


To be continued....
 

Attachments

  • 5A709111-CDE8-4205-BEE5-B9D5E0C020B4.jpg
    5A709111-CDE8-4205-BEE5-B9D5E0C020B4.jpg
    154.1 KB · Views: 797
  • 81B11358-2F3A-44B8-A4DA-FE711B3A9C8B.jpg
    81B11358-2F3A-44B8-A4DA-FE711B3A9C8B.jpg
    160.4 KB · Views: 796
  • 0A299FC4-344B-4A3B-96F4-1DFD4710B9D3.jpg
    0A299FC4-344B-4A3B-96F4-1DFD4710B9D3.jpg
    143 KB · Views: 788
  • C7A73E95-B01D-4C28-B00D-ACA7233601CC.jpg
    C7A73E95-B01D-4C28-B00D-ACA7233601CC.jpg
    154.4 KB · Views: 789
  • 594038AC-06A3-4BAA-AD9B-6C2F5B5C6E3E.jpg
    594038AC-06A3-4BAA-AD9B-6C2F5B5C6E3E.jpg
    148.9 KB · Views: 786
  • 48D44838-231B-4C96-B1E5-DE1EA184DBDA.jpg
    48D44838-231B-4C96-B1E5-DE1EA184DBDA.jpg
    154 KB · Views: 787
  • 6061891F-8331-436A-B8A0-6504D35ED417.jpg
    6061891F-8331-436A-B8A0-6504D35ED417.jpg
    151.3 KB · Views: 782
To avoid these ads, REGISTER NOW!
OP
F

fnieto

Well-known member
Joined
Aug 27, 2013
Messages
1,401
Location
Tucson,Arizona
Did you rent that vacuum tool or own it?

I purchased it. Its not a high end American unit but is made in Taiwan and works well. I also own another Astro tool that has worked very well for me so I had no hesitation buying this.

attachment.php


Hope this helps.
 

Attachments

  • 5B8DD5B7-6D47-4526-A902-CF62EFA38F99.jpg
    5B8DD5B7-6D47-4526-A902-CF62EFA38F99.jpg
    157.8 KB · Views: 797
OP
F

fnieto

Well-known member
Joined
Aug 27, 2013
Messages
1,401
Location
Tucson,Arizona
Those vacuum fillers are awesome--I've been trying to justify a reason to buy one but haven't gone through with it yet

I maintain my rigs myself and find some tools really speed up certain processes. This tool does just that. Its also handy for troubleshooting.
 
OP
F

fnieto

Well-known member
Joined
Aug 27, 2013
Messages
1,401
Location
Tucson,Arizona
Continued...Columbine Pass.

This hike was the about 9 miles from base camp as well but with only an elevation of around 13K feet at the Pass.

Around three miles you come to a fork.
IMGl]https://www.garagejournal.com/forum/attachment.php?attachmentid=960701&stc=1&d=1577546966[/IMG]

Above the treelike looking towards the Pass.
attachment.php

attachment.php


At close to 12,500' looking back from our starting these beautiful Alpine Wild Flowers.
The Vally you see is where we came in from Needles trailhead some 10 miles or so.
attachment.php


A view to the East from the Pass. Thats Columbine Lake.
attachment.php


And looking to the SouthWest. Our base camp was down there at the base of that Valley among the trees.
attachment.php


The entire three days and two nights was amazing with over 30 miles of trekking it will be one for the memory books.
 

Attachments

  • F1EBE46A-C2A6-42DF-8879-BD4F80453340.jpg
    F1EBE46A-C2A6-42DF-8879-BD4F80453340.jpg
    155 KB · Views: 623
  • FC683901-B175-443D-AF20-D10CD48A28AC.jpg
    FC683901-B175-443D-AF20-D10CD48A28AC.jpg
    150.4 KB · Views: 623
  • CA8A1710-D142-42A1-BF64-C660CB6A9A6F.jpg
    CA8A1710-D142-42A1-BF64-C660CB6A9A6F.jpg
    141.9 KB · Views: 37
  • 8865E2D6-6F0E-4610-93BE-A34B51CD27BA.jpg
    8865E2D6-6F0E-4610-93BE-A34B51CD27BA.jpg
    143.5 KB · Views: 625
  • 86619D66-D7B8-448F-B935-D1E43931D994.jpg
    86619D66-D7B8-448F-B935-D1E43931D994.jpg
    144.2 KB · Views: 629
  • 8E61AF16-47F2-4684-97B9-3022F90BF79D.jpg
    8E61AF16-47F2-4684-97B9-3022F90BF79D.jpg
    166 KB · Views: 48
  • 4BF6D48A-95D2-407C-BF93-10BB967D732E.jpg
    4BF6D48A-95D2-407C-BF93-10BB967D732E.jpg
    148.9 KB · Views: 627
OP
F

fnieto

Well-known member
Joined
Aug 27, 2013
Messages
1,401
Location
Tucson,Arizona
Got back on Sunday from the Colorado excursion to find all the Thuren Fabrication components waiting for my attention. For you Dodge fans out there, Thuren offers some very nice quality components. This kit went into a 2006 2500 ram with the 5.9 Cummings.

The shocks where an upgrade to Fox 2.0 and the steering damper was King. We also upgraded the center link and installed a steering box stabilizer to firm up the known weak design.
attachment.php


Passengers side shows the new upper/lower arm, coil spring, shock and reservoir as well as the anti-sway bar and links.
attachment.php


Passenger side buttoned up and the wheel well liner trimmed a bit for the reservoir.
attachment.php


Rinse and repeat for the drivers side and on to the center link, pitman arm, steering box stabilizer and dampener.
attachment.php


The King dampener attached to the upgraded centerlink.
attachment.php


A shot of the added steering box support bracket.
attachment.php


All done and ready for an alignment. I was able to center up the steering wheel quite close.
attachment.php


My over all opinion of the Thuren Fabrication components are A+. Everything installed without drama with perfect line ups. It's also a plus to work on a desert truck as no rust issues are encountered. The steering stabilizer is offered by Rough Country and I was also impressed with fit and finish. The rear suspention was treated to new Thuren shackles and Fox 2.0 with reservoirs. The New heavier duty center link is Dodge Mopor.
Thuren takes time to clean off any spatter prior to powder coating and the welds are impeccable.
 

Attachments

  • B2D8ABF0-009F-4666-A4F7-2180189214EB.jpg
    B2D8ABF0-009F-4666-A4F7-2180189214EB.jpg
    146.5 KB · Views: 623
  • 66E06922-ACCD-48F7-9718-2EDF3DC9B280.jpg
    66E06922-ACCD-48F7-9718-2EDF3DC9B280.jpg
    148.2 KB · Views: 623
  • 342E332A-CBBC-42AB-9D4A-44A50869839D.jpg
    342E332A-CBBC-42AB-9D4A-44A50869839D.jpg
    127.8 KB · Views: 620
  • C7EF6D3C-B2D3-4B67-9418-5D5008585E3D.jpg
    C7EF6D3C-B2D3-4B67-9418-5D5008585E3D.jpg
    151.8 KB · Views: 620
  • F38F3077-723C-45AF-9F96-4697644E8AF9.jpg
    F38F3077-723C-45AF-9F96-4697644E8AF9.jpg
    143.2 KB · Views: 625
  • 53A48880-1C88-4602-82A8-B4D78C58BA14.jpg
    53A48880-1C88-4602-82A8-B4D78C58BA14.jpg
    150.1 KB · Views: 625
Last edited:

IMXCITD

Well-known member
Joined
Apr 14, 2005
Messages
193
Location
Virginia
Just discovered this thread and spend some time reading it start to current. Great shop!! You have been thru it w both shoulders!! Hope you are healing up well. We have twin trucks.....except mine is one year newer. Can you post up some more pics of your truck? What tire and rim combo are you running? I think we have almost the same lift setup...mine is fabtech. Can you post some pics of your pups as well?
Again....hope you are hanging in there w your shoulders! :beer::beer:


standard.jpg
 
Last edited:
OP
F

fnieto

Well-known member
Joined
Aug 27, 2013
Messages
1,401
Location
Tucson,Arizona
Nice views on your hike! :thumbup:

So, have you driven the Dodge with the upgraded components? How's it drive and handle?


:beer:

Thanks brother!
Ironically, the rig was driven to Colorado for a week long excursion through several passes. I informed the gentleman to have everything re- torqued at or around 500 miles. Typically, this fell on deaf ears. He lost one 5/8" nut on his passengers side anti-sway upper link. Luckily this was not critical and sourced one at a Tru Value hardware store somewhere near by. He brought the rig back to me after some 1,300+ miles for re-torquing. It was then when he reported how much smoother the ride was. He absolutely loved the results.
 
Last edited:
OP
F

fnieto

Well-known member
Joined
Aug 27, 2013
Messages
1,401
Location
Tucson,Arizona
What a bummer. So did the hydro boost job on the duramax fail to load as well?
did part two of Colorado's Columbine fail as well?
Stinking computers....
 

losdudes

Well-known member
Joined
Mar 10, 2011
Messages
210
Location
Colorado
I just completed your journey on the post over the last few days. I like your work and will follow along. I spent many years in the Phoenix area and visited Tucson and areas east. Now live in Colorado and like it, my wife got tired of the heat. Keep up the good work and postings and take care of your health.
 
OP
F

fnieto

Well-known member
Joined
Aug 27, 2013
Messages
1,401
Location
Tucson,Arizona
None of the pictures are working


I thought it was just me.

If Paco is posting pictures, I for one want to see them, no matter the subject.:beer:


Not sure what happened but almost sure it was my doing. I attempted to rectify the images and ended up deleting both the hydro boost and UCA's jobs on the Sierra.

I can only post up 7 photos at a time so I will need to break up bigger jobs into parts so no details are lost in translation. I appreciate you fellas following along and I apologize in advance for being a computer challenged idiot!. It takes me quite a bit of time to post up jobs but I don't have anything else to do with a broken wing at the moment.

Give me some time and I'll repost both lost jobs.
Happy New Year fellas!
 
OP
F

fnieto

Well-known member
Joined
Aug 27, 2013
Messages
1,401
Location
Tucson,Arizona
I just completed your journey on the post over the last few days. I like your work and will follow along. I spent many years in the Phoenix area and visited Tucson and areas east. Now live in Colorado and like it, my wife got tired of the heat. Keep up the good work and postings and take care of your health.

Thanks for following along. I enjoy working with my hands no matter what as long as it puts a smile on my mug. I've been in Tucson since 73 and briefly left while I served. I like the S/W but truth be told I don't like city life. I live twenty minutes from Tucson and I'm OK with that.

My recent visit to Colorado was special and I'm already scheduled for October 2020 for some "Hut Hiking" through Snuffles traverse. I booked for my son and nephew as well so it will be a special experience for me. I can understand the heat getting to your wife so the move to Colorado makes sense.
Thanks for the well wishes and be well yourself.
 
To avoid these ads, REGISTER NOW!
OP
F

fnieto

Well-known member
Joined
Aug 27, 2013
Messages
1,401
Location
Tucson,Arizona
I had noticed some oily substance under the drivers side of the frame the last time I serviced the Duramax. it became apparent I had a small drip forming between the brake master and the hydro booster. A quick internet search indicated my piston seal was likely the culprit. I also sourced a company that sold resealing kits for around $23 delivered. They also offered a special inverted torx socket driver optional for a total of $27 delivered. The reviews where stellar so I punched the kit and it soon arrived. This was done in November but it still fresh on my mind.

I began by flushing the power steering system. l learned a long time ago to flush systems that require new components. Dirty particulates can and will cause seals to leak. That said I used a clear vinyl hose to tap into the low pressure return line and routed it to a 5 gallon pail.

attachment.php


The front end was off the ground allowing full turning left to right. At the hint of cavitation 2-1/4 cups of power steering fluid was added. I had a measuring station set up in front of the rig.
I used one full gallon of O'Reilly's economy fluid to completely flush the system. I then used quality fluid to finish the process.

Here you can see the darker dirty fluid at the start.

attachment.php


About 1/2 gallons later, The fluid looked like honey. I continued the flush until I went through the gallon of the inexpensive store brand.

attachment.php


Heres a shot of the seal kit and driver offered by Boost Auto Parts.

attachment.php


With the fluid now flushed and new quality fluid in the power steering reservoir I separated the brake master from the Hydro booster, removed the two hard lines and removed the four nuts under the dash behind the brake peddle. This was the most difficult part for me as my shoulder complained in the contorted positions. The booster was place in an old cake pan as I anticipated fluid loss once separated. The four E-12 bolts could probably be removed with a 12 point socket but they where tight and possible rounding of the heads could result. For four extra bucks, it's worth having the correct socket.

attachment.php


A good view of the direction of the faulty piston seal. These are flat seals so it really difficult to ID a bad seal.

attachment.php


Care must be exercised when separating the two halves as spring tension is present and can result in loss of small parts. The Doggie treat bins came in handy for reassembly. It was much easier to reassemble in the vertical position as the valves stems and piston required aligning while overcoming spring tension.

attachment.php


Part two coming up.....
 

Attachments

  • 8A481D9D-320E-4FC2-8296-F3B452D0D347.jpg
    8A481D9D-320E-4FC2-8296-F3B452D0D347.jpg
    150.4 KB · Views: 685
  • 4494B6C8-4CE0-45A8-93B7-FA62ED6BC2B2.jpg
    4494B6C8-4CE0-45A8-93B7-FA62ED6BC2B2.jpg
    151 KB · Views: 687
  • 59F41281-1F0E-4D11-9571-F3AAB23B9E54.jpg
    59F41281-1F0E-4D11-9571-F3AAB23B9E54.jpg
    149.4 KB · Views: 678
  • 05668309-C2AE-4CD2-9546-16FE3B7C3A81.jpg
    05668309-C2AE-4CD2-9546-16FE3B7C3A81.jpg
    148.2 KB · Views: 676
  • AEC3E0B2-63D5-431D-91CD-12A4B37666E5.jpg
    AEC3E0B2-63D5-431D-91CD-12A4B37666E5.jpg
    100.2 KB · Views: 670
  • 9934DA73-CA2C-4F2E-B987-7B6E156F3176.jpg
    9934DA73-CA2C-4F2E-B987-7B6E156F3176.jpg
    109.7 KB · Views: 677
  • A0F76F9C-88A6-4C3E-835C-7E5286AFCAF9.jpg
    A0F76F9C-88A6-4C3E-835C-7E5286AFCAF9.jpg
    79.6 KB · Views: 682
OP
F

fnieto

Well-known member
Joined
Aug 27, 2013
Messages
1,401
Location
Tucson,Arizona
Part two hydro boost.

These are the components found inside the boost. That small orifice at the top left is DIRECTIONAL so it must go back in the correct orientation. Failure to do so will render your booster useless the first time you hit the brakes as unregulated power steering pressure will destroy the unit. Again be carful separating the two halves and take notice of how things come out. A dab of Vaseline was used to retain the small orifice inlace while inverting the the parts to be joined. Fresh power steering fluid was used to lube the new seals.

attachment.php


Working alone requires some preplan so this is an example of the pre filled station to keep things going. As soon as I filled the reservoir, I refilled the measuring cup with 2-1/4 cups of fluid. I found this to be the maximum allowable refill to prevent overfilling resulting in a mess.

attachment.php


With the booster back in and no further leaks noted a quick degreasing was done.
The booster/brake master has been dry since then.

attachment.php
 

Attachments

  • 793F191C-3F3C-4590-9EFE-D77FE53841EA.jpg
    793F191C-3F3C-4590-9EFE-D77FE53841EA.jpg
    152.9 KB · Views: 681
  • 7D03EF67-7E27-40B3-A635-A8511C24896F.jpg
    7D03EF67-7E27-40B3-A635-A8511C24896F.jpg
    149.3 KB · Views: 687
  • 07F3DEB1-F437-4982-93D4-711C4CB5D69B.jpg
    07F3DEB1-F437-4982-93D4-711C4CB5D69B.jpg
    148.3 KB · Views: 689

LXCam

ALLIANCE MEMBER
Joined
Apr 23, 2013
Messages
19,105
Location
AZ
Great timing for me Paco. The wife’s ride has developed some staining on the drivers side that I’ll be damned if I can see where it’s coming from (which I kinda suspected). So thanks for the heads up on the “watch outs”.
 
OP
F

fnieto

Well-known member
Joined
Aug 27, 2013
Messages
1,401
Location
Tucson,Arizona
Great timing for me Paco. The wife’s ride has developed some staining on the drivers side that I’ll be damned if I can see where it’s coming from (which I kinda suspected). So thanks for the heads up on the “watch outs”.


It always good to catch leaks/drips early. Post up the repair if you have time.

Happy New Year Cam!
 
OP
F

fnieto

Well-known member
Joined
Aug 27, 2013
Messages
1,401
Location
Tucson,Arizona
So another issue I had with the Sierra was one of the alignment cams was at its maximum adjustment. The rig was within range and she's still tight but with the Fabtech lift and larger tires it was obvious the only way around this would be an aftermarket upper ball joint or completely different UCA's. Fabtech offers a pair for this 6" lift. Its a serviceable Uniball with additional caster engineered to allow for the oversized tires. The rig was a couple of months old when I first installed the lift so the first alignment was unremarkable with plenty of adjustment left in the cams. As Time went on and 90K miles later there was enough ware in the upper ball joint to warrant the upgrade. I also took this opportunity to replace the steering dampener and change out the Fabtech sway bar links.
As for the sway bar, Fabtech recommends flipping the bar to avoid contact with the tie rods. The problem with this is I would have minor tire rub when at full turn. This was never a problem but it wasn't right. Fabtech still recommends this today. I was dismissed by a Fabtech engineer indicating this is the only way to run this particular lift. After evaluating and measuring, I realized there is a way to run the sway bar in the correct orientation intended by GM. I also found plenty of aftermarket "extended links" offered by other lift kits.
I found some Cognito that would work for my application.

Taking inventory and actually reading the instructions. Many times I don't follow each step in order as common sense overrides the order of operation.

attachment.php


After handling the Thuren kit I was less than impress with Fabtech's welds and the lack of cleaning prior to powder coat. The rest of the machined parts where stellar. The 1" tapered pins are impressive compared to the OEM ball joint. The stainless spacers where also good quality as well as the Uniball.

attachment.php


As mentioned, some thread chasing was required for the zerk due to heavy powder coat. The arms also had way more weld spatter for a pricy item.

attachment.php


All preassembled and ready.

attachment.php


I went and pulled all four tires as I would rotate them at the end.

attachment.php


Here you can see the unloading clamp used to take the pressure off the adjustment bolt.

attachment.php


The recorded measurement and turns out for future reference. The original measurement from the floor to the inner top front fenders where also recorded.

attachment.php


This job requires more detailed photos for those interested so I'll need to break up the post into parts.

Sierra UCA's Part B coming up.
 

Attachments

  • 263C6403-84A2-434F-B2E6-2DCED0A813EA.jpg
    263C6403-84A2-434F-B2E6-2DCED0A813EA.jpg
    150.9 KB · Views: 614
  • 20F9F703-E42C-40DC-AC5E-0BB94720E26C.jpg
    20F9F703-E42C-40DC-AC5E-0BB94720E26C.jpg
    131.9 KB · Views: 613
  • 30BBCC31-517E-404B-8134-1921FBA72DD0.jpg
    30BBCC31-517E-404B-8134-1921FBA72DD0.jpg
    149.8 KB · Views: 617
  • 145B3E03-22D2-4C91-B2B0-5A852AC4BF58.jpg
    145B3E03-22D2-4C91-B2B0-5A852AC4BF58.jpg
    153.1 KB · Views: 623
  • A4BD1C16-F3E5-469B-B744-65ED36734C14.jpg
    A4BD1C16-F3E5-469B-B744-65ED36734C14.jpg
    101.1 KB · Views: 618
  • B3FE2400-23DB-4AF2-B08F-56CCC6DD7CEA.jpg
    B3FE2400-23DB-4AF2-B08F-56CCC6DD7CEA.jpg
    151.6 KB · Views: 625
  • 67CFEDD8-B2A8-4860-9475-CED887EB595C.jpg
    67CFEDD8-B2A8-4860-9475-CED887EB595C.jpg
    153.8 KB · Views: 621

zmotorsports

ALLIANCE MEMBER
Joined
Oct 20, 2009
Messages
21,348
Location
Northern Utah
Nice job on the suspension upgrades Paco.

I'm running the RCD 6" lift on my 2006 and have been running extended sway bar links without issue from day one as I didn't feel like inverting the sway bar either. I bought my truck with 58k on the odometer in 2009 and I've only put about 41k on it in 10 years now. I'm also running the Cognito steering components and upper control arms and they are nice components. I do need to repaint my frame and undercarriage though as it is starting to look a bit weathered but still good for a 14 year old truck.

Your truck still looks amazing and is definitely well cared for my friend.:beer:
 
OP
F

fnieto

Well-known member
Joined
Aug 27, 2013
Messages
1,401
Location
Tucson,Arizona
Thanks Mike,

Like you I try to take care of my rigs to the best of my ability. I see Cognito makes reinforcement brackets for the pitman and idler arm. My steering has always remained tight and she has always tracked straight but with the larger tires I'm probably gonna install said upgrades in the near future. I almost went with RCD back in 05 but Fabtech had way more information out in the webs at that time. RCD does make a quality lift.

With your attention to detail, you'll have your chassis looking new in no time brother.

With my rig approaching 15 years old and only 90K on the clock she's still like new much like your 06. When she works for me she works hard pulling.
Happy New Years brother.
 

zmotorsports

ALLIANCE MEMBER
Joined
Oct 20, 2009
Messages
21,348
Location
Northern Utah
I am running Fabtech's outer tie rods as they are about the "beefiest" (technical term) that I have run across and have had them on since I've owned the truck.

I think you'll be pleased with the Cognito steering supports for the center link. I think they really help with wear as they keep the center link from rocking and prematurely wearing the joints out.

Happy New Year to you as well my friend.:beer:
 
OP
F

fnieto

Well-known member
Joined
Aug 27, 2013
Messages
1,401
Location
Tucson,Arizona
I am running Fabtech's outer tie rods as they are about the "beefiest" (technical term) that I have run across and have had them on since I've owned the truck.

I think you'll be pleased with the Cognito steering supports for the center link. I think they really help with wear as they keep the center link from rocking and prematurely wearing the joints out.

Happy New Year to you as well my friend.:beer:

Hi Mike,
The Fabtech tie rods are stout for sure. I found the inner and outer boots via 4 wheel drive parts. Fabtech wanted over $40 to ship those to me from one state over. I had just under that in parts.

I will be looking at the Cognito supports for sure.

Thanks for that brother.
 
OP
F

fnieto

Well-known member
Joined
Aug 27, 2013
Messages
1,401
Location
Tucson,Arizona
Part two of the UCA's

Removal of the OEM components where unremarkable. Installation of the Fabtech UCA's was another story. They where tight and required extra effort. I installed the passengers side first and my wing was spent and hurting for the drivers side. I considered making a spreader jack from some bar stock and all thread but tried something else that worked out well.

All the cam adjusters where marked prior to disassembly for reference on reassembly. This was a waste of effort as the new arms with the added castor built in the design where no where near the old marks.

An example of the passengers side cam at maximum.

attachment.php


The set up on the stubborn drivers side using 3/4" all-thread rod jam nutted trough the shock tower and a ratchet strap to pull the arm into place. This only worked because the rigid set up and straight pull.

attachment.php


The Cognito links where straight forward but the welds where sub par. A fast thin pass can be seen in the photo. I stripped the powder coat 1" past the weld and ran a hot cover pass and repainted.

attachment.php


I do like the shackle style pivot mount. This will prolong the bushings life as they are more in line. Hard to see but the added fillet weld gave it the right look.

attachment.php


The sway bar in the correct orientation with plenty of clearance of the tie rod. You can see the slight rub ares from when it was upside-down. No more rub with full turn.

attachment.php


With the tires on and the Suspention loaded it became ovbious to me that I would have to do a tape measure alignment for the 20 mile drive to the alignment specialist.

attachment.php


How she sat after the tape measure alignment.

attachment.php


After alignment, all cam adjusters have ample future adjustment.

Would I recommend this Fabtech and Cognito links? Yes, just know you will need to fix some quality issues. My rig has never been involved in any type of accident. The tight fitting UCA's where probably welded improperly or Fabtech's jigs need some attention. Cognito needs to adjust their robotic welding speed. My .02
 

Attachments

  • 908C556E-E62F-4110-AF7B-C8EC3E15B892.jpg
    908C556E-E62F-4110-AF7B-C8EC3E15B892.jpg
    152 KB · Views: 521
  • 9C6D49DE-F578-4FD0-A361-0750E20E4A6C.jpg
    9C6D49DE-F578-4FD0-A361-0750E20E4A6C.jpg
    145 KB · Views: 518
  • 6D3BFA1A-B96F-43A4-8B42-0E93845B3AF3.jpg
    6D3BFA1A-B96F-43A4-8B42-0E93845B3AF3.jpg
    138.9 KB · Views: 511
  • 1BF87114-440A-4EB1-8922-4A81D624364D.jpg
    1BF87114-440A-4EB1-8922-4A81D624364D.jpg
    101.3 KB · Views: 511
  • F22D66A3-F926-48D2-B030-5F7141A09B12.jpg
    F22D66A3-F926-48D2-B030-5F7141A09B12.jpg
    64.2 KB · Views: 514
  • 42620FA2-96E3-45C5-8526-1557666A6096.jpg
    42620FA2-96E3-45C5-8526-1557666A6096.jpg
    114.2 KB · Views: 512
  • 455354E5-E470-4DAE-8BCB-9910E2F9FE83.jpg
    455354E5-E470-4DAE-8BCB-9910E2F9FE83.jpg
    101.4 KB · Views: 515
Last edited:
OP
F

fnieto

Well-known member
Joined
Aug 27, 2013
Messages
1,401
Location
Tucson,Arizona
So it seemed October was Suspention month. I had a good friend ask me for help with his 2001 Nisson Xterra. He had purchased it for only $1500 with just over 200K miles from a co-worker. It seemed the front end was very loose and was very noisy. Being a 2WD it seemed straight forward and shared the same style of torsion bars my rig employed.

This job took me about 10 hours from start to finish as again the Drivers side fought me all the way. All the parts where ordered from RockAuto based on a parts list I had provided him with. I did assess the front end a week prior and found pretty much everything worn out including a broken front drivers side shock. He had close to $800 in parts but the labor was gratis. This young man got his probation year under my wing some 22 years ago and we've remained good friends. He had lent me a small stove for my Colorado trip so he knew I was in the market for one. He surprised me with a Jet-Boil. This stove will boil water in well under a minute and is wind resistant. A handy addition for my through hike adventures and a kind gesture on his part.

Out with the worn out old.
attachment.php


The new tight Suspention. The passengers side.

attachment.php


attachment.php


Drivers side view.

attachment.php


The rear got new shock as well.

attachment.php


Again no rust issues to report. This rig has lived in the SW since new. Everything was lubed and the front end alignment was close enough to drive to the alignment shop without an issue.
 

Attachments

  • CFAD4B1D-3DDC-4A1C-9E57-4FE0F11FC85D.jpg
    CFAD4B1D-3DDC-4A1C-9E57-4FE0F11FC85D.jpg
    143.5 KB · Views: 451
  • 890426EE-28F4-4E80-986D-A8F0950835DB.jpg
    890426EE-28F4-4E80-986D-A8F0950835DB.jpg
    141.2 KB · Views: 453
  • 279E9EF6-1F8A-4AA4-889B-6EF3525095D5.jpg
    279E9EF6-1F8A-4AA4-889B-6EF3525095D5.jpg
    144.5 KB · Views: 453
  • 35F4EF6A-673A-42ED-8CBA-AB01937FEA5D.jpg
    35F4EF6A-673A-42ED-8CBA-AB01937FEA5D.jpg
    148.2 KB · Views: 453
  • 1DE492E8-69C7-497C-97E6-8702B9E9F4AB.jpg
    1DE492E8-69C7-497C-97E6-8702B9E9F4AB.jpg
    126.1 KB · Views: 457

zmotorsports

ALLIANCE MEMBER
Joined
Oct 20, 2009
Messages
21,348
Location
Northern Utah
Dang Paco, you've been a suspension replacing fool the past several months.:lol_hitti

Like always though, your work is top notch all the way my friend. Glad to have you back and posting your projects again.
 
OP
F

fnieto

Well-known member
Joined
Aug 27, 2013
Messages
1,401
Location
Tucson,Arizona
Hahah! mostly during October but not my favorite type of work in all honesty.

Thanks for the encouraging words brother. I still have a few more posts leading up to my temporary decommissioning (again).
 
OP
F

fnieto

Well-known member
Joined
Aug 27, 2013
Messages
1,401
Location
Tucson,Arizona
Part of November was spent on vehicle maintenance. Bothe the 1500 and 2500 got fresh brake fluid. I first sucked out the old fluid from the brake reservoir and filled it well above the full line. I then pulled vacuum at the drivers side front caliper then front passengers etc. I did the opposite of bleeding which would be to begin at the farthest point. I maintained fresh fluid in the reservoir not allowing it to run dry and **** air. I stayed at each caliper until I had fresh looking fluid.

The closest to the brake master.

attachment.php


Finishing up with the furthest passenger side rear caliper.

attachment.php


I did it this way to to save time but not 100% this is the correct order of operation when preforming this. If someone could chime in I would appreciate it.

The same process was followed on the Sierra.
 

Attachments

  • 466558FA-D1A2-4404-B424-E6A8F557D08C.jpg
    466558FA-D1A2-4404-B424-E6A8F557D08C.jpg
    93.2 KB · Views: 351
  • 605DF82C-0ACF-40E4-8A2A-BFCF48B1CDBB.jpg
    605DF82C-0ACF-40E4-8A2A-BFCF48B1CDBB.jpg
    117.6 KB · Views: 351
To avoid these ads, REGISTER NOW!
Top Bottom