To avoid these ads, REGISTER NOW!

Our 22 X 30 "Scout" Den

To avoid these ads, REGISTER NOW!
OP
J

jmait769

Well-known member
Joined
Jul 10, 2012
Messages
83
Location
Las Cruces, NM
Looking very good; 'high and tight' I believe is the correct military phrase. :beer:

Now that the floor is coated, how are you planning to protect it from welding, grinding, etc.? Take a picture for us here at GJ; take a night shot to highlight the clear coat.

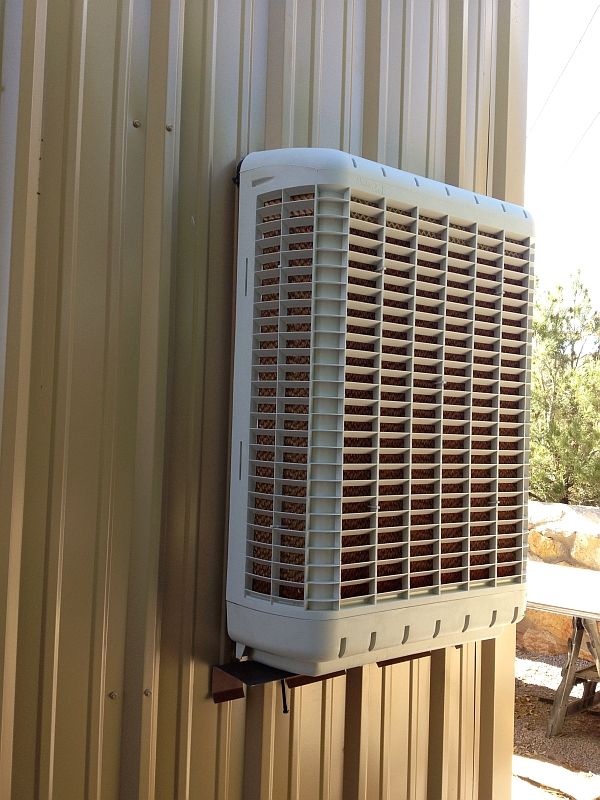
What is the plan for the air compressor pad? Are you going to enclose it with the same material as the building? Any plan for a 'porch' roof?

Keep us posted on the progress on all fronts: building, Scout(s), Mustang paint, and anything else you care to share. That's some beautiful country from the pics, never been there, so how's about posting some more pics of 'Scout(ing) in the Wild'. I've got my Willys PU project to keep me busy, but, DANG, I'd like to own a Scout one of these days! They just look like a 'Ton-O-Fun'!
Thanks! The floor is pretty much going to have to defend for itself!! j/k! I don’t plan on it staying pristine but will put down some welding deflection paper when needed. One advantage of living in this area is we have about 300 days of sunshine so can always weld on the driveway if need be. This pic was taken after the clear was applied. I went out today and lifted the tape in some areas and the epoxy is hard as a rock so, considering the cost, I’m pretty happy.

NG057.jpg


We will enclose the pad with the same material as the building. When Mueller sent the materials they protect it with layers of extra sheeting so we think we have enough to accomplish this – or close to it. We have a Mueller dealer in El Paso so easy to get more if necessary. Not sure on the porch roof yet but shade is a premium here and this is my wife’s area to sit so it will probably move to the head of the “to-do” list! :willy_nil

Lots of stuff planned but for now it is just getting moved in and making it functional.

Scouts are unique! Here is my favorite pic of ours on the trail:

SS770135.jpg


Looking towards Las Cruces (barren!!) :dunno:

SS770143.jpg


Love it floor looks good thanks for posting btw
Thanks!!

Another Binder Planet guy here. Nice set-up!
Thanks! :) It’s hard to keep up with both sites!!!

Jay
 

JPorkins

Active member
Joined
Dec 28, 2011
Messages
37
Sir, you raised an awesome daughter. Great garage & scout also, someday I hope to restore a IH pickup.
 
OP
J

jmait769

Well-known member
Joined
Jul 10, 2012
Messages
83
Location
Las Cruces, NM
"Both" sites? Man, I wish I was only on 2 forums. It's even harder being an active member of 5 forums. :eek7:
Sir, you raised an awesome daughter. Great garage & scout also, someday I hope to restore a IH pickup.
All I can say is :drool: Nice start! :thumbup:
Thanks!!

Thanks for the additional pics; it really does look like some great four-wheeling country.

It looks like you could just go on forever out there in the desert; true?

I read a little of the areas history. Seems like a great place to live.

http://www.lascrucescvb.org/a-historical-perspective/
Lot of desert here that is for sure!! We like the weather but it can be awful dry. We just got some rain today (sprinkles!) which was the first in many months!! Takes some getting used to.

Picked up this GrayMills parts washer off of CL for $100! Hope it was a good deal. Had twenty gallons of fairly new solvent in it too!

NG058.jpg


After cleanup and some paint. Notice I did that in the "old" garage! :)

NG060.jpg


Jay
 
Last edited:
OP
J

jmait769

Well-known member
Joined
Jul 10, 2012
Messages
83
Location
Las Cruces, NM
We are still in the process of moving in and using the garage so just a small update.

Because the house does not have an attic, and storage space is a premium, I had promised my wife (ok...a bribe! :( ) some space in the garage so we have started that. You can see in the first post my layout for the garage but I forgot to add this pic of the planned storage area:

GaragePlan2.jpg


Deviated a little bit from that initial drawing, now that the actual garage is up, but here are some pics from the start of the construction:

The outhouse!

NG063.jpg


NG065.jpg


Mezzanine or loft or….? Not really sure what to call it but here are some in-progress shots. This is sitting and lagged onto the 8” purlins around the sides. I ran metal angle iron from the roof rafters down to the wood beam to support the outer floor area on the left side. The beam is doubled and has a layer of MDF in between them.

NG075.jpg


NG074.jpg


Trimmed out what we could and painted it. Still a bunch of work left to do including finish the inside of the outhouse, put some type of door system in and start on the workbench area. Really want to setup something similar to Steevo’s HF Toolboxes Workbench - Phase 3 thread on the left side. That work bench Steevo made is topnotch and we hope ours comes out as nice

NG072.jpg


NG069.jpg


Here is a shot looking out. Put the floor through hell already and am still very pleased with it. Dragged all kind of stuff over it and has held up very well. Best part is it is so easy to clean! :)

SC650775.jpg


Jay
 

welder57

Well-known member
Joined
Feb 26, 2011
Messages
414
Great looking shop-may I ask a question on the concrete-why did you not put visqueen down before you poured the pads? Here in my part of the world (Alabama) that would be a must have thing to do. Have a Blessed Day.
 
OP
J

jmait769

Well-known member
Joined
Jul 10, 2012
Messages
83
Location
Las Cruces, NM
Great looking shop-may I ask a question on the concrete-why did you not put visqueen down before you poured the pads? Here in my part of the world (Alabama) that would be a must have thing to do. Have a Blessed Day.

Thanks! I believe the reason they do not use visqueen here is because of the low humidity and virtually no water in the soil. We are in the high desert where the elevation is about 4000 ft so water is not a problem in the area. Matter of fact we pray for it every day!!! :lol: By the way I lived a good part of my youth in Enterprise, AL. I remember the red clay dirt well!!

nice build and uh......very nice "scout"

Subscribed!

Hey thanks! :)

Jay
 

1921runabout

Well-known member
Joined
Oct 9, 2012
Messages
57
Location
Portales, NM
Jay,

Your project is sure looking good. You have a nice place there. Next time you're over to Cannon, let me know and I'll treat you to lunch or dinner and show you my cars.

I've begun building a 24' X 30' garage for my toys. We poured the slab last Friday and hopefully will be moving forward with the framing come spring.

Orlando
 
OP
J

jmait769

Well-known member
Joined
Jul 10, 2012
Messages
83
Location
Las Cruces, NM
Jay,

Your project is sure looking good. You have a nice place there. Next time you're over to Cannon, let me know and I'll treat you to lunch or dinner and show you my cars.

I've begun building a 24' X 30' garage for my toys. We poured the slab last Friday and hopefully will be moving forward with the framing come spring.

Orlando
Hi Orlando! That is awesome on the start of your garage! You should start a build thread!! I thought I was going to get out there this month but that doesn’t look like it is going to happen until after March. If you ever get out this way too let me know!

Well we have been working on the other Scout project but we have added some new equipment to the “Scout Den”!

First addition was a Miller 211 my family bought me for Christmas!!

NG086_zps68a0bd82.jpg


I built a wire holder for the stand and you can see some more pictures in this post: Link


Sticking with the color blue we put up a BendPak XPR-10A lift this week.

NG098_zpsc6bd8504.jpg


I researched and researched the type of lift we thought we needed and finally settled on this one. Lots of great information on this site and we bought it directly from BendPak. I contacted Jeff at BendPak and in less than a week the lift was here. Can’t say enough about their assistance and the product is just topnotch! We had no problems and I guess the only minor thing was a few scratches from shipping. I need to get with them for some touchup paint. We also added the Frame Cradle Pads to the order.

NG099_zps8077a880.jpg


Our install was typical I think with others who have posted here on GJ. The instructions were plainly written and we used an engine hoist to move the columns off of the trailer. We then set them on some dollies so we could move them into position. Probably the most daunting task is getting the column vertical and it took about 5 of us to lift them.

NG090_zpsb879e835.jpg


You can see my daughter sanding in the background while we play with the lift! :)

NG095_zps281e1bbb.jpg


NG091_zps12edadd5.jpg


We deviated from the garage plan a little and did not offset the hoist but placed it in the center as wide as it would go. I think this was the best decision for the size of our garage and what we do in it. Next up I would like to start on some work benches and the air system.

Jay
 
OP
J

jmait769

Well-known member
Joined
Jul 10, 2012
Messages
83
Location
Las Cruces, NM
One thing I have wanted to do is place a seal at the top of the rollup door. Spring weather for us usually means high winds and dust so needed to get the 1½ gap at the top of the door sealed.

NG102_zps6d28ac63.jpg


I used the idea Charles (in GA) recommended in this thread Rollup door top seal from B&D in Australia. They make a seal that fills the gap.

051856_02.jpg


Could not find it here in the USA so made one like it. I used a seal I found on Amazon from M-D Building Products:


I install an L bracket I cut from an extra purlin I had to fill part of the gap to about 1”. Main thing was to make sure the door did not contact this when opening or closing the door.

NG103_zpsfde15b34.jpg


Here is the seal on the door. I just riveted it on with the rivet heads on the inside portion of the door.

NG104_zps98b4dbed.jpg


This is what it looks like rolled up inside the door.

NG105_zps0e33635d.jpg


Seals pretty well and really has no effect on the door as you roll it up.

NG106_zps62a20fa0.jpg


I would still like to mount a broom type seal on the outside of the door both on the sides and the top so will also look into that.

Jay
 
OP
J

jmait769

Well-known member
Joined
Jul 10, 2012
Messages
83
Location
Las Cruces, NM
Good looking shop, and those are some nice Binders, too. :beer:
Another Binder fan here. Great looking shop. Good luck and keep us posted.
Hey thanks for looking and the comments! I have been slow to update this as we are dividing our time between the 65 Scout we are restoring and our “Tool Room” project. Not ready for pictures but hopefully will get to update that this weekend.

Here is a pic of us putting the body back on for a test fit. Can't say it enough how much we like having the lift!! Definitely worth the cost and makes this so much safer to do.

SC650810_zps93370da5.jpg


SC650811_zpsf0d4f991.jpg


We put this back together temporarily to check body gaps and fit before it gets painted.

SC650830_zps7992a803.jpg


Jay
 

Omphaloskeptic

Well-known member
Joined
Oct 11, 2008
Messages
2,346
Location
Ultima Ratio, Wa.
So, how did all the pieces line up? Any areas that need to be 'massaged'? What's the color scheme going to be on the paint job; stock or custom?

That lift certainly makes life easier for this rebuild! If you didn't have the lift, how would you have approached the fit check to be safe and sane? Mind if I ask what the lift/installation set you back? I keep thinking the two-post asymmetric is what I'll get down the road. What is your opinion of the rig you have; any 'shortcomings'?
 
OP
J

jmait769

Well-known member
Joined
Jul 10, 2012
Messages
83
Location
Las Cruces, NM
So, how did all the pieces line up? Any areas that need to be 'massaged'? What's the color scheme going to be on the paint job; stock or custom?

That lift certainly makes life easier for this rebuild! If you didn't have the lift, how would you have approached the fit check to be safe and sane? Mind if I ask what the lift/installation set you back? I keep thinking the two-post asymmetric is what I'll get down the road. What is your opinion of the rig you have; any 'shortcomings'?
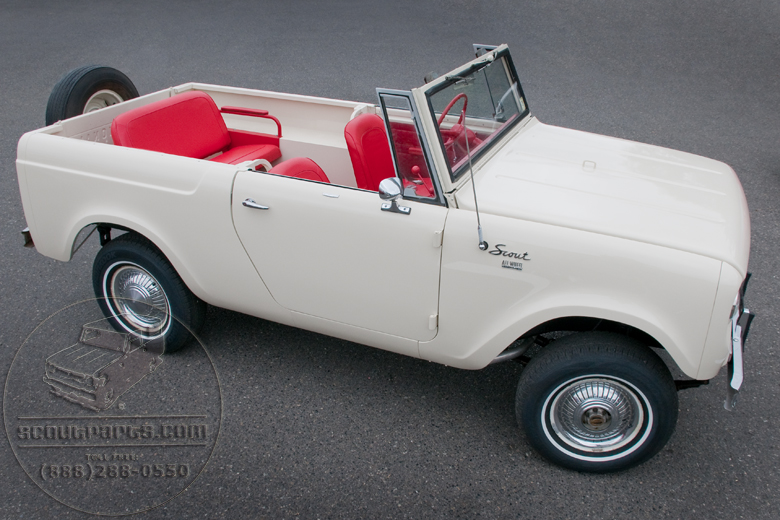
Better than we had thought! The top and windshield were from another Scout (these were bead blasted) so wanted to make sure they all went together well on this body. Windshield folds smoothly and the top needed a little hammer work on the mounting points where it meets the windshield. It looked like someone had tipped the top forward still attached to the windshield frame. We had a few issues with the tailgate as it was tweaked a bit at the point where the cable latches meet the body. Little metal work there and it closes smoothly. Doors, fenders and hood all aligned very well. Still more body work is required and lots of sanding!! :willy_nil

SC650828_zps2541a5b1.jpg


The color scheme will be white body with red interior. This will be a clone of the red carpet special Scout issued after the 100,000th Scout was built. Here is a great example:


Here is the steering wheel we just repaired in the red color we will use.

SC650835a_zpsbe180828.jpg


SC650845_zps3f380b2a.jpg


Well, here is how we lifted the body off of the frame on one. Safe and sane? Probably not! Used jacks in the rear and engine hoist up front. It really was stable but was a bear to pull the frame out from under it! We call this "redneck alley“ :lol: and is a hidden and fenced area behind the other garage. I promise it is all cleaned up now!!!

SC65010a_zps14028c75.jpg


The lift was under 3K and we installed it ourselves. I bought it directly from BendPak and did get the GJ discount. My opinion on the lift is it was well worth the price, no doubt, and workmanship is top notch. Best part is not having to run around lifting with a floor jack and then laying on your back when working underneath. Really nothing to complain about. For our garage size and placement the asymmetric was the best choice. Plus I can park two in the same spot now:

SC650829a_zps9b1e8465.jpg


Wow, kudos on the garage, scout and family involvement!
Thanks! I read your build and wow!!!! :shocking: Great job and I really like the color choices you made. Very professionally done!!

Jay
 
To avoid these ads, REGISTER NOW!

firecracker

Well-known member
Joined
Mar 16, 2013
Messages
415
Location
Lancs UK
Fantastic build Jay!!! love the Scout11 I had a 72model in the late 70s. Great to see your family with an interest(hands on)as well.:bowdown:
 
OP
J

jmait769

Well-known member
Joined
Jul 10, 2012
Messages
83
Location
Las Cruces, NM
Gotta love those IHC Scout's.
They are addicting!!!

I did not get as far as I thought this past weekend but here is a small update. I called this room our "outhouse" but we changed that to the “tool room” as the garage has taken shape. We added some storage areas so it serves more than one function.

This area is behind the door. Hard to take a complete pic as the space is small.

NG108_zps6c7c9c57.jpg


First time I have hung drywall – lot of cussing!! Tape job came out better than I expected and I used spray on wall texture for the ceiling and upper portion of the walls. Man, is that stuff expensive! The Z purlin takes up 8” of wall depth so we put in a built in cabinet for storage. Will trim out and put some doors on it.

NG107_zpsd521402c.jpg


I was going to use those shower surround fiberglass panels on the lower section but the cost was almost the same as the tile I got on sale.

NG114_zps99cdf3aa.jpg


This is the “outhouse” part! Still need to figure out the grout color. Can't decide between white, dark grey or charcoal?

NG115_zps73e424e5.jpg


Hopefully will get to wrap this up by the end of this weekend!

Jay
 
OP
J

jmait769

Well-known member
Joined
Jul 10, 2012
Messages
83
Location
Las Cruces, NM
Guess the ladies have to trek back to the house hehehe.
Yes, it was hard breaking the bad news to them! :dunno: Really I didn’t get much flack as they just think it is funny. Two things I have discovered so far with a detached garage – you still need some tools in the attached garage and it really is a hassle to stop what you are doing to go inside for a pee break or a coke. I’m looking for a refrigerator now! :lol:

Jay
 
OP
J

jmait769

Well-known member
Joined
Jul 10, 2012
Messages
83
Location
Las Cruces, NM
Very nice!
Thanks!!

Time for an update to the Scout Den! It has been a very busy past month for me as I finally finished my degree and graduate on Saturday so not a whole lot of time spent in the garage. That will change now!!

My family gave me some toolboxes for graduating so I wanted to put them in a frame similar to the ones Steevo designed and made. Here are some in progress shots.

NG129_zpsd95aa0ab.jpg


NG132_zpsa49bb04b.jpg


NG133_zpsd7bda2f8.jpg


NG135_zpsbdf0e153.jpg


You can see that I pretty much copied Steevo’s design right down to the feet inserts with just a change dimensionally to fit the boxes. I also added metal plate to the outside legs to hide the boxes. We have already put this to use and can say it is by far the best bench I have ever owned - really a great design and so glad Steevo shared it! :)

NG141_zpsc698352c.jpg


NG142_zps73b429ae.jpg


Still need to add doors to the toolroom shelves and do a little more trim work to call this area done.

NG121_zps35f71cb1.jpg


Also added this MasterCool swamp cooler.

NG123_zps567e94ee.jpg


Jay
 

bashr52

Well-known member
Joined
Aug 15, 2012
Messages
108
Location
VA
Looking great!!! I see a potential for a tool to take a swim in this picture though :lol_hitti

NG121_zps35f71cb1.jpg
 

Manshoon

Member
Joined
Apr 8, 2013
Messages
15
Outstanding job on the garage and the things you have added to make it so much more functional. I hope one of these days I am able to do something similar in my own garage.

I have a ways to go as funding is very limited. Thank you for sharing all the cool ideas. I love the Scout to, reminds me of my dads and brother both had a couple in years past and it's something you rarely see anymore on the road around my home.

Steve
 

jdeck

Well-known member
Joined
Feb 18, 2013
Messages
82
Location
Boston, MA
The Steevo bench is just sick, absolutely sick...I want one in my garage!!...wish I could make something like that for myself. Funny how there is a lot of healthy jealousy on these boards. Nice work.:beer:
 

Omphaloskeptic

Well-known member
Joined
Oct 11, 2008
Messages
2,346
Location
Ultima Ratio, Wa.
Well, first of all, CONGRATULATIONS on getting your degree!:rocker:

What was your major, and are you working in your field now, or hope to?

Breezed back through the thread to refresh what's been done; "You've come a long way"!
Being 'Army (ret.)', you're still living their enlistment hype "Be All You Can Be". :lol_hitti

Very nice (modified) execution of Steevo's bench design; looks great! With the deeper drawers of those Craftsman boxes, let's see some pics of what lives beneath your tool bench. Speaking of which, what the specs on the top working surface; did you fab it or have it done? I believe I have the exact same Wilton vise; is that the Hammerite blue?

So, now that you've been graduated, are we going to see some major progress to the 'White' Scout?:evil:
 

rmckee

Well-known member
Joined
Jan 2, 2012
Messages
457
Location
Wake Forest, NC
Bench looks great! Stang looks great! Shop looks great! Lift looks great!

Awesome space. Looking forward to seeing photos of the Scout as it progresses.
 
To avoid these ads, REGISTER NOW!
Top Bottom