To avoid these ads, REGISTER NOW!

Parker #39 vs. Parker #39X

upwrencheh

Member
Joined
Nov 4, 2015
Messages
8
I just purchased my first vintage vise. It is a C Parker #39. It weighs 52 pounds. What is the difference between this vise and #39X?
 
To avoid these ads, REGISTER NOW!

drivesitfar

Well-known member
Joined
Oct 23, 2013
Messages
36,172
Location
Pacific Northwest
UP: congrats on finding and buying an old Parker vise. not sure of their #'s so i'll let others post what they know if they see your thread. can you post a few pictures of it? i use the paperclip just above where you are writing your posts to attach pictures sort of like attaching them to an email.

then with pictures others might be able to answer your question or provide a catalog page.

also welcome to the group and hope you stick around to post thoughts and questions as you can.

cheers
 

jrobb316

Well-known member
Joined
May 18, 2014
Messages
1,377
Location
WI
The X is supposed to be the heavy duty version. Like the difference between the 800 series "superior" vises and the 900 "eclipse" series vises. Actual difference, probably a little heavier. I have a couple of the 900 series and they are plenty beefy enough.
 
OP
U

upwrencheh

Member
Joined
Nov 4, 2015
Messages
8
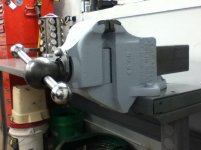
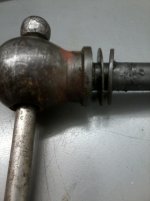
I dis-assembled the vise and have noticed a few issues with it, maybe someone can help me out. The first was the bolt retaining the main screw into the dynamic jaw is bent. The thread isn't anything that is standard nowadays. It mics out at .290 inches with about 20 TPI. Are these things still available or should I just drill and tap to say 3/8-24? Also there is alot of clearance between the lead screw and the hole where it goes thru the dynamic jaw. Should there be a bushing there? When I disassembled it there were 2 flat washers. What holds the ball on the end of the handle, press fit? Lastly the lead screw is loose in the handle knob. Is that normal and how are they attached?
See attached pics...........:dunno:
 

Attachments

  • 112815_1732%5b00%5d.jpg
    112815_1732%5b00%5d.jpg
    83.3 KB · Views: 33
  • 112815_1834[00][1].jpg
    112815_1834[00][1].jpg
    126 KB · Views: 34
  • 112815_1836[00][1].jpg
    112815_1836[00][1].jpg
    87.7 KB · Views: 33
  • 112815_1831%5b00%5d.jpg
    112815_1831%5b00%5d.jpg
    82.1 KB · Views: 32
Last edited:

McBrownie

Well-known member
Joined
Mar 27, 2014
Messages
1,827
Location
Cleveland, OH
Nice old Parker. Here are the numbers on my retainer screw for a Parker 203. It's basically a 5/16-20. From what I understand is that you can still find the tap, but not the bolt. I would work on straightening your bolt if you can.

View media item 49830
As for the handle, I think the knobs were "forged" onto the lead screw. I would look for welder who knows what they are doing to get that firmed back up. The bottom line on Parkers is that if the jaws are in good shape, then they are a great vise.

Take a look at the Vise 101 thread starting on post #117 to see what I went through with my 203.
http://www.garagejournal.com/forum/showthread.php?t=252830&page=6
 
OP
U

upwrencheh

Member
Joined
Nov 4, 2015
Messages
8
Hey McBrownie, Thanks for the info on that Parker retaining bolt. I think I will just try to straighten it. Read about all of your grief with that 203........Geez, you must have the patience of Job. That finished product really looks good! I noticed that you put a bushing in the dynamic jaw and it looked like the hole was worn to about the diameter of the replacement bushing. Was there a bushing in it originally and how much of an interference fit did you have on that bushing? Did you have to ream it after the press fit? I think I will have to do something similar with my 39. Where did you get that motor bushing? Thanks again for the post and directing me to your 203 rebuild.
 
To avoid these ads, REGISTER NOW!
OP
U

upwrencheh

Member
Joined
Nov 4, 2015
Messages
8
Here is what the 39 looks like now. I cleaned all of the grease, rust and old paint off in the electrolysis tank. I straightened the retaining screw as best I could and threaded the handle ends with 1/2-20 TPI and put on some threaded 1.375" ball knobs. Right now it is painted with Rustoleum primer.......Final color undecided
 

Attachments

  • IMG_0029.jpg
    IMG_0029.jpg
    66.1 KB · Views: 30
  • IMG_0028.jpg
    IMG_0028.jpg
    72.6 KB · Views: 20

bagged89s10

Well-known member
Joined
Mar 13, 2005
Messages
4,607
Location
CT
Here is what the 39 looks like now. I cleaned all of the grease, rust and old paint off in the electrolysis tank. I straightened the retaining screw as best I could and threaded the handle ends with 1/2-20 TPI and put on some threaded 1.375" ball knobs. Right now it is painted with Rustoleum primer.......Final color undecided


Nice work. Where did you buy the ball ends and can you share exactly how you attached them to the round bar?
 
OP
U

upwrencheh

Member
Joined
Nov 4, 2015
Messages
8
Hey Bagged, I turned the ends of the handle down to 1/2 inch then just ran a 1/2-20 die to cut new threads on each end. I had to undercut the threads a little on the inboard end so the balls would thread on completely. I purchased the balls at McMaster-Carr at their website, link below.....
They have many different sizes, I used 1-3/8 diameter balls. The originals were about 1-1/8 diameter. I used red Loctite on the threads to secure the ball ends, hopefully permanently......

http://www.mcmaster.com/#metal-threaded-balls/=10asne8
 

bagged89s10

Well-known member
Joined
Mar 13, 2005
Messages
4,607
Location
CT
Hey Bagged, I turned the ends of the handle down to 1/2 inch then just ran a 1/2-20 die to cut new threads on each end. I had to undercut the threads a little on the inboard end so the balls would thread on completely. I purchased the balls at McMaster-Carr at their website, link below.....

They have many different sizes, I used 1-3/8 diameter balls. The originals were about 1-1/8 diameter. I used red Loctite on the threads to secure the ball ends, hopefully permanently......


http://www.mcmaster.com/#metal-threaded-balls/=10asne8


Thanks, that's what I figured.
I did the same thing but used acorn nuts and turned them smooth on the last handle I made. I'm thinking about ordering threaded ball ends for my next handle, although I kind of like the oval ends.
ImageUploadedByTapatalk1450571756.010628.jpg
 

Outlawmws

Well-known member
Joined
Aug 9, 2011
Messages
39,477
Location
The Badlands
Nice old Parker. Here are the numbers on my retainer screw for a Parker 203. It's basically a 5/16-20. From what I understand is that you can still find the tap, but not the bolt. I would work on straightening your bolt if you can.

View media item 49830
As for the handle, I think the knobs were "forged" onto the lead screw. I would look for welder who knows what they are doing to get that firmed back up. The bottom line on Parkers is that if the jaws are in good shape, then they are a great vise.

Take a look at the Vise 101 thread starting on post #117 to see what I went through with my 203.
http://www.garagejournal.com/forum/showthread.php?t=252830&page=6

Now that's odd. my 974 uses a std 1/4-29 thread, I just rechecked as I replaced that screw with a socket head cap screw when I first cleaned it up and painted it almost 30 years ago. And yes, I just verified the thread is snug and not slopping around while I had it out. No way would an oversize bolt fit in there...

Another solution if your bolt does not straighten to a usable state, is to Helicoil it to 1/4-20. the thread pitch is the same just clear the ID with the tap drill for the Helicoil , tap it and pop the Helicoil in. Finis.
 
To avoid these ads, REGISTER NOW!
Top Bottom