To avoid these ads, REGISTER NOW!

Pinch Me, it it real?

Omphaloskeptic

Well-known member
Joined
Oct 11, 2008
Messages
2,346
Location
Ultima Ratio, Wa.
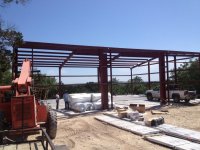
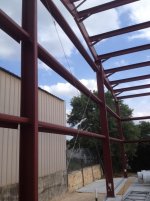
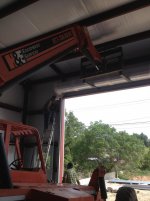
As has been said, "Everything is bigger in Texas"! :thumbup:

Bigger builds, bigger bills, bigger hassles with the HOA, city, county, utilities....
You deserve some kind of medal for 'Patience and Perseverance' in dealing with all that mess. Your WIFE deserves an even bigger medal for putting up with your household garage antics! LOL

A 4,000 square foot garage seems like a big 'sacrifice' to keep the wife happy. Jeez, some of the things husbands have to do to keep their wives happy!:lol_hitti

Since this is a Texas build, are you going to have to A/C installed throughout to keep it livable?

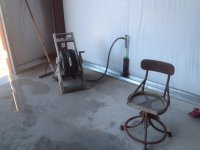
P.S. - That drill restoration is pretty amazing. What process did you employ to do all the mirror polishing?
 
Last edited:
To avoid these ads, REGISTER NOW!
OP
M

motormitch

Well-known member
Joined
Aug 27, 2012
Messages
636
Location
Austin TX
The shop is a little crazy I admit and I know that I am blessed with an amazingly patient and generous wife. (she's also hot and a real ********* car chick!)

As far as HVAC goes, I plan to have one system for the shop and one for the finished space, but I have not been able to get a good set of bids yet. Strange, but everyone takes a look at it, promises something and never delivers. I've gotten a couple of verbals, but nothing in writing. I think it is two reasons. First, my plans are just my own Google Sketchup plans and not formal professional plans and that worries some of the subs who don't know how easy I am to work with on the fly. Second, there is a lot of building going in here in Austin and we have a sub shortage with the heat season coming. I hope that with the building finished to a dry state, the HVAC guys can see it and be more comfortable bidding.

As far as getting a high polish on the drill parts, I start with sanding if really bad, light de-rust treatment with evapro-rust and then the real magic happens on the buffing wheel. I use a sisal wheel on hard metal like the drill and a black compound (coarse) and then switch go a soft wheel with a white compound. I have had a lot of luck with the same approach on my vintage snap on tool collection. I always buy tools that look pretty bad so I get a great deal and then spend hours on the wheel.
 
OP
M

motormitch

Well-known member
Joined
Aug 27, 2012
Messages
636
Location
Austin TX
Here is an example of an old fan I recently finished where I stripped the bone paint and did a high polish on the aluminum body, base and blades to look even more art deco. In this case, I used 600 wet paper and then used a soft wheel with green compound. I may clear coat the fan to present oxidation over time, but clear coating directly on such a highly polished finish is something I am still working out. This will look nice in the finished space of the space.
 

Attachments

  • fan1 old front view.jpg
    fan1 old front view.jpg
    140.2 KB · Views: 601
  • fan1 old side view.jpg
    fan1 old side view.jpg
    129.3 KB · Views: 572
  • fan1 new front view.jpg
    fan1 new front view.jpg
    131.7 KB · Views: 657
  • fan1 new side view.jpg
    fan1 new side view.jpg
    134.4 KB · Views: 876

Omphaloskeptic

Well-known member
Joined
Oct 11, 2008
Messages
2,346
Location
Ultima Ratio, Wa.
Beautiful result on the Westinghouse fan! If you have time to snap a few pics of your buffing/polishing station, please post them here. I've yet to use the two-wheel arbor set-up I put together years ago; don't ask me why I haven't made use of it yet....
When I do decide to practice on some parts, I'd like to have my station set up to better contain the mess I'm sure I will create. lol

In regard to putting a clear coat on the polished fan blades, is a powder-coat clear on aluminum a possibility?
 
OP
M

motormitch

Well-known member
Joined
Aug 27, 2012
Messages
636
Location
Austin TX
Well more progress was made today. Materials for the walls, roof, and insulation were delivered. The Ditch Witch dug my water line trench deep in basically solid Texas limestone. Last but not least, they hung one of the two man doors. Now I feel safe and secure.
 

Attachments

  • materials show up.jpg
    materials show up.jpg
    145.2 KB · Views: 464
  • ditch witch 1.jpg
    ditch witch 1.jpg
    148.5 KB · Views: 492
  • ditch witch 2.jpg
    ditch witch 2.jpg
    141.8 KB · Views: 484
  • door.jpg
    door.jpg
    142.7 KB · Views: 564
OP
M

motormitch

Well-known member
Joined
Aug 27, 2012
Messages
636
Location
Austin TX
Can I be ready? You damn skippy. If this shop is not in full form by 4/14, you will find me in a rubber room, wearing a rubber helmet, hitting a rubber wall with a rubber hammer.
 
OP
M

motormitch

Well-known member
Joined
Aug 27, 2012
Messages
636
Location
Austin TX
It doesn't look like a lot of progress, but all the tension cables got put in place so that after the roll up doors are in place everything can get totally squared and locked down. You have to look closely to see them, but they are there. Insulation wrap is supposed to happen tomorrow, but there is a possibility of rain which we need so badly that I won't complain about a small delay.
 
OP
M

motormitch

Well-known member
Joined
Aug 27, 2012
Messages
636
Location
Austin TX
Why do you have to put in tensioned cables

My builder is a big of post tensioned cables in general and in Texas where there can be clay pockets it ensures that you are not going to have cracking due to shifting or settling. It is generally believed to be a better re-enforcement than re-bar which doesn't kick in until a crack or shift starts whereas tensioned cables are always pulling the concrete together in multiple directions. The cable aren't just run through the concrete, they are tensioned at (not total sure but I 5,000 lb ) a very high level of tension. This is done as the concrete is about 2/3 cured. The cables are inside a greased sleeve so the tension can be applied as the pouring is done. They are set every 3 feet, making the foundation almost a floating slab.
 
OP
M

motormitch

Well-known member
Joined
Aug 27, 2012
Messages
636
Location
Austin TX
Yesterday progress was made. Insulation and sides have started going up. Back wall and section of front got done before this strange stuff called rain came in. I seem to remember years ago hearing about something called rain here in Austin Texas.
 

Attachments

  • back wall.jpg
    back wall.jpg
    142.2 KB · Views: 645
  • front door.jpg
    front door.jpg
    136 KB · Views: 606
  • rain stop.jpg
    rain stop.jpg
    142.2 KB · Views: 607

Omphaloskeptic

Well-known member
Joined
Oct 11, 2008
Messages
2,346
Location
Ultima Ratio, Wa.
"Back wall and section of front got done before this strange stuff called rain came in."

Well, strange as rain may be to Austin, isn't that in keeping with the city's unofficial motto?

KEEP AUSTIN WEIRD!

*** :tard::badteeth::Freak::Kiss::Freak::badteeth: ***​
 

Aaron P.

Well-known member
Joined
Nov 27, 2007
Messages
96
looking really big n moving along nicely...soon you will be in n it will be filled with all sorts....lovely mustang ya got....

in post #17 why is the ground covered in plastic?? ive never seen anything done this way????
 
OP
M

motormitch

Well-known member
Joined
Aug 27, 2012
Messages
636
Location
Austin TX
looking really big n moving along nicely...soon you will be in n it will be filled with all sorts....lovely mustang ya got....

in post #17 why is the ground covered in plastic?? ive never seen anything done this way????

Moisture barrier. I'm not the expert, but I am pretty sure that at least around here, an professionally engineered slab always called for it.
 
OP
M

motormitch

Well-known member
Joined
Aug 27, 2012
Messages
636
Location
Austin TX
looking really big n moving along nicely...soon you will be in n it will be filled with all sorts....lovely mustang ya got....

Here is another one my Mustangs. 1968 convertible with 302. She looks good in the pictures, but the paint is **** up close so she will be one of the first customers of my new paint booth when the shop is done.
 

Attachments

  • 68 stang 2.jpg
    68 stang 2.jpg
    139.8 KB · Views: 341
  • 68 stang 1.jpg
    68 stang 1.jpg
    138.8 KB · Views: 394

Aaron P.

Well-known member
Joined
Nov 27, 2007
Messages
96
i know its a moisture barrier but why is it done in squares??? sorry i should have said that in the first place....here in ireland it wouldnt be done in squares like that...it would be just flat, but we build it like this soil, hardore whacked so its compressed, sand blinding, rigid insulation, vapour/ moisture barrier then the concrete floor/ slab....its very very rare for someone to build a timber garage here due to our crappy damp climate :mad:

loving these cars mitch....one for each suitable day be it wet or sunny...nice man :bounce::D
 
To avoid these ads, REGISTER NOW!
OP
M

motormitch

Well-known member
Joined
Aug 27, 2012
Messages
636
Location
Austin TX
i know its a moisture barrier but why is it done in squares??? sorry i should have said that in the first place....here in ireland it wouldnt be done in squares like that...it would be just flat, but we build it like this soil, hardore whacked so its compressed, sand blinding, rigid insulation, vapour/ moisture barrier then the concrete floor/ slab....its very very rare for someone to build a timber garage here due to our crappy damp climate :mad:

loving these cars mitch....one for each suitable day be it wet or sunny...nice man :bounce::D

The space between the squares form a mesh of "beams" of deeper concrete adding strength for things like car lifts, heavy equipment, etc that might crack a thinner slab. My slab is 6" thick over the top of the squares and 18" in the beams. This will allow me to do pretty much anything I want to in the shop without worrying about cracking the slab.

In many cases there will also be something called piers which are just like piers on a boat dock. They will dig a set of very deep holes, put a large tube in the hole vertically and then when the concrete is poured if will fill up the holes and make concrete piers under the slab. This is done is areas with soft earth, clay, etc..
 
OP
M

motormitch

Well-known member
Joined
Aug 27, 2012
Messages
636
Location
Austin TX
Update on progress today. After a MASSIVE rain and hail storm, the builder got to work today. I also spent the day installing some of the channels needed for steel stubs to be used to install power outlets, air hose outlets, etc.. and then buttoned up after I am happy with everything.

I also have water now.

Here are some pictures.
 

Attachments

  • inside after rain 2.jpg
    inside after rain 2.jpg
    139.4 KB · Views: 417
  • inside after rain 1.jpg
    inside after rain 1.jpg
    137 KB · Views: 468
  • build 1 after rain.jpg
    build 1 after rain.jpg
    145.3 KB · Views: 485
  • water 2.jpg
    water 2.jpg
    150.2 KB · Views: 415
  • water line 1.jpg
    water line 1.jpg
    151.6 KB · Views: 435

mdkingsley

Well-known member
Joined
Nov 18, 2012
Messages
371
Location
Chickamauga Ga
This is a great shop I will be subscribed from here on. I know what you mean about working in the house. I used the stove to bake clean an intake once. Wife was not home at the time. She walked in and said what is that smell and was NOT happy. That stove stunk for a long time even after cleaning. Keep the updates coming. Also great mustangs, I got my son a 68 convertible that we will redo some day and just aquired a date code 68 mustang 302 for it.
 
OP
M

motormitch

Well-known member
Joined
Aug 27, 2012
Messages
636
Location
Austin TX
Short update> This morning I installed metal channels on the purlins and concrete floor around the entire perimeter. Screwing the channel onto the purlin 8' up has clearly reminded me of my age and physical condition.
 

Attachments

  • channels installed.jpg
    channels installed.jpg
    132 KB · Views: 579

Aaron P.

Well-known member
Joined
Nov 27, 2007
Messages
96
thats great on the floor mitch, never seen anything like it but its kinda like a waffle slab....great idea for the floor allowing you to place the ramp were ever ya please...your never too old for that stuff man....it will be well worth it when the roof is finished....MOVE IN TIME :thumbup:

I take it there will be some sort of fence or wall going out front for security n cameras???
 
Last edited:
OP
M

motormitch

Well-known member
Joined
Aug 27, 2012
Messages
636
Location
Austin TX
Yes, there will be a 10' high black vinyl coated chain link fence, 8 motion activated exterior LED lights and digital cameras with night vision on the front, back and 2 inside. When are you coming over to Texas to check it out :)
 

Aaron P.

Well-known member
Joined
Nov 27, 2007
Messages
96
hey mitch id love to be on a plane now :thumbup:.....its great to see so many guys been able to build man caves n ave such nice motors to put in them....:drool:
 
OP
M

motormitch

Well-known member
Joined
Aug 27, 2012
Messages
636
Location
Austin TX
Well today the basic building was put together. All that is left is trim out, final screw up on the all of the panels and interior touch up. After that comes the driveway pour, electrical, HVAC, and interior build out.

The picture of the chair is something I pulled from the dumpster in front of the construction site that people seem to be using as a city dump. For some strange reason, I dig it. I might restore it as a nod to the garage journey....
 

Attachments

  • trim ready.jpg
    trim ready.jpg
    144.5 KB · Views: 1,067
  • trim ready 2.jpg
    trim ready 2.jpg
    144.8 KB · Views: 974
  • new chair.jpg
    new chair.jpg
    139.5 KB · Views: 1,108
OP
M

motormitch

Well-known member
Joined
Aug 27, 2012
Messages
636
Location
Austin TX
Well, more progress today. Most of the trim went up, walls screwed in at all levels and then most exciting, the massive Janus 3000 insulated roll up doors got installed. However, upon rolling them down, all three were dented pretty badly. The pictures don't really show how deep the dents really are. After looking through some of my pictures today, I found one that shows the culprit. The installers used a forklift without and any padding to lift them and hold them 14' in the air. However, the steel building GC is a great guy who didn't even blink and accepted full responsibility. He is ordering all new doors tomorrow. I'm sure the installers aren't going to like the conversation he will have with them, but really who does something like that without thinking it would dent the doors? If you ever find yourself wanting a great steel building at a fair price in the Austin TX area, look up Brinkner GC inc.
 

Attachments

  • dent 4.jpg
    dent 4.jpg
    134.1 KB · Views: 350
  • dents 3.jpg
    dents 3.jpg
    122.6 KB · Views: 374
  • dents 2.jpg
    dents 2.jpg
    115.4 KB · Views: 393
  • dents 1.jpg
    dents 1.jpg
    112.6 KB · Views: 431
  • forl lift door.jpg
    forl lift door.jpg
    138.7 KB · Views: 559

Omphaloskeptic

Well-known member
Joined
Oct 11, 2008
Messages
2,346
Location
Ultima Ratio, Wa.
It might be time to print those door installation pictures and hand them to the GC so he has them when he has the 'disgustion' with the door installation company management. You know what they say, "A picture is worth a thousand words"!
 
OP
M

motormitch

Well-known member
Joined
Aug 27, 2012
Messages
636
Location
Austin TX
Here is a refrigerated water fountain from the 40s that I just finished restoring that will soon be in the finished shop to wet my whistle while working up a sweat on other projects. The amazing thing is that I didn't have to touch the refrigeration system. It still works perfectly after over 70 years.....

Unfortunately, I didn't have a bunch of before pictures of the whole unit, but you can see from the picture of the top that the porcelain top was in pretty bad shape as well as the fittings. The picture of the water inlet/outlets on the back shows the color and condition of the exterior. Now, can I move it with dinging it up?
 

Attachments

  • water 1.jpg
    water 1.jpg
    137 KB · Views: 333
  • water 2.jpg
    water 2.jpg
    145.3 KB · Views: 309
  • water 3.jpg
    water 3.jpg
    141.5 KB · Views: 303
  • water 4.jpg
    water 4.jpg
    135.9 KB · Views: 328
  • water 5.jpg
    water 5.jpg
    143.8 KB · Views: 331
  • water 6.jpg
    water 6.jpg
    143.4 KB · Views: 468
  • water 7.jpg
    water 7.jpg
    135.6 KB · Views: 370

Omphaloskeptic

Well-known member
Joined
Oct 11, 2008
Messages
2,346
Location
Ultima Ratio, Wa.
motormitch, looks like that fan needs a trip to CudaChick1968's 'Glitz and Glowz' shop for that fine, final finish. lol

Nice job on the water fountain; looks like it's ready for another 70 years of service! Just a thought about a possible dual function for the cooler. That chrome cap opposite the fountain spout; is it a second line (internally) to allow the addition of a goose neck faucet? I was in the 'Shop Safety Sam' mode and thought it might make a good emergency eyewash station in case (perish the thought) that the need might arise for a fast face flush. A goose neck faucet might also come in handy day-to-day as a filling station for the shop's coffee maker...
 

CudaChick1968

Member Emeritus
Joined
Jul 1, 2011
Messages
1,800
Location
Northwest Tennessee (38230)
motormitch, looks like that fan needs a trip to CudaChick1968's 'Glitz and Glowz' shop for that fine, final finish. lol

Nice job on the water fountain; looks like it's ready for another 70 years of service! Just a thought about a possible dual function for the cooler. That chrome cap opposite the fountain spout; is it a second line (internally) to allow the addition of a goose neck faucet? I was in the 'Shop Safety Sam' mode and thought it might make a good emergency eyewash station in case (perish the thought) that the need might arise for a fast face flush. A goose neck faucet might also come in handy day-to-day as a filling station for the shop's coffee maker...

Awwwwww, that's a new one there Omphalo -- I like it! :D Thank you for the kind words sir < curtsey >

Great idea on the safety modification too.
 
To avoid these ads, REGISTER NOW!
Top Bottom