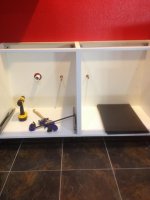
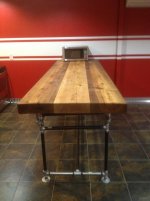
I also had a rude reminder of why the shop is called the "Blood-Shed", but I'll cover that next.
Now, I'll share my latest Blood-Shed Moment. Background setting.
I have a Sullair ES-6 rotary compressor that I bought from a factory that was expanding and needed more compressor. After a couple of installation hiccups around wiring the motor for 3 phase Delta vs Wye. I had it installed and running great. A couple of weeks ago, I noticed there was oil in the tank because the automatic drain was burping it out. What's up with this? After posting questions here and getting on the phone with the factory, it was decided that all I needed to do was change the air filter, the oil/air separator file, oil filter and complete Sullair Fluid change. Basically a complete service. Easy enough right?
I gather the tools and head out back to the compressor. A friend named Marty stops by and says he wants to help so he can learn. I guess this would the blind teaching the blind? Starts with the removal of a large metal screw-in cap. To loosen the cap you must insert a small metal rod like a phillips head driver or allen wrench into one of 2 holes on the edge and use this to start turning the cap until you can finish unscrewing by hand In my defense, I had just changed a saw blade on my skill saw to work on the table described earlier so my Righty Tighty, Lefty Loosey was a little mixed up. Combine that with he fact I have lexdysia, sorry I meant dyslexia and the odds were against me actually doing something as simple as loosening a screw-in cap. You guessed it, I bent two allen wrenches and a Snap-on driver trying to "loosen" the cap. F-it, time for the monster pipe wrench, destroy of all bolts, nuts or anything it can grip. As I am placing the monster on the cap, I have to make sure I turn it the right way for the great white shark-like teeth to bite into the cap and this was when I realized that some idiot at Sullair actually designed the large screw-in cap to use standard clock-wise tightening as opposed to reversed like saw blade nuts or VW beetle rear brake hub nuts (another story). How dare he. Now I must undo 30 minutes of over tightening.
I put the mighty pipe monster on the cap, take a deep breath, use my hulk like anger powers to call up massive strength and give the wrench a mighty pull at which point I realize I had placed the wrench on backwards and slammed my hand between the wrench and the compressor mounting plate. A little blood is shed, which it turns out only heightened the shop's appetite for more later. I skip it off (see earlier story) and put the wrench on properly and the cap is removed and the air/oil separator is replaced. Marty is taking notes to learn everything he can.
Next comes the oil drain plug. The on-line manual show a large bolt, much like a regular oil plug. Nay, nay, it was a big *** allen screw. I mean big like in out of the hundreds of allen wrenches that have accumulated in my tool boxes, none come close to being large enough. It's Sunday morning, nothing is open and I know none of my friends will have anything like this that I can borrow, because they all borrow tools from me. I am stupid enough to spend everything I can on tools and have a generous heart. My wife refers to this aspect of my nature as gullible.
In a flash of brilliance, I explain to Marty that since the oil filter is almost as low and oriented the direction as the oil plug, I can just undo it to drain the oil since I am replacing the filter anyway. A little old oil mixed with 5 new quarts is no big deal I wisely explain. Take note of my cleverness Marty. I proceed to unscrew (yes, I got it right this time) the filter with a drain pan handy and when it come loose the oil gushes out and I realize the pan is just a hair to big to fit under so the great lubrication flood of 2013 begins. I can tell you exactly how any shop rags to take to soak up 4.5 quarts of Sull Lube. Fortuitously the compressor is outside on a service pad next to a desolate chunk of land so I will be able to degrease and clean up later with Gunk and a water hose so I just laugh it off. What about the environmental impact? Please remember that I am old enough to have grown up on a dirt county road that was oiled by the county regularly to keep dust down. Yes young people, my generation took old oil to the county to be used for road maintenance in this manner. Millions of gallons were used like this in my home town and you can clearly see that I turned out just fine, right?
Anyway, the oil was foamy with water so I decide that all of it had to be removed. The plug must come out so that I can get that last half quart of watery oil. What to do? After reviewing all of my options, it came down to hooking up an old 110V air compressor I had and using my air powered oil suction tool to get the rest out through the filler hole or fabricate my own tool to remove the plug. Which would you pick? Yes, clearly any chance to use a grinder on metal can not be passed up. Out comes the bench grinder and I donate an old 1/2" socket extension from HF to be used. Yes, it is square and the hole is allen shaped, but I have done this before and it worked. How tight could an oil plug be? After a successful grinding, the tool is made and tried. Nope, just strips out and spins inside the hole. I suddenly remember that I have some extra bolts used to install my lifts and they are large enough be shaped into an allen head. Marty wants his turn at grinding so after explaining all of the safety procedures he starts grinding following none of them because walking all the way around the building just to get some gloves etc.. is just too much work.
The grinder is sitting on the top of a AC packaged unit and so it is not bolted down. As Marty is pushing the bolt against the wheel, the grinder is walking backward a bit.

Naturally Marty asks if I could hold the base of the grinder while he is pushing. No problem. Glad to help. I reach out to grab the base of the grinder and my hand/eye coordination flickers on and off like an old light switch so what I end up grabbing isn't the base of the grinder. No this doesn't end up in a man love story, this is the Blood Shed after all. I grab the grinding wheel. The spinning at the speed of light, grinding wheel. The coarse hard cutting, grinding wheel. I instantly know I have done a bad thing because I felt something hit bone. Being of a ******* nature, way too much of my bone has been directly touched by foreign objects so I know that feeling. I grab my hand, yell a string of obscenities that would make Adrew Dice Clay proud and start the process of accessing the damage. This little game we know as "I'm afraid to look cause something might be missing". Well, the thumb was still attached and the only bone showing was a very small spot at the bottom of the large area of tissue the grinder removed. Here is a picture after I cleaned it, bandaged it and got the bleeding mostly stopped. The Blood-Shed continues the tradition.

Incidentally, we finished the screw fabrication, it worked and the compressor is purring like a kitten. Marty has expressed some concern over my qualifications as a teacher, but hey, if he can't realize the value in seeing what not to do as a teaching method, then I will just find another who appreciates my technique.

")