To avoid these ads, REGISTER NOW!

Pit Cart Project Started

OP
D

Don Campbell

Well-known member
Joined
Dec 20, 2013
Messages
652
Location
Gaylord , Michigan
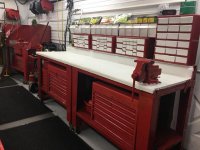
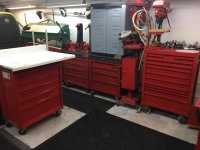
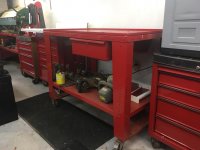
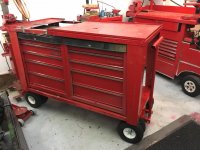
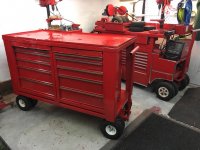
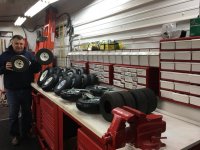
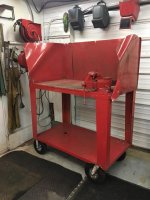
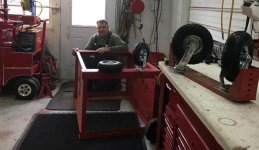
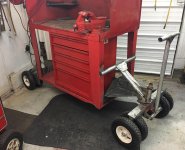
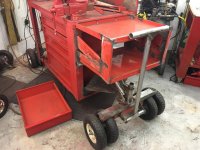
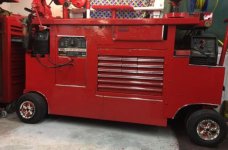
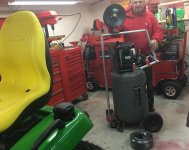
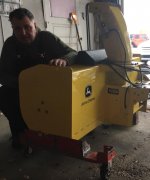
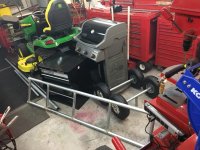
Todays update shows me inserting two bottom toolboxes under my workbench. I used the plasma to cut out the old drawers. This will be much more practical. The second photo shows how I use one tool chest for a mini workbench with a short countertop attached. I got another box cleaned and lubed today. Two of these boxes will be connected together for the second rolling toolbox . This will give me more floor space and make the other empty metal table more useful.
 

Attachments

  • box one.jpg
    box one.jpg
    79.3 KB · Views: 169
  • box two.jpg
    box two.jpg
    75 KB · Views: 152
To avoid these ads, REGISTER NOW!

Bears Fan

Well-known member
Joined
Jan 26, 2012
Messages
3,437
Location
Indiana
attachment.php


Wow! That looks awesome! I think a Indy car pit crew could use that :thumbup: :thumbup:
 
OP
D

Don Campbell

Well-known member
Joined
Dec 20, 2013
Messages
652
Location
Gaylord , Michigan
Thanks !!!
Todays photos shows me moving the metal table in place to start working on it. Also you can see I inserted another lower box between two other boxes on the south workbench. I could never justify expensive boxes but I always tried to make them work.
Most of these Husky boxes I got for around $60.00 each. A few of the Task Force boxes I got for $50.00 each. They made it easy to make 4 of my little workbenches with little cost. I have 85 tool box drawers so now I am finally labeling them after all these years. The metal table will get the lower shelf dropped down 3" , get the drawer cut out and get lengthened about 12 inches. Getting smaller duel wheel set up front and rear and a T-handle and same steering set up. Mostly a old man puttering type project. Much lighter than the first one.
 

Attachments

  • table one.jpg
    table one.jpg
    58.7 KB · Views: 96
  • table two.jpg
    table two.jpg
    46.8 KB · Views: 87
OP
D

Don Campbell

Well-known member
Joined
Dec 20, 2013
Messages
652
Location
Gaylord , Michigan
I got the top drawer cut out today and split the table with the plasma cutter. Looks like 13" stretching it will fit the two bottom tool boxes. Once the new length is welded back together at the new length I can lower the bottom shelf down a few inches lower. This is going to be so nice to use this wasted shelf for two of the tool boxes.:bounce:
 

Attachments

  • table cut in half.jpg
    table cut in half.jpg
    75.5 KB · Views: 95
OP
D

Don Campbell

Well-known member
Joined
Dec 20, 2013
Messages
652
Location
Gaylord , Michigan
I got the longer table frame welded back together today. I will lower the bottom shelf tomorrow. It has to go down almost to the wheels. Going to have to get the plasma cutter back out . I got my new mag wheels today for the pit cart. Also a little chrome trim, looks a little more sporty now, ha,ha.:rocker:
 

Attachments

  • table welded back tgether 2.jpg
    table welded back tgether 2.jpg
    24.2 KB · Views: 105
  • magwheels.jpg
    magwheels.jpg
    47.5 KB · Views: 120
OP
D

Don Campbell

Well-known member
Joined
Dec 20, 2013
Messages
652
Location
Gaylord , Michigan
:bounce:Making progress again today as I got the bottom shelf lowered 6 inches and test fitted the two boxes, nice fit. I removed the old wheels and are starting to cut out the metal for the eight tires that will go on this one. These smaller tires have sat in my back shed for over 10 years. I bought 40 of them for model building . I used 30 of them. It will be nice to get some use out of these 8. Now I have 8 nice wheels from the two boxes that I will upgrade to my large drill press and my small sheet metal shear. They both have too small of wheels . I am really enjoying these simple shop projects. This is the most organized my little workshop has ever been. FUN !!
 

Attachments

  • wheelsone.jpg
    wheelsone.jpg
    99.6 KB · Views: 144
  • wheelstwo.jpg
    wheelstwo.jpg
    75.1 KB · Views: 130

GLTHFJ60

Well-known member
Joined
Oct 31, 2013
Messages
821
Location
Durham, NC
Bad ***!!

Instead of the dual tires at each corner, think you could get away with single go kart tires instead?
 

Stuart in MN

Well-known member
Joined
Sep 8, 2005
Messages
23,047
Location
Minneapolis
I would imagine go kart tires aren't rated for very heavy loads, so while they make look cool they may not be the best choice for a heavy pit cart.
 
OP
D

Don Campbell

Well-known member
Joined
Dec 20, 2013
Messages
652
Location
Gaylord , Michigan
Thanks , actually I do have 12 brand new go cart slicks on my shelf I bought over 10 years ago. I bought 25 of them and never used all of them for my models. They do not have rims and I checked today about getting rims for them. I have another fun project for next week to make another one of my tools work much better. I have always loved to putter and tweak things since I was very young. Thats all I know , I am never happy leaving things alone , ha,ha. I always have to change them , ??
Todays progress I got the front steering axle assembly roughed in and tacked in place. It rolls very nice. I still got tweak the boxes to fit better, then build the front T-handle and cut out the metal to fill in the gap. This one will not get the mag wheels or the chrome package. The next project I have been wanting to do for years !! And very practical , not just to look cool !! I'll share it next week.:beer:
 

Attachments

  • table on 8 tires.jpg
    table on 8 tires.jpg
    89.1 KB · Views: 135
OP
D

Don Campbell

Well-known member
Joined
Dec 20, 2013
Messages
652
Location
Gaylord , Michigan
No , not motorized. Keeping it simple and low cost. This pic shows the front T-Handle and steering all assembled and painted. Also I trimmed the boxes to fit nice and snug together.
Almost done with rolling bench #2 .
 

Attachments

  • T-Handle done.jpg
    T-Handle done.jpg
    82.3 KB · Views: 103
OP
D

Don Campbell

Well-known member
Joined
Dec 20, 2013
Messages
652
Location
Gaylord , Michigan
I got the second rolling tool box done today and painted. Also here is a few of my 14 go cart slicks . Tomorrow I will mount 6 of them on rims.
 

Attachments

  • slicks.jpg
    slicks.jpg
    63.4 KB · Views: 83
  • slicks2.jpg
    slicks2.jpg
    82.4 KB · Views: 105
OP
D

Don Campbell

Well-known member
Joined
Dec 20, 2013
Messages
652
Location
Gaylord , Michigan
Thanks , the tool box in the back is 44 years old, just some fresh paint and a little chrome molding and some plastic mags made it look nice again. The front two boxes are 11 years old and these seem almost new again . Hard to believe doing a little fabricating on them is making them much nicer to work with.
 
OP
D

Don Campbell

Well-known member
Joined
Dec 20, 2013
Messages
652
Location
Gaylord , Michigan
Today I only had time to get to the shop to mount two of the Go-Cart Slicks. Tomorrow I will mount 8 more and hopefully get going on the next shop improvement project. I now have 20 left over steel wheels extra for more fun little upgrades in the shop. Cleaning the shop and back shed and now doing these fun little projects is just what I hoped retirement would be like. :beer:
 

Attachments

  • rims mounted.jpg
    rims mounted.jpg
    86.2 KB · Views: 119
OP
D

Don Campbell

Well-known member
Joined
Dec 20, 2013
Messages
652
Location
Gaylord , Michigan
I decided to keep going on the last table improvements. I got the bottom shelf lowered and the old wheels removed and the new wheels attached. Do NOT like these wheels !!
Front wheels are very wobbly making the table feel very tipsey . And thats with nothing on the table. I lifted the table from the floor and it tipped over the opposite way right on my brand new John Deere. Put 5 nice scratches on it.:lol_hitti :lol_hitti :lol_hitti :headscrat:headscrat
So Friday I will remove them and go back to my other design like the first two. Even though this will be a shorter wheelbase , I like the stablilty of the 8 tires. Then I know the boxes will set fine . I also stocked up on steel for the winter so that is nice. :beer:
 

Attachments

  • table 3 too.jpg
    table 3 too.jpg
    73.1 KB · Views: 119
  • table 3.jpg
    table 3.jpg
    63.1 KB · Views: 106
OP
D

Don Campbell

Well-known member
Joined
Dec 20, 2013
Messages
652
Location
Gaylord , Michigan
Back in the shop and I got the front steering and frame parts fabricated and welded in place for rolling table number 3. It will end up having the longer wheelbase. I did not like the short version at all. Tomorrow I will remove the old small tires and enjoy the new long wheelbase with 8 tires that will be very stable. I plan on 300 lbs on these wheels so I feel better going this route. I love the first two rolling benches and even excited to get this one done. My little shop has never been this organized , EVER !!:dunno:
 

Attachments

  • front assembly number 3.jpg
    front assembly number 3.jpg
    87.6 KB · Views: 77
OP
D

Don Campbell

Well-known member
Joined
Dec 20, 2013
Messages
652
Location
Gaylord , Michigan
T-handle assembly number 3 done and it works great !! Steers very easy. I also have the first tool box fitted under the table top. The front fab design looks confusing but it is very sturdy . I used the metal I had on hand and it worked fine. Square tubing is so expensive .
None of this frame work will show when it is done.:confused:
 

Attachments

  • table 3 t handle.jpg
    table 3 t handle.jpg
    89.3 KB · Views: 73
To avoid these ads, REGISTER NOW!

BUGTHUG

Well-known member
Joined
Nov 12, 2010
Messages
2,960
Location
Kansas
I would think some big riding lawn tractor rims and tires would be more better?:dunno: and I'm sure you have some of them around?:headscrat
 
OP
D

Don Campbell

Well-known member
Joined
Dec 20, 2013
Messages
652
Location
Gaylord , Michigan
I'm trying to use up all the tires I have laying around for years. Lawn tractor tires are a bit too large for these projects. Today I cut up three of the drawers from the tables not being used now and am converting them into three front shelves. I will also add three similar shelves to the rear section . This will give me more use out of this table. Still looks rough at this stage but I have plans to make it look much nicer when finished.:)
 

Attachments

  • front shelves.jpg
    front shelves.jpg
    91 KB · Views: 137
OP
D

Don Campbell

Well-known member
Joined
Dec 20, 2013
Messages
652
Location
Gaylord , Michigan
Got some red paint out today and got the new front shelves finished up. These will be handy on each end of the welding table. Tomorrow I will get going on the rear shelves. I had no idea when I started on the first welding cart I would do three similar projects. I am going to try for the first time to squeeze a car in the shop for winter storage. These new tables can be moved around very easy now. It will be a tight fit with just 4" on each side. Once inside there will be room to open the door to get out. I may take the lift out of the shop for the winter too.:dunno:
 

Attachments

  • painted front shelves.jpg
    painted front shelves.jpg
    64.8 KB · Views: 96
OP
D

Don Campbell

Well-known member
Joined
Dec 20, 2013
Messages
652
Location
Gaylord , Michigan
I love plowing snow !!, I have 13 garden tractors and I made snow blades for most of them and I have a mini front end loader plus a 54" snowblower . I get very excited like today as the weatherman is saying 6 to 10" of snow for us tomorrow !! I have always loved playing in the snow . Also my wife and I enjoy painting quite a bit , not good at it but it is fun .:eek:
Today I worked a little on the welding table. I love the new longer work surface. Also redid the end shields to hold vise grips and clamps, etc. Built a frame for the smaller tool drawers beside the other bottom. Working on the rear framework now. I want the portable air tank to fit under the end for easy removal out the front. Still looks rough without paint but you can get a idea of the new improvements.
 

Attachments

  • longer table.jpg
    longer table.jpg
    85.8 KB · Views: 118
OP
D

Don Campbell

Well-known member
Joined
Dec 20, 2013
Messages
652
Location
Gaylord , Michigan
Fenders built for the rear, boxed in rear section , front fender well piece attached, boxed in small drawers and started painting but ran out of paint. Starting to look nicer now.:thumbup:
 

Attachments

  • fenders.jpg
    fenders.jpg
    66.7 KB · Views: 85
OP
D

Don Campbell

Well-known member
Joined
Dec 20, 2013
Messages
652
Location
Gaylord , Michigan
Rolling workbench #3 got more paint today and some fancy wheels and a little chrome trim. These were three fun projects mostly from used metal I had already had. They are going to be so much nicer to work with in and out of the workshop. The best thing I ever did was to make the first portable welding cart. I have never enjoyed using the welders and plasma cutter this much with them all nice and neat and mounted side by side.:rocker:
 

Attachments

  • magwheels.jpg
    magwheels.jpg
    59.9 KB · Views: 110
OP
D

Don Campbell

Well-known member
Joined
Dec 20, 2013
Messages
652
Location
Gaylord , Michigan
Before I start the next shop project I thought I would share this . I had a old wheelbarrow sitting out back for 5 years . Flat tire and ready for the trash . I pulled it out to put in the trash and could not do it. I grabbed some tires and converted it to a three wheel outfit. Now no lifting to move it around. I built a push handle so I don't even have to bend over to move it . I love it , so simple and feel good not filling up the landfill.:bounce:
 

Attachments

  • wheelbarrow.jpg
    wheelbarrow.jpg
    71.9 KB · Views: 666
OP
D

Don Campbell

Well-known member
Joined
Dec 20, 2013
Messages
652
Location
Gaylord , Michigan
Now I have 24 left over wheels from the tables and tool boxes. Today I am lubing them all up for future smaller projects. I got my little kerosene heater out today and it seemed very nice to take the chill out. I only run it 10 minutes each hour. That keeps the bitter cold out and keeps the lights much brighter. I dress warm and keep moving so just a little heat is perfect.
 

Attachments

  • oil wheels.jpg
    oil wheels.jpg
    96.2 KB · Views: 108

Bears Fan

Well-known member
Joined
Jan 26, 2012
Messages
3,437
Location
Indiana
attachment.php


Awesome job on the CAT wheelbarrow! I could actually see some company stealing your idea and maybe manufacturing something similar to sell...
 
OP
D

Don Campbell

Well-known member
Joined
Dec 20, 2013
Messages
652
Location
Gaylord , Michigan
Air Compressor project started, it will get two of the swivel wheels for the front and a taller push handle so I can move it around much easier. I got all those wheels so I might as well use them, ha,ha.
 
OP
D

Don Campbell

Well-known member
Joined
Dec 20, 2013
Messages
652
Location
Gaylord , Michigan
Todays photo shows the duel swivel wheels mounted in front , the new more user friendly handle , some added hooks for accessaries, and the start of a shelf up above for a hose reel. It moves around great now , will be very handy moving it from the shop to the front garage and even out in the driveway if needed. These are little workshop projects I have always wanted to do but never had time. Looks rough at this stage but once everything is finished and painted grey to match it should look nice. :headscrat
 

Attachments

  • hose reel.jpg
    hose reel.jpg
    78.5 KB · Views: 119
OP
D

Don Campbell

Well-known member
Joined
Dec 20, 2013
Messages
652
Location
Gaylord , Michigan
Looking much better tonight . I made a rack for accessories next to the hose reel. Also got some paint on the new parts. Going to be so nice !! Funny how puttering on shop stuff you had for years makes them so much nicer. This was the first project I got to use the welding cart and the new bigger welding table. They worked Great !!! :beer:
 

Attachments

  • painted compressor.jpg
    painted compressor.jpg
    85.6 KB · Views: 116
OP
D

Don Campbell

Well-known member
Joined
Dec 20, 2013
Messages
652
Location
Gaylord , Michigan
Next project test fitting snowblower dollies. I'm using the old table supports and the old wheels from the tables. Almost no cost involved. I'm using the blower frame as support and not having to make a complete frame. This is going to be so handy. The blower is 3 years old and still looks like new. Used very little , maybe 30 hours on it.
 

Attachments

  • dolly 2.jpg
    dolly 2.jpg
    53 KB · Views: 68
OP
D

Don Campbell

Well-known member
Joined
Dec 20, 2013
Messages
652
Location
Gaylord , Michigan
5 degrees , 70 " of snow , shoveled my roofs now 3 times , great Christmas with the family and finally getting back in the workshop. Yesterday I started the parts for the 54" snowblade dolly. And here is a picture of my next project I will start next week. I am going to tweak my gas grille into a pit cart grill. It will get bigger single tires, mag wheels a T-handle , have a Weber Gas Grill in the middle, a 17" flat grill on one side and a acorn JR. Smoker on the other side. Then it will get a short table on both ends. I would like to fill in the bottom to cover up the tanks. It wont look anything close to this cool setup but it will be a fun winter project. :thumbup:
 

Attachments

  • grill.jpg
    grill.jpg
    120.9 KB · Views: 91
OP
D

Don Campbell

Well-known member
Joined
Dec 20, 2013
Messages
652
Location
Gaylord , Michigan
Thanks , it has been fun !! Here is the finished dolly for my 54" plow . Another small but useful little workshop project done. I used more recycled parts from the old benches. I tried to keep the footprint the same as the plow. :beer:
 

Attachments

  • plowdollyone.jpg
    plowdollyone.jpg
    71.3 KB · Views: 51
  • plow dolly two.jpg
    plow dolly two.jpg
    69.5 KB · Views: 44
OP
D

Don Campbell

Well-known member
Joined
Dec 20, 2013
Messages
652
Location
Gaylord , Michigan
BBQ Cart Started today, I bought a cheap toolbox this morning to support the flat grill. You can see the taller 15" tires and mag wheels that will go on it. The left side will get the Acorn Smoker . Should be a great setup when finished. :rocker:
 

Attachments

  • bbqcart.jpg
    bbqcart.jpg
    97 KB · Views: 79
OP
D

Don Campbell

Well-known member
Joined
Dec 20, 2013
Messages
652
Location
Gaylord , Michigan
21 below zero this morning , my little shop is easy to heat. My 110,000 btu space heater runs 5 minutes every half hour and it keeps it comfortable . Low ceiling and small area warms up fast. Plenty of insulation keeps it cozy. Today I got the BBQ cart axles done and the main frame parts partially cut out and welded together. Normal winter I would not go to the shop but I am enjoying these little builds and even today I was excited to head out to putter.:headscrat
 

Attachments

  • axles.jpg
    axles.jpg
    97 KB · Views: 58
To avoid these ads, REGISTER NOW!
Top Bottom