To avoid these ads, REGISTER NOW!

Above 1200 Sq/FT Plugger Workshop

Wokspaces above 1200 squarefeet.
To avoid these ads, REGISTER NOW!

drivesitfar

Well-known member
Joined
Oct 23, 2013
Messages
36,028
Location
Pacific Northwest
You’ve certainly got many skills!!

Sawdust bricks similar to the old presto logs? A lot less labor intensive than cutting up firewood and guessing they are pretty efficient and not overly spendy?

Looks like the weather is perfect snd nothing better than watching nature and the critters out there in your view.

Have another grand weekend.
 
OP
P

Prospecter

Well-known member
Joined
May 16, 2015
Messages
2,421
Location
Maine
You’ve certainly got many skills!!

Sawdust bricks similar to the old presto logs? A lot less labor intensive than cutting up firewood and guessing they are pretty efficient and not overly spendy?

Looks like the weather is perfect snd nothing better than watching nature and the critters out there in your view.

Have another grand weekend.
Thanks.

Sawdust bricks are indeed similar to Presto Logs, though less expensive. We can burn them in our wood stoves. Very clean and efficient, although I probably would burn them anyway, because I've had wood fires most of my life and like them. They are compressed sawdust, like wood pellets, only bigger.

Price is about the same as if I bought my wood cut and split, and then stacked it myself. Both are competitive with oil and propane, although all the prices fluctuate. I don't focus on the prices much. I like the wood stoves, and cutting / splitting firewood is getting a bit much.

The weather is nice, but very hot. Seems like very hot weather goes with moving!
 
OP
P

Prospecter

Well-known member
Joined
May 16, 2015
Messages
2,421
Location
Maine
Used a biscuit joiner and Z clips to attach card table top to the legs. The top had previously split because it was attached with many screws so the table could not expand and contract with the seasons.
unnamed-1.jpgunnamed-2.jpgunnamed-3.jpgunnamed-4.jpg
I cut off the damaged veneer on the desk, to see what there was to deal with. Eventually I cut back a little more to get a square edge to mate with the new veneer. Some of the underlying plywood layers also needed to be glued. I used Super Glue for that. Not shown, but both the left and right sides also have damaged veneer that I removed.
unnamed-8.jpgeunnamed-9.jpg
 

Attachments

  • unnamed-5.jpg
    unnamed-5.jpg
    48.2 KB · Views: 1

drivesitfar

Well-known member
Joined
Oct 23, 2013
Messages
36,028
Location
Pacific Northwest
Nice work on the table repair and dare I say genious fix. I know you like critters and birds and all that Mother Nature has to offer but like you there are the pesky ones that seem to take more than their share or do damage too.

You at least got him posing and can you send a sleeping dart his direction and have him wake up on another mountain?

Keep up the great stuff and hope your sale on the other property is a smooth transaction.
 
OP
P

Prospecter

Well-known member
Joined
May 16, 2015
Messages
2,421
Location
Maine
Measuring and cutting the veneer to fit. I lined up the left and top, and then overlayed the right hand side. I cut through both layers, and removed old bottom layer on the left, and new top layer on the right. Oddly, the veneer grain runs vertically instead of horizontally.
unnamed-0.jpgunnamed-1.jpg
Removing excess veneer up to the cut line.
unnamed-2.jpgunnamed-3.jpgunnamed-4.jpg
Cleaned up the hardware - Before and after. The knobs are mostly steel except for the button that shows.
unnamed-5.jpgunnamed-6.jpgunnamed-7.jpgunnamed-8.jpgunnamed-9.jpg
 
OP
P

Prospecter

Well-known member
Joined
May 16, 2015
Messages
2,421
Location
Maine
Brushing on contact cement on both the desk and veneer. This is the highly flammable stuff, so all the windows were open.

IMG_1981.jpeg
IMG_1985.jpeg
Same procedure on the other side, except the left butts up against the rear leg, which is a little out of plumb. I fit the top and left side first, then cut through both layers on the right side as before.
IMG_1996.jpeg
Trimming the bottom edge flush. I left the edge slightly proud of the underlayment, then gently sanded the new edge to match the old.
unnamed-10.jpg
 
To avoid these ads, REGISTER NOW!
OP
P

Prospecter

Well-known member
Joined
May 16, 2015
Messages
2,421
Location
Maine
I put the desktop piece of veneer on today, and got a coat of stain on. The stain turned out to be a good match, which is a relief. Likely the veneer mahogany is a different species from that used originally, so I am pleased to have the stain minimize the differences.

Tomorrow, I need to meet the ramp truck guy up north to move the 2038 to the Mid-coast.
 
OP
P

Prospecter

Well-known member
Joined
May 16, 2015
Messages
2,421
Location
Maine
unnamed-2.jpg
Two playful siblings caught in the same trap.
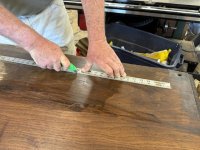
The veneer completely repaired. The stain is a good match, but the repair is a rougher texture so I'll do a light sanding and re-stain the repairs.
unnamed-3.jpgunnamed-4.jpg
Third sibling caught.
unnamed-5.jpg
4th capture is larger, and might be a large sibling, or a small mama. At least one more to still to trap and relocate. We are fortunate to have a nearby preserve just far enough away that these critters will not return.
unnamed-6.jpg
The 2038 arrives from up north. I like my 790. Nothing really wrong with it. Just that the newer 2038 is an extra 10ish HP, has folding ROPS to fit easily under an 7' garage door, hydrostatic transmission, more comfortable operator station, easier fuel filler, quick attach 3ph and quick attach front end loader. My attachments for the 790 fit the 2038, and a snow plow and forks are included with the 2038. So it's time for the 790 to go to its next life.
unnamed-7.jpg
The van had an oopsie moment, due to the unfortunately placed 3ph counterweight. I inadvertently placed the weight in a bad spot creating a trap that inevitably was sprung in our exhausted state from our temporarily complicated life. Oh, well. Only scratches. 70% buffed out, including all of the paint transferred from the weight. I'll improve it a little more with some Dupli-color when I get a chance.
unnamed-8.jpg
The offending counter weight.
unnamed-9.jpg
 

drivesitfar

Well-known member
Joined
Oct 23, 2013
Messages
36,028
Location
Pacific Northwest
Nice work catching the pesky critters!!

Glad to hear you now have the bigger tractor and they all your cool attachments fit. Around here paying to move stuff across town or an hour or more away gets pretty spendy. Hence some of us buying trailers so hope your guy was reasonable.

I can’t see the damage to your car but happy to hear you have it figured out. I’ve even fixed a few dents to some of our older Honda numbers with my heat gun.

Have a grand day!!!
 
OP
P

Prospecter

Well-known member
Joined
May 16, 2015
Messages
2,421
Location
Maine
It was a little speedy, but nice to let the guy who knows what he is doing negotiate the 75 mph stretch, and the narrow construction lanes in Bangor. I've used these guys before, and they are very easy to work with. I don't begrudge the owner/driver making a living, and glad to not do it myself.

Heat gun is a great idea. I'll tuck that one away in my brain for a future need. :coffee:
 

drivesitfar

Well-known member
Joined
Oct 23, 2013
Messages
36,028
Location
Pacific Northwest
Heat gun works great to push out bumper indents from behind after you heat the damage from the front.

I hear you about moving vehicles and paying the pros cause that’s what I do too and thankfully not that often with my 40+ years of driving Hondas.
 
To avoid these ads, REGISTER NOW!
Top Bottom