To avoid these ads, REGISTER NOW!

Plumbing my compressor with copper. Will this basic set up be ok?

CalsXS2

Well-known member
Joined
Jun 2, 2013
Messages
507
My compressor is what started life as a Speedaire 60 gallon 5hp. I bought it for $50 with a blown up pump. I put a harbor freight 5hp twin cylinder pump on it. It worked ok for awhile, then blew a reed valve. But that's since been repaired.

If you care to watch, here's a link to my 6 part videos of repairing the Harbor Freight compressor pump.


I used this compressor to sand blast my 72 Yamaha XS2 frame. I used the plastic HF gravity fed sand blaster. Lots of issues with clogging and moisture. I was basically washing the frame off with water as I went along,,,lol.

Lesson learned. Improperly plumbed from the start. Can't blame the equipment.

So now I'm setting up a HF sand blast cabinet. I've done most of the mods except swapping out the gun. I definitely need to re-plumb this thing.

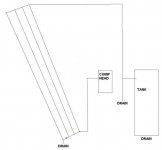
I have a very small garage so the cabinet is only 8' from the compressor. In the HF owners manual it shows a very basic plumbing set up. But it says to use 3/4'' pipe for the main line, and then 1/2'' for the drop. Since I'm so close could I just use 1/2'' for the main or would I be better off with the 3/4''. Or is this HF idea just not worth doing?

I would love to do one of the big up and down thingy's with the copper, but that's not in the budget right now.

My main problem is moisture. I would love to put an after cooler on the compressor. But the HF pump has some weird 3/4'' refrigeration line on it. I had a very hard time finding the right fitting to hook it up. So I think if I tried to use some kind of transmission cooler on it with 1/2'' or smaller fittings it would create a huge bottle neck. Right? I don't know if I could even find the right fitting to down size.

I've seen guys using a car a/c condenser also. I have a F250 condenser I would love to use but don't think I can because of the small line size. Right?

I should mention that I do want to do soda blasting with this cabinet too. All the aluminum stuff on both my motorcycle projects. Carbs, and side covers, ect. I'm doing a 72 Yamaha XS2 650, and a 72 Honda mini Z50. I'm thinking I'm going to need a lot better moisture control for soda. Or will I. But I just need yo get SOMETHING started,,,lol.

Here's the HF idea. Should I try it? I should mention I'm on a very tight budget. Heck. After doing all the mods to the cabinet (metering valve, lights, ect.) I'm kinda broke for awhile. It's hell being poor and on a fixed income,,,lol.
 

Attachments

  • 20190305_080505[1].jpg
    20190305_080505[1].jpg
    138.9 KB · Views: 181
  • 20190305_080643[1].jpg
    20190305_080643[1].jpg
    147.8 KB · Views: 101
Last edited:
To avoid these ads, REGISTER NOW!

Phantomd

Well-known member
Joined
Aug 26, 2015
Messages
183
Location
Near Boulder CO
Unless you plan on doing a lot of sand blasting I think you can get away with 1/2" line, but I'm not an expert.

HF does sell a refrigerated air dryer that people seem to like from the reviews I have read.

I like the RapidAir products, super easy to install.
here is their 1/2" kit
https://www.amazon.com/dp/B005FKYRTU/?tag=atomicindus08-20
its basically Pex-AL-Pex with standard fittings and special termination blocks.
 
OP
C

CalsXS2

Well-known member
Joined
Jun 2, 2013
Messages
507
Unless you plan on doing a lot of sand blasting I think you can get away with 1/2" line, but I'm not an expert.

HF does sell a refrigerated air dryer that people seem to like from the reviews I have read.

I like the RapidAir products, super easy to install.
here is their 1/2" kit
https://www.amazon.com/dp/B005FKYRTU/?tag=atomicindus08-20
its basically Pex-AL-Pex with standard fittings and special termination blocks.

Thanks for the link. But that kit is for sure not in my budget,,,lol.

I considered pex but I think I really need the copper for any cooling benefit I could get to help with the moisture.
 

NC Rick

Well-known member
Joined
Oct 26, 2017
Messages
302
Location
Asheville
I have an 80 gallon tank compressor. I connected it to a vertical “drop leg” on the wall using a short length of braided stainless steel flex tube and a ball valve shut off. The primary drop leg and a length of pipe that runs the length of the shop is 1”( but 3/4” is fine)steel pipe with a draft angle back towards the compressor and its drop leg. From there I use mostly copper 1/2” connecting branches with drop legs. The longish metallic run with draft allows condensation and drain back. Even at high flows in a humid environment I do not have moisture problems and have even painted a few cars with it. My compressor is 17cfm at 170psi. so it makes a pretty good flow for a small shop (26x38’)
 

Kaizen

Well-known member
Joined
Jan 9, 2015
Messages
6,948
Location
New England
That setup is good. However you won’t get much cooking or water condensate as it’s too short. I have fifty feet of black iron now and it works well. On my new compressor I’m going to do a slopes run on the wall with copper before it gets in the tank. It’s expensive but cheaper then any other thing I’ve seen. I like that it’s passive. Keep the diameter as big as you can.


Sent from my iPhone using Tapatalk
 

59 wagon man

Well-known member
Joined
Oct 25, 2010
Messages
1,589
Location
hollywood fla
follow the hf drawing paying attention to pitching away from the compressor. by pitching back to the compressor the air constantly keeps trying to blow the condensate back up into the overhead piping. by pitching away the water can run along the bottom of the pipe helping to separate the moisture
 

gerryw

Well-known member
Joined
Aug 10, 2008
Messages
815
Location
toronto area
As for 1/2 copper, thats what i have used for the last twenty years ( 60 gallon, 6 ? Hp)
Works great for all auto tools, plus i have a glassbeading cabinet. I use a pipe style air dryer ( really cheap to buy/ fab) i have a $25 electric auto drain on the bottom of compressor


Gerry
 
Last edited:

Steve_P

Well-known member
Joined
Sep 15, 2010
Messages
5,188
I have my compressor outlet going vertical to a hose, then to 3/4 copper that runs down the wall as far as possible and then it drops down and runs back towards the compressor. I have 3 vertical dead drops with valves to drain moisture - two at 90 degree turns . It transitions to 1/2 copper at the end then to a regulator and filter before it changes to a hose to connect to a hose reel. The horizontal tubing slopes down with the flow direction as mentioned. I have 50+ feet horizontal tube thats on the wall, spaced off on 1×1 wood pieces screwed to the studs.
 

sberry

Banned
Joined
Jun 18, 2005
Messages
35,747
Location
Brethren, Michigan
A 1/2 line will deliver more to a sandblaster than a HF compressor can make. 1/2 is good for 35 cfm blast at over 60 ft.
A 5 hp comp makes barely 1/2 that much air, not much to gain from larger pipe.
 
Last edited:

Kaizen

Well-known member
Joined
Jan 9, 2015
Messages
6,948
Location
New England
A 1/2 line will deliver more to a sandblaster than a HF compressor can make. 1/2 is good for 35 cfm blast at over 60 ft.
A 5 hp comp makes barely 1/2 that much air, not much to gain from larger pipe.


But at what pressure? Some blasting is under 50 psi but needs big cfm. I’m sure half will be fine on such a short run.


Sent from my iPhone using Tapatalk
 

sberry

Banned
Joined
Jun 18, 2005
Messages
35,747
Location
Brethren, Michigan
.Your compressor only makes a limited amount. I think the main reason that drawing was used is they simply found one and copied.
Hook a 3/8 hose to the blaster or open it up, see how long it takes to run the 5 hp out of air. Sandblast from these types of comps is low rate.. not hi. Very little system pressure drop. Not a big deal like impact use which has huge burst demand, 2x what blast is,, which is less but longer.
I have used some equipment which was a little factor,, 150 cfm or more on 3/4 hose.
 
Last edited:

johninct

Well-known member
Joined
Dec 21, 2010
Messages
2,599
Go 3/4". Extra air and volume won't ever hurt. Also, make sure you follow the directions with the little up then down like in the diagram.
 

NC Rick

Well-known member
Joined
Oct 26, 2017
Messages
302
Location
Asheville
I agree with the bigger main run, you gain capacity and lower the velocity in the pipe. I think that is why my system works so well with the draft back to the compressor. With the 5’ drop legs on either end of my 30’ run of pipe I really don’t get water in them cleaning out yet the compressor side is the only side I have found any. My tank makes a good bit of water.

I also feel like the draft back towards the compressor avoids moisture pockets into the down stream distribution branches.
 
Last edited:
To avoid these ads, REGISTER NOW!

sberry

Banned
Joined
Jun 18, 2005
Messages
35,747
Location
Brethren, Michigan
There are some trade offs. 3/4 isn't going to hurt, the question is that does it help. Some have talked about steel pipoe corrosion, I suspect those are larger lines with low flow. Some velocity is good, as the picture correctly points out, slight slope away and with air flow, I am not sure what "draft back is" ?
That pic is a generic sample and part of a pic of a larger systems developed for more industrial applications. A vertical pipe going high as it can helps from blowing outright drops up in to the rest of the system. The over the top hydrants,,, another good idea in a GM plant with continuous air use beyond where juice gets blown along to the next drop. I could see a T at the end and a drip leg or even a 4 way or up and over with another t going on if that makes any sense.
I don't even have legs on a couple of mine, they simply go to the filter/trap.
 

Attachments

  • air reggie.jpg
    air reggie.jpg
    75.2 KB · Views: 54

bluebolt

Well-known member
Joined
Dec 28, 2008
Messages
5,447
Location
Benton LA
I use 1" black pipe with my Ingersoll Rand 80 gallon compressor. It is angled for drainage and goes 30 feet before the first normally used air outlet. It totally eliminated water problems when using my glass bead cabinet. I have had zero problems with since I put it in about 10 years ago.
 

engineer2

Well-known member
Joined
Dec 13, 2009
Messages
11,825
Location
Chicago burbs
As said, a refrigerated air dryer will solve your moisture problem.
It'll get you a dew point of around 35°F.
An aftercooler alone will get you a dew point of around 75°F.
It also depends on where you live. The need for moisture removal depends on how humid your ambient air gets. If your humidity never gets over about 30%, an aftercooler might be sufficient.
 

Bretny

Well-known member
Joined
Jul 31, 2017
Messages
3,918
Location
Dutchess county NY
Build one of these. I built one many years ago.
Refridgerated cooler are expensive and more to go wrong.

I plasma cut and paint with my 60gal compressor. I get next to no water out of the tank due to it being cooled/dryed before it even gets to the tank.
 

Attachments

  • COMPDRYa.jpg
    COMPDRYa.jpg
    30.4 KB · Views: 79

driftpin

Well-known member
Joined
Dec 22, 2016
Messages
11,308
Location
Miami-Dade/Broward Co. Florida
Build one of these. I built one many years ago.
Refridgerated cooler are expensive and more to go wrong.

I plasma cut and paint with my 60gal compressor. I get next to no water out of the tank due to it being cooled/dryed before it even gets to the tank.

So, yours is all before the tank. How long are the multiple runs, each? Are they spaced away-from the wall, & how-much? What pipe material & dimension?
 

Kaizen

Well-known member
Joined
Jan 9, 2015
Messages
6,948
Location
New England
Build one of these. I built one many years ago.

Refridgerated cooler are expensive and more to go wrong.


I plasma cut and paint with my 60gal compressor. I get next to no water out of the tank due to it being cooled/dryed before it even gets to the tank.


What’s the thinking on having it all connected vs one long run? Would seem to me a long run will cool it better and give more ability to extract water. Just has to be horizontal so I guess if someone was strapped for wall space?


Sent from my iPhone using Tapatalk
 
OP
C

CalsXS2

Well-known member
Joined
Jun 2, 2013
Messages
507
MAJOR FAIL!! It won't pick up the media.

First let me set the story straight. The part where I blasted my 650 Yamaha frame and had all the moisture problems may not be correct. My Son says that was with a different compressor and hose set up. I honestly don't remember,,,lol.

But a couple a few years ago I had this hooked up to a plastic blast cabinet. It would not pick up the media there either. That's when I discovered the blown reed valve on the pump. I sold the plastic cabinet. But I did fix the pump.

Now I'm hooking up the new HF blast cabinet.

As I said I'm kinda broke right now so I wasn't going to do any of the copper. But today I wanted to just try it it. So I tried it the way it was all ready set up. It will not pick up the media. But I'm hoping it's because there's so many wrong sizes and restrictions.

Here's how it is. Tell me what you guys think. I can post pics if need be.

1. Straight out of the tank I have a wrong 1/2'' ball valve. I guess it's supposed to be a "FULL PORT" valve. Never heard of such a thing when I built this thing.

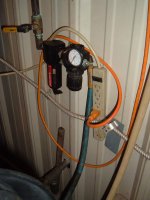
2. Then from there it goes to a 1/2'' filter/water trap. Then it's reduced down to 1/4'' going into a 3 way splitter.

3. Off the 3 way splitter it has a 1/4'' quick connect going to a 3/8'' id hose that is at least 50' long. Maybe more. It's on a hose real.

4. I have that run to the blast cabinet. It has a 1/4'' quick connect attached to one of those cheap 1/4'' red plastic water traps made to go onto a paint gun. From that onto the blast gun.

5. I have a metering valve on the bottom of the trap door. It's like what Tacoma sells.

6. I have not one drop of water,,,lol. I find that hard to believe.

Before you guys start yelling at me I know this set up is not ideal. It was just a test,,,lol. But dang. Shouldn't it work a little. I did get a little tiny bit out of it when I had the pressure set to 50psi.

I tried all different pressures, and settings on the metering valve. I also tried 2 different sizes of media. One was super fine, the other not so much. But nothing as course as sand.

Just for testing I went and got a 4' x 1/2'' hydraulic hose. It's all I could find in 1/2''. I'm going to put the cabinet right next to the compressor and see what happens. All I can do I guess.

Is there any way I can tell how much cfm I'm getting out of the compressor.

I'll report back after I see what happens.
 
Last edited:
OP
C

CalsXS2

Well-known member
Joined
Jun 2, 2013
Messages
507
I'm about to loose my mind.

I put the 4' x 1/2'' hydraulic hose straight onto the gun. It still won't pick up.

It's filling the clear hose from the metering valve about half full. Then it's just sitting there.

The only thing I can think of is maybe eliminating the metering valve and use the pick up tube that came with it. But everone says those are junk and switched to the metering valve.

Any idea's?
 
Last edited:

Steve_P

Well-known member
Joined
Sep 15, 2010
Messages
5,188
Half inch is certainly fine for even 7.5 HP for flow. 3/4 slows the flow rate vs 1/2 so the air can cool more and the moisture drop out
 
OP
C

CalsXS2

Well-known member
Joined
Jun 2, 2013
Messages
507
Half inch is certainly fine for even 7.5 HP for flow. 3/4 slows the flow rate vs 1/2 so the air can cool more and the moisture drop out


Man. With all due respect you sure about that. I always thought that the bigger the pipe more flow. Smaller the pipe more pressure.

Can we get some other opinions please. I just went and bought a bunch of stuff to switch over to 3/4 coming out of the compressor.
 

Steve_P

Well-known member
Joined
Sep 15, 2010
Messages
5,188
With a given compressor output (supply) the larger the output tube diameter the slower the flow in the tube. Of course a larger tube can flow more than smaller. But with a fixed supply output the larger the tube it flows into the slower the flow . The output from the compressor is fixed by the pump displacement and RPM

If you have a fixed supply into 1" tube and a 60"the flow will be slower in the 60" tube because of the diameter.
 
OP
C

CalsXS2

Well-known member
Joined
Jun 2, 2013
Messages
507
With a given compressor output (supply) the larger the output tube diameter the slower the flow in the tube. Of course a larger tube can flow more than smaller. But with a fixed supply output the larger the tube it flows into the slower the flow . The output from the compressor is fixed by the pump displacement and RPM

If you have a fixed supply into 1" tube and a 60"the flow will be slower in the 60" tube because of the diameter.


I'm not 100% following what you're saying. All I know is it didn't pick up with the 1/4'' hose. or the 1/2''.

You got any ideas what my problem is?
 
OP
C

CalsXS2

Well-known member
Joined
Jun 2, 2013
Messages
507
Well I got it going temporarily by having the blast cabinet right next to the compressor.

Turns out the new HF blast gun IS JUNK. I took it apart and it was assembled wrong. I more or less rebuilt it. But it still leaks air from around the trigger plunger. I could maybe put a new o-ring in it and that might fix it. But seems like more wasted time when we all know these guns are trash.

So I went and got a Cambell Hausfeld gun from tractor supply just to try out. It works!!

I may just run this gun until I can afford a better one. But I need to get it plumbed now,,,lol.
 
To avoid these ads, REGISTER NOW!
Top Bottom