To avoid these ads, REGISTER NOW!

Pole Barn Insulation and Framing- After the fact

tonyciambrone

Well-known member
Joined
Nov 4, 2015
Messages
1,152
Location
Northern Illinois
Hello all-

I decided to make a thread outlining how I went about insulating and framing in the walls of my polebarn- after it was built and finished.

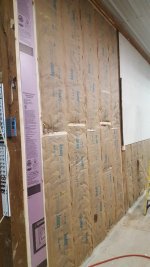
The previous owner toe-nailed a 2x6 horizontally between each post, and used varying numbers of 2x6 'studs' hanging horizontally from the horizontal member. Then r19 batts were either duct-taped together free floating or stapled to the vertical 2x6. I didn't like that because there were so many gaps the r-value was practically nill, and you could push the wall in and out with your hand since there was no bottom plate, and no real top plate.

So, I decided to tear it all out and start from scratch.

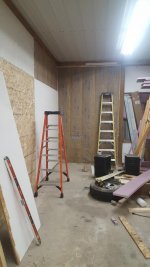
Here is what I started with
 

Attachments

  • 20200408_115538.jpg
    20200408_115538.jpg
    64 KB · Views: 208
  • 20200408_115545.jpg
    20200408_115545.jpg
    63.3 KB · Views: 256
To avoid these ads, REGISTER NOW!
OP
T

tonyciambrone

Well-known member
Joined
Nov 4, 2015
Messages
1,152
Location
Northern Illinois
My original plan was to run R7.5 1.5" foam board between the girts, then frame 2x6 stud walls between posts. Then finishing with 5.5" Rockwool. I decided for the money it made more sense to put a continuous R10 layer of 2" foam board over the girts/foam board, then frame a 2x4" wall stuffed with whatever insulation I had or could get cheaply.

My girts were not evenly spaced, nor level between posts so most times I cut a taper and fit the boards tightly. Sometimes that wasn't possible so I used can spray foam to fill gaps. Then I shaved off the excess and taped with Kimberly Clark Block-it tape. Later I would learn that GP forcefield tape, while more expensive is a superior product and the width really helps in this case.

The R10 board were cut to fit, and shoved up as high as possible within the wall cavity. I initially fastened them to the girts with plastic washer cap nails but got tired of those because they bend and deform easily. I ended up using plain deck screws with fender washers later.

At the top of each wall, between the R10 and ledger board at the top I hammered in a 2x4 horizontally, and fastened through the ledger, making an L shape. Then I built stud walls out of 2x4 pressure treated for the bottom plate, 2x4x12 construction for studs, and a 2x4x8 construction top plate. It was difficult to get them flush with the posts so I had to use scrap pieces of 2x4 to force the outer studs into the foam board a bit.

Bottom plate got sill seal and caulk, then was anchored to the slab with Tapcons.
 

Attachments

  • 20190420_124408.jpg
    20190420_124408.jpg
    105.8 KB · Views: 231
  • 20190422_181621.jpg
    20190422_181621.jpg
    148.8 KB · Views: 244
OP
T

tonyciambrone

Well-known member
Joined
Nov 4, 2015
Messages
1,152
Location
Northern Illinois
The outer board I anchored to the posts also via deck screws, and the top plate of the wall assembly was anchored to previously mentioned 'top plate' attached to the ledger board.

Then I put what I had- R15 rockwool at first, and leftover foam board, a layer of 1.5 and a layer or 2.0 to fill the 2x4 cavities that were not 16" on center.

Post to post is about 90" edge to edge, sometimes 88 and sometimes 91 if you catch my drift. Framing 16" on center or 24" on center evenly and cleanly just wasn't going to happen.

Once I ran out of R15 rockwool, I caught R15 faced rolls on sale at Menards for $5 a piece so I used those. I don't typically advocate for fiberglass because it relies on good air sealing, but I figured with all the continuous foam board behind it there was no problem.

Then I rehung the good pieces of 5/8" OSB and cut new ones where the joints were sloppy before. I also turned the bottom pieces from vertical to horizontal.
 

Attachments

  • 20200404_093654.jpg
    20200404_093654.jpg
    81.2 KB · Views: 177
  • 20190423_193505.jpg
    20190423_193505.jpg
    58.7 KB · Views: 162
  • 20200411_182806.jpg
    20200411_182806.jpg
    67.6 KB · Views: 149
OP
T

tonyciambrone

Well-known member
Joined
Nov 4, 2015
Messages
1,152
Location
Northern Illinois
So in conclusion- what did I learn and what would I do differently.

Like RR Buildings I agree that Housewrap or some WRB should be used on the outside of pole buildings. I also think foam board between girts aught to be standard, using 24" between girts would be so easy to install and simple as long as post spacing is +/- 8 Feet.

My walls were full of dirt, bugs, dust and every type of filth imaginable. There's just nothing to stop stuff and critters from blowing in all the little gaps without wrap or continuous insulation.

As always do things right the first time. It was a lot of effort and waste to remove the old 'framing', r19 batts and recut sloppy OSB sheathing.

Block-it tape ***** and is too narrow. Forcefield tape is much better and wide enough to apply easily to seams. The best method is probably to caulk and smooth all seams with a silicone caulk first, let cure, then tape over. Tape obviously likes the girts to be clean as possible before application. Next time I will try ZIP tape and maybe Prosoco R Guard sealant instead of caulk?

Jury is out on blocking between studs, some sections I did, some I didn't. I think the 5/8" OSB horizontally should provide a similar effect.

GE canned spray foam is not nearly as good as DOW great stuff door and window. Not worth the cost savings. It doesn't adhere as well and tends to pull out the foam from the gaps when removing excess.

Overall I'm pleased at the result and it was worth the effort. I like having solid, warm walls that are not drafty.
 

ChaseIt

Member
Joined
Nov 4, 2016
Messages
5
Location
Southwest Indiana
I'm in a similar situation. I inherited an old pole barn and currently in the process of a reskin/reroof. I plan to finish out about 1/3 of it for climate control. Based on your before pix, I have the same work ahead of me on the insulation. I like the way you worked it out. Thanks for posting what you did.
 

MSPoirier

Well-known member
Joined
Dec 30, 2019
Messages
56
Location
MA
I was looking at the pictures and the only thing I thought you might want to keep an eye on is because your xps foam is so well taped and sealed you may want to be careful of trapping any moisture between the foam and the facing of the insulation. I do believe kraft face is semi permeable but not sure, looks good!

- Sam

New England Region
 
To avoid these ads, REGISTER NOW!

purediesel

Well-known member
Joined
Apr 17, 2016
Messages
193
Location
Ada Oh
I was looking at the pictures and the only thing I thought you might want to keep an eye on is because your xps foam is so well taped and sealed you may want to be careful of trapping any moisture between the foam and the facing of the insulation. I do believe kraft face is semi permeable but not sure, looks good!

- Sam

New England Region


This is a very good point. Since your 3.5" closed cell foamboard wall will act as a vapor barrier you should be using unfaced batt insulation to allow the cavity to dry inward if there was a presence of moisture. You should never have 2 vapor barriers in a wall cavity since it will trap moisture.
 
OP
T

tonyciambrone

Well-known member
Joined
Nov 4, 2015
Messages
1,152
Location
Northern Illinois
My understanding is XPS board is around 1 perm and so is Kraft faced insulation. I'm not too worried about that but I understand your point. Tape is namely to keep boards together and to keep wind from blowing through
 

Natty Bumppo

Well-known member
Joined
Dec 8, 2019
Messages
370
Location
Savoy, MA
I just dont get why people build a pole barn then frame it in like a stick built building just to insulate.

My 2 cents as this is what I did. To stick build a 25x35 garage my code would not allow for the building to be studded out on a floating cement slab. Code required footings and full frost walls. A pole barn does not. That's a huge cost savings.
 
To avoid these ads, REGISTER NOW!
Top Bottom