I'm looking to put a 5" slab in a 30x56 pole barn. Will likely have to do this in sections. What I'm wondering is, with a rebar mat ******* 18" on center what do I need to consider if I'm thinking of renting a power buggy to haul from the truck to the pour section? Is this even feasible over a rebar mat? I don't want the rebar at the bottom of slab when it's all said and done. Is this something where I can leave out the chair supports except where it's being poured? Plywood over the rebar mat in the travel area? I'm not familiar with what you can or can't do with one of these buggies. Thank you.


You are using an out of date browser. It may not display this or other websites correctly.
You should upgrade or use an alternative browser.
You should upgrade or use an alternative browser.
Pole Barn Slab Pour
- Thread starter Awac457
- Start date
billconner
Well-known member
Watching this. I'll have similar situation next spring. Weighing pump cost.
Leaflessshadetree
Well-known member
Extra chutes should get you 30 ft. for Mine at 60 ft I hired a pump truck.
ConCretin
Well-known member
If you have some plywood, laying it down to create a runway for the power buggy would be your best option. Driving the buggy over supported rebar won't work. With #5 bar, you'll have a tough time getting it re-supported if you lay it flat to drive over it.
If your doing it in sections anyway, why not just arrange your pours so you can reach with a chute? I'd just prep each section as you go so you don't have to deal with driving over rebar etc. to get to the section you are placing.
Also, a mid to high range water reducer will provide a higher slump that flows easily without compromising strength.
Rusted Nut
Well-known member
I definitely agree with this. Power buggies are slow if you’re placing much at all, you’ll need several of them and labor to place and finish as well.If your doing it in sections anyway, why not just arrange your pours so you can reach with a chute? I'd just prep each section as you go so you don't have to deal with driving over rebar etc. to get to the section you are placing.
Also, a mid to high range water reducer will provide a higher slump that flows easily without compromising strength.
wssix99
Well-known member
+1 on using chutes. For areas where the truck's sections won't reach, you can screw long 2X12 boards in a "V" shape and create your own extension. Dudes with shovels help and will be less expensive than other options.
BTW - In worst-case scenarios conveyer trucks are great for slabs. No need for the extra expense for pumpers.
BTW - In worst-case scenarios conveyer trucks are great for slabs. No need for the extra expense for pumpers.
mike93lx
ALLIANCE MEMBER
Or you could do like the crew that poured my pool deck and just throw a bunch of low wage workers with wheelbarrows at it.
If it was me, I'd find a way to get the concrete to its new home with the truck
If it was me, I'd find a way to get the concrete to its new home with the truck
I didn't explain my barn configuration very well. I've got a 10' high garage door on one of the 30' sides and a 3' man door on the opposite 30' side. My only access with a chute is through the garage door. I'm not sure how far the truck chute will reach from the door but the remainder of the 56' is what I'll need to make up. The barn posts are at 8' oc so I originally thought about forming up a 16x30 section at the far end from the garage door but I think I'd have to leave out a section of form (temporarily) and run a buggy over the rebar. I'm just trying to get concrete pulled from the end far enough that I can then use a 40' conveyor or build a chute to bring it the rest of the way.If you have some plywood, laying it down to create a runway for the power buggy would be your best option. Driving the buggy over supported rebar won't work. With #5 bar, you'll have a tough time getting it re-supported if you lay it flat to drive over it.
If your doing it in sections anyway, why not just arrange your pours so you can reach with a chute? I'd just prep each section as you go so you don't have to deal with driving over rebar etc. to get to the section you are placing.
Also, a mid to high range water reducer will provide a higher slump that flows easily without compromising strength.
41plym
Well-known member
Hire a pump.
Youngandfree
Well-known member
Is it just sheet metal on purlins? What about unscrewing some sheet metal to make access?
Countyroadtrailers
Well-known member
Id definitely use a pump, but if I wasn’t going to and I was set on pouring in sections I would reverse the pour from what you are describing. I would pour the deepest you can reach with the truck then drive over the pour with the buggy after it reached cure
ConCretin
Well-known member
Thanks for the additional information.I didn't explain my barn configuration very well. I've got a 10' high garage door on one of the 30' sides and a 3' man door on the opposite 30' side. My only access with a chute is through the garage door. I'm not sure how far the truck chute will reach from the door but the remainder of the 56' is what I'll need to make up. The barn posts are at 8' oc so I originally thought about forming up a 16x30 section at the far end from the garage door but I think I'd have to leave out a section of form (temporarily) and run a buggy over the rebar. I'm just trying to get concrete pulled from the end far enough that I can then use a 40' conveyor or build a chute to bring it the rest of the way.
Even if you prep one section at a time or place from the door back as suggested by CountyRoadTrailers, you'll still have to buggy within the section you are placing. You'll need a ramp to get into the placement area and plywood to drive on. I don't know of another way. Placing will be slow due to time spent maneuvering the buggies and manpower will be needed to constantly move the plywood.
We used to do a lot of buggying but labor costs eroded the economic benefits to nil for all but the smallest placements. I don't remember the last time we used them. If your labor is free and you have enough of it, maybe it makes sense in your case.
I wonder how the cost of a single placement with a hired finisher and pump would compare to multiple placements with rented buggies when taking into account the quality of the result and the aggravation of doing multiple placements yourself? Just food for thought.
Last edited:
nadogail
Well-known member
Pumps were made for this.Id definitely use a pump, but if I wasn’t going to and I was set on pouring in sections I would reverse the pour from what you are describing. I would pour the deepest you can reach with the truck then drive over the pour with the buggy after it reached cure
Dreamer1975
Well-known member
I did a 36x56 and poured it over two weekends. Pulled the truck in for the back half nd then did the rebar on the front and poured it the next weekend to avoid that problem. It worked really well
kj_mustang
Well-known member
No clue what they charge now, but I had my pole building and house basement pumped in by a guy with a trailed pump rig. I think he charged $350 for the day. Well worth it.
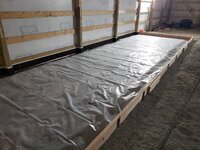
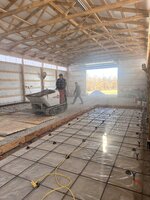
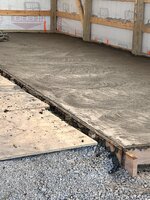
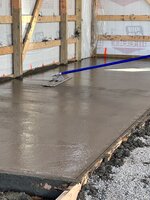
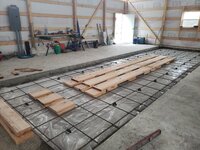
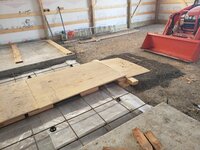
Hey guys, sorry for the delay. Wanted to update you with what I decided to do on this floor pour. We made the first pour the other day which included two 5.5 - 6 cy pads at the rear of the barn. One in the morning and the other in the afternoon. Each pad was about 9.5'x32' and located along the long walls of the barn with the center 10' +/- left as gravel for the time being. I rented a buggy, threw down some plywood in the center section and backed the concrete truck to just outside the garage door. From there it took 11-12 buggy trips for each pad and took between 40-45 minutes to unload the truck on the first pad and about 35 min for the second pad. Overall each pad was screeded and bull floated in just over an hour. So for now, I haven't had to run a buggy over the rebar mat. But, I'll likely have to do that for the center section which I'm prepping now. Either that or run over the plywood covered slabs we just poured once they get strength (which I really don't prefer to do). So, I'll try to have an update on the center pour once it's done. In the mean time I've included a few pics of what's completed so far. Hope this helps someone looking to do something similar.
Attachments


billconner
Well-known member
thanks for sharing that.
scofo
Well-known member
Looks good. One bite at a time.
Can you tell me the name of the red candlestick looking things, I assume are for receiving rebar at a later time? Also is the black band on the lower girt just tar paper or ? White band for screed ?
Can you tell me the name of the red candlestick looking things, I assume are for receiving rebar at a later time? Also is the black band on the lower girt just tar paper or ? White band for screed ?
Those red "sticks" are exactly what you decribed. Called Speed Dowels, I found these at White Cap and decided to try them as I didn't really want to hammer drill on the new slab if I could avoid it. They seemed to work pretty well and accept a #4 bar. They are about 9" long. That black band you see is 1/2" fiberboard. The white band is a "void cap" that fits snuggly on top of the fiberboard and allows you to snap off the top "cap" in the future allowing for a 1/2"x1/2" void to seal. We'll see how well that works out as I haven't done it yet. I'd thought about screeding from it but being that narrow {1/2") and the fact that I would be the rookie doing it didn't seem like a great idea for me. So I moved over about 16" or so off the long wall and set a screed pipe to grade.Looks good. One bite at a time.
Can you tell me the name of the red candlestick looking things, I assume are for receiving rebar at a later time? Also is the black band on the lower girt just tar paper or ? White band for screed ?
scofo
Well-known member
Thanks for the answers. Good luck going forward.
Hey guys, I'm looking for some more expertise. With the two slabs shown would it be best to place expansion joint material along the edges prior to pouring the center strip? Ive seen pours where some have but others have not. Thank you
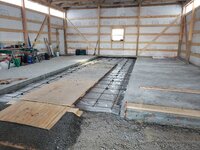
Set all winter and forgot to post anything further on how I approached the barn slab pour. This is how we did the middle pour. I didn't want to drive concrete on the previously poured concrete and decided to buggy the concrete down the center of the slab and dump out the end. As we progressed through the pour we kept backing our way out of it and removing the temporary runway for the buggy. Little more work but went well and allowed me to buggy the concrete over the rebar mat without affecting or crunching it. Still have another section to pour before it's complete.
Attachments
-
 20231204_154701.jpg846 KB · Views: 31
 -
 20231204_154721.jpg872.3 KB · Views: 29
 -
 20231204_160136.jpg770.3 KB · Views: 28
 -
 20231204_160159.jpg774.6 KB · Views: 28
 -
 20231204_160223.jpg822.9 KB · Views: 27
 -
 20231205_123705.jpg955.9 KB · Views: 26
 -
 20231205_123718.jpg1 MB · Views: 24
 -
 20231205_123731.jpg953.1 KB · Views: 25
 -
 20231207_104924.jpg1.3 MB · Views: 28