To avoid these ads, REGISTER NOW!

Porcelain Workshop Floor

Cave Creek Ray

Well-known member
Joined
Mar 8, 2015
Messages
383
Location
North Central Arizona
In an effort to stop hijacking T4's thread on an awesome porcelain job, I decided to start my thread early. I have half the workshop done and will eventually do the garage in the house with porcelain as well.

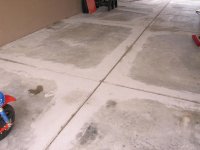
Background: I bought a (5 acre) horse property in Arizona a couple years back. The home was 24 years old and we discovered a bunch of problems after the purchase. We ended up gutting and re-framing 120 feet of exterior wall due to rot and mold. We removed 22,000 lbs of Saltillo tile. Full window (24) replacement. Full re-stucco. Interior upgrades. Basically, an entire renovation that lasted a year or more. Except for subbing out the stucco, re-framing, window replacement and interior tile install, I did most of the demo and re-wiring and plumbing. I acted as general for the whole job, otherwise we could never have afforded it. It took non-stop 10 and 12 hour days but, we managed to move in after 9 months. What would make me do all of that?

It came with a horse and RV setup. I call it "the barn" but it is actually two separate buildings joined together. One side is the RV storage room, 27 x 42, and the other side of the building is a 3-stall horse barn, with two tack rooms and a wash rack for the horses. We won't have horses but we want to maintain the options for future owners. Just the galvanized fencing in our arena and barn area is an incredible expense should you try and install it today.

This building was a couple years newer than the house was but it had been allowed to run down due to lack of use. That was the story with the entire property as the prior owners were aged and in advanced states of illness. We literally were the right buyer at the right time.

Anyway, I'll try and figure out how to get VBulletin to insert the pictures to line up with my narrative. Without that, this whole story is going to be a pain to follow along with...

Most of these are pictures were shot right after we made an offer on the property.

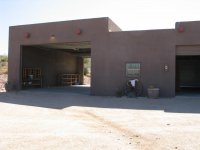
1. The RV garage is on the left and the horse barn is on the right. From the exterior, this is undoubtedly the ugliest building you could have built. Basically a box with doors.

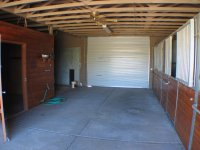
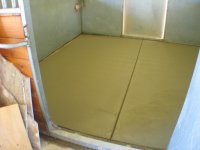
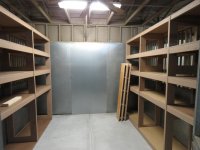
2. These are the horse stalls or "jail cells" as a friend calls them. They were nasty dirt floors that had housed horses for a decade and a half. I subsequently concreted in the floors and built shelving. The far walls had horse doors installed with 1" gaps around the doors. I sealed those in with matching galvanized and have much less dust and "critter" intrusion.

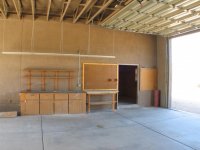
3. This is a long shot across the barn area with the horse wash rack in the back ground. My tractor lives here now so the wash rack has been transformed into a small workshop with cabinets and a counter top. I have a washer and dryer I am going to try and "stack" to save space and use for washing shop towels and the like.

4. The RV barn was pretty sad. The cabinets were pure annoying. Super cheapie with clip-on wall shelving. No thought into what went where. It was so nice to drive my tractor in and knock them down. And, the doors are only 12' high! Most RVs today require a 13' or larger door. Trailers fit fine. Through the door was one of the tack rooms. Oddly, there was no exterior man-door for this building. You had to force up one of the roll-up doors or leave a door open all the time. So, I took a concrete saw and cut out the window (see first picture) and installed a regular door.

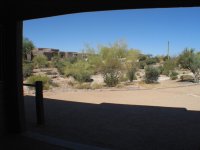
5. The views are really amazing out both of the garage doors. This was mid summer and most everything was pretty crispy.

6. It was nice to have room for storage when it came time to move in. Most of that stuff has been re-located to its proper location now.

7. The one thing they didn't skimp on was door openers. I will eventually upgrade the radios in these to a more modern design for use with remotes.
 

Attachments

  • Echo Canyon (shots)-17-2.jpg
    Echo Canyon (shots)-17-2.jpg
    119.5 KB · Views: 623
  • Echo Canyon (shots)-27.jpg
    Echo Canyon (shots)-27.jpg
    144.1 KB · Views: 583
  • Echo Canyon (shots)-25.jpg
    Echo Canyon (shots)-25.jpg
    140 KB · Views: 613
  • Echo Canyon (shots)-21.jpg
    Echo Canyon (shots)-21.jpg
    124.8 KB · Views: 588
  • Echo Canyon (shots)-29.jpg
    Echo Canyon (shots)-29.jpg
    114.2 KB · Views: 529
  • Echo Canyon-Barn Cold Room-12.jpg
    Echo Canyon-Barn Cold Room-12.jpg
    136.8 KB · Views: 595
  • Echo Canyon (shots)-32.jpg
    Echo Canyon (shots)-32.jpg
    127.1 KB · Views: 544
Last edited:
To avoid these ads, REGISTER NOW!
OP
C

Cave Creek Ray

Well-known member
Joined
Mar 8, 2015
Messages
383
Location
North Central Arizona
Mods: Anyone know why this page selected random words to turn into hot links???

With my workshop serving as a storage room for most of my equipment and garage gear, I had to de-clutter before I could tile anything. It was so tight, it resembled a rabbit warren with little pathways through the "stuff." The plan involved moving the boxes and non-garage odds-and-ends to the horse stalls. Problem is, during the renovation of the home, the dirt-floor stalls ended up being my storage location for extra lumber, drywall, bags of material and loads of junk. So, I cleaned out that entire mess.

The first thing was to concrete in the floors of the horse stalls. I found a great crew and they did an absolutely super job of installing real floors in all three stalls. (pic one)

Then, I needed storage shelving. Lots of it. The good news is I had a decent supply of dimensional lumber leftover from the house remodel. By adding a little to it, I was able to fabricate a huge array of shelving. Not fine cabinetry by any means but very sturdy. My neighbor had 10 gallons of free paint that were an acceptable color so I painted them all prior to assembly. (pic 2) That was a major pain but it made assembly go really quickly and kept paint off my nice new concrete.

I finally got the shelves installed and lined each shelf with 1/4 Masonite to keep the shelves smooth and slick enough to slide boxes on and off of. All totaled, there was over 50' of shelving, eight feet high. (pic 3) You can see in this picture the galvanized panels I used to seal in the horse doors.

De-cluttering the workshop as best I could allowed me to seriously think about tiling. I had ordered a gorgeous set of New Age Pro cabinets and when they arrived, I realized they matched to color in the workshop exactly. I then found a porcelain tile at Home Depot that looked close. I bought one and took it to the workshop and was amazed: It matched the cabinets and wall perfectly. Only problem was, it was $2 a sq ft and it was pretty popular.

Everyone at my local Home Depot knows me by name because I have been over there, sometimes three times a day during the house renovation. They tried every possible way to get me a lower price on the tile and couldn't because it was a "one time purchase" from a new supplier in Mexico. My wife reminded me that, "You are only gonna do this one more time so get what you want." Yes dear! I ordered 2,100 sq ft of tile and had them deliver it to the house and barn. I'll use 700 sq ft in the house garage next winter.

The "Tiley Bits..."

In my last home, I had a painted concrete floor. (Rustoleum water based two-part epoxy with a slight tint by the paint guys at Home Depot. No poly overcoat.) It was a 1400 sq ft garage and the paint held up remarkably well over the 18 years I was there (with one re-coat) but, I was tire of paint screw-ups. Plus, a friend of mine has a "Toy Barn" for his hot rods and just for a space the size of my workshop, it ran him $5,000 to have it done. Buying the best 20 mil military-grade two-part was going to run me about what I was looking at spending on porcelain. And, with a history of water under our slab due to zero attention paid to runoff and a layer of concrete-like rock under my workshop slab, I decided (after digging and plumbing an entire roof drain system) to go hard scape. Plus, it is virtually bullet proof and holds up far better to abrasion and chemicals than any paint or epoxy coating. And, I could put it down myself.

What could possibly go wrong? :wtf:

My workshop floor had a few oil spills but was amazingly stable concrete. Except for a few shrinkage cracks in a slab or two, the majority of the sections (slabs) had only cracked along the crack joint the concrete team installed. Perfect. How do I tile across the crack joints though?

In my home, the Bosnian tiler used a fabric material and some kind of glue/isolation material to hide a few cracks in our entry way. I hit the 'Net and found the Floor Elf. (www.floorelf.com) This guy is a commercial tiler in Colorado and does great work. He also helps nubes like me figure out what they need to do to get a great install. His advice: "Honor the expansion joint all they way up through your tile." That way, the sections could still move slightly and not crack the tiles. Another must was, always grout the crack joints with sanded caulk to allow movement. Also, leave a small gap around the edge of the room for expansion and fill that in with the same flexible caulk. This colored caulk will disappear when you go back and add in the regular colored grout in the rest of the tile gaps. I am "lucky" in that I am doing the install during peak heat (summer) so any gaps I leave will be overkill come winter.

Newbie Mortar 101 Lesson.


Tiles under 14" and considered "small" tiles and those can be set using standard thinset mortar. Tiles beyond that length may see more deviation in the floor underneath so the mortar may need to be thicker. Thinset does not like to get thicker than about 1/4 inch before it cracks horribly due to shrinkage. To solve this problem, they add more material to the Portland cement in the mortar (sand?) to allow it to handle thicker installs. My tile was 12 x 24 so I was looking for a medium bed mortar.

I discovered a medium bed recommended by the manufacturer (Custom) called Megalite. Custom makes a Versabond LFT which is a medium bed mortar but Megalite has what appears to be tiny balls of plastic material in the mix and it is supposed to handle movement the best of all their products. For that it costs twice as much as the Versabond LFT ($42 vs $18).
Again, my wife's words came back to me: "You are only gonna do this once. Do it right."


Homey 'Po had small ramping for the tile edge so I grabbed some and back-filled the edge with construction adhesive for extra strength. (pic 4) Then, I used Gorilla Tape for the first time to tape the ramping down while I tiled. Worked pretty well.

Starting Out

OK. You have piles of tile boxes and 20 bags of mortar... Where do you start?

Normally, in home situations, you want the tile symmetry to be balanced with obvious things like your front entry door. Tilers will play around with tiles trying to get the right starting point, then they will snap a few lines, one being the King line, and start at the center and move away from that point of balance. Its an artsy thing that actually makes sense.

For a garage or shop, you have more latitude. I tried that, laying out my first tile dead center on the door opening. I discovered that one inch of a tile would fall over the crack joints about six feet either side of that tile. A 1 inch sliver of tile is not the easiest thing to install. Two inches is easier. So, for my "King line" I chose the crack joint on this side of the garage. While I selected 1/8 grout line gaps everywhere else, I would use 1/4" gaps over these expansion joints and, as I said, fill them with flexible caulk that matched the hard grout.

Using that methodology, after five days of tiling, I had half of the 1100 sq ft garage done. You lay solid tiles everywhere you can. When those set up in 24 hours, you can cut the edge pieces and install them.

The last photo is a close-up of the 1/4" gap following the crack joint. You just have to be within an inch of it to prevent your tile from cracking. I managed to stay right over mine even though it wandered slightly.
 

Attachments

  • Barn Concrete Pour-4.jpg
    Barn Concrete Pour-4.jpg
    84.9 KB · Views: 575
  • Barn Shelves-2.jpg
    Barn Shelves-2.jpg
    145.8 KB · Views: 683
  • Barn-Stalls-3.jpg
    Barn-Stalls-3.jpg
    115.3 KB · Views: 601
  • Workshop tiling job.jpg
    Workshop tiling job.jpg
    134.1 KB · Views: 702
  • Workshop tiling job-10.jpg
    Workshop tiling job-10.jpg
    125.5 KB · Views: 746
  • Workshop Tile-5.jpg
    Workshop Tile-5.jpg
    141.2 KB · Views: 648
  • Workshop tiling job-5.jpg
    Workshop tiling job-5.jpg
    144.4 KB · Views: 681
Last edited:
OP
C

Cave Creek Ray

Well-known member
Joined
Mar 8, 2015
Messages
383
Location
North Central Arizona
"Gee Ray... Didn't You Do Any Floor Prep Before Tiling?

DOH!

It was inconsequential, I almost forgot. Yes... there are a few things to consider.

The third shot is of the floor after I ground the high spots off the crack joints.

"Huh?"

I put a straight edge all over my floor to figure out how lumpy it was. Concrete is literally "man-made," often on the end of long poles pushing float levelers across a sea of green mud. Its never going to be perfect and variations are to be expected. One I didn't expect was the "bulge" by all the crack joints. But, it makes sense if you think about it. The wet concrete is basically a liquid. When they use the crack-joint tool, it displaces material to make the "crack" in the concrete. It essentially creates a weak area along the concrete slab and that invites the crack into that joint.

Where does all the concrete go that used to be where the groove is now? Like the bow of a boat cutting through water, the tool displaces cement away from the joint area and quite often, the concrete installers work it down enough that you don't see it -until you lay a straight edge on the area. My level was a 72" level and you can see, 3' from the joint the end of the level was about 1/2 to 3/4 of an inch higher. It took three hours with a hand grinder to take that off. You can see almost a 1/4 of an inch came off in the areas where joint lines intersected. Then, I filled the crack lines with 50-year caulking and put Red Guard over the spider cracks and an oil spill area. It stuck really well! I had used citrus cleaners and cat litter a few tries and the Red Guard stuck like mad. The mortar sticks to Red Guard like mad too.

Custom offers a lifetime guarantee if you use their Red Guard as an isolation membrane for gaps up to 1/8" and then use one of their higher end mortars to prevent cracking. Their guarantee includes labor to have the tile removed and replaced. Based on my experience trying to get a few globs of mortar up from the day prior, this tile is down.
 

Attachments

  • Worshop Floor-2.jpg
    Worshop Floor-2.jpg
    120.4 KB · Views: 348
  • Worshop Floor-3.jpg
    Worshop Floor-3.jpg
    67.1 KB · Views: 323
  • Worshop Floor-7.jpg
    Worshop Floor-7.jpg
    129.4 KB · Views: 339
  • Worshop Floor-9.jpg
    Worshop Floor-9.jpg
    146.8 KB · Views: 338
  • Worshop Floor-12.jpg
    Worshop Floor-12.jpg
    124.5 KB · Views: 397
  • Worshop Floor-11.jpg
    Worshop Floor-11.jpg
    148.1 KB · Views: 334
  • Worshop Floor-10.jpg
    Worshop Floor-10.jpg
    140.2 KB · Views: 368
Last edited:
OP
C

Cave Creek Ray

Well-known member
Joined
Mar 8, 2015
Messages
383
Location
North Central Arizona
"How Did You Grind The Floor Spots? What Equipment Did You Use??

I was going to rent a nice heavy floor machine that rolls around like a lawn mower and cuts off the high spots. Only problem, it weighs 300 lbs and requires a trailer. So, plan B dictated the hand grinder. Worked awesome. I rented a Hilti Vac and I am sure glad I did. That thing must cost close to $700 and I had to clean out the filter a dozen times during the grinding process. It would have toasted my ShopVac. All totalled, it was $30 for the grinder and the vacuum for three hours. I had to buy the diamond head for $80 but it will outlast the project, including the house garage.

One other tool I had which is indispensable, is a tile saw. I bought this MK years back to do a shower in my daughter house (First tile job! Never leaked!) Good tile saws run $1000 but HD sells their rental units really cheaply. I paid $225 for this one and its like new when I clean it up after a job. Decent diamond blades for it run $40. I haven't cut too many tiles thus far but porcelain is the hardest material a blade can cut. I expect this one blade will make it through the whole workshop -or nearly all the way.

That about covers the prep I did. Other than making a lot of dust, it was pretty painless. Can't wait to get the other side prepped and start tiling there.

Stay tuned...
 

Attachments

  • Worshop Floor-4.jpg
    Worshop Floor-4.jpg
    143.5 KB · Views: 212
  • Worshop Floor-5.jpg
    Worshop Floor-5.jpg
    140 KB · Views: 207
  • Workshop Tile-2.jpg
    Workshop Tile-2.jpg
    145.2 KB · Views: 242
Last edited:

duneslider

Well-known member
Joined
Jan 20, 2013
Messages
2,245
Location
Riverton, Utah
You won't regret honoring the control joints!

Normal sanded caulk won't last very long in a garage environment. Silicone is better but it isn't sanded. I have tried sprinkling dry grout over fresh color matched silicone caulk with mixed results.

I have seen sanded urethanes but they aren't made by the tile manufacturers and there may not be a good color that matches your grout choice unless you go for grey.
 
OP
C

Cave Creek Ray

Well-known member
Joined
Mar 8, 2015
Messages
383
Location
North Central Arizona
Thanks!

I did go grey and I put down the caulk in the joints yesterday. I am hoping with 1/8 joints, the rest of the standard grout doesn't see much action. Other than a few rubber-wheeled rolly carts, and the occasional vehicle in for service, the grout lines will see foot traffic and broom traffic. My grout lines are 1/4 deep almost everywhere so that should really help in keeping the grout in place.

I am going to try a suggestion from a friend: Paint my floor jack wheels with Plasti-Dip just to quiet them down. UPDATE: I wrapped them with 20 mil electrical tape from HD and it works AWESOME!

The tile is a mix of medium grey and tan so the grey grout seemed a good fit. I found a neat grout admix that makes the grout far more stain resistant. The manufacturer said its far better than post-install sealers. Tech guy said it lasts "forever" -whatever that is! Another side benefit is it makes the grout harder.

Today I painted a wall adjacent to the tile. Funny how it looked really nice until I tiled. Glad to get it painted and I'll be sure and do the other side before I get tile down. Dropped several drops of paint on the tile and they wiped right up -even after drying. Not much sticks to porcelain.

Tomorrow I finish the grout. Then, in a couple days, I'll move all the junk onto the tile and get started on the other side. Its been 114 here in Phoenix but, in the shade, it only gets up to the 90's by the time I quit at 2:00 PM. My house is a higher elevation than downtown and its cooler up here.

I know it sounds like a crazy time of year to be working but, its so fun seeing the finish line coming up, I really enjoy spending the time to get it done right.

:)
 
Last edited:

Angelfire

Well-known member
Joined
Mar 22, 2012
Messages
1,367
Location
New Mexico and Ireland
Can you describe the control joint application a bit more? I've always heard "honour the control joint" but never really knew what that meant. I'll be doing my garage floor eventually so might as well get the methodology down. In one place you mentioned the grout line needs to be within one inch of the control joint which seems to imply the groutline doesn't necessarily have to fall on the joint. Am I reading this correctly? And secondly, I see you doubled your grout line width at the control joint....is there some sort of a formula to be had here (ie. double the grout line of the rest of the floor or maybe it needs to be X% of the actual control joint?). Sorry for the elementary questions. I've laid a fair bit of tile but never with control joints (and it was Saltillo so that's a whole nuther beast to begin with!) so am just curious.
Cheers.
 
OP
C

Cave Creek Ray

Well-known member
Joined
Mar 8, 2015
Messages
383
Location
North Central Arizona
Saltillo!

I tore out tons of that stuff and they used roofing felt across cracks on the slab under the mortar and it worked! Zero cracking when I tore the whole house up!

The concept is simple: The crack joint is the most likely location should you have any cracking in the concrete substrate due to movement. A good concrete job doesn't move much but, with the seasons, there is expansion and contraction.

The idea is to put a seam in your tile pattern over the crack joint and fill that with flexible colored grout. I got that suggestion from the Floor Elf. Great guy and very helpful.

Here you can see the vertical crack joint in my concrete (filled part way with white caulking). As you noted, the joint is twice as wide and I just did that to make sure there was plenty of flexible caulk there to protect the adjacent tile. This is pretty much overkill. The short pieces are the rest of the last row of tiles I set. Its hard to see in this picture but, there is a crack seam going left-right in the shadows of the installed tile.

attachment.php
 

Attachments

  • Workshop tiling job-6.jpg
    Workshop tiling job-6.jpg
    144.4 KB · Views: 3,717
Last edited:

Angelfire

Well-known member
Joined
Mar 22, 2012
Messages
1,367
Location
New Mexico and Ireland
Thanks for this!

Yeah, putting down the Saltillo is a lesson in patience and sore knees!

So, it looks as though you do have the tiles sitting over the expansion joint at least a bit. Did you just thinset over the expansion joint or did you keep it clear and just filled in with colored caulk after the tiles were set? I'm thinking 100% coverage on the back of the tiles would mean thinset needs to go in there otherwise that seam could be a weak spot for things dropping on it etc.... Just curious. Thanks much.
 
OP
C

Cave Creek Ray

Well-known member
Joined
Mar 8, 2015
Messages
383
Location
North Central Arizona
What I did was...

As I was laying in the tiles, I would occasionally ****** a load of mortar into the crack joint. No big deal. Before laying the next tile across the joint, I'd run my finger along the edge of the previous tile and buttress the edge of the tile with mortar. If it looked like there were any spots that needed mortar, I'd use a 2" straight trowel and buttress the edge of the previous tile. Makes it plenty strong.

Then, I'd plant a good line of mortar on the edge of the crack joint and lay my next tile. If any got into the joint, I used a small pointy trowel to push that under the latest tile I laid. All you need is a 1/8th" space in that joint. 1/4" is better. Even if a little mortar gets in there, it will crack with movement. The caulk will hide the movement.

I didn't "back butter" any tiles. All were laid dry.

The Floor Elf said you could actually get up to 6" away from a crack joint and still be OK but I wanted to try and keep it much closer. If you really line up my joint running the longest distance (42'), you can see the slight variation as I followed the joint. But, at first glance, it looks laser straight.

Grouting today... Should take another day and then a good cleaning. Will update pictures then.
 
Last edited:

duneslider

Well-known member
Joined
Jan 20, 2013
Messages
2,245
Location
Riverton, Utah
There are a few reasons for "soft" joints. One is when going over these control joints. They will move with the seasons and if you tile directly over them you very likely could get cracking in whatever is above the joint. Second is you need soft joints for expansion of the tile itself. Tile will expand and contract with temp changes and with moisture changes. The soft joints in this case prevent tenting, google that one, you don't want that to happen either.

Nobody likes honoring control joints or expansion joints but it is the RIGHT way to do it. With the proper materials you can slightly relocate where the joint is in the tile layout but you must do it correctly.

Filling joints with normal sanded latex/acrylic caulk isn't the "best" way to go (especially in a garage). That type of caulk doesn't do well with water and other chemicals that are found in garages. Being in Arizona you will probably fair better than other areas though. Schluter makes some nice pieces to use instead of caulk. (Dilex-BWS)

I am guessing you used Grout Boost in your grout. It is pretty good stuff. I haven't used it much though. I generally pushed people towards epoxy or urethane grout. By the time I added the extra in for grout boost and the extra work I was almost to the price of epoxy/urethane.

It is always good practice to back butter the tile. I would highly recommend it, especially installing in a hot environment.
 
OP
C

Cave Creek Ray

Well-known member
Joined
Mar 8, 2015
Messages
383
Location
North Central Arizona
Good points.

I work when the concrete is cooler. I have found wetting it lightly before laying helps cool it (with our low humidity). Its almost dry to the touch when I start laying but its cooler.

Some of the patchwork pieces I had to back butter but, the main field of uncut tiles seemed to really like the Megalite. Custom says it has the highest PSI rating of any mortar they sell. But, somehow it can handle tile movement. Still can't wrap my brain around that.

The grout additive looked like white glue but smelled different. Amazingly, this half of the shop only took 1 1/2 bags of mortar. They grey is a little lighter than the sample but for the shop, its fine. For the house garage, I'll probably switch to a brown color.

As always seems to be the case, when you upgrade the floor, the wall that used to look just fine now looks nasty. I repainted the wall before finishing the tile and grout. Glad I did.

attachment.php


After a day to cure, I am going to wash out the floor good and squeegee it to get the last of grout haze. It wipes right off but after four hours on my hands and knees today, I left it for another day.

In the both pictures you can see the expansion joint running the entire length of the shop, uninterrupted. About 1/4 of the way back, you can see where a joint ran across one of the tile rows because I had to split that row.
 

Attachments

  • Workshop 1-2 Done-2.jpg
    Workshop 1-2 Done-2.jpg
    140.6 KB · Views: 212
  • Workshop 1-2 Done.jpg
    Workshop 1-2 Done.jpg
    139.7 KB · Views: 3,698
Last edited:
OP
C

Cave Creek Ray

Well-known member
Joined
Mar 8, 2015
Messages
383
Location
North Central Arizona
MOMENTARY THREAD HIJACK:

See that reflective material in my 20x12 doors? That is the same stuff windshield sun blocks are made out of. It has an R-value of 3.6. To get that kind of R-value you would need almost three inches of foam. I used my laser thermometer on the bare metal in late February at about 10 A.M. and registered 114 degrees. On an adjacent piece of that reflective material, the thermo only saw 78 degrees. It will hold heat in as well, in case you live up north.

I got it at Home Depot in a big roll and cut it into pieces with a box cutter and a straight edge. Weighs nothing and its not even glued in. It has made a huge difference this summer over last. If you already have insulated doors, you could add this material using spray adhesive. I am going to do my house garage doors with it once I replace the doors. For the cost of getting insulated door panels, I can add two layers of this material and have six times the R-value.

Back to your regularly scheduled programming...
 
Last edited:
OP
C

Cave Creek Ray

Well-known member
Joined
Mar 8, 2015
Messages
383
Location
North Central Arizona
inphx,

A friend wanted her hubby to look at my floor because they have a nasty concrete floor in their garage. After peeking at mine last weekend, they are going to have someone tile theirs this winter.
 

Aggie 2002

Member
Joined
Nov 7, 2014
Messages
19
Location
Frisco, TX
Floor looks great! I'm on the fence with tile but every time I see finished pictures it pushes me more towards that direction. I've got a 3 car (560ish sq feet) and doing it myself is daunting!

Do you happen to have a link for that reflective material you purchased at home depot? That project is on my short list.

Thanks!
 
OP
C

Cave Creek Ray

Well-known member
Joined
Mar 8, 2015
Messages
383
Location
North Central Arizona
Aggie,

This link is for 100' rolls which I would have bought for my huge doors had I known it was available online. I have seen it in Lowe's as well for a couple bucks cheaper a roll.

http://www.homedepot.com/p/Reflectix-48-in-x-100-ft-Double-Reflective-Insulation-BP48100/202092205

560 sqft is just about what this half of the garage is. All up its a little over 1100 sqft. The garage in my house is next and its just under 700 sqft. It has a parking step so that will take a little more time to get installed right. I have to order an edge wheel for my saw that will radius the edge of the tile piece on the upper step edge. That will be a new experience.

Tile is so dang tough compared to anything you paint on.

Today, I was moving things onto the tiled area and my Tomahawk II Chipper Shredder that weighs about 400 lbs rolled up the edge of the tile easier than I expected and the machine caught up with me quickly and "crashed" onto the tile with the metal U-leg grinding to a halt on the edge of the first tile... It probably slid 5 inches. It would have screwed up epoxy right to the concrete.

I looked down and there were two rusty lines on the tile. I wiped the rust off the tile: Zero damage. All it did was grind the rust off the bottom of the chipper leg.

Here are the tools I used... The 2" square masonry trowel was my right hand during much of the mortar layout. The small pointy trowel (not pictured) helped straighten tiles or raise them slightly. It was a "fingernail" you didn't have to worry about breaking.

attachment.php


The one tool I used a lot that is not pictured is a cheap aluminum level used to get the tiles level with one another as you lay them down. You are not looking at the level bubble so buy a plastic or cheap aluminum one in 48". Sometimes you have to put all your weight on it to get a high tile down. It'll take a beating so don't spend more than $10 on one!

The picture shows two mixing attachments. The circular one did an awesome job but it was a real booger to clean. The four-hoop grout mixer did about as good a job and cleans off really well. I wipe them down with WD-40 at days end or every other use. The wax in WD keeps the stuff from sticking. The stain additive to the grout makes it harder to get off so keeping up with cleaning all your tools is essential. For grouting I only used the bucket scoop (a drywall item in the drywall section of HD) and a rubber grout float and a sponge.

For mixing, you have to have a heavy-duty mixer, especially for the mortar. This old Harbor Freight model was under $30 a decade back and has one speed either direction, which makes mixing really nice. Just mixing up 13 bags of mortar has been rough on it. Don't try this on a regular drill.
 

Attachments

  • Workshop Tile Tools (Cr).jpg
    Workshop Tile Tools (Cr).jpg
    141.5 KB · Views: 3,503
Last edited:
To avoid these ads, REGISTER NOW!

Track t-4

Well-known member
Joined
Dec 18, 2008
Messages
78
Location
Maryland
Ray,

Your project is coming along nicely. I especially like all the detail you provide that will surely help others who consider porcelain tile for their garage.
 
OP
C

Cave Creek Ray

Well-known member
Joined
Mar 8, 2015
Messages
383
Location
North Central Arizona
Track,

Thanks.

There is no substitute for experience. And for those of us who choose to embark on major projects with no experience in many of these areas, learning from the mistakes and research of others, is the only real course to follow. And a HUGE thanks to the pros who take time to come online and offer their advice. Whether prepping concrete for epoxy or tile, there are steps you MUST follow to have a decent chance on a successful outcome. Even with all the information in the world, there are folks who don't have the time, patience, or "hands" to do projects themselves. I am lucky because I am retired. My project is my job.

For people out there trying to decide on tile vs. other options, all I can offer is what is in my posts -just like your posts helped people make the decision for themselves. Your awesome result got me motivated. Tiling yourself is work. No doubt about it. But its not a Herculean task.

I did water-based two-part paint in my last house. I followed the prep instructions to the letter. Two weeks after install, it started coming up in large areas. When I called the manufacturer, the tech guys said, "Well, you didn't acid wash off all the concrete creme." I said, "Well you instructions say explicitly NOT to acid wash." He responded, "Well, that is because most people don't neutralize the acid well enough. If you do that you get a far better result."

Great.

I spent two weeks pressure washing off the original paint. Then I acid washed and neutralized. Using Rustoleum, I had great results with hot tire pick-up in only a couple of spots. All in all, doing that job on a 1000 sq ft garage took me almost five weeks before I drove my first car in for the first time. I have about half of that thus far on my 550 sq ft of tile. No matter what you do, it will take time. I am doing a huge area. There is no bonus for me if I finish a week earlier.

Having suppliers on this site surely helps you with every step of the process doing the application for yourself but, ultimately you are on your own. Even hiring it done doesn't always result in a perfect job. Is there even such a thing as perfect? My jobs certainly isn't. But you know, I like the fact that I did it myself. Had I hired it done, it would have been cost prohibitive.
 
Last edited:

Shea

Well-known member
Joined
Sep 19, 2012
Messages
2,864
Location
California
Wow, very nice! This porcelain tile project went quick compared to others we've watched here.
 
OP
C

Cave Creek Ray

Well-known member
Joined
Mar 8, 2015
Messages
383
Location
North Central Arizona
Shea,

Its only half done! :)

I had a bunch of machinery I had no room for so I had to tile half of the room and then move the equipment onto the new tile and tile the rest. I am halfway through the move and decided to take a day off. A couple more weeks and I should be done.
 

Shea

Well-known member
Joined
Sep 19, 2012
Messages
2,864
Location
California
Ah.. OK. Still pretty darn quick DIY for the square footage you have covered so far. You are doing great!
 
OP
C

Cave Creek Ray

Well-known member
Joined
Mar 8, 2015
Messages
383
Location
North Central Arizona
For you "Texas tilers"...

When we renovated the home that came with the barn I am tiling, we chose a really nice tile that was reportedly made by an Italian company with a plant in the USA in fact, just east of Dallas, TX! Ragno USA is the American branch of an international tile company. Their products are absolutely top notch and if I lived anywhere within a days drive of Sunnyvale, TX, I'd be calling them about blems/seconds/end lots for my garage. Nearly EVERYBODY in TX has either a horse trailer or a dual axle car trailer that could handle a couple thousand pounds of tile. I bet there is a deal or two out there for the patient!

Italian tile is not cheap. But Italian tile that doesn't have to get a ride across the ocean before a truck ride to your house is a lot cheaper!

The tile in my house is porcelain that is photo-printed from pictures of real travertine. They didn't just do two or three tiles. Mine comes in 7 different tile shots so it looks incredibly real. Not necessarily what you want for a garage but, it looks awesome in the house. My point is, they make very high-grade rectified tile (edge ground for high accuracy) in a bundle of styles. If you are in the area, check them out!

:)

Google them! Ragno, 359 Clay Road, Sunnyvale, TX 75182
 
Last edited:
OP
C

Cave Creek Ray

Well-known member
Joined
Mar 8, 2015
Messages
383
Location
North Central Arizona
Its been a busy week or two but I am finally throwing down tiles again. I had to paint the 2 largest walls because the tile made the old paint look bad. Now everything looks spanking new. And, I had to run a bunch of new electrical outlets and switches.

As I mentioned previously, I centered a row of tiles along a expansion joint on one side of the garage knowing that it would require a cut tile on the opposite side along the joint located there. As it is, I'll have an inch sliver of tile which is both strong and manageable to install. Had I centered the instal, the sliver would have been about 1/2" along each expansions joint. Twice as much cutting. I decided it was not worth it.

When you have to cut tiles, its important to measure against installed and "immobile" tiles. Otherwise, you measurements are subject to moving tiles and the tiles you cut may be useless.

To finish out this side of the garage, I had the installed tile I had moved all my stuff onto. As I worked away from that tile, I had more expansion joints to cross and that meant more cutting. So, I am taking it one day at a time.

Here's what the section I laid today looks like. It integrates with the previously installed tile and the transition should be seamless.

(This section took two hours to install and clean up from. In the AZ heat, a couple hours during the cool morning is easy. I'll get the shop completed after about a week of work in small chunks.)
 

Attachments

  • Workshop Tile (2nd half)-4.jpg
    Workshop Tile (2nd half)-4.jpg
    140.3 KB · Views: 295
  • Workshop Tile (2nd half).jpg
    Workshop Tile (2nd half).jpg
    142.1 KB · Views: 305
  • Workshop Tile (2nd half)-5.jpg
    Workshop Tile (2nd half)-5.jpg
    144.6 KB · Views: 311
  • Workshop Tile (2nd half)-3-2.jpg
    Workshop Tile (2nd half)-3-2.jpg
    137.1 KB · Views: 277
Last edited:

OJ Bartley

Well-known member
Joined
May 18, 2009
Messages
605
Location
Toronto, ON
Ray, how did I miss this thread!? Your tiles are gorgeous, and you've done an amazing job. The explanations and detail you've recorded your work with are also fantastic, and will be a great resource to future tilers. I wish I had known about your WD-40 tip on the mixer, I used the 4-hoop one too, and really tried to get it back to shining and new at the end of each tiling day.

Awesome, awesome work!
 
OP
C

Cave Creek Ray

Well-known member
Joined
Mar 8, 2015
Messages
383
Location
North Central Arizona
O.J.

Thanks! It ain't perfect but, you know it looks a lot better than many of the tile jobs I used to see when I was traveling around the country. I am having fun and the best part is, I am wrapping this project up.

Today I cut and installed the 2" pieces along the edge of one of the expansion joints as well as cut all the other pieces along and around those joints. It gets pretty complicated juggling what cut piece goes where. Another issue is keeping the project moving by making sure you have enough tiles welded down to measure off for the cut pieces. I have figured out a "flow" and things should wrap up after I get back from a short trip with my wife.

Except for the little pieces that I had to set and re-set a few time, the process is pretty basic:

-Dump out some mortar
-Use the slotted trowel to work the material around, making sure you are covering every inch under the tile. This makes sure the mortar is well well distributed and well bonded to the concrete surface.
-Drop the tile onto the mortar. Press it down and wiggle, and make sure the edges line up with the adjacent tiles.
-Scoop out any mortar in the joint (using a spacer) and then wipe the tiles down and insert spacers. Then push each tile up firm against neighboring tile in the order you laid them.
-When out of mortar, mix and repeat. It takes a little patience and planning. This room is 1150 sq ft so its been a bigger project than my garage will be.

I was all set to tile Monday and realized I hadn't prepped the expansion joints with caulk yet. I got that all ready for Tuesday. Then, in the pre-dawn light, I realized I had a different dye lot of tile sitting on a pallet of the lot I am installing. (I'll use those elsewhere or return them.) I had to move about 1900lbs of tile out of the way and then move the pallet of correct tile into the workshop. That wasted another 25 minutes. My fault. I shoulda gotten them all pre-located the day prior. Oh well.

Today, I got about 1/4 of the remaining floor done and will work at it until its done. I should make good headway in the next couple of days.
 

Attachments

  • Workshop Tile (2nd half)-8.jpg
    Workshop Tile (2nd half)-8.jpg
    145.8 KB · Views: 334
  • Workshop Tile (2nd half)-10.jpg
    Workshop Tile (2nd half)-10.jpg
    118.2 KB · Views: 342
  • Workshop Tile (2nd half)-11.jpg
    Workshop Tile (2nd half)-11.jpg
    136.9 KB · Views: 329
  • Workshop Tile (2nd half)-14.jpg
    Workshop Tile (2nd half)-14.jpg
    142.4 KB · Views: 328
  • Workshop Tile (2nd half)-15.jpg
    Workshop Tile (2nd half)-15.jpg
    136.7 KB · Views: 380
Last edited:

20_rc51_00

Member
Joined
Jun 26, 2014
Messages
14
great thread! Looking to tile the garage next year. This will be one of the go to resources.

One question I have is how do you safely clean and dispose of mortar? I bet it can destroy plumbing even if diluted. Just scoop out into the garbage and then wipe down with a rag to clean your tools? Is there any caustic in this stuff that could harm skin?
 
OP
C

Cave Creek Ray

Well-known member
Joined
Mar 8, 2015
Messages
383
Location
North Central Arizona
I survived a week in Durango rafting and zip-lining. :)

I am three tiles (in the corner) short of being completely done with laying the workshop (1150 sf). A day of grouting this remaining half and I should be starting the cabinet install. I went on a caffeine-powered bender the other day and worked ten hours straight completing almost half of this side (225 sf).

What to do with mortar... Good question actually.

I try like crazy to use up all my wet mortar. At $42 a bag, its a precious commodity. But, at the end of the day, if I have any extra I dilute it and use it as a soil stabilizer in a wash that is forming uphill of my workshop. (I have had wheelbarrow loads of granite wash across my drive. This should help.)

OK, if you don't need to use it elsewhere, the best solution is scooping your mortar bucket as clean as you can and then tossing the pure leftover softened chunks in a garbage bag in a garbage can. Hose out your bucket and toss the thinned out leftovers on any dirt area. After it hardens, a light raking and it breaks up and disappears into the soil. On sandy decomposing granite (most of AZ) I have tossed bucket loads of paint and mortar washings in the area where I am going to excavate for a driveway pad next winter. Taking a garden rake to the area makes it totally disappear.

WARNING! Mortar and even tile dust from wet saws will stain an asphalt driveway. I have a wonderful stain going on but was planning on re-coating the asphalt this fall anyway, so its not a biggee in my case.

Just be careful of getting it near plants as mortar has lye in it and may affect some plants. The desert plants along my new wash don't seem to care at all. The stuff is pretty fast-hardening and what crumbles from foot traffic is compact and seems inert.

Tools get a wipe-down with WD-40 every other day. The tile saw gets a bath in it before starting the job.

One observation: The wet-saw spray from my shower job using plain ceramic floor tiles was NASTY! It stuck to the saw and everything the spray got on. These porcelain tiles barely produce any sticky ******. My saw wipes off easily every couple of uses. Huge difference and my porcelain is cheaper Mexican stuff. So far, I am impressed.

Pictures in a day or two when I get done. :)
 

Attachments

  • Durango Trip (rafting)-3.jpg
    Durango Trip (rafting)-3.jpg
    150.5 KB · Views: 80
  • Durango Trip (rafting)-5.jpg
    Durango Trip (rafting)-5.jpg
    153.7 KB · Views: 82
  • Durango Trip (Zip-Lining)-4.jpg
    Durango Trip (Zip-Lining)-4.jpg
    158.5 KB · Views: 95
  • Durango Trip.jpg
    Durango Trip.jpg
    154.6 KB · Views: 90
OP
C

Cave Creek Ray

Well-known member
Joined
Mar 8, 2015
Messages
383
Location
North Central Arizona
Technique post for people actually starting tile... (I learned these over time... Wish somebody would have told me.)

Depending what kind of mortar you are laying down (thinset -less than 14" longest side tile or medium -14" or larger tile -you will be using a 1/4" notch trowel or a 1/2" notch trowel. Looks easy enough to watch a guy spread the stuff around. But there are subtleties to the use of a trowel.

The trowel is actually a "valve" for spreading on exactly the right thickness mortar. The trowels job is to extrude strips of mortar the tile can mash down and adhere to. If you spread the mortar with the 1/2" trowel at about a 45 degree angle, you are extruding strips of mortar that are less than 1/2" high. If you really need a thick bed, holding it 90 degrees to the concrete gets you the full 1/2" of mortar lines.

The basics: A bucket of mortar (black) and a bucket of water (red) a sponge and a trowel.

I had a section where the concrete pitched up the last 6 inches along the wall. There I wanted thin mortar. Two feet out from the wall, I needed the full 1/2" bed. I started the spread at a high angle off the wall and stood the trowel up to 90 degrees as I moved away from the wall. The amount of mortar was just what I needed both in the thin section and in the thicker bed.

As anyone who has done it, laying tile is the same procedure, multiplied by the number of tiles. Its easy to waste time unnecessarily. Try to combine flows. For example...

Mixing up some mortar with the HD drill. Mix it up per direction and wait ten to fifteen for the moisture to "spread." Then mix it again for about 5 minutes and then it has to sit another 10-15 before you spread it. That gives you time to clean off your mixer. For some stupid reason, I was always refilling my clean water bucket first, and then putting the mixer in the clean water and running it clean. Dumb. I finally got in the habit of saving my muddy clean water from the last section to clean out my mixer. THEN I cleaned out the wash bucket with clean water.

"What's a wash bucket, or clean water?"

You have a bucket of mortar that glues down the tiles. While you are working, it helps to have a clean water bucket and a tile sponge to clean up drips or around the edges of tiles you have laid before setting off to start another row. Keeping your tools clean really makes the project go easier and in the case of tile laying, keeping things clean saves you time. Chipping off mortar globs is a pain and eats up time you could be laying tile. After my days work, I pulled up my spacers and that was it. I only had three small mortar "bridges" between tiles that I had to saw out with a hand tool.

Its not rocket science by any means. You'll get a flow after the second or third bucket of mortar. I actually enjoyed this second half of the workshop. It really came together fast and the progress was a real motivator. A few edge pieces to cut tomorrow and while those are setting up, I'll grout the other half of that side. Day after tomorrow, I should be "El Dunno."

The basic items you use: A mortar bucket (black Homey 'Po paint bucket holds about 3/4 a bag of mortar), a bucket of clean water (red), a notch trowel (scraped off and resting in the water bucket), a tile sponge, and spacers, and a 2" square trowel (in the mortar bucket) which gets its handle washed frequently in the water bucket). See how easy this is? :)
 

Attachments

  • Workshop Tile (2nd half)-13.jpg
    Workshop Tile (2nd half)-13.jpg
    137.6 KB · Views: 126
Last edited:
OP
C

Cave Creek Ray

Well-known member
Joined
Mar 8, 2015
Messages
383
Location
North Central Arizona
Done!

However, not with the "project!"

I got the final tile down and grouted. I now have to do drilling into the cement block wall to the right to secure the 2x6s that will hold up the cabinets. Plus, all the junk on the "heap-o-****" side of the garage needs a severe cleaning and dusting. No sense in tidying up the floor only to booger it up getting the cabinets in. When I get those in and things more tidy, I'll get the floor clean for a proper "FINI" pic. For now you get swirly third-wiping grout haze! And you will LIKE IT!

You'll notice the white caulk behind the cabinet location along the floor. That will get paint before the cabinets go in.
 

Attachments

  • Workshop (Tile done)-5.jpg
    Workshop (Tile done)-5.jpg
    134.8 KB · Views: 273
  • Workshop (Tile done)-6.jpg
    Workshop (Tile done)-6.jpg
    101.3 KB · Views: 309
OP
C

Cave Creek Ray

Well-known member
Joined
Mar 8, 2015
Messages
383
Location
North Central Arizona
Yeah! -Thanks!

With saws on one side and work benches on the other!

I taught CCW classes for awhile and we were always looking for a good facility to teach them in. Heck, I can hang my projector in the rafters and fold out the giant screen! Options! The key to a good workshop! :thumbup:

(That's months away! Back to work...)
 

OJ Bartley

Well-known member
Joined
May 18, 2009
Messages
605
Location
Toronto, ON
Ray, those tiles look dead flat, and your grout looks very smooth. Really great work. I wish I could have employed that kind of precision on my floor. I'll just call my mistakes "character". :)

Awesome job!
 
OP
C

Cave Creek Ray

Well-known member
Joined
Mar 8, 2015
Messages
383
Location
North Central Arizona
They just look flat because the floor is so large!!!

There were three in a row that I was sure I'd have to break out. I thought it would make an interesting video for people thinking porcelain was to fragile. Well, once I got the floor grouted, they look fine. Grout is a pain but it hides a multitude of sins!!!

I am mounting the support timber on the block wall behind the cabinets (New Age from up North ay!) and hope to get the cabinets installed this weekend. Then I can really get the mess sorted, get the floor cleaned, and get a proper finish photo for the thread.

One day at a time. Its been really humid down here with toasty temps. I guzzled through a gallon and a half of ice water before 10 AM this morning and folded up by 11.

Gotta know your limits. :eyecrazy:
 
To avoid these ads, REGISTER NOW!
Top Bottom