To avoid these ads, REGISTER NOW!

Porcelain Workshop Floor

OP
C

Cave Creek Ray

Well-known member
Joined
Mar 8, 2015
Messages
383
Location
North Central Arizona
The closest I'll get to a "fini" pic for awhile!

I "quick mopped" but still have to get the floor good and clean once I am done moving in.

I am now going through boxes of stuff I packed at my old garage and trying to integrate them into the "new" workshop. Its like trying to pour ten gallons of **** into a five gallon bucket. And I thought my new cabinets would be plenty of storage to cover me! Time to start sorting and chucking! Still stuff to move to the other side of the barn or donate. One day at a time.

Thanks for watching the progress and all your words of encouragement and support. :)
 

Attachments

  • Workshop Tile (Finished)-2.jpg
    Workshop Tile (Finished)-2.jpg
    139.3 KB · Views: 531
  • Workshop Tile (Finished)-3.jpg
    Workshop Tile (Finished)-3.jpg
    135.3 KB · Views: 472
  • Workshop Tile (Finished).jpg
    Workshop Tile (Finished).jpg
    138.1 KB · Views: 472
To avoid these ads, REGISTER NOW!

OJ Bartley

Well-known member
Joined
May 18, 2009
Messages
605
Location
Toronto, ON
Very nice, Ray! That is definitely a floor to be proud of. And you're a significant step ahead of me, because mine never got mopped after it was finished, just forced into work.
 
OP
C

Cave Creek Ray

Well-known member
Joined
Mar 8, 2015
Messages
383
Location
North Central Arizona
Thanks OJ...

I am getting that room to work I have sorely needed. A little more "sortin" and I'll be in "bidness."

Like yours, this is a working shop. No time for daintiness like housecleaning!

:)
 
OP
C

Cave Creek Ray

Well-known member
Joined
Mar 8, 2015
Messages
383
Location
North Central Arizona
Had some leftover tile from our house remodel...
Had some leftover mortar from the workshop tile job...
Had some leftover grout from a house remodel a decade ago...

Had a stinky former tack room I wanted to make into an office. Here's what I started with...

attachment.php


Another shot... Smelled like old leather and rat poop.

attachment.php


This is after ten days of framing/insulating/drywalling/running new power lines and switches/painting and tiling..

attachment.php
 

Attachments

  • Echo Canyon (shots).jpg
    Echo Canyon (shots).jpg
    110 KB · Views: 1,187
  • Echo Canyon (shots)-23.jpg
    Echo Canyon (shots)-23.jpg
    97.4 KB · Views: 1,185
  • Barn Office Tile.jpg
    Barn Office Tile.jpg
    141.4 KB · Views: 1,190
Last edited:
OP
C

Cave Creek Ray

Well-known member
Joined
Mar 8, 2015
Messages
383
Location
North Central Arizona
One more shot. The natural stone is rough and will serve as a fine door mat...

attachment.php


I am going to re-purpose some old cabinet parts and refinish them in clear natural on a custom base. On the counter top I'll put hardware boxes in cubby-hole cabinets made for the parts boxes.

attachment.php
 

Attachments

  • Barn Office Tile-4.jpg
    Barn Office Tile-4.jpg
    146.1 KB · Views: 1,188
  • Barn Office Tile-2-3.jpg
    Barn Office Tile-2-3.jpg
    107.8 KB · Views: 52
  • Barn Office Tile-2-2.jpg
    Barn Office Tile-2-2.jpg
    107.8 KB · Views: 1,191

OJ Bartley

Well-known member
Joined
May 18, 2009
Messages
605
Location
Toronto, ON
Looks good Ray. Neat idea with the "integrated" doormat, I hope you don't end up cursing yourself for that one. lol
 
OP
C

Cave Creek Ray

Well-known member
Joined
Mar 8, 2015
Messages
383
Location
North Central Arizona
Thanks OJ,

We have the same "mats" in our house in front of the sinks. The irregular edges and extra exposed grout makes it non-skid. This tile is a little more slippery than the tile in the workshop. Our entire 36sf shower is lined with the same natural "pebble" rock as was the shower in our last house. We figured we'd do it again, we liked it so much.

I guess we are boring!

:)
 
OP
C

Cave Creek Ray

Well-known member
Joined
Mar 8, 2015
Messages
383
Location
North Central Arizona
Its been a busy year since I tiled my workshop. I love the floor and its zero-care ease of use. I did put a tiny chip in one surface after dropping a steel cutting tool that weighed about four lbs. The tool bounced about ten times and one of those took a tiny 3/8" wide divot out of a tile. Any other floor surface would have been hammered. I cannot easily find that tile though I know where it is. Its a workshop, not a "car showroom."

I finally put concrete in on the western side of the barn and got the place painted. Looks like a proper project shop now. Still straightening the inside but the outside looks much better without the hokey "poles."

attachment.php


The backside before I got the lights installed... Both ends are drive-through.

attachment.php


I am about to start the tiling on the main house garage and will update this thread with those pictures as well...

Ray
 

Attachments

  • Barn -FINISHED!!!!.jpg
    Barn -FINISHED!!!!.jpg
    145.5 KB · Views: 1,002
  • Barn Remodel -Concrete-3-2.jpg
    Barn Remodel -Concrete-3-2.jpg
    136.6 KB · Views: 91
  • Barn-Paint done-2.jpg
    Barn-Paint done-2.jpg
    116.1 KB · Views: 1,012
Last edited:
OP
C

Cave Creek Ray

Well-known member
Joined
Mar 8, 2015
Messages
383
Location
North Central Arizona
OK.

Its summer in Arizona.

Daily temps hit 110 degrees.

I feel the need to slam down some tile!

For the three people on this site that actually are considering putting down tile of some sort, instead of that expensive shiny goo you are afraid to work on, my next project is a little different. Last summer it was the workshop. This summer will be the house garage. I'll be using the same porcelain tile.

Background-

This garage has epoxy floors. The home was 23 years old when we bought it. The previous owners had the floor epoxied in off-white. I am guessing the white epoxy was 15 years old and the darker re-coat was around 6 years old.

Then the termites moved in.

Termite treatment requires boring the slab to get termiticide under the floor. As is typical, they bored every two feet around the perimeter with a 1/2" bit and then filled the holes with mortar. The result was pretty ugly. So the owners re-coated the floor in a thin new color of epoxy: Fingernail polish reddish brown. Gack. However, it this project, the color difference really helped identify the layer differences. That helped me confirm the bond characteristics of the epoxy layers.

Naturally, you want to lay your tile to a virgin concrete surface, if at all possible. I rented a floor machine from Home Depot to test the strength of this epoxy and to see if I could abrade it. The results were interesting.

I used 60 grit carborundum screens which did a pretty good job of sanding most of the way through the outer (darker) coat of epoxy. I would still be out there sanding if I had tried to get the epoxy all off. With the excellent bonding strength of the epoxy, I soon realized that the epoxy would serve a very similar purpose as some of the masonry moisture barrier products out there. So, rather than remove it, I only wanted to take off any loose areas and then key the surface up well enough to get a good bond with the mortar. The epoxy surface held up pretty well (and I could tell based on the color difference between coats) so I wanted to make sure any mortar I would yob down would stick. So, I tested it.

After buffing with the 60 grit, I got out my 7" diamond grinder wheel and ground up the edges of the epoxy just inside the threshold of the garage door where moisture had pooled on the epoxy out in the sun, and that moisture had found a couple of cracks to weep into. Countless gallons also wept into the expansion joint between the slab and the driveway. In nearly 25 years, the moisture loosened up the epoxy and I could easily tell what was still bonded and what was not by grinding that area. I also removed all the epoxy that was outside the garage door and will leave it concrete.

This was the floor after keying...

attachment.php


These were the areas that had de-bonded due to moisture over the years...

attachment.php


A quick grinding got the loose stuff removed....

attachment.php


Now, to test the bonding strength of the Epoxy... I shattered a piece of tile and mortared pieces in various spots around the garage. I also took small pieces of wood and glued them to the floor using Titebond III aliphatic resin. Then, to check the bond strength between the epoxy and Custom's RedGard moisture barrier, I painted a sample of that on as well...

attachment.php


I also glued up a vertical on the original epoxy coat where a tile riser would go...

attachment.php


Then. I let all of the test areas sit for two days.

Keeping most of the cabinets on wheels helped. Harbor Freight dollies are VERY handy...

attachment.php


Prior to dealing with the floor, I had some repairs to do that were the result of on-going roof leaks the prior owners never recognized nor resolved. Plus, during the remodel process, I had run wires down the wall and routed them into the attic to feed the microwave and other circuits that needed service. Between my drywall damage, and the water damage, the repairs took a week followed by paint. The garage is now 80% painted with the remainder of the repairs located above and behind the 5000 lbs of tile awaiting installation. I'll get the floor done and then go back and do that corner.

I was eager to find out what the bond strength was between mortar and old epoxy... Finally, I could get a hammer and see.
 

Attachments

  • House Garage-2.jpg
    House Garage-2.jpg
    94.7 KB · Views: 859
  • House Garage-3.jpg
    House Garage-3.jpg
    137.3 KB · Views: 860
  • House Garage-4.jpg
    House Garage-4.jpg
    138.1 KB · Views: 865
  • House Garage-8.jpg
    House Garage-8.jpg
    74.8 KB · Views: 861
  • House Garage-6.jpg
    House Garage-6.jpg
    121.1 KB · Views: 866
  • House Garage-5.jpg
    House Garage-5.jpg
    125.5 KB · Views: 860
Last edited:
OP
C

Cave Creek Ray

Well-known member
Joined
Mar 8, 2015
Messages
383
Location
North Central Arizona
Technical babbling you can skip if desired...

Before I busted up my newly applied chunkules of tile, I had to find out how tight mortar bonded with concrete. The best technical dta I could find for my mortar indicated a bond strength of 200 psi. That is perfect mix in perfect condition on a perfect surface. I don't need perfect. I just need my tiles to stay down after I lay them. I'd be happy with close to 100 psi.

I had visions of using a fish scale to try and pull up the wooden blocks. But, having regularly picked up 60 and 80 lb bags of mortar, I had a good idea what that felt like. I grabbed the wooden blocks with a large set of Channelocks and reefed skyward. The first try pulled me off balance and I managed to separate the wood from the floor on the second try with something between 60 and 80 lbs of tug. The failure point was the concrete letting loose of the epoxy. I was impressed. The epoxy was very well adhered to the concrete. Had it not been, grinding would have been the only course prior to tiling.

attachment.php


The mortared tile pieces had to be pried up or chipped off with a chisel. Their point of failure was between the mortar and the epoxy. The epoxy was still well bonded to the floor. On the vertical piece, I noticed somewhat less bonding between the mortar and the epoxy. That epoxy had not been keyed by the buffing machine because it was a vertical surface.

Lastly, the areas of RedGard I had painted on were chiseled on with a 1" scraper and I had zero luck getting any of that stuff loose at all. That told me that by using RedGard or a similar surface primer, I could get very adequate bonding between the mortar and the epoxy.

attachment.php


Just for giggles, I contacted the nice technical folks at Custom Building Products and inquired as to whether or not RedGard would be the best bonding agent -or was there another product I could add to the mortar mix? Many masons simply add white glue to mortar to get a better bond. I wanted the best product.

They came back with another product which must be largely glue mixed with a little aggregate to give it good bonding texture: MBP. MBP is a multi-surface bonding primer that ensures a great bond. MBP is not available at Home Depot but is available on HomeDepot.com so I ordered enough to complete the job. Three hours after I roll the MBP down, I can start laying tile. Prior to rolling the MBP down, I will TSP wash the floor and dry it.

Things are currently on hold as I await the installation of my new garage doors. Once I can get them up and the new side-mount Chamberlain door openers installed, I can work out the positioning of my Schluter Reno ramp which I opted to use in this job. Its better suited for vehicle traffic and is also available from HomeDepot.com.

Reno ramp...

attachment.php


New challenges-

This job presents a few more challenges than my shop installation. That one was vastly larger (almost 1100 sq ft) compared to a 3-car garage. But, this garage has 3" parking curbs which will have to be finished. My wife was worried about not seeing the steps so I bought dark charcoal versions of the same floor tile to serve as an accent to highlight the step. That should look nice.

Plus, the step tile edge needs to be rounded so I bought a 3/8" edge wheel to do this detail. Additionally, I will install ceramic baseboards to clean up the gap between the tile floor and the newly painted walls.

Once I get all the tile installed, I'll finally get to focus on the cabinet installation after simply standing the cabinets in my garage over a year ago. Having all this time to really ponder what would go best where has helped me resolve how this garage will ultimately come together. With a early 2700 sq ft workshop building, I don't need a lot of **** in my house garage. We want that model home look -uncluttered and clean. One car, one UTV and four motorcycles should be all that is left in view. Everything else goes inside the cabinets. If it doesn't fit, its gone.

It'll be a couple weeks before I make any more progress. For now, I have stopped at sealing the expansion cracks...

attachment.php


Here's the tile awaiting installation... You can see the drywall repairs I have done around the door nearby. Finishing will have to await the tile installation.

attachment.php


More later....

Ray
 

Attachments

  • Schluter Reno Ramp.jpg
    Schluter Reno Ramp.jpg
    99.2 KB · Views: 855
  • House Garage-3-2.jpg
    House Garage-3-2.jpg
    91.1 KB · Views: 852
  • House Garage-10.jpg
    House Garage-10.jpg
    127.2 KB · Views: 854
  • House Garage-2-3.jpg
    House Garage-2-3.jpg
    128.1 KB · Views: 851
  • House Garage-9.jpg
    House Garage-9.jpg
    123.2 KB · Views: 860

duneslider

Well-known member
Joined
Jan 20, 2013
Messages
2,247
Location
Riverton, Utah
Good call on using their bonding agent over the red guard. The red guard probably would have worked great but that wasn't what it was designed for. We did in the past use red guard thinned down as a bonding agent and it worked well. That was before CBP made the bonding agent. Always good to call customer support when doing non-standard stuff.
 
OP
C

Cave Creek Ray

Well-known member
Joined
Mar 8, 2015
Messages
383
Location
North Central Arizona
Yup! Thanks for the voice of experience.

And, the CBP is a little cheaper AND it goes farther. I took my pails of RedGard back and am awaiting the CBP delivery.

I have a low spot I want to use leveling mix on and the tech folks just sent me a response saying the leveling compound works great over CBP. I have a few very small lips along some crack joints that I may use self leveling mix to take the edge off of. I note from reviews online that this stuff sets up really fast so I will mix up small batches for the blended areas -if I decide to use it.

I was thinking that grinding the surface down for these small areas down to get a perfectly flat floor would punch holes in my nice epoxy base coat. For the 1/8" high spots, I am thinking I'll fillet a little SLC in and that should serve as a nice transition. It may be a waste of time as I will be honoring the joints so each high spot will be right adjacent to an expansion joint anyway. Who will notice a tiny change in slope? Instead of 1/2" mortar I am going to lay 3/8 which should be more than enough to float into these high spots.

I am going to go around and survey and mark all the high spots again after painting the blue CBP primer. This will remind me where the few high spots are and to make sure I pay attention to the tile set in those locations.

This floor is amazingly level with 1/8" or less deviation everywhere. And after nearly 25 years, there is not one crack anywhere in the body of the epoxy except where moisture got under the door. It should be a great install. :bowdown::bowdown: (I hope the Gods of Tiling shine upon me!!!)

Ray
 
OP
C

Cave Creek Ray

Well-known member
Joined
Mar 8, 2015
Messages
383
Location
North Central Arizona
Uh oh!

Ordered a new car and they called and said, "Its in PRODUCTION!" Time to get my *** in gear as the car will be here in 2-3 weeks!!! Can't bring a nice new vehicle into a garage of horrors...

OK. I mentioned the MBP, primer. WOW! that stuff is cool. Imagine glue that has ultra-fine sand in it. When you paint it on a smooth surface it bonds like glue and dries feeling like 80 grit sandpaper. That's what MBP is.

I had a low spot that used to form a lake inside my garage. That humidity, along with a few roof leaks are the reason my drywall was tattered in the garage. If I laid my tile down, it would dam up the water coming in BUT, the tile would follow the slope of the floor and I'd end up with a depression on top of the tile. Not good. The solution was some kind of leveling compound.

Washing out the garage, here is a good picture of the lake just inside my door...

attachment.php


The tech people at Custom recommended some primer under the leveling compound so I painted the area first. Cool thing about the MBP is its thin enough to still see all your layout marks through!

attachment.php


Custom leveling compound flowed out like syrup and, using a notch trowel and a chip brush, I feathered the edges nicely. Working time is a quick 5-7 minutes. Notice I brought the leveling compound out side to cover the old slab that had peeling epoxy... Looks better than the old concrete and I bet its waterproof.

attachment.php


Got the whole garage painted with MBP and while I cussed out Custom because I was sure starting out that the bucket was not going to cover anywhere near the 800-odd feet they said it would, I realized toward the end I would have some leftover. Good on Custom. :) I used some of the extra to coat a little heavier over the areas where the water penetration had popped the epoxy off in a few small areas. MBP appears to be a water barrier similar to RedStop. I'll further protect the area by covering the outside portion of the garage slab with leveling compound and seal the wasted and crumbling expansion joint outside with silicone RTV and prevent any water from getting under the slab through that joint. No water, no efflorescence. Did it in my last house and it worked great after cleaning out the joint. Amazingly, there is no "feel" difference between the thin areas and the areas I put a thicker coat on. Both feel like 80 grit sandpaper.

attachment.php


Tomorrow, I start slamming down tile!

:)
 

Attachments

  • House Garage Tiling-9.jpg
    House Garage Tiling-9.jpg
    118.4 KB · Views: 705
  • House Garage Tiling-7.jpg
    House Garage Tiling-7.jpg
    103.7 KB · Views: 699
  • House Garage Tiling-3.jpg
    House Garage Tiling-3.jpg
    145 KB · Views: 696
  • House Garage Tiling-4.jpg
    House Garage Tiling-4.jpg
    101 KB · Views: 693
Last edited:
OP
C

Cave Creek Ray

Well-known member
Joined
Mar 8, 2015
Messages
383
Location
North Central Arizona
Last night, we had a half inch of rain in about 30 minutes. I expected to find some water in my garage near the low spot but, there was zero water inside the garage. Before using the leveling compound, there would have been a pond like the one pictured above. Nice to win little battles!

The first job was to get the Schluter Reno ramp glued down so I mixed up a slightly soupy mix and back-filled the ramp to ensure its not only glued down but structurally aided by being full of mortar... UPDATE: After a year the floor looks brand new. I was moving a big motorcycle and accidentally put one of my center stand legs on the Schluter ramp and stood the bike up on the stand! I moved the bike and went back to see if I had dented the ramp: No damage thanks to the fill of mortar!

attachment.php


I fogged a little water on the area where the ramps went and then flipped them and slid them into place based on my previous survey marks. I weighted them down to make sure they didn't move and to ensure they'd bond well...

attachment.php


With the ramps down, I had to find out whether the expansion joint perpendicular to my ramps was straight. I set up a laser off a square and found the line off a tad...

attachment.php


I wagged the offset from the ramps back and found starting about 3/4 inch off center at the ramp end would get me about 3/4" off the joint the other side at the other end. That is plenty close to "honor an expansion joint" so I started laying tiles.

Then, I made a huge mess...

attachment.php


The soupy mix for the ramps didn't quite work out as well for the tile. It was a goopy-soupy mess that took me an hour to get lined up and cleaned... This white mortar has loads of polymer in it and it will set up on the tile face like glue. That is what you want because its designed to glue down glass tile that is not porous. Getting it everywhere made clean-up a mess.

attachment.php


After I got back into the hang of tiling (I have been off all year!) I remembered a technique that helped in the workshop. I lay four or five tiles in a row. **** them tight with the previous row, level them with my straight edge (I am using my old aluminum 48" level), clean up the excess mortar, and then slide them apart and you get this nice clean joint. Plus, by butting the edges, any tile not exactly installed level will show up easily. Once corrected, when you slide them apart and install the spacers, everything looks awesome. Here they are before "expanding" them and sticking in the spacers... Much easier to work with with a thicker mortar!!!

attachment.php


I worked until the sun started to move into the garage and then had to quit. Hot tile sets your mortar off too quickly and its dangerous to work in those conditions. Plus, after sitting on my **** the last couple months, I was tired, so I quit for the day. Rule of DIY Tiling: Work as long as its fun and don't kill yourself so bad you cannot work tomorrow! I am not paying myself by the hour so...

I'll post more in a few days when I get more done. The monsoons have kicked in out here in AZ and the high is 95 with pretty high humidity. The floor temperature is about 85 degrees in the shade. Early morning is 80 at sunrise. Supposed to be cloudy off and on with rain periodically all week. Typical Arizona summer monsoon season.

Ray
 

Attachments

  • House Garage Tiling-2-2.jpg
    House Garage Tiling-2-2.jpg
    138.1 KB · Views: 666
  • House Garage Tiling-3-2.jpg
    House Garage Tiling-3-2.jpg
    137.8 KB · Views: 663
  • House Garage Tiling-4-2.jpg
    House Garage Tiling-4-2.jpg
    135.1 KB · Views: 661
  • House Garage Tiling-5-2.jpg
    House Garage Tiling-5-2.jpg
    135.3 KB · Views: 657
  • House Garage Tiling-10.jpg
    House Garage Tiling-10.jpg
    109.9 KB · Views: 666
  • House Garage Tiling-11.jpg
    House Garage Tiling-11.jpg
    142.7 KB · Views: 664
Last edited:

Pay2play

Well-known member
Joined
Jun 20, 2015
Messages
180
Great, looking forward to your build Ray! It will keep my garage porcelain tile fix going until my project gets started! [emoji846]


Sent from my iPhone using Tapatalk
 
OP
C

Cave Creek Ray

Well-known member
Joined
Mar 8, 2015
Messages
383
Location
North Central Arizona
P2P,

Thanks!

I was in pretty good shape when I finished up my back yard remodel a couple months ago. Funny how sitting for a couple months kicks you **** (I'm 60). Lifting 80 lbs boxes of tile is good exercise. :)

If you have any questions, just yell.

More later!

Ray
 
OP
C

Cave Creek Ray

Well-known member
Joined
Mar 8, 2015
Messages
383
Location
North Central Arizona
Monsoon craziness out here in Arizona. Had to fold up twice on Tuesday and haul the tile saw in due to thunderstorms overhead. Got a zillion pieces cut yesterday and ended up working 11 hours to get a bunch of them glued down. I finished up getting the rest of the cut pieces set today and my fingers were bleeding. Time to take a break! Can't take much time off, my new car is due in on Monday....

Here is the current status after three days...

attachment.php


attachment.php


Now that the expansion joints are all cut and laid, things will go much faster...

Ray
 

Attachments

  • House Garage Tiling-2-3.jpg
    House Garage Tiling-2-3.jpg
    133.9 KB · Views: 600
  • House Garage Tiling-12.jpg
    House Garage Tiling-12.jpg
    134.8 KB · Views: 604

Pay2play

Well-known member
Joined
Jun 20, 2015
Messages
180
What kind of grout you are using? I'm putting down a lighter tile and want the grout to blend. Want to make an educated choice here.


Sent from my iPhone using Tapatalk
 
OP
C

Cave Creek Ray

Well-known member
Joined
Mar 8, 2015
Messages
383
Location
North Central Arizona
P2P,

My tile has brown and grey in it. Imagine a grey tile. Imagine taking a heavy steel brush and dipping it in brown paint and then "painting" the grey tile with the wire brush. You have to look at it closely to see it. I liked the grey hint because it matches my cabinets in the workshop.

In the workshop, I used Custom Sanded grout. A couple of our Pro installers say there are better polyurethane grouts but my joints are 1/8" so there's not a lot of grout there anyway. I haven't had any crack or pop loose in a year. I have extra I can mix up if needed.

I used a darker grey color in the workshop with an additive that helped the grout not take stains. So far, the grout looks great in the workshop. For the garage, I wanted something a little "browner" but ended up choosing something that looks more like "grey brown." I also ordered 8 tubes of grout/caulk to seal in the expansion joints and the wall edges. I always get my wife to help when it comes to choosing colors. I'd just avoid a super light colored grout that gets dirty easy. Even with my additive to the grout, I still plan to seal the joint areas before parking, just to be positive they are sealed. If you absolutely have to go light grout, just seal it a couple times with the good oil-based sealer and remember to do it at least once a year after TSP or citrus cleaning.

Today, I was getting chased by monsoons again. I ended up closing down for about two hours and then resumed. Here's where I sit after four good days of work...

attachment.php


attachment.php


I hope to get the main floor done this weekend and the upper step done Monday.

Ray
 

Attachments

  • House Garage Tiling-5-3.jpg
    House Garage Tiling-5-3.jpg
    134.2 KB · Views: 569
  • House Garage Tiling-4-3.jpg
    House Garage Tiling-4-3.jpg
    127.3 KB · Views: 563
Last edited:
To avoid these ads, REGISTER NOW!

Pay2play

Well-known member
Joined
Jun 20, 2015
Messages
180
Looking good Ray! My tile choice is shades of almond with high variation. e9548c566a728202e07acb612de5efdc.jpg
I talked with my installer about a darker grout in case it would look dirty over the years. He suggested a lighter color so the tile didn't have a grid look, rather a blended single slab look. I get the point and I like the idea, like the picture above, this is from my sample board. He told me the grout would hold up well and gave me a reason why that I can't exactly remember. It may have been an additive of some sort, I know it wasn't epoxy grout though. I sent an email to see what it was exactly. I'm willing to clean the floor more in the nasty winter months when mud, salt and melting snow will be dripping off the truck on a daily basis. Sealing and cleaning is surely doable for a great look.
Thanks for sharing your install Ray, you're really making progress!


Sent from my iPhone using Tapatalk
 
OP
C

Cave Creek Ray

Well-known member
Joined
Mar 8, 2015
Messages
383
Location
North Central Arizona
You'll be fine as long as you seal it up really well and then re-seal it every year after "spring cleaning." You are going to have one up-scale floor! Be sure and save four or five tiles. I have almost 2000 sq feet of this stuff down so I am going to save a few boxes in case I drop a breaker bar from the rafters and chip a tile. Easy to store but hard to replace.

My neighbor is a real estate agent and her hubby is a contractor. My wife was out the other morning walking the dogs and ran into them on the street. The other wife asked, "Where is Ray?" My wife responded, "He's at home, tiling the garage." She looked at my wife with a blank look and asked, "Why is he doing that???" My wife responded, "Because he's crazy about a nice garage!"

I think she'll be surprised when she sees it all done. I guess she has never seen a place done with an upscale garage. I'll be wrapping it up this week.

:)
 
OP
C

Cave Creek Ray

Well-known member
Joined
Mar 8, 2015
Messages
383
Location
North Central Arizona
Here's a repeat I posted on another thread about the tile I chose...

Here is a close-up of my Home Depot, made in Mexico porcelain. Note the rougher finish. Not a polished smooth surface porcelain tile. The clear glaze is "mottled" before being fired again.

attachment.php


My color balance was off. This picture makes it look green when its actually a nice brown...

attachment.php


It is "rectified" tile which means it is verified square before leaving the factory. Note the tiny grinding marks on the corners...

attachment.php


By the way, this tile just went on mark down at the HD's here in Phoenix. I paid $2 a sqft. It is now down to $1.50 sqft and is available in brown, dark grey/black, and white/grey.

Pretty good quality.
 
Last edited:

Pay2play

Well-known member
Joined
Jun 20, 2015
Messages
180
Looks very nice Ray. I get goofy looks from people that think tile is for a bathroom or kitchen. No one really thinks about its true durability. I've always wanted s showroom look and porcelain is how you get it. Keep up the good work Ray!


Sent from my iPhone using Tapatalk
 
OP
C

Cave Creek Ray

Well-known member
Joined
Mar 8, 2015
Messages
383
Location
North Central Arizona
Well, its Monday and I have 99% of the floor tile down with the upper steps and the baseboards yet to cut and lay. Then its grout time.

With the mortar dust on the tiles, I figured a little tire dust wouldn't matter. I hate leaving my vehicles outside, especially in summer...

attachment.php


A little edge of tile needs to be cut and then I'll lay the black edge of the steps (to better show up so people don't trip) and then lay the whole upper step areas. The tool cabinet (just out of picture to right) will necessitate a two day operation as that thing weighs a boatload and I don't want to roll it down the step.

attachment.php


My hood is up because in the summer out here in AZ, the engine compartment gets really hot and bakes your rubbery bits. I open the hood and let the engine "chimney off" the heat. Its a ritual but my fuel injectors lasted 17 years and that's unheard of out here. I also get more mileage out of my belts and hoses...
 

Attachments

  • House Garage Tile-3.jpg
    House Garage Tile-3.jpg
    134.6 KB · Views: 809
  • House Garage Tile.jpg
    House Garage Tile.jpg
    132.2 KB · Views: 801
Last edited:
OP
C

Cave Creek Ray

Well-known member
Joined
Mar 8, 2015
Messages
383
Location
North Central Arizona
OK... time to wrap this project up. What's that? A hurricane is coming? GREAT! We need the rain. I guess I'll have to change my plans...

With the two or three days of heavy rains headed our way, I decided to do as much cutting on the tile saw outside as I could safely do this morning before the weather moved in.

A quick review for garage tiling:

Folks who have never done tiling are at a loss as to where to get started.

Inside your home you have a zillion options that can make or break an install. The key is figuring out the King Line (aka Jesus Line) that the whole pattern must follow. For entryways, it usually centered on the middle of your front door and continues as far as the tile will go. Same with single rooms like bathrooms. Snap a line from the middle of the doorway straight back to the far wall. Depending on the shape of your tile, your patterns will run right off that line.

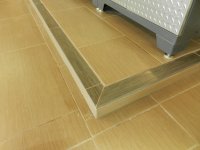
Thankfully, with garages, things aren't quite that critical. As long as you line the tile "ramp" (Schluter ramp or similar) squarely under your door, and keep your tile pretty much against the spacers on each row, the errors you introduce will be negligible, if even noticeable. YOU will notice many errors that will disappear one the job is grouted. Other you know about, will be indiscernible by your friends or the head inspector, your wife.

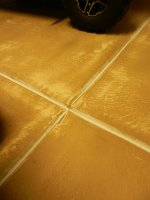
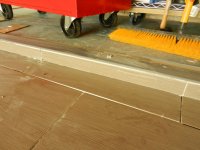
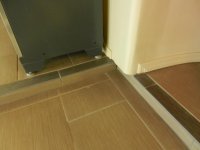
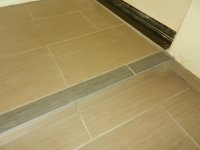
Garages have expansion joints or crack control lines, sometimes saw-cut into the slab. The old saying is, "Honor your crack joints." Those joints are intended to crack and with the normal expansion and contraction of the concrete floor, if you simply tile over those joints, you will likely see cracking in your tile over time. If you align your tile installation where there is a crack joint within 3-4 inches of a tile grout line, any cracks will migrate up through the mortar and through the grout. The tiles either side of the expansion joint will be unharmed.

So, for my garage install which has a 16' door and an 8' door, I started on the center of the 16' door which is where the crack joint was. I butted two full tiles, one either side of the slightly wider (1/4") expansion joint and tiled away from there.

Don't get too wrapped up because your expansion joints are either not straight or not square.

Remember, in most cases, guys who have poured your whole slab are finishing up the day doing the garage. The garage is the only place where expansion joints are installed and they may start out at a measured location, but from there they are eyeballed. Many times, the concrete finishers are in rubber boots, ankle deep in concrete, trying to get a smooth joint troweled in with a tool on a 15' pole. Every step they take ruins the finish of the garage floor so they want to get in and get out as quickly and carefully as they can before things really start to harden up.

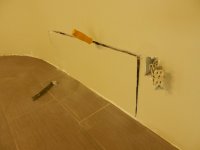
All you need to do is stay within 2-3 inches of the joint as you tile, keeping your joints as close to it as possible. The closer, the better. Use a square and either snap a line or shoot a laser to find out what you are dealing with. It the line leans to the right as it travels from the door to the back of the garage, figure out how much it "leans" and divide that in half.

If the expansion joint hits the far wall 3" right of where it starts under the door, simply start tiling 1.5" right of the expansion joint and as you tile back, the expansion joint will cross under your expansion joint grout line and you'll end tiling about 1.5 left of the joint. If the joint wanders all over the place, just pick an average and let it wander under your tile joint.

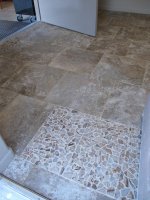
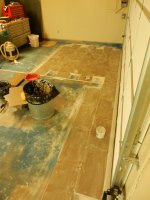
Here was my initial start, working off the main expansion joint in the center of the two-car door...

attachment.php


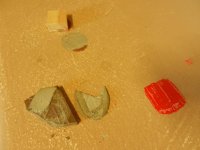
You want to lay as much solid tile as possible. Depending on your pattern, you may only be able to lay one row before having to cut tile to cover the expansion joint. NEVER substitute whole solid tiles as space keepers for tiles that need to be cut. Its always a hassle and small movements in the tiles can create big headaches as you try and fit cut tiles in between solidly set rows of uncut tiles. It is best to cut tiles or have tiles cut for that expansion joint grout line so you can at least get the main body of the floor done, either to another crack joint or to the walls on either side.

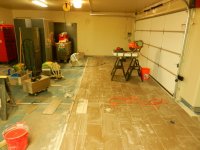
Here is where I got ahead of myself and used a few "spacer tiles" to position tiles either side of an expansion joint. When I came back the next day to cut tiles, I found the rows were very slightly out of alignment. The tiles bridging the expansion joint had to be custom cut and that was a major pain. From that point on, I had a stack of tiles split in two to toss in as I went. Much 'Mo Bettuh.

attachment.php


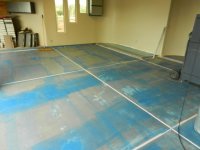
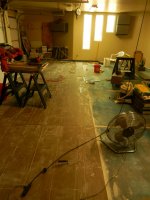
Doing the fill-in tiles along the wall is kind of fun. You simply measure each tile leaving a gap for the spacer in the inside and a 1/4" expansion gap on the outside edge next to the wall. Cut the tiles and lay them in the holes so you know where they go and you can go to town cutting a bunch. With the hurricane supposedly raining all day tomorrow, I have about 30 tile pieces already cut awaiting mortar. I'll spend tomorrow gluing them down.

The new tiles are easy to spot as they are the clean ones with no grout...

attachment.php


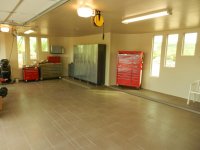
After tiling a 1200 sqft workshop, and office off the workshop, and now a three car garage, I find I actually like doing tile work. If you don't have a saw or don't have the time to do what ends up being a multi-day job, by all means hire the work out -if you can be sure of the guy you hire. If he wants to tile right over expansion joints, I'd find another installer.

Even if you hire a guy, at least by reading this thread, you will know enough to figure out whether your guy is qualified.

Ray
 

Attachments

  • House Garage Tiling-4-2.jpg
    House Garage Tiling-4-2.jpg
    135.1 KB · Views: 783
  • House Garage Tile-3-3.jpg
    House Garage Tile-3-3.jpg
    104.7 KB · Views: 775
  • House Garage Tiling-5-2.jpg
    House Garage Tiling-5-2.jpg
    135.3 KB · Views: 787
Last edited:
OP
C

Cave Creek Ray

Well-known member
Joined
Mar 8, 2015
Messages
383
Location
North Central Arizona
Well, the "hurricane" was a bust. But, at least we got cooler temps and high cloud cover. I got a fair amount done... until I ran out of mortar.

I got two of the upper sections partially laid. Reaching back more that two tiles is tough and its better to harden up and do it the next day. Killing yourself mid project doesn't help...

attachment.php


attachment.php


I cut the vertical riser pieces and installed as many as I could. I made sure the narrow black tread was well supported by mortar as that will increase the strength and prevent tile cracking.

attachment.php


After a mortar run today, I should be ready to kill off the rest of the risers and nearly all of the tile baseboards. Then, a day of grouting and this job is almost done. I still have the corner where the tile stack sat to tile and drywall repair and paint but that should go quickly.
 

Attachments

  • House Garage Tile-4-4.jpg
    House Garage Tile-4-4.jpg
    105.8 KB · Views: 761
  • House Garage Tile-2-4.jpg
    House Garage Tile-2-4.jpg
    136.4 KB · Views: 767
  • House Garage Tile-3-4.jpg
    House Garage Tile-3-4.jpg
    139 KB · Views: 765
OP
C

Cave Creek Ray

Well-known member
Joined
Mar 8, 2015
Messages
383
Location
North Central Arizona
Just about to grout the steps. I have the baseboards cut for the outside walls.

attachment.php


attachment.php


The next pics I post will be of the finished project...
 

Attachments

  • House Garage Tile-4-5.jpg
    House Garage Tile-4-5.jpg
    84.9 KB · Views: 722
  • House Garage Tile-2-5.jpg
    House Garage Tile-2-5.jpg
    91.5 KB · Views: 725
OP
C

Cave Creek Ray

Well-known member
Joined
Mar 8, 2015
Messages
383
Location
North Central Arizona
I lied....

One thing I have been putting off because I have focused on the tile was installing a couple outlets to power my garage tunebox as well as one over my tiny workbench area. Using extension cords plugged in behind bolted in cabinets was not a real good idea so I took a little time to "make it right." That is the fun about doing your own work. You can make it as nice as you want to.

I have run scores of outlets both in this house and in prior houses. In installations where I had an inspector check my work, I never had negative comment. I learned some great tricks from a couple of electricians I hired in on this house renovation and I thought I'd pass them along. Stubbing off existing outlets is easy and safe if you follow a few basic procedures.

First, kill the power to your outlet. I plugged a fan into the outlet until I found the breaker for that circuit. I then verified the power was off at the outlet before removing it from the wall.

I needed to add two outlets to an existing outlet that was going to basically get "lost" behind my cabinets. One option is to "daisy chain" the wires from the existing box to one of the new boxes and then run a second wire from that box over to the second new box. Most house baseboard outlets are wired like this. When you are running box spacing with big distances between the new boxes, this is the more efficient way to wire in new receptacles.

The other option is "home running" them where both new boxes wire back to the original existing box. I like this because it makes the new additions a little more secure in that the second new box isn't dependent on the wiring splices in the previous box. I only had a short run so wire distance wasn't a factor. I chose this method for this addition.

The technique I use is opening up the base of the wall up to gain access to the bays you'll need to run the wires. I had two bays to cross so I cut the base of the wall about 6" past the second stud. Use a stud detector to mark your stud locations so you know where the studs are.

attachment.php


Notice the angle of the rock saw... I cut the piece out at an angle so it will fit back into the hole -but not fall through, in a bed of drywall mud. You want to use the same piece to repair the wall, if you can. Use caution removing it because you will have nails or drywall screws that are holding the piece to the wall and you'll want to pull the piece loose without breaking it. Work slow.

Once I got the wall chunk out, I marked the locations for the two outlets I wanted to add. Triple check your locations before cutting because you don't want interference between a cabinet or counter top and you new outlet. Then, mark the size of the cut-in box and cut your hole as close to that size as possible. Only cut around the box shape, leaving the interference tabs plenty of meat to hold on to.

attachment.php


Now, run your wires. I ran both wires out of the lower right existing box. so I drilled the two studs I had to cross in the center of the stud and also drilled through the stud the existing box was mounted to -and into that box. Then I ran my wires.

The existing box saw all black (hot) wires wound together with a pigtail added to power that outlet. An electrician showed me this method and its WAY more secure than just wire-nutting wires together. Cut an inch or more insulation off of all the wires to be joined and then, using electrician pliers, wind those babies together. Leaving about 3/4" of the wind, trim off the excess. Then use an appropriate sized wire nut. This method ensures the wires don't rely simply on the wire nut for contact. The wire nut is basically just along to insulate the joint. Do the same for the white (common) and the ground. The pigtails off each will power the existing plug in that location, or you can abandon the plug there and simply use a cover plate over the outlet box. As more insurance against a ground catching a hot lead, I wind electrical tape around the outlet screws before I screw it into the wall.

attachment.php


The new boxes get wired after you hang the cut-in boxes. Use a power drill-driver but stop as soon as the binder teeth catch the drywall. Going any further will rip the teeth off the screw. In my double box, I was adjacent to a stud so I sank two screws into the side of the stud just for an extra secure box.

attachment.php


Once everything is wired and secured in the boxes, re-power that circuit and test each outlet. You can buy a tester at Home Depot for $6 that plugs in to an outlet and verifies that you have the common and the hot on the correct side. If there are any crossed wires, now is the time to fix it.

Then its time to repair the hole in the wall. Trial fit the old piece to make sure you have clean joints and no interference. You will need to screw drywall screws into the existing studs as well as along the edges of the piece along the base (into the footer) and into any supporting wood you add for strength. I cut past a stud to the left, so I added a 1/2" thick 6 x 12 board and screwed it into the wall using three screws. Then, when I mounted the drywall piece, the left side had something to screw to. The right side had the existing stud. The bottom had the footer. The top, because of the bevel saw cut, supported itself just fine.

Here's the mud in the joint waiting for the old piece. You can see the added wood support inside under the drywall mud...

attachment.php


Screw it all up secure... then knock off the rough edges and give it a base coat of drywall mud...

attachment.php


After a light sanding and another skim coat of drywall mud (aided by a fan to speed dry time) I painted the repair and here's how it looked when I was done...

attachment.php


Looks better than extension cords...

Ray
 

Attachments

  • House Garage Tile (Fin)-2-2.jpg
    House Garage Tile (Fin)-2-2.jpg
    72.6 KB · Views: 628
  • House Garage Tile (Fin)-3-2.jpg
    House Garage Tile (Fin)-3-2.jpg
    48.2 KB · Views: 632
  • House Garage Tile (Fin)-6.jpg
    House Garage Tile (Fin)-6.jpg
    93.1 KB · Views: 634
  • House Garage Tile (Fin)-5.jpg
    House Garage Tile (Fin)-5.jpg
    65.1 KB · Views: 629
  • House Garage Tile (Fin)-8.jpg
    House Garage Tile (Fin)-8.jpg
    119.5 KB · Views: 631
  • House Garage Tile (Fin)-9.jpg
    House Garage Tile (Fin)-9.jpg
    66.8 KB · Views: 631
  • House Garage Tile (Fin)-10.jpg
    House Garage Tile (Fin)-10.jpg
    45.8 KB · Views: 635
Last edited:
OP
C

Cave Creek Ray

Well-known member
Joined
Mar 8, 2015
Messages
383
Location
North Central Arizona
Just about finished. A few mortar "******" spots to clean up and an area to grout (i ran out of stain admix) but I'll get that done this afternoon.

attachment.php


attachment.php


The black step edge really helps you see the step easier...

attachment.php


Some of the weird corners in this garage took some thinking...

attachment.php


attachment.php


attachment.php


Now that I have used up 3500 lbs of tile, I can finish this last step and be done with the project. This corner will be for yard tools...

attachment.php


Sure looks better than it did when I bought the place.

:)
 

Attachments

  • House Garage Tile (Fin)-3-3.jpg
    House Garage Tile (Fin)-3-3.jpg
    104.9 KB · Views: 588
  • House Garage Tile (Fin)-12.jpg
    House Garage Tile (Fin)-12.jpg
    98.6 KB · Views: 585
  • House Garage Tile (Fin)-6-2.jpg
    House Garage Tile (Fin)-6-2.jpg
    124 KB · Views: 585
  • House Garage Tile (Fin)-5-3.jpg
    House Garage Tile (Fin)-5-3.jpg
    96.2 KB · Views: 588
  • House Garage Tile (Fin)-7-3.jpg
    House Garage Tile (Fin)-7-3.jpg
    113 KB · Views: 582
  • House Garage Tile (Fin)-4-3.jpg
    House Garage Tile (Fin)-4-3.jpg
    119.9 KB · Views: 583
  • House Garage Tile (Fin)-11.jpg
    House Garage Tile (Fin)-11.jpg
    135.2 KB · Views: 587
Last edited:
OP
C

Cave Creek Ray

Well-known member
Joined
Mar 8, 2015
Messages
383
Location
North Central Arizona
Found a picture of the mess it was when we moved in.

attachment.php


This vanity out of the master bath served as my workbench/tool **** pile for months. The white drywall repairs around the windows were because when we went to swap in the new windows, we found yet another area of exterior wall that had to be replaced, this time due to termites eating up water damage. All together, we jacked the ceiling in several rooms and removed and replaced over 120 feet of exterior wall with all new timber. This was the last one to be done.

attachment.php


Somehow, there are 4 motorcycles in this mess...

attachment.php


Glad to have that behind me.
 

Attachments

  • House Garage-Pre-2.jpg
    House Garage-Pre-2.jpg
    135.4 KB · Views: 568
  • House Garage-Pre-3.jpg
    House Garage-Pre-3.jpg
    93.2 KB · Views: 564
  • House Garage-Pre.jpg
    House Garage-Pre.jpg
    123.8 KB · Views: 567
Last edited:

SiGmA_X

Well-known member
Joined
Aug 13, 2005
Messages
1,111
Location
Portland, OR
Ray, you do really excellent work and I appreciate your detailed info. It is a good jumping off point! From your chats with Custom, is it safe to assume you can apply the MBP directly on un-prepared subsurface? I believe that is what I read in the technical documents, if I understood it correctly.

Also you mention sealing the grout - what do you use for that?

How do you like rolling equipment across the 1/8" grout lines?
 
Last edited:
OP
C

Cave Creek Ray

Well-known member
Joined
Mar 8, 2015
Messages
383
Location
North Central Arizona
Thanks man! When you don't know what you are doing, there is far less worry! :)

...is it safe to assume you can apply the MBP directly on un-prepared subsurface?

Kinda... You want to know that you are bonding the awesome MBP to something that is sticking to the concrete. My tile went over epoxy, which I scoured to make sure the MBP would better stick to. I cannot scrape the MBP off with a trowel. I made sure the epoxy was stuck down well. What are you putting your tile on?

Also you mention sealing the grout - what do you use for that?

I used an admix that takes the place of part of the water you use to mix up the grout. Its supposed to help seal and make the grout a little harder. It available at HD and ran about $20. On top of that, after the grout dries for a day, I hit it with 511.

attachment.php


attachment.php


How do you like rolling equipment across the 1/8" grout lines?

Plastic wheeled equipment hardly knows the joint is there. Even my huge HUSKY tool case weighing 7-800 lbs rolls fine and that's at 90 degrees to the joints.

Metal wheeled items like jacks make a little noise but some of that can be resolved by using a rough sander or grinder and radiusing the edge of the outer 1/8" of the wheel. One friend suggested Plasti-Dip on the wheels but, I have not tried that yet. Over in my workshop, the jacks roll around just fine. I have always had my jack stands on 1/2" MDF to protect my old epoxy floor and for stability and they work great on tile too.

I have been finishing up the "corner from hell" where the tile was piled. Got 3/4 of the tiles set today and all the edge tiles cut. I'll set those tomorrow and then grout Tuesday. Hopefully I'll be totally complete by Wed.

Some may wonder why the tile in the previous pics was a little dirty. You shoulda seen it after three days of drywall work! The dust and drywall mud made a mess but, the nice thing about porcelain is, nothing sticks to it. Even paint. When I get all done, I am going to flood the garage and squeegee it all out.

This project is the first one I did baseboards for. Normally, you just do 3 or 4 or 5" pieces and glue them up. My garage had this weird drywall "hangover" that dictated the pieces be custom cut in a widening dimension as you head toward the door. That took a bunch of time but it sure looks a lot better now.

I'll post pics when I get it wrapped up.

Ray

__________________
 

Attachments

  • House Garage Tile (fin)-2-5.jpg
    House Garage Tile (fin)-2-5.jpg
    135.1 KB · Views: 464
  • House Garage Tile (fin)-13.jpg
    House Garage Tile (fin)-13.jpg
    138.8 KB · Views: 463
Last edited:

Brett K

Well-known member
Joined
Jan 29, 2009
Messages
90
Location
PA
That looks great! I do have a question though. I may have missed a step but why didn't you tape the drywall joints when you patched that panel?
 

SiGmA_X

Well-known member
Joined
Aug 13, 2005
Messages
1,111
Location
Portland, OR
Thanks Ray. My base floor is ~18yo concrete that must have had some sort of minor sealant applied. I could rent a grinder and do the whole area but I'm not sure that I need to. Maybe testing the surface adhesion like you did would be a good idea.

Do you plan to re seal the grout annually?
 
OP
C

Cave Creek Ray

Well-known member
Joined
Mar 8, 2015
Messages
383
Location
North Central Arizona
Brett,

If your panel is solidly anchored and your wall is also anchored, there is really no need to tape the joints. I cut about 30 holes of varying size in my walls and ceilings during this remodel and dozens before and, if you cut at an angle and create a plug out of the panel and then glue the panel back in using mud, and then solidly screw it into the wall and the supporting structure (or a wood ply panel) you don't need any tape. I have had to re-cut in the area of one of my repairs and they are more solid that the original drywall.

Sigma,

Yeah. Use some wood glue to glue a half dozen 1" square blocks glued on end grain. Let it dry over night. If you really have to work to bust them loose, you have a good surface to coat and overlay. If you can pull on the blocks to the tune of 60-70 lbs using channel locks or vice grips and they hold on, you are fine. You might do a good TSP wash before starting to get all the oil and oily residue (WD-40 overspray as well as Silicone spray fumes) off. Use real TSP. The TSP substitute doesn't seem to work nearly as well.

Ray
 
OP
C

Cave Creek Ray

Well-known member
Joined
Mar 8, 2015
Messages
383
Location
North Central Arizona
It O-Fishul.

The garage tile project is complete!

The corner where the tile was stored got a ton of drywall repairs done and all painted and then I finished the small area of tile that needed setting.

attachment.php


Trying to get the tool wall organized...

attachment.php


While the tile is done, the garage is far from complete. I have a host of details that need to be finished to complete this garage. When I get it finalized, I stick a final update shot or two in.

My pressing project right now is wood working. Our house had wood stairs that went to a roof observation deck and they weathered over 25 years and were pretty rotten. I have a dozen more to make and then I have to re-assemble a new stairway to replace the old one that has been gone for two and a half years. Then, in October, we start the complete renovation of our front yard and hardscape.

When you are retired, the fun never stops...

Stay tuned and thanks for everyone who took the time to ask questions or comment. Anyone with questions, I'll check back from time to time so ask away and I'll try and offer my two cents.

Ray
 

Attachments

  • House Garage Tile (fin)-2-6.jpg
    House Garage Tile (fin)-2-6.jpg
    124.7 KB · Views: 380
  • House Garage Tile (fin)-14.jpg
    House Garage Tile (fin)-14.jpg
    123.8 KB · Views: 379
Last edited:

E12-535iTurbo

Well-known member
Joined
Feb 27, 2014
Messages
492
Location
The Netherlands
I'll go into detail on this when I'll start with my own floor. I'm very greatfull for the information you shared here. I'll get back to you in a couple of months :).

Nice avatar btw. Do you own an E30?
 
OP
C

Cave Creek Ray

Well-known member
Joined
Mar 8, 2015
Messages
383
Location
North Central Arizona
Always glad to help. I found I actually enjoy tiling but, at my age, my knees start to get tired doing 100 squats a day. And, its less fun in the summer. :)

I have a 2000 E39 (528) I bought off a kind old retired gentleman.

I had seen the car at the post office for years. It had a German License plate on the front (AZ only uses rear plates) and that was because it was a fly-and-drive car. I owned a 525 at the time but talked to the elderly owner and stuck a note in his glove box with my information. Six months later, I got a phone call. Its 17 years old next month and it just clicked over 91K. Looks brand new. I bought it with 35k on the clock in 2005. If you look way back in the pile of **** that is currently my workshop, you can kind of see it. :Twitch: That will change this winter.

I ordered a BMW X5 in July. We wanted to get one of the last non-black interiors. When it arrived, the only things that were not black were the upper door cards and the seats. We rejected the car and cancelled the deal. Now my old car looks better in this garage. Perhaps I can find another nice used BMW.

Around the local area, I drive my Polaris noise-maker.

attachment.php


Ray
 

Attachments

  • House Garage Tile (fin)-15.jpg
    House Garage Tile (fin)-15.jpg
    127.5 KB · Views: 343
Last edited:
To avoid these ads, REGISTER NOW!
Top Bottom