To avoid these ads, REGISTER NOW!

Portaband stand

blacksuit99

Well-known member
Joined
May 21, 2007
Messages
91
Well I have to say I am a little upset with you guys. Someone here should have let me know that #1 I needed a portaband and #2 I needed a stand for it! I’ll forgive you guys this time lol.:pimpflash

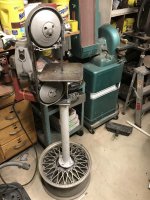
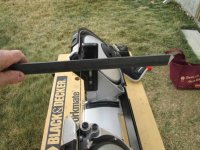
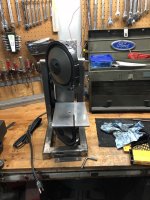
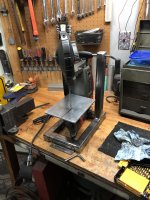
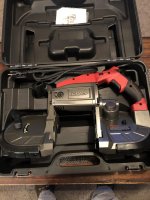
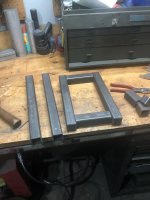
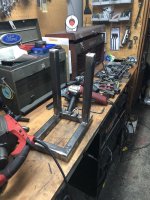
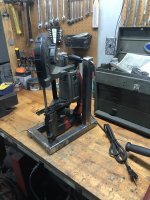
I have found myself doing more and more metal projects and the angle grinder cut off wheel is getting old. I only have a small garage so space is at a premium. Started looking online and saw the portabands and swag tables and thought I needed something like that! Well stole some ideas here and there on the net and this is what I came up with. Going to paint and either add an on/off switch or foot pedal. Also gonna put a bigger table on it.I’ll update when I’m done in case it helps anyone else. Post yours up if you have done the same.
 

Attachments

  • 79E6064E-347E-4626-B747-E0AA1F6124CD.jpg
    79E6064E-347E-4626-B747-E0AA1F6124CD.jpg
    90.4 KB · Views: 339
  • 7B860C2E-C575-42F3-AC47-814B4470B36D.jpg
    7B860C2E-C575-42F3-AC47-814B4470B36D.jpg
    82.4 KB · Views: 314
  • 20FABF07-85A3-4AA2-ADA9-FB57437CF33A.jpg
    20FABF07-85A3-4AA2-ADA9-FB57437CF33A.jpg
    109.6 KB · Views: 325
  • 94E3CF41-E81E-4B7A-AD5D-6A071066D6EC.jpg
    94E3CF41-E81E-4B7A-AD5D-6A071066D6EC.jpg
    122.2 KB · Views: 347
  • 3A529AC5-5956-4F84-8CF6-F603EC59825F.jpg
    3A529AC5-5956-4F84-8CF6-F603EC59825F.jpg
    118.1 KB · Views: 490
To avoid these ads, REGISTER NOW!

Kaizen

Well-known member
Joined
Jan 9, 2015
Messages
6,948
Location
New England
How is it secured at bottom? Great idea to secure to wall or post


Sent from my iPhone using Tapatalk
 
OP
B

blacksuit99

Well-known member
Joined
May 21, 2007
Messages
91
I’m not sure I’m understanding what you mean. Any piece would hit the saw before the upright.
 
OP
B

blacksuit99

Well-known member
Joined
May 21, 2007
Messages
91
How is it secured at bottom? Great idea to secure to wall or post


Sent from my iPhone using Tapatalk

If you notice the u shape piece in the back, that is what secures the bottom. Once set in it seems to be pretty sturdy. I plan on putting some holes up front that I can drop a L shaped round bar into to keep it from sliding past the front of the bench.
 

Bodj Built

Well-known member
Joined
Feb 3, 2016
Messages
1,165
Location
Moorpark, CA
I’m not sure I’m understanding what you mean. Any piece would hit the saw before the upright.

Imagine you have an L shaped piece, with the long end pointing toward the right vertical tube. If you only need to cut a small piece of the lower "L" off, the top part will hit. There are ways around this (flipping the part), but I'd try to keep that right side as clear as possible
 

bdbecker

ALLIANCE MEMBER
Joined
Nov 18, 2015
Messages
5,554
Location
Iowa
I’m not sure I’m understanding what you mean. Any piece would hit the saw before the upright.

Say you have a 20" long by 9" wide piece of sheet steel and you want to trim an inch off the long edge to make it 20"x8". If you get rid of the tube in back, you'll be able to cut until it hits the saw body. At that point, you rotate the work piece 90 degrees and nibble off the ~3"x1" piece of drop, and then rotate back to 90 and continue your cut for another 3". Repeat the rotate and nibble until you have the whole thing cut.

With the tube in place, you'll be limiting how long of a work piece you can cut. With the tube removed, there is no constraint.

That is a clever design using pins into the handle. I wonder if it can be reconfigured to pin over the top of the handle from the one side instead of having two uprights, or moving that one support to the rear behind the body of the saw itself.
 
Last edited:
OP
B

blacksuit99

Well-known member
Joined
May 21, 2007
Messages
91
Say you have a 20" long by 9" wide piece of sheet steel and you want to trim an inch off the long edge to make it 20"x8". If you get rid of the tube in back, you'll be able to cut until it hits the saw body. At that point, you rotate the work piece 90 degrees and nibble off the ~3"x1" piece of drop, and then rotate back to 90 and continue your cut for another 3". Repeat the rotate and nibble until you have the whole thing cut.

With the tube in place, you'll be limiting how long of a work piece you can cut. With the tube removed, there is no constraint.

That is a clever design using pins into the handle. I wonder if it can be reconfigured to pin over the top of the handle from the one side instead of having two uprights, or moving that one support to the rear behind the body of the saw itself.

Thanks for pointing some of that out! I’ll give it some thought for sure!
 

Slednut

Well-known member
Joined
Dec 20, 2012
Messages
2,550
Location
Washington state
Looking forward to seeing the finished product, I bought this stand to do a stainless exhaust system and with a foot pedal is very handy.

I'm thinking about making different extensions for the blade guide so it will be easier to cut a straight line. I bought a miter gauge which is useless.
 

Attachments

  • Band Saw2.jpg
    Band Saw2.jpg
    100.1 KB · Views: 303

rpcraft

Well-known member
Joined
Aug 14, 2014
Messages
1,057
Location
Waco
I opted to buy one from SWAG. I have used it so much. Even my buddy with a full size unit is kind of jealous because the blades are so cheap and last so much longer comparativley, lol. I think the only regret I have in my unit is that I did not get it powder coated, but I am lucky enough now that I am able to powder coat it myself, just as soon as I find the time to tear it down, blast it, and powder it!
 

bdbecker

ALLIANCE MEMBER
Joined
Nov 18, 2015
Messages
5,554
Location
Iowa
Looking forward to seeing the finished product, I bought this stand to do a stainless exhaust system and with a foot pedal is very handy.

I'm thinking about making different extensions for the blade guide so it will be easier to cut a straight line. I bought a miter gauge which is useless.

What is the issue with the miter gauge/slot? Is the table too short for the miter gauge to engage the slot correctly?
 

StormcrowAz

Well-known member
Joined
Nov 3, 2011
Messages
750
Location
Phoenix, AZ
Just finished mine a couple weeks ago. It’s actually the second one, I had an older Harbor Freight unit (pre-Bauer) that treated me well for the last 8-9 years. I retrofitted the old stand to fit the new saw.

Old saw
50849373162_ac29296e54_c.jpg


Stand with the old saw removed
50849373182_95bc70347c_c.jpg


Neat idea with the handle, never even thought of that. I ditched the handle entirely and made a little metal insert instead.
50921862858_0943fc521d_c.jpg


50921862868_fb2003b0b5_c.jpg


50922546866_ebc1e4726f_c.jpg


50921862753_7ba7660d82_c.jpg


Completed
50922674347_ca3999f0ca_c.jpg


50921862828_8732273190_c.jpg


And the foot pedal is definitely a must-have for me. The old saw had a trigger lock, but didn’t find one on the Bauer, so zip-tied the trigger for constant-on.
 

Kenstone1

Well-known member
Joined
Oct 2, 2015
Messages
734
Looks to be from the "when in doubt make it stout" school of engineering, just me though.
Sorry for what I typed right there.

For power a hose clamp over the trigger and plugged into a power strip with a switch.
Not elegant but simple.
jmo,
:eek:

Edit: And duct tape over any motor vents that are level with the table.
It'll keep the chips out of the motor...
.
 
Last edited:

Slednut

Well-known member
Joined
Dec 20, 2012
Messages
2,550
Location
Washington state
What is the issue with the miter gauge/slot? Is the table too short for the miter gauge to engage the slot correctly?

Because the top and bottom guides are so far apart and not adjustable like a regular band saw the blade wonders as it goes through the material.

Marking and free handing the cut is what I've been doing. Having a disc/belt sander really helps.

I am working on an extension for the top guide.
 

icecactus

Well-known member
Joined
May 17, 2011
Messages
302
I opted to buy one from SWAG. I have used it so much. Even my buddy with a full size unit is kind of jealous because the blades are so cheap and last so much longer comparativley, lol. I think the only regret I have in my unit is that I did not get it powder coated, but I am lucky enough now that I am able to powder coat it myself, just as soon as I find the time to tear it down, blast it, and powder it!

Don't bother with the powder coat. It looks cool but a buddy of mine, and myself both wish we would not have gotten it. The metal shavings get hot and sorta stick into the powder making them a pita to get off.
 

Slednut

Well-known member
Joined
Dec 20, 2012
Messages
2,550
Location
Washington state
I don't want to poach this thread, I made this and still had to adjust the miter gauge so it would cut 90 degrees. The nice thing is it use to cut an arc so it did fix that, cuts are nice and straight.
 

Attachments

  • Swag3.jpg
    Swag3.jpg
    101.6 KB · Views: 259

Kenstone1

Well-known member
Joined
Oct 2, 2015
Messages
734
I don't want to poach this thread, I made this and still had to adjust the miter gauge so it would cut 90 degrees. The nice thing is it use to cut an arc so it did fix that, cuts are nice and straight.

Nice :rocker:
:D
 
OP
B

blacksuit99

Well-known member
Joined
May 21, 2007
Messages
91
I don't want to poach this thread, I made this and still had to adjust the miter gauge so it would cut 90 degrees. The nice thing is it use to cut an arc so it did fix that, cuts are nice and straight.

Definitely going to have to keep this in mind!
 
To avoid these ads, REGISTER NOW!
OP
B

blacksuit99

Well-known member
Joined
May 21, 2007
Messages
91
Looks to be from the "when in doubt make it stout" school of engineering, just me though.
Sorry for what I typed right there.

For power a hose clamp over the trigger and plugged into a power strip with a switch.
Not elegant but simple.
jmo,
:eek:

Edit: And duct tape over any motor vents that are level with the table.
It'll keep the chips out of the motor...
.
Should have mentioned, this square tubing was free. It was left over from a rod rack my buddy and I made. I’m also going to make spacers for the top rod through the handle. That way the top won’t budge either. Not sure I’ll go with the foot pedal, I’m thinking more about one the push button switches.
 

BD1

Well-known member
Joined
Mar 18, 2007
Messages
4,602
Location
north side
I used a plate for the table of my saw. Drilled holes to match guide holes, welded angle iron to bottom, and add a wheel for base.
Originally I used it in vise . After seeing how handy it is, I added a base. Saw stays permanent and slot in table allows for blade replacement without removing saw. This saw was $25.00 because casting is busted off.
I use all the time for my metal artwork.
 

Attachments

  • 7DEF2260-791C-461F-AE9B-BC45634E8604.jpg
    7DEF2260-791C-461F-AE9B-BC45634E8604.jpg
    120.7 KB · Views: 218

Kenstone1

Well-known member
Joined
Oct 2, 2015
Messages
734
Saw Stand: Something Hacked/CHEAP and Fast

I was building something and was tired of cutting stuff with a hacksaw so I went HF and bought a portable bandsaw.
After a few cuts hand holding that saw it became apparent I needed a stand but didn't have the time to fab one.
I ended up clamping that saw in a cheap Workmate and cut with it that way for a long time before building a vertical stand.

Yep, hose clamp on the trigger, plugged into a power strip with an on/off switch, and tape over the motor vents.
:dunno:
 

Attachments

  • WorkmateClamp.jpg
    WorkmateClamp.jpg
    72.7 KB · Views: 172
  • Cutting.jpg
    Cutting.jpg
    80.4 KB · Views: 160

rpcraft

Well-known member
Joined
Aug 14, 2014
Messages
1,057
Location
Waco
Re: Saw Stand: Something Hacked/CHEAP and Fast

I've seen a lot of guys just cut the flat plate to stick on the face and then mount the saw in a vice and call it done. I probably should have saved some money and done that but oh well.
 

Gutman

Well-known member
Joined
Jan 10, 2019
Messages
292
Location
ENC
Seconding on Slednut's hijack...

Brilliant!

Slednut- Can you provide a couple more pics/details on your mod? May be a sideview or a closer view? Can it be adjusted or is it fixed, but to a smaller gap?

I've got the exact same setup (minus your mod, of course) and I'm experiencing the same issue.
 

Slednut

Well-known member
Joined
Dec 20, 2012
Messages
2,550
Location
Washington state
Seconding on Slednut's hijack...

Brilliant!

Slednut- Can you provide a couple more pics/details on your mod? May be a sideview or a closer view? Can it be adjusted or is it fixed, but to a smaller gap?

I've got the exact same setup (minus your mod, of course) and I'm experiencing the same issue.

Here's a side photo, starting from the top there are four pieces to the extension.

The piece that bolts to where the original guide block was. The second spacer (not painted) that is 1/2" high that is bolted to the third piece that extends down to the bottom (fourth) piece that the guide block is bolted to.

There are three spots in the third piece where I can bolt the bottom piece to so it is adjustable. I can also drill and tap more spots in it if I need to.

On the third piece the distance between the spacer at the top and the bottom of it is the same as the bottom piece that holds the guide block.

Another mod I'd like to do is if possible make a mount for the guide blocks that put them 90 degrees to the tires of the porta-band. It would take the twist out of the blade. This would allow me to cut longer pieces.
 

Attachments

  • Swag4.jpg
    Swag4.jpg
    93.8 KB · Views: 229
OP
B

blacksuit99

Well-known member
Joined
May 21, 2007
Messages
91
Here's a side photo, starting from the top there are four pieces to the extension.

The piece that bolts to where the original guide block was. The second spacer (not painted) that is 1/2" high that is bolted to the third piece that extends down to the bottom (fourth) piece that the guide block is bolted to.

There are three spots in the third piece where I can bolt the bottom piece to so it is adjustable. I can also drill and tap more spots in it if I need to.

On the third piece the distance between the spacer at the top and the bottom of it is the same as the bottom piece that holds the guide block.

Another mod I'd like to do is if possible make a mount for the guide blocks that put them 90 degrees to the tires of the porta-band. It would take the twist out of the blade. This would allow me to cut longer pieces.


Very cool idea, may be stealing this after I get further along. Thanks for posting.
 

Gutman

Well-known member
Joined
Jan 10, 2019
Messages
292
Location
ENC
Slednut,

Thanks for the additional details and the pic. That tells the full story.

I've added this mod to my worklist, though I might think about it a bit more and see if I can't adjust your design and make the guide block sliding and held in position with a thumbwheel or something.

Keep us posted if you devise a way to rotate the guide blocks too!

I'm looking to add some work stops to mine, and possibly a sled that uses both slide channels and allows tilting of square tube.
 
OP
B

blacksuit99

Well-known member
Joined
May 21, 2007
Messages
91
Got the table made and put on. Used aluminum for the the table but may make one out of steel. I think I’m going to weld the piece of angle on the front and use pins to keep it from sliding back. Ordered a switch from northern tool which should be here in a few days.
 

Attachments

  • AC863133-F659-45C9-AAE8-16B14078B40D.jpg
    AC863133-F659-45C9-AAE8-16B14078B40D.jpg
    121 KB · Views: 144
  • 620703EE-A06F-49FE-8550-9ACD9472D0C3.jpg
    620703EE-A06F-49FE-8550-9ACD9472D0C3.jpg
    130.2 KB · Views: 170

bdbecker

ALLIANCE MEMBER
Joined
Nov 18, 2015
Messages
5,554
Location
Iowa
Would like to see somebody include some dimensions or sketches with these projects

I'd bet most of these tables start as a general concept and are built to fit using materials on hand. When I built my stand, I had a piece of plate I wanted to use as the top. I cut a piece of cardboard to match the size of the plate, and then trimmed the cardboard to fit the saw. I transferred the screw locations to the cardboard by installing the screws into the saw and lightly tapped the cardboard with a hammer. I then put the cardboard back on the plate and traced what needed to be trimmed and marked the holes. The only measurement I probably made was how long to cut the legs.

View media item 108027
 
Last edited:

Kenstone1

Well-known member
Joined
Oct 2, 2015
Messages
734
Last edited:
OP
B

blacksuit99

Well-known member
Joined
May 21, 2007
Messages
91

BTL-A4

Well-known member
Joined
Feb 28, 2018
Messages
1,252
Location
Santa Clarita
Here's a side photo, starting from the top there are four pieces to the extension.

The piece that bolts to where the original guide block was. The second spacer (not painted) that is 1/2" high that is bolted to the third piece that extends down to the bottom (fourth) piece that the guide block is bolted to.

There are three spots in the third piece where I can bolt the bottom piece to so it is adjustable. I can also drill and tap more spots in it if I need to.

On the third piece the distance between the spacer at the top and the bottom of it is the same as the bottom piece that holds the guide block.

Another mod I'd like to do is if possible make a mount for the guide blocks that put them 90 degrees to the tires of the porta-band. It would take the twist out of the blade. This would allow me to cut longer pieces.

I have one of these tables with a Makita. It cuts pretty straight, but I wouldn't mind making a guide. What did you use for the bearing wheels on the guide?
 

ndnchf

Well-known member
Joined
Jan 9, 2012
Messages
1,556
Location
Fredericksburg, Virginia
Slednut - I've been studying your guide block mod photos and description. Do I see a washer between the blocks at the circled location ? Is that to correct blade alignment? Thanks.
 

Attachments

  • Swag3.jpg
    Swag3.jpg
    117.3 KB · Views: 99

ndnchf

Well-known member
Joined
Jan 9, 2012
Messages
1,556
Location
Fredericksburg, Virginia
Thanks to slednut for the inspiration. I made a drop down blade guide for my Bauer.
 

Attachments

  • 20210306_163928_copy_763x1838.jpg
    20210306_163928_copy_763x1838.jpg
    49.8 KB · Views: 115
  • 20210306_163958_copy_763x1612.jpg
    20210306_163958_copy_763x1612.jpg
    61.3 KB · Views: 104
  • 20210306_163917_copy_763x1749.jpg
    20210306_163917_copy_763x1749.jpg
    57.3 KB · Views: 95

Slednut

Well-known member
Joined
Dec 20, 2012
Messages
2,550
Location
Washington state
That looks great ndnchf, the washer was an attempt to get a 90 degree cut with the miter gauge. I soon found that I had to adjust the miter gauge. I don't remember how many degrees but it's at least a couple.

I do like that it cuts straight through flat stock now with the gauge and I don't get an arc cut.
 

lilscorpion

Well-known member
Joined
Mar 15, 2010
Messages
3,599
Location
Colorado
Slightly different approach than others here - made a traditional laminate top and router plate-like insert out of aluminum years back.

5d8dcd64bc8b2feb18661fdc55bf2e6d.jpg

I did I this way so I’d have the benefit of a Ben top unit but be able to use it in multiple formats. I can drop it into my router table.

c71502933148b7deee34d32b936d7805.jpg

Or use/store it in this minimally intrusive mobile mini table attached to the wall with French cleats.

e50deaf0d888dc99078d95f908b9c3e3.jpg

Maybe my favorite - installed in a slide-away drawer.

34aedfe9ecfa3b61e0385d866eeaa164.jpg


The portable bandsaw is perfect for the fabricator that has minimal space. Their only limits on your creativity is throat depth.
 

Attachments

  • 5d8dcd64bc8b2feb18661fdc55bf2e6d.jpg
    5d8dcd64bc8b2feb18661fdc55bf2e6d.jpg
    206.6 KB · Views: 13
  • c71502933148b7deee34d32b936d7805.jpg
    c71502933148b7deee34d32b936d7805.jpg
    51.5 KB · Views: 12
  • e50deaf0d888dc99078d95f908b9c3e3.jpg
    e50deaf0d888dc99078d95f908b9c3e3.jpg
    38.7 KB · Views: 12
  • 34aedfe9ecfa3b61e0385d866eeaa164.jpg
    34aedfe9ecfa3b61e0385d866eeaa164.jpg
    519.7 KB · Views: 20

ndnchf

Well-known member
Joined
Jan 9, 2012
Messages
1,556
Location
Fredericksburg, Virginia
I'm pleased with the drop down roller guide I made. But if I were to do it again, I'd make one change. For the lower adjustable piece I welded 2 bolts in place and used wing nuts on the back. I found that I need to loosen and pull the blade up to have enough room to pull the welded bolts out of the holes in the upper piece. If I did it again, I'd weld nuts to the front and use thumb screws from the rear. This would make it easier to adjust with no need to fiddle with the blade. I don't expect to be changing position very often, so its not a big deal. But passing this along for someone else who may make one.
 
To avoid these ads, REGISTER NOW!
Top Bottom