To avoid these ads, REGISTER NOW!

Powder Coating?

To avoid these ads, REGISTER NOW!

NHBandit

Well-known member
Joined
Jan 11, 2012
Messages
2,757
Location
East Tennessee
Your buddy should check out my article on masking if he doesn't mind taking advice from a hobbyist. It should help him with his tape lines.

Powder Coat Masking Pt.2
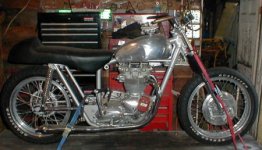
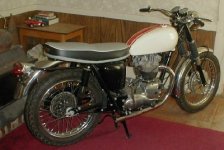
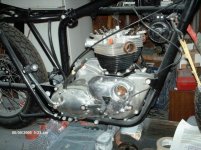
It was several years ago and he closed his shop quite awhile ago as well. Too bad really. He had a home made oven that was big enough to hold an entire car. In fact he did the complete chassis for my old racecar as well as several vintage Harley & Triumph motorcycle frames. In fact the powder I'm using to teach myself how to do it was some stuff he had left over. Does powder have a shelf life if kept dry ? The black I used recently for my first attempt seemed to work fine and it's all tightly sealed in Mason jars. Here are a few pics of some stuff he did for me back when I was building 60s vintage Triumphs. He did all the frames and all the misc. small parts as well. And yeah, some of the pics were taken inside the house. I was single then.... LoL
 

Attachments

  • frame.jpg
    frame.jpg
    67.9 KB · Views: 39
  • powdercoated parts overview.jpg
    powdercoated parts overview.jpg
    71.6 KB · Views: 47
  • frankenbike.jpg
    frankenbike.jpg
    29.1 KB · Views: 40
  • 66 bonnie almost done.jpg
    66 bonnie almost done.jpg
    50.6 KB · Views: 37
  • 004.jpg
    004.jpg
    137.2 KB · Views: 36
Last edited:

CudaChick1968

Member Emeritus
Joined
Jul 1, 2011
Messages
1,800
Location
Northwest Tennessee (38230)
Sorry Bandit, but all I can think of right now with only a half a cup of coffee in me is the latest industry reality show coming out soon entitled "When Powder Coating Goes Bad ..." :D

If your containers aren't tightly sealed and/or if you live in a humid area, the powder will absorb moisture out of the air. It will all stick together and become a big hard chunk. Short of breaking it up and running it through something like a flour sifter, it's pretty much unusable at that point. Powders are made up of various particles of acrylic, polyester, and other plastics. From the AzkoNobel site, this is their formal explanation:

There are six main ingredients that make up the recipe for powder coatings.

Resin is always present and comes in two types; polyester and epoxy.

Curing agents are added to bind the coating. For polyesters, primid curing agents are used. For epoxies, dicyandiamide curing agents are used. Hybrid curing agents are also occasionally used, which contain different quantities of the primid and dicyandiamide curing agents.

There are various additives that are often used with a wide range of properties. Some of these give the powder a matt [sic] effect and others create a hardened finish, for example.

Post additives prevent the powder from caking and are added when the powder is hard and broken into small chips.

Tint pigments are also added to the mix. There are two types; inorganic, which are generally pale and dull and organic, which are more brightly coloured.

Extenders (fillers) are added to reduce glossiness and supply the coating with extra durability.

The quantity of each ingredient differs depending on a number of factors.

The powder may be thermoplastic (becomes soft, remoldable and weldable when heat is added) or thermoset polymer (can not be welded or remolded when heated).


Unless all of those ingredients are free-flowing and able to readily mix together, you can't count on consistent or decent results.

It sounds though like the guy you got yours from was well-versed in powder storage so if you can still pour some out, swirl it around in a cup and have it resemble water (rather than little chunks), it should be fine to use.
 

NHBandit

Well-known member
Joined
Jan 11, 2012
Messages
2,757
Location
East Tennessee
It's almost noon. Get to work !... LoL and thanks. I'm cheap and only doing this for my own junk. I'll take your advice though and ditch any that looks chunky. Most of it seems fine.
 
OP
9

99ishvr4

Well-known member
Joined
Jul 27, 2013
Messages
118
Location
Florida
I have also found that older powder doesn't seem to take a charge as well. Newly ordered powders cover great, but when I am using an older powder, the Faraday areas seem to be more difficult than usual. You can make it work, even it if is clumpy, I believe the recommended procedure is to fluidize it for several hours which should break up any chunks and mix the powder. But if you only have a pound of each powder or so, then its not really worth it to go through the trouble.
 

dodge610

Well-known member
Joined
Aug 22, 2010
Messages
5,467
Location
North Canton Ohio
Glad To hear there are others doing this Powder Coating Thing Just kidding. Just today reopened the shop for business closed er up for 1.5 yrs. Except for doing my own work and a few thing for friends just did not have time for it. My other job that is my main job was using up 60 hrs of my week and the boy being in college. Well my main job cut my hrs. way back boy is finally graduating yep he made it so going back to my mistress powder coating and bead blasting. Now to get back up to speed on the new powders and to pick up new customers and some of the old. Leanne just wanted to say dont worry dear I cannot hold a candle to you babe you are in a league of your own your work is amazing I will get back to doing the trick stuff but never in your league.
 

NHBandit

Well-known member
Joined
Jan 11, 2012
Messages
2,757
Location
East Tennessee
Whatever you do, never tell her something can't be done... I make a comment about a buddy telling me you can't do 2 colors because they will run together when you bake the part so she posts up pics of valve covers done in SIX colors... :thumbup:
 

dodge610

Well-known member
Joined
Aug 22, 2010
Messages
5,467
Location
North Canton Ohio
That's wonderful news 610! Congrats to your son and to you as well! I hope the side job can fill in where the full time leaves off and wish you many years of continued success.

Thanks Leanne that means a lot coming from you. 2 colors I can do was working on 3 on the same part but never mastered it I will tho im sure just a little trial and error as I am sure you know. Hope your business is goin good also.:beer: Now all the boy has to do is get that big boy job and we are set. he better me and momma got a lot of money spent on this degree of his but he is worth every cent we spent.
 
Last edited:

Anthonyca

Active member
Joined
Jun 10, 2012
Messages
30
That work on Cudachick's website is the best powder coating I have seen. :thumbup: I had a friend who worked in a powder coating shop in the 90s and he did some great work for me. I still remember how amazing that Edelbrock manifold looked with the clear coat on it but it was all single colors. I never even realized one could do so much with powder coat.
 

CudaChick1968

Member Emeritus
Joined
Jul 1, 2011
Messages
1,800
Location
Northwest Tennessee (38230)
Thanks Leanne that means a lot coming from you. 2 colors I can do was working on 3 on the same part but never mastered it I will tho im sure just a little trial and error as I am sure you know. Hope your business is goin good also.:beer: Now all the boy has to do is get that big boy job and we are set. he better me and momma got a lot of money spent on this degree of his but he is worth every cent we spent.

It'll be worth it in the end both on your account and the kid's. If he's anything like you it's a given that he's a good kid and a hard worker. It's great -- no, actually it's refreshing -- to see so many involved and proud dads around here.

Anthony, thanks for checking it out and for the generous compliment! I love my job. :D
 
OP
9

99ishvr4

Well-known member
Joined
Jul 27, 2013
Messages
118
Location
Florida
I have several articles planned out but I want your guys input on what kind of article that would really help you out. Basically let me know what topic you would like me to cover next.

The articles in planning are:

Defect Center: I will take pictures of every kind of defect you will encounter while powder coating, and let you know what it is and how to correct it.

Air compressor plumbing around the garage

Multi-coats: how to properly do 2 or more coats.
 
OP
9

99ishvr4

Well-known member
Joined
Jul 27, 2013
Messages
118
Location
Florida
There is a new article on the site: How to build a powder coating oven. It is part 1 of 2. Check it out: http://www.powdercoatguide.com/2014/09/how-to-build-powder-coating-oven.html

bCTPknZ.png
 
To avoid these ads, REGISTER NOW!

NHBandit

Well-known member
Joined
Jan 11, 2012
Messages
2,757
Location
East Tennessee
VERY COOL!! PM me with your plans for it. You know I have a kind of special thing for TA's with that phoenix bird on the hood LOL
LOL.. Speaking of a Phoenix.. To celebrate the ex leaving I had new name covered up with one. Or I could just pretend I had this done in tribute to my favorite lady powdercoater... How are you my friend ?
 

Attachments

  • IMG_0955.jpg
    IMG_0955.jpg
    137 KB · Views: 46

CudaChick1968

Member Emeritus
Joined
Jul 1, 2011
Messages
1,800
Location
Northwest Tennessee (38230)
That looks awesome Bandit! Congratulations on both the new artwork and the new liberation. I think both suit you very well.

LOTS of hours in the shop trying my best to catch up from an overly busy uhhhhh so-called "slow" season during the summer before the real onslaught of the fall and winter starts (and I still have 20+ in line now). Finished up some M/Ts for a '69 GTX belonging to my first New Zealand customer yesterday :bounce:

005 - Copy.jpg

006 - Copy.jpg

and some really cool custom projects the last few weeks. Here's a little more Powder **** ... I don't think I've shared any of these on GJ yet.

053 - Copy.jpg

050 - Copy.jpg

A 1935 Dodge trunk-mounted spare on arrival ...

001 - Copy.jpg

... the total Faraday cage from hell!!! LOL (I don't do many rims but this was for an existing customer who had it sent out before I could talk him out of it.)

021 - Copy.jpg

023 - Copy.jpg

Keep on keepin' on there Mr. Bandit!! Great to hear from ya.
 

Weedwaka

Well-known member
Joined
Mar 28, 2008
Messages
737
The guides great. Thank you for posting it.

Keep working on it and refining it and soon it will draw a ton of traffic. Don't let anybody get you down.
 

creativecars

Well-known member
Joined
Nov 15, 2010
Messages
4,300
Location
Indiana- where horse and buggies still roam
I just found a restaurant warming cabinet that is about 6' tall and 3' square that I was thinking about turning into a powder oven. It currently will warm to 150 and I was hoping to add a large element to the bottom to get it to 400 degrees. It is on wheels, insulated and pretty heavy duty. What do you think??
 

CudaChick1968

Member Emeritus
Joined
Jul 1, 2011
Messages
1,800
Location
Northwest Tennessee (38230)
Thanks Rickster! :D

creativecars, if it was originally formed for a maximum temp of around 150 you might want to investigate the insulation some more before spending a lot of time modifying it ... but I'll bet it would work.
 
OP
9

99ishvr4

Well-known member
Joined
Jul 27, 2013
Messages
118
Location
Florida
The guides great. Thank you for posting it.

Keep working on it and refining it and soon it will draw a ton of traffic. Don't let anybody get you down.

Thanks, although work on the website has slowed down, I will always keep adding new stuff and I do have decent steady traffic so some people definitely find it helpful.

I just found a restaurant warming cabinet that is about 6' tall and 3' square that I was thinking about turning into a powder oven. It currently will warm to 150 and I was hoping to add a large element to the bottom to get it to 400 degrees. It is on wheels, insulated and pretty heavy duty. What do you think??

Like Cudachick said, as long as the insulation is up for it, it should do fine. If not, fiberglass insulation is relatively cheap and it wouldn't be too much work to replace the insulation. In my research of oven insulation, it seems almost all types of insulation are up for the task though.

You could salvage the heating element and controls out of a household oven if you want to do it for basically free. However, a household oven may or may not heat up that space. If not, you can order a couple of elements and wire them up to a pid controller which will give you the most accurate temps inside of the oven. Just make sure you do your research and make it as safe as possible. Use high-temp wire anywhere that the wiring passes through the oven walls, you can switch tor regular wiring on the outside of the oven.

Should be a cool project, do you have any pictures of the cabinet?
 

Whiskeymike

Well-known member
Joined
Oct 31, 2013
Messages
775
Location
Austin, TX
The guides great. Thank you for posting it.

Keep working on it and refining it and soon it will draw a ton of traffic. Don't let anybody get you down.

x2. I found it very helpful in getting the basics. Thanks for taking the time to collect and write all of the information.
 

CudaChick1968

Member Emeritus
Joined
Jul 1, 2011
Messages
1,800
Location
Northwest Tennessee (38230)
Whiskeymike, wire marks are the devil in my opinion :D and are to be avoided at all costs. If you aren't familiar with the Faraday Cage phenomenon, read up on it through wikipedia -- it's what makes the wire repel the powder.
 
OP
9

99ishvr4

Well-known member
Joined
Jul 27, 2013
Messages
118
Location
Florida
x2. I found it very helpful in getting the basics. Thanks for taking the time to collect and write all of the information.

Great, I am glad you found it helpful. Regardless of what has been said in this thread by another member, I do not just collect information. With the exception of the new Oven Build article, all of the information is from my own powder coating experiences and I follow the practices every day that I am coating.

When you hang a workpiece on a hook, how do you ensure that the area it is being hung from get's coated?

Any time a part is being masked somewhere, I will try to integrate my hook into the masked area so that it there are no hooks marks. Say a part has a build in stud or a bolt hole, I don't coat those areas anyways, so I will hang them from the stud, or screw in a bolt into the bolt hole and hang it from the bolt. When I do wheels, I screw a bolt and nut into the valve stem hole and hang from that. Of course, not all parts have these provisions and sometimes you will have a hook mark. I use the smallest hooks possible for the job to minimize the hook mark. Sometimes, I can't even find the hook mark when I am done, but if it there is a little visible bare metal area, I will just use some matching touch up paint (like model car paint) Just a little dab will do.
 

CudaChick1968

Member Emeritus
Joined
Jul 1, 2011
Messages
1,800
Location
Northwest Tennessee (38230)
Screwing a spare bolt into a hole you're trying to keep free of powder works fine ... until you cure it. Then you have a helluva time trying to remove the cured-in bolt without tearing up the powder surrounding the bolt hole.

Just invest in some high temp silicone plugs instead. If need be, you can poke your wire right through one of them and hang up the part without worry ... or spending an hour trying to get your cured bolt back. :D
 
OP
9

99ishvr4

Well-known member
Joined
Jul 27, 2013
Messages
118
Location
Florida
Screwing a spare bolt into a hole you're trying to keep free of powder works fine ... until you cure it. Then you have a helluva time trying to remove the cured-in bolt without tearing up the powder surrounding the bolt hole.

Just invest in some high temp silicone plugs instead. If need be, you can poke your wire right through one of them and hang up the part without worry ... or spending an hour trying to get your cured bolt back. :D


The bolt is just used for hanging, I have silicone plugs... After I'm done spraying, I turn the bolt a turn or 2, it breaks the powder connection and comes right out after baking.

The bolt is a little difficult to turn, considering the part is hanging from it, I just grab it with pliers and turn it clockwise, and let the weight of the part unscrew it.
 
Last edited:

CudaChick1968

Member Emeritus
Joined
Jul 1, 2011
Messages
1,800
Location
Northwest Tennessee (38230)
The guides great. Thank you for posting it.

Keep working on it and refining it and soon it will draw a ton of traffic. Don't let anybody get you down.

I presume part of that comment was directed toward me LOL :D and that's cool. Again, with the utmost respect to all, the main problem I have with this Guide is that it's not written from personal experience and contains downright erroneous information. And I haven't even read the whole thing, just portions of it from time to time while this thread has been in existence.

For example, the little section on eliminating orange peel addresses only the amount of powder on a part. In reality, orange peel -- practically inherent in powder coating to some degree anyway -- is more often attributable to oven and ambient temperature and humidity, and how quickly the part being coated actually gets up to temp.

These old Jensens arrived from my retired Nascar driver customer a few years ago.

001 - Copy.jpg

002 - Copy.jpg

014 - Copy.jpg

'Now that's orange peel ...'

Noooooooo, it's NOT. That's merely excessive powder application to the extent that it actually left craters in the finish, and is precisely what I thought of when reading the explanation in the Guide.

The fact that the Guide is comprised of many coaters' experiences as they relayed them over the internet doesn't necessarily make them into a Bible of how it should be done. For all we know, the information being assembled as gospel could have originally come from someone who bought a HF gun and decided to write a review after using it once. The "if it's in writing then it must be true" thing does not apply in real life and it surely doesn't apply here either.

PLEASE understand that I don't begrudge anyone who wants to powder coat their own stuff or learn more about it (it's how I got started too, on my old hot rod's parts back in 1999). I've been doing this over 16 years and would never undertake to write a book about it because there's just too much involved to start with. What I continue to have a problem with is teaching the world only a portion of how to do it right because it hurts the entire industry as a whole and, from what I've seen, does not invite the reader to explore further or encourage anyone to expand beyond its instructions.

It can kind of be equated to knowing how to make a really great grilled cheese sandwich and a year later, reading some stuff on the internet and then deciding to write a book about gourmet cooking. At the least, please assemble a Bibliography so your research can be traced to its source.

I can almost hear the dissident grumbles now ... 'if she can say all that then why doesn't she help him with it?' It's because while I was also learning how to powder coat, I worked as a paralegal for 20 years and can type 130 words a minute. :D I also couldn't possibly teach anybody a hundredth of what I know without having them standing right next to me. Try explaining in a few sentences how to use a plasma cutter effectively to a nurse and it will probably make ya laugh, but it's essentially the same thing here.

And to all, if you're truly into this as a hobby then you won't stop learning or trying new things EVER.
It's how innovations happen. Get out there and make some. :3gears:
 

BrBa

Member
Joined
Aug 2, 2016
Messages
13
I have wanted to start powdecoating and this is exactly the type of thing I have been looking for. Thanks for sharing!
 
To avoid these ads, REGISTER NOW!
Top Bottom