To avoid these ads, REGISTER NOW!

Prep for Additional Topcoat on New Epoxy Floor

wizo

Active member
Joined
Mar 29, 2010
Messages
28
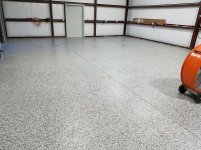
I just finished a 3 part epoxy floor (primer, base coat w/ chips, and 2 part topcoat) on my 450 sq ft. garage. I applied approx 25# of chips (and wish I left it a solid color because I **** at spreading the chips and it is not even). What I didn't realize is with the heavy chip content the floor is not smooth. I would like to add another top coat to help create a smoother finish.

I am beyond the 24hr re-coat time window. I plan to use the "ARMORULTRA LOW V.O.C CLEAR 2-PART TOPCOAT" over my existing "MILITARY 2-PART TOPCOAT".

The big question is how to prep my floor for the next coat. It was suggested to use a burnishing pad with a floor buffer.
That being said can you suggest:
  • What pad to use and method to using it? Single pass, cross hatch?
  • How to prep the edges (scotch bright?)?
  • Any other tips or suggestions?

Thanks in advance
 
To avoid these ads, REGISTER NOW!

Armorpoxy

Well-known member
Joined
Aug 18, 2013
Messages
3,731
Location
NJ
Hi
Carefully run a flat floor scraper over the floor or lightly sand the edge high spots by hand. Topcoat won't fix high spots or edges that stick up due to overlapping flecks. The floor can be lightly scratched up by using a red 3M type pad on a buffer or by hand just to micro scratch the floor for adhesion. Wipe down with denatured alcohol after prepping but before applying the coat.
 

aalleexx

Well-known member
Joined
Apr 22, 2008
Messages
136
Location
East Texas
Thanks Armorpoxy, Will look into renting a buffer and try one of the red 3M type pads with the alcohol wipe down before the next topcoat.

P.S.

What's the best way to avoid the roller marks using an18" roller?
Still noticeable after two topcoats.
 
OP
W

wizo

Active member
Joined
Mar 29, 2010
Messages
28
Here are a few pics to get a better idea of the floor.

tgT8jiyh1XDUbl7anxLB5FuIxd8cK-xcQL2GCNFj9NCHFnJXmSJz7jPjlp9WwTiQjG2qkOUQ1krvmv9ymtV32DIKSJqdvD7I-LkmK100YjR8JMXXo3WnylM59Sf1rHEnZhxpheKkIWLVxUKLtxmvSxhjZS5DucSGHvqOM_Edwvs4Y5TArCrD-38Rxa8fLIbsAItMzQwqtdBvUD6unDmPadOLchVpHRjW57lEYn3fiWRAPaT3SLRUZQaic1li6i0-Def0mu2Ja8blE_rZxjqbtoGeu7v4cT5RNKHjwXqf-r_RnzQH3WhoJun3H-ph6yTZ8ylpcoQ4nPxEeQ7O0hS7sp1NOmYopckBZUb4tRQoLUfHi--MablSx94ldrorNquSltAX1eL-BbKfU_tUPCsCE9aFvxJXC-iur1SKIHQjruDd6IH01DAmyUBN7mXZpx3fEM2o7FObnNr8PdBINpPoqfLQ3V2qhQ4QJM7YHKNfV09rjZCFDozSOchD3v2T8q6kQfOuVvLb-SSNqnmF-MFMBDSRccvVueVpsBua8KTk7iGEDOpniXO5TGu0hlJQP3VEy46z26VruMk--DhIJzkM-80R8ZHN2IVE78dUDP8=w1347-h1010-no


fuWQqa1CKvDKyyjk1-QjKb2ABqVjy_DedNVahSRSi8oD0XUWmSywbl7cTjPkjBuMy9zk1kS4YXGhyvItvqlHnzu1xtUvKKWu05UG5NneP5fXLoLbXE3waBwt1PizT2w1ft2rLgIncnF0VGeFYK1F2p4EnM1j8UWgkvmJFZFznSwtZYPmlFTEmmwYxw8lKSTx09CDA2PRjNosDoD-pjZPaHwyqfUR57BxDMgIaDzTXI82rbsKTCovglFkPKQTQTSm_Gh8rCp41zZYuqguf7dXvJw2a_sqgy6sqDLYQYnWLVJLfKX6kqyUL5OVKvdZ48QcfBMykXte8vvZZJYkkZbONk9QEjFF0lycNGqFEMuyiiWpci2elrZpUXDkr_ywKAzMumO3giHMkHMEwqtqg-VRz20dZHaKF5Npmj1vCDodjg3bhYjWRZ86mfeBMm2MTIiFW3SHUjIA5IfCXBxzzCpUMpR9J1jCfVZqc-GZVeG-GoUy-lpnRJwXAOkxDye7OjmQP_hgQgO4ZjpMWhzIkfwTdsD7ozJ_5WO_SOFSInCr8ayxlrcWd_xv1M5dDwYd3NZ_q_wD0PEQG1xgKq5W4ZDOrTFehgCVtPCKVIZtNww=w1347-h1010-no


YESJ_GU3JvWFBRR7o3ptFd9jpTkXXnzP86NaJVU4kjWS5eWqOf7ExB1B3XPoCojIY_I9tLXjfFAzjUN8SdsHfyRunP1DdawL6zcRRelORaxIX2HTQ8ZZwDAhONwZtckDjyqOM175dDavtdiI-WvzFFjtPUVz0CxzXoCU07Q4p2M95izmbXQzRp60rEhB-klZ1MDMfoq_1nrRw3jTtA6yg61_pJsZhwgHrEZAk8Tvz8bIkzQj0bHKvhxA2738cX0QgRLptm8TjEb5G1W2rn66y5c-Dh5zmXTaoPPEkgrImbVjkqR2NPFezUutUQRpbox6ZmeBaFP0jgn_NRL6z3DaEwZLunvF8POd4P1bH6rePrJy_YRtsgRNMo9JAdf27slXySxGR222H9J6uJZv5mwmu51sbMeaBTC1kzL5VRjRYJijIYrnI4WoVqJEsbxxEECdYudVvCjv9B54qJ9C8MYav6weYTlQbJu485dAXsAnhctsC3WzoiU_oribUOb4WW97ulwswLejoS0Pp_SgEGGI-ght-lkJwo6p0mZywYCo8wphBywojZqvzYCMlZMBl0wHBcpU3yQgaD5MGsn_xUO4mn5T0-5-0V8sV6aS1Ho=w1347-h1010-no


Tuwb00XiuXg4XACVoBPt3ZhNEuw5pWo-h85fgbLkZVJmVJdokQV4x4YXcwEKr_j7i7WCLUdDqRj1AaIygRwplmh3-DVXT0Bw1XnkNOKYYZ7F3TTKr05brXS42q-uMbPqc402V1bVM1GKGdpA1RwhnCSLA_QGvA-DHZ0dhgnoxuiTcffJx03mafH61LzG2Qa3dk26YKeY-EVF8A9ICA2gLqwmYA9sMmpuS1TIFuwvc8SCqnaXWhMgQY2Mz5t-IH1_7HOvX0fFLWkmXAiu6h7d3k3D59z5V945VnENeYnfsArkTMKtOmhZ--6LOhlOhVBsIEpmmjgFrq5wFbwy4Z86hIHfRnwhx2YZDETNUz4_mu6QrHk0IAmZ-oN79uFMMywqUO7Cw_I5KfJHuVIiEJEU_nClg2exNx4kaNps875eC0exWPvJhRAG754V-Avb35bwIjrdtTJYQBpkc2ItbbKL4DUIzS7UrevY1zNxZl2wABXzZX0ZZuZXI5XKk55hLjDcRFjt2wWyzCgruwy2cqPz0e2sNXmKnxGcNbecTKuBpvy6SoMY8oHfPX9HvTPh6RTVnqChLhTNKAH4usB3PLKt0yxdSWqdC1AMXdv5lxI=w1347-h1010-no


7PnXmHzOdDv3kEOR9YhEFIu9rOqgX_WJ-JH9iqQZjXZM9dmRVgxgjRVm7qZboHuMKh37CKqdAC71DVWj5zdUZ_FKPYsHE0XEURvnw-SiDWYsr5opTFsv41FD0cCM99qauuCYvS2Ucz5E27YQIXsYpp-aEmzJwVV_WWDAjO5N80KikV674qY7An6WYvJjVGFAkKo5KMkRIs1-jiH7kDbLdxWrHkSN1wz675YPZ_ug4iNftpNOVRAeF7evOYkXnLYHXr2QHvTqm0sHICD5VZjJVvxwuspxkWnAGBRcuwHwf1xT7gvIbOEoD677SDs2ASCG6TGuD8Cx-SjBUtPm5Qmv31yqq3SDnfCsoEb70RkywZ4funpBnlYhaqo0HTkNWVWJHREysZFphoL0KSEe8r22k4OlE69oXnNwxScjrXcW40w_vEItAakQ8e_yeJjHmxkm1eMeCYlWDRvscmBX19dCy0K8TwSDPK4MiPaAz7X6vunWhhQfDc2Hy5qhT1-UcFcYcL67WfORur_lxO29DD2xLZbsII4Bosw3i7qsEvgAxNfwBUBQljlS4vs0u0QLvkZqU57Ehz8ZemV3niBtxzOhw0cO5Ap0DjxXwHxXVIw=w1347-h1010-no
 

texas123

Well-known member
Joined
May 19, 2016
Messages
136
Location
Fulshear, TX
Designer Grey? Looks like mine but with more flakes. Mine is a couple of years old & seemed to yellow a little. I just clean it with soap & a stiff push broom and it looks good still.
Anyway, Armorpoxy sent me an additional can of top coat (free of charge) & I noticed mine smooth out a little bit. I can still feel the friction additives & flakes, but a little less now. I think I used 25# of flake for a 3 car garage. The texture from the flake is the best part. It doesn't change the look like the friction additive did.
You can see mine if you look at my build:
https://www.garagejournal.com/forum/showthread.php?t=330611
 
Last edited:
OP
W

wizo

Active member
Joined
Mar 29, 2010
Messages
28
Designer Grey? Looks like mine but with more flakes. Mine is a couple of years old & seemed to yellow a little. I just clean it with soap & a stiff push broom and it looks good still.
Anyway, Armorpoxy sent me an additional can of top coat (free of charge) & I noticed mine smooth out a little bit. I can still feel the friction additives & flakes, but a little less now. I think I used 25# of flake for a 3 car garage. The texture from the flake is the best part. It doesn't change the look like the friction additive did.
You can see mine if you look at my build:
https://www.garagejournal.com/forum/showthread.php?t=330611

You go it, designer grey. I used approx 25# of flake on a 2 car garage. I think I like your amount of flake a litter better. I will see after I add the 2nd topcoat.

If I don't get the finish I like I might think about doing a coat or 2 of clear Polyurea over it later on. That is if it is compatible with my current coating.
 
To avoid these ads, REGISTER NOW!

aalleexx

Well-known member
Joined
Apr 22, 2008
Messages
136
Location
East Texas
I also went with designer grey. Have two topcoats of clear so far but want to add more to get rid of the roller marks. They are more obvious depending on the lighting. Any suggestions appreciated.
 

Attachments

  • 1a.jpg
    1a.jpg
    134.3 KB · Views: 51
  • 2a.jpg
    2a.jpg
    151.4 KB · Views: 54
  • 3a.jpg
    3a.jpg
    130.1 KB · Views: 52
  • 4a.jpg
    4a.jpg
    102.9 KB · Views: 58
  • 5a.jpg
    5a.jpg
    149.9 KB · Views: 53
OP
W

wizo

Active member
Joined
Mar 29, 2010
Messages
28
I also went with designer grey. Have two topcoats of clear so far but want to add more to get rid of the roller marks. They are more obvious depending on the lighting. Any suggestions appreciated.

I think it would be hard to cover roller marks with a clear coat (topcoat). Are the roller marks from the color coat or your topcoat?
 

Donzi camino

Well-known member
Joined
Sep 5, 2017
Messages
113
Location
new orleans la
i just finished my floor and also had the 100% chips on floor. I used a 100% solid epoxy and like you wasn't happy till i put 3 coats of clear to get full coverage over the chips. It made the floor budget 3 times the estimated cost but i just couldn't leave it half ***. Surprisingly the metallic epoxy covered great and wish i would had done the whole floor like that.
 

Armorpoxy

Well-known member
Joined
Aug 18, 2013
Messages
3,731
Location
NJ
When doing a full or very heavy broadcast it's imperative to use a flat floor scraper on the flecks and vacuum well prior to applying he topcoat. A drywall sanding stick also works well. This knocks down high spots and overlapping edges. Also on these types of floors a second coat of topcoat is always needed at the minimum since the first coat runs into the millions of mini caves and gaps created by overlapping flecks.

For this look but an even smoother floor instead of two topcoats, we often sell a coat of 100% solids clear uv-stabilized epoxy to coat over the flecks which smooths the floor out a lot, and then it gets topcoated, or two coats of Spartacote polyaspartic also work great.

All of the above makes the floor more expensive, but smoother and very durable.

On the above photos of this floor a coat of 100% solids UV and then a topcoat may be a better choice.
 
Last edited:

LegacyIndustrial

ALLIANCE MEMBER
Joined
Jun 7, 2010
Messages
7,993
Location
deerfield, IL
Using a thin urethane will always require 3 coats minimum. Choose a good Polyurea and get away with 2 or choose a high solids Polyaspartic and do it in one!

The floor pictured was coated and dry within a few hours. 30 min working time. One coat and done!

Clear-Epoxy topcoats are fine for interior rooms but will amber in a garage. Not if but when.

IMG_6392.jpg


Sent from my iPhone using TapatalkIMG_6383.jpg
 
Last edited:
To avoid these ads, REGISTER NOW!
Top Bottom