To avoid these ads, REGISTER NOW!

Preparing shop floor base for radiant heat

FarmerSid

Well-known member
Joined
Dec 12, 2005
Messages
145
Location
Ontario, Canada
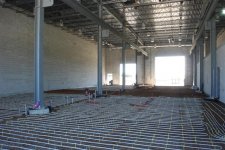
Hey all! Looking for some advice on getting my shop floor set up for radiant heat. The shop size is 36'X40'. I have the insulation all laid down with 6 mil vapor barrier underneith. I also have 4'X8' sheets of 6"X6" mesh laid down on top if the insulation. I have recieved various opinions and would like to hear what you all here have to say.

I have 1500 ft of 1/2" PEX (Oxypex by BOW) in 3 X 500 ft rolls. How should I start laying this stuff out? I would like to have the manifolds in the SE corner under a set of stairs that goes to the second story. I have two 10' roll up doors and one man door on the south wall, one window on the east wall, a window and man door on the north wall and nothing on the west wall as the barn part of the building is on the other side of the west wall.

I was thinking of running a loop from the manifold in the SE corner heading west along the south wall were the two big doors are then heading north up along the wall that separates the shop and barn then heading east along the north wall making this loop and all loops 250'. Don't know if this is the way I should run it.

Should I tie the sheets of mesh together or not? Should I place the outside loop 12" away from the outside walls then place the next two tubes 6" apart and then space the rest of the tubes 12" apart as I move towards the center of the room?

I have a Bear B-52 car lift that is rated at 8000 lbs. It is the same model as the Hydra-Lift 28 that is still in production. It has a base that bolts to the floor and the two uprights bolt to it. You drive over a hump in the middle which covers the cables. Should I remove the insulation where the hoist is going to go to increase the thickness of the concrete where the hoist is going to go?

I am putting down 4" of 4500 psi (32 mpa) concrete every where but will have 5 3/4" of concrete where the hoist is as that is how thick the insulation panels are. I am using cut outs from exterior doors for insulation. They are 22"X36" metal on both sides and are R15.

Last question. I plan on tieing the PEX to the mesh. Do I leave the mesh and PEX at the bottom of the slab or do I pull it up as it is being poured so that it will be in the middle of the slab?

Any and all help is greatly appreciated.

Cheers!

Sid
 
To avoid these ads, REGISTER NOW!

Swammy

Member
Joined
Jul 18, 2006
Messages
24
Location
SYRACUSE, NY
I'm interested in hearing your results and getting your feedback.

I'm building a 40' X 65' garage and I'm thinking about putting in radiant heat.

Where did you buy the pex tube and how much do I need for 2,600' ?

What do they use for insulation under the tubing and do you use a special mix concrete?

Thanks

Dave
 
OP
F

FarmerSid

Well-known member
Joined
Dec 12, 2005
Messages
145
Location
Ontario, Canada
Hey Dave. I am in Ontario, Canada so any prices I state are Canadain prices. I bought the PEX tube at my local Home Hardware store. I got prices from many suppliers and found Home Hardware had the best prices. What I got was Oxypex made by BOW. Cost me $149.99 for a 500 ft roll. From my understanding you will nee 2600 ft of PEX for your floor at 12" ceters. I used exterior door cutouts for my insulation. You know when you buy an exterior door for your house you can get them with or without windows in them. Some have half moons at the top. Some have a window with a grate type design in them and some have a sliding window in them. I found a supplier that sells these cut outs. Cost 25 cents a square ft. Cost me $350 as opposed to $2100 for 2" styrofoam SM. These panels are R15 where SM is R10. No special concrete is needed as far as I know. I'm using 4500 psi (32 mpa).

Cheers!

Sid
 

Vermaraj

Well-known member
Joined
Sep 20, 2006
Messages
92
The mesh should be overlapped one square and wired. Then use cement bricks or wet concrete to raise the mesh to an elevation = middle of slab.

The pex gets attached to the mesh using rebar wire or plastic clips. I like the clips much better. They minimize the chances of nicking the pipe during the wiring and let the pipe slip a little when you move the mesh during the pourl. Also they elevate the pipe off the mesh about 1/4" to avoid abrasion during the pour.

Don't know enough about running the loops. There are several downloadable programs that will calculate the routing & temps. We did one job where a zone was dedicated to heating all the door areas, approximately 3' into the garage. It called for a temp adjustable manifold. Water heating this zone was about 10 degrees hotter than the other zones. Owner seemed very pleased with the results.
 
OP
F

FarmerSid

Well-known member
Joined
Dec 12, 2005
Messages
145
Location
Ontario, Canada
Vermaraj, thanks for the info. Would you mind pointing me to these programs to figure out the routing and temps?

Cheers!

Sid
 

Swammy

Member
Joined
Jul 18, 2006
Messages
24
Location
SYRACUSE, NY
Sid

Thanks for the info

I live in Syracuse ( southern Canada )

I have checked on the web and the pex seems to be around .40 a foot.

I think I will need 3 zones, but I don't know much about how to install the tubing.

We're just finishing the roof this week, luckily before the snow flys.

Hope to be pouring in the next couple of weeks.

I ordered the vapor barrier today

Dave
 
OP
F

FarmerSid

Well-known member
Joined
Dec 12, 2005
Messages
145
Location
Ontario, Canada
Hey Dave,

I paid 0.30 cents per foot CDN. You are about 2 hrs south of me. I'm a little west of the Thousand Island bridge obviously on the Canadaian side. I don't know much about installing the PEX either. The more I read and talk to people the more it seems what is most important is to keep the loop lengths as close as possible to the same length.

I am hoping that the experienced users here will grab a seat and share the knowledge with us.

Cheers!

Sid
 
To avoid these ads, REGISTER NOW!

kid

Member
Joined
Jun 18, 2006
Messages
5
Sid, I can explain my set up just to give you another example.
My shop is 30X36' unattached, i used 3 300' loops of 1/2" pex tubing. (all heat is removed from tubing by the end of a 300' run) if I did it again I would use 3/4" tubing (better heat transfere because of more surface)
Insulated the out side of my foundation with 2" foam going down 2'
no insulation or vapor barrier under the 5" slab (wast of money)
Start each loop at an out side wall (about a foot inboard from edge) and continue back and forth moving inward and back to your manifold. That way you apply the most heat at the coolest area first.
You dont need to be perfect when laying out your tubing, just dont kink the tube at the bends.
I installed my tubing ontop of the layer of sand & used clothes hangers cut up & bent into U bends to "pin" the tubing to the sand. Then layed the wire mesh over the tubing & started pouring cement. Dont let the pex lay out in the sun for long because it degrades from sun light. ( a day wont hurt)
I did not use the insulation under the slab to save money, the only draw back to this is the heat up/ cool down time takes a little longer because you are using the earth under your slab as a heat sink. Another benefit with no insulation under slab is if you loose your electricity for 3 days your shop will only cool down about 15 degrees (it happened to me)
I use 1 curculation pump (Grandof) 1/15 HP (same elect. usage as a 70 watt bulb) to run all 3 300' loops.
1 40 gallon hot water heater
dont use the instant hot water heaters that do not have storage, you want the tank storage.
When it is 5 degrees out side here in kansas, the hot water tank will kick on for about 20 minutes then off for about an hour or more, & keeps the shop at 66 to 68 consistantly. (floor stays at 70 degrees)
I keep the heater set between vac & warm to keep the water comming out of the tank about 90degrees. Any body that has this type of heat will tell you that any warmer is just too hot.
you can get alot if info on radiant heat from the internet.
My system works great & cost a total of $850.00 for everything. You will be glad you went with this type of heat.
Uses an avarage of approx. $35.00 worth of natural gas a month thru the winter. I have had this system for 5 years now with no regrets.
 

boiler7904

Well-known member
Joined
Apr 4, 2006
Messages
3,414
Location
NW IN
Here's what I've learned from being involved with the installation of heat tubing for about 70,000 sf of finished floor area (could be more - I don't really know) in 12" slabs in the last month or so from a construction standpoint:

1. Figure out where your lift is going to go now and dedicate a location for it. Once that is determined, take the lift post baseplate and triple it's size. Spraypaint a rectangle that size centered at each post location. Take a piece of #3 (3/8") rebar and drive it into the gravel base at the center of each post location so that the top of the pin is flush with the finished slab elevation or slightly higher if you want. It can always be cut off or ground down later. Spraypaint the pin a bright color.

These two steps do two things for you. The spraypainted rectangle shows you where not to put tubing so that you can drill for post anchor bolts later. The exposed steel pin reminds you where you omitted tubing and is safe to drill when it comes time to install the lift. The small amount of omitted tubing will have a minimal (if any) effect on your heating but is more than made up for if you would have hit a tube drilling for the anchors. You can see what was done on the project I'm working on in the middle of the attached photo that I took this afternoon.

I would consider thickening the slab and adding some some rebar in each direction under each lift post. If you made a small thickened pad - maybe 3' x 3' x 8" or 1' thick with some #5 bar at 6" o.c. each way, you'll end up with a much stronger floor for very little money. You'd only add about 1/2 a yard of concrete and 3 or 4 pieces of rebar. To me, that is easy money to spend.

2. The tubing can be tied to the wire mesh with standard cable ties as long as the extra tie doesn't stick up through the finished slab.

3. Our installers are using compressed air to test for leaks during installation. It's quicker and easier to deal with leaks. During the concrete pours, they use water. Without the water, air filled tubing has the ability to float to the surface and raise the mesh with it.

4. Plan your sawcut control joints now. Standard practice is to cut through 1/4 - 1/3 of the total slab thickness. In our case, that would have meant 3" to 4" deep sawcuts. 3/4" tubing 2 3/4" from the surface does allow for that so we changed to a 1 1/2" to 2" deep sawcut. Pressurizing the system with water will show you instantly if you have gone too deep with your cuts. This is especially important if you are pitching the slab to drains or out a door and don't account for that in the gravel base.
 

Attachments

  • DSC04895.JPG
    DSC04895.JPG
    59 KB · Views: 105

BobH

Member
Joined
Aug 11, 2006
Messages
11
The saw cut control joints are mostly for contraction so dosn't it stress the pex if a joint opens a little? What do you do where you have a full on expantion joint in a large slab? Dip down into the sub-base and back up again?
 

boiler7904

Well-known member
Joined
Apr 4, 2006
Messages
3,414
Location
NW IN
BobH said:
The saw cut control joints are mostly for contraction so dosn't it stress the pex if a joint opens a little? What do you do where you have a full on expantion joint in a large slab? Dip down into the sub-base and back up again?

The control joints are there to control where the concrete cracks when it starts to crack, which it will do. On our project, the room in my first post is being split into two pours, each have is on a seperate zone / manifold so they are completely seperate.
 
OP
F

FarmerSid

Well-known member
Joined
Dec 12, 2005
Messages
145
Location
Ontario, Canada
We did the pour on Saturday. 19 cubic meters. PEX is still holding the air pressure fine. I was worried about that PEX the whole time we were pouring. Spent sunday and monday continually keeping the concrete wet.

Cheers!

Sid
 
To avoid these ads, REGISTER NOW!
Top Bottom