To avoid these ads, REGISTER NOW!

progress report and adjusting trajectory

Mainiac Mat

Well-known member
Joined
Sep 2, 2020
Messages
401
Location
Maine
Hey gang,

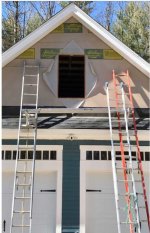
Well I finally finished trimming out the OHD openings inside and out. Doors are in and scheduled for installation this coming Monday.

I also go the eve vents and trim in, and closed in the bottom of the pent roof, so the bats are going to have to have their parties somewhere else. All trim has a coat of primer and one coat of finish.

g.jpg

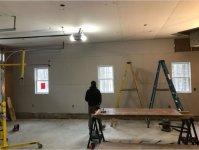
I got the sub panel powered up last night and hope to have a couple circuits wired for power outlets to the doors and on the walls.

p.JPG

I hope to get the man door installed this weekend as well.... so after Monday I should be able to secure the garage properly.

I even got my lovely wife and MIL to stain clapboards and have enough on hand to finish two walls.

So now I have to decide on a trajectory.... should I....

Option 1: double down on finishing the trim and getting as much siding up as I can before the weather turns? (it's mid-October already and this is in Maine... so I can expect snow any time after Thanksgiving). This option uses the warm weather for painting trim boards.

or...

Option 2: resign myself to getting through he winter with just the house wrap up, and shift gears to finishing the rough wiring, insulating and getting the ceiling strapped and sheet-rocked, so that I can get my LED fixtures installed. This option uses the warm weather for mudding and taping the rock and painting the ceiling.


Budgetary constraints are dictating that I can't sub any of this out... so it's just me and every once and a while a Saturday helper (young guy from church who had his hours cut at work).
 
To avoid these ads, REGISTER NOW!

Moss

Well-known member
Joined
Dec 21, 2013
Messages
148
Location
Ontario Canada
Nice garage, I vote for finishing the outside. You'll feel a lot better knowing it's all finished and looking nice. I think you will be able to figure out a heat option to plug away inside over the winter.
 

Don1357

Well-known member
Joined
Apr 15, 2019
Messages
948
Location
Palmer, AK
yup! Outside first! I have no windows nor doors yet but need to first finish the siding.

I'll wait until we get bellow 0f so I have proper motivation to do the doors... I'll be sensible and stop working on the unheated space if we hit -20f :D
 

Prospecter

Well-known member
Joined
May 16, 2015
Messages
2,396
Location
Maine
Get as far as you can outside. No black flies. No mosquitoes. Limited mud. We'll get some kind of storm (at least in the mid-coast area) before Thanksgiving, but it won't last. In the mid-coast, I can generally work outside until almost Christmas.

With doors on, you'll be able to maintain a working temperature inside right through the winter. I was able heat my 24x30 with just a portable kerosene heater to about 50 d. all winter. (Use the good K1 though, and keep the wick clean!)
 
OP
M

Mainiac Mat

Well-known member
Joined
Sep 2, 2020
Messages
401
Location
Maine
4-wire feeder to detached building:
Kevin

I'm running 2-2-2-4 MFR to the panel

The two line voltage black wires are going to the breaker, the third wire goes to the neutral bus (black with white stripe... attached at lower left) and the 4th wire (green) goes to the ground bus on the right. Bonding bar cross connecting neutral and ground is removed and ground bus is bonded to the panel itself.

Perhaps you guys can't see the black wire with white stripe going to the neutral bus and think I'm running 3 wire.
 
OP
M

Mainiac Mat

Well-known member
Joined
Sep 2, 2020
Messages
401
Location
Maine
Neutral wire is hiding behind the line voltage wires... you can see it better in this pic....

4.JPG

Overhead doors were installed Monday. I chickened out and paid to have it done as I was intimidated by the torsion spring. Next to the

OHD.jpg

I got the Lift Master app installed and now we can control and monitor them from our phones. Finally... the garage is secure.
 

PCustoms

Well-known member
Joined
Jul 23, 2011
Messages
22,404
Location
VT
Please let me know if you see anything else wrong with the panel wiring.

You need to separate your neutral and grounds. Go back and read the link posted

EDIT: if that's done then I have no idea wtf I thought I saw originally
 
OP
M

Mainiac Mat

Well-known member
Joined
Sep 2, 2020
Messages
401
Location
Maine
Started siding and installed brass lanterns... wired 3-way switch back to house so lights can be turned on from our side entrance mudroom.

1.JPG

2.JPG

3.JPG
 

larry4406

Well-known member
Joined
Jan 27, 2006
Messages
19,075
Location
Northern Virginia
Nice job!

I really like the glass windows above the garage door; have not seen that before.

Definitely do the outside first. You can always work inside with a heater over the winter.
 
OP
M

Mainiac Mat

Well-known member
Joined
Sep 2, 2020
Messages
401
Location
Maine
I bought the transom windows from a little outfit in VT called First Line Sales. They are PVC on the exterior and primed wood on the interior, with wood extension jambs. They are true divided light windows with separate panes of glass betwixt the muntins

They have lot's of sizes and configurations available, as they are all essentially custom built from a cut list of stock components.

I paid $350/ea. for them. Shipping would have killed the deal, but the owner agreed to meet me half way (in NH), which worked out great and made it a freight free and tax free transaction.

Broshco makes them too, but they were twice as expensive and had narrow little panes of glass that looked funny (to my eye).
 
To avoid these ads, REGISTER NOW!
OP
M

Mainiac Mat

Well-known member
Joined
Sep 2, 2020
Messages
401
Location
Maine
I decided to go through the winter with the house wrap and focus on the interior....

Got the Hot Dawg going in early December

hot dawg.JPG

Z-vent.JPG

gas to hot dawg.JPG

pwr to hot dawg.JPG

terminator.JPG

regulator.JPG

tstat.JPG
 
OP
M

Mainiac Mat

Well-known member
Joined
Sep 2, 2020
Messages
401
Location
Maine
Then set about indoor work...

Insulating and strapping the ceiling...

ceiling insulation.jpg

strapping.jpg

And evenings in the woodshop pre-fabricating the window trim.

window trim.JPG

Had a couple warm days in December and got trim installed on the first window.

window trim 2.JPG
 
OP
M

Mainiac Mat

Well-known member
Joined
Sep 2, 2020
Messages
401
Location
Maine
With heat available and the ceiling insulated, working in the garage was comfortable, even on the coldest days.

As I finished insulating the walls, the heater cycled less, and less frequently.

insulate walls.JPG

Rented a panel lift and recruited a (young, fit and well paid) helper to sheet rock the ceiling. My first time putting up 5/8" rock and the 12' panels were HEAVY.

ceiling sheet rock.JPG
sheet rock ceiling.JPG

Then it was time for the walls.

sr-2.JPG

But after realizing that snow melt was going to cause more condensation problems than I had anticipated, I pulled an additional circuit for a ceiling fan.

Ceiling fan box.JPG
ceiling fan.JPG

Fortunately, I saw the light before I buttoned up the last wall.

I'm now 90% done hanging the wall sheet rock.
 

Attachments

  • sheet rock walls.JPG
    sheet rock walls.JPG
    59.5 KB · Views: 37
OP
M

Mainiac Mat

Well-known member
Joined
Sep 2, 2020
Messages
401
Location
Maine
Though I've done dry wall mud and tape a couple times before, I'm very good at it. So I've been watching YouTube videos and getting some better tools.

I ordered a Banjo off Flee Bay....

banjo.JPG

And decided to use heavy all purpose for the tape coats...

mud all purpose.JPG

And light weight Plus 3 for all the finish coats.

mud light weight.JPG
 

Attachments

  • siding.jpg
    siding.jpg
    43.4 KB · Views: 394
OP
M

Mainiac Mat

Well-known member
Joined
Sep 2, 2020
Messages
401
Location
Maine
Weather turned warm this week.... mid 60s. So I did a quick pivot and switched to out door work, hanging siding on the east wall.

attachment.php


Siding is Red Cedar (FJP). I had recruited my wife and MIL to pre stain a good size stash of clapboards last fall, so I was ready to roll.

I always put the first coat of stain on (with clapboards horizontal on saw horses) before I put the them up, as it seams to soak in and bind better. I do the same for the trim (paint all sides and ends). Then I put a second and final coat on when it’s all up.

That catches up the progress report to time now....:beer:
 
OP
M

Mainiac Mat

Well-known member
Joined
Sep 2, 2020
Messages
401
Location
Maine
We have had some really nice spring weather and I was able to finish up the east wall and get a final coat of stain on it.

east wall.jpg

I cope cut the clapboard around the window trim molding and bedded it into some quality calk. Hoping this seals up well.

cope cut.jpg

Had another great weather forecast for this past weekend, so I took Friday off and put three days into the west wall siding.

west wall.jpg

Almost to the top... then I paint my way down and drop the staging as I go.
 
OP
M

Mainiac Mat

Well-known member
Joined
Sep 2, 2020
Messages
401
Location
Maine
It's in the Baer paint catalog as "Federal Blue" and it is... surprise, surprise.... the same color as our house.
 
OP
M

Mainiac Mat

Well-known member
Joined
Sep 2, 2020
Messages
401
Location
Maine
Working aloft this weekend to get the last window installed in the south gable...

gable window framing.JPG

gable window framing-2.JPG

All sealed up, window trim installed and calked.

Got all the tools put away and staging down and stuffed in the pole barn just before a little afternoon shower broke.

gable window.JPG
 

Attachments

  • gable window.JPG
    gable window.JPG
    95 KB · Views: 41
  • gable window framing-2.JPG
    gable window framing-2.JPG
    66.8 KB · Views: 36
  • gable window framing.JPG
    gable window framing.JPG
    80.8 KB · Views: 46
OP
M

Mainiac Mat

Well-known member
Joined
Sep 2, 2020
Messages
401
Location
Maine
Finishing up the south wall gable...

Man battle stations:
staging south gable.JPG

Putting up the facia and painting trim with second coat.
I blocked out with strapping stock and then used 1x3 pre-primed solid pine for the facia. This created a slot to tuck the cedar clapboards under.... makes installation less fussy (small gaps on mitered ends are covered) and more weather tight (not relying on calk). All trim was pre-primed and got a coat of exterior acrylic prior to installation, then second coat once up.

paint trim.JPG

Likewise, FJP cedar clapboards installed rough side out, get a coat of opaque stain horizontal on saw horses, where it's easy to get full coverage and the stain soaks in better... then installed with stainless ring shank siding nails. Working by myself, so slow going with a ton of up-down-up-down.... brutal on my Achilles, calves and arches.

siding south gable.JPG

Had to re-configure staging to a shorter plank with the ladders up higher... worked my way to the peak putting up the siding, then stained my way back down.

south gable aloft.JPG

Finally done after three days.... broke down the staging and was pretty pleased with the final result. Mrs. Mainiac likes it, so I'm in good standing.

south gable done.JPG


OK... truth be told... I really don't like heights. It helps that I was able to borrow a rock solid 24' aluminum staging plank from a contractor friend, but that last bit at the peak was pretty dicey, and I was fretting about it a lot the night before. I had to force myself to put one foot in front of the other and was very slow and deliberate... trying to keep 3 points of contact, making sure not to get tangled up on the air hose, and keeping my tool belt organized. Shoving the nail gun in my suspenders worked out pretty well to keep my hands free. When it was all said and done, I collapsed on the couch with a cold one and had a weird kind of stress let down reaction, and had jittery hands.

I'm very glad to have this done, but am having second thoughts about doing the north end, as I have ~5' of foundation exposed on the back side, so the peak is that much higher.

Here's what I have planned for the north wall. The 6' shed roof is for storing 3-point hitch tractor implements (York rake, snow blower, etc...). I'm debating whether to rent a lift, or to job it out to a roofer I know who has a Lull. He's not cheap, but he and his partner would knock it out in a day and it may be well worth it. These are "kill-ya" heights if you take a spill.

north wall shed.JPG

Thanks for looking in. Let me know what ya think of the progress and plans for the back wall.
 
Last edited:

bradpac

Well-known member
Joined
Sep 8, 2013
Messages
721
Location
Central TX
This thing is turning out beautiful. My first instinct is to hire out the back, but you've done it all this far so I say go for it or at least help. Maybe a safety lanyard would give you a little more piece of mind.
 
OP
M

Mainiac Mat

Well-known member
Joined
Sep 2, 2020
Messages
401
Location
Maine
Finally finished the back (north) wall. With 5' of foundation exposed on this side, the ridge on was almost 30' high, and I was none too interested in lugging my 55+ **** up that high on ladder jack staging again, so I hired a guy to do the siding up high and slap a second coat of paint on the rakes. I installed and fabricated the trim for the thermostatically controlled power vent up in the attic.

Here's my happy painting crew pre-staining the FJP Cedar clapboards...

NW painters.JPGNW clapboards.JPG

ridge vent installed...
NW vent.JPG

Siding done and moving on to the shed...
NW header.jpg
 
OP
M

Mainiac Mat

Well-known member
Joined
Sep 2, 2020
Messages
401
Location
Maine
Framed and roofed lean-to done...
NW done for now.JPG

Stuffed full of tractor implements and log splitter...
NW tractro implements.JPG

Decided to close in the ends...

leen-to east.JPGleen-to west.JPG
 

Prospecter

Well-known member
Joined
May 16, 2015
Messages
2,396
Location
Maine
That's a really nice looking building! What's the gray attachment in the middle between the snowblower and the log splitter?
 
OP
M

Mainiac Mat

Well-known member
Joined
Sep 2, 2020
Messages
401
Location
Maine
That's a really nice looking building! What's the gray attachment in the middle between the snowblower and the log splitter?

That's what I call my "super sucker".... I salvaged the blower off of an old dust collection system at work with a fried motor and fabricated a frame and two stage step-up pully arrangement. I mount it to my tractror's 3 pt. hitch and run it off the PTO. 540 rpm at the PTO is then stepped up to the ~1,800 rpm needed for the blower. It's intended to wage war on leaves... but needs modification.
 

rawen2

Well-known member
Joined
Feb 26, 2021
Messages
167
Location
High Desert of CO
Absolutely beautiful building!
Just a question about the shed roof where it meets the back wall of the garage. I see the metal flashing in the earlier pic before the shed is built. Where is the flashing afterwards? I thought it would be visible on top of the shingles. I'm no contractor so I'm just curious how that detail was done.
 
To avoid these ads, REGISTER NOW!
Top Bottom