To avoid these ads, REGISTER NOW!

Project `52 DiamondT towrig/RV

RoosterBooster

Well-known member
Joined
Apr 24, 2014
Messages
225
Location
Vegas (winter) ...somewhere in the Utah mountains
some of you guys (and girls ?) asked about a build thread of my <T> ;
i do have one running over at Pirate4x4 ... but it is huge (and a mess :wtf:)
so i figured i post here a "highlights only" version ;)

the whole thing started when a fellow member at Pirate posted an add for a vintage <T>;
turned out that the <T> was a Fire engine for the SF NM fire department and had only 12000 miles on the clock...
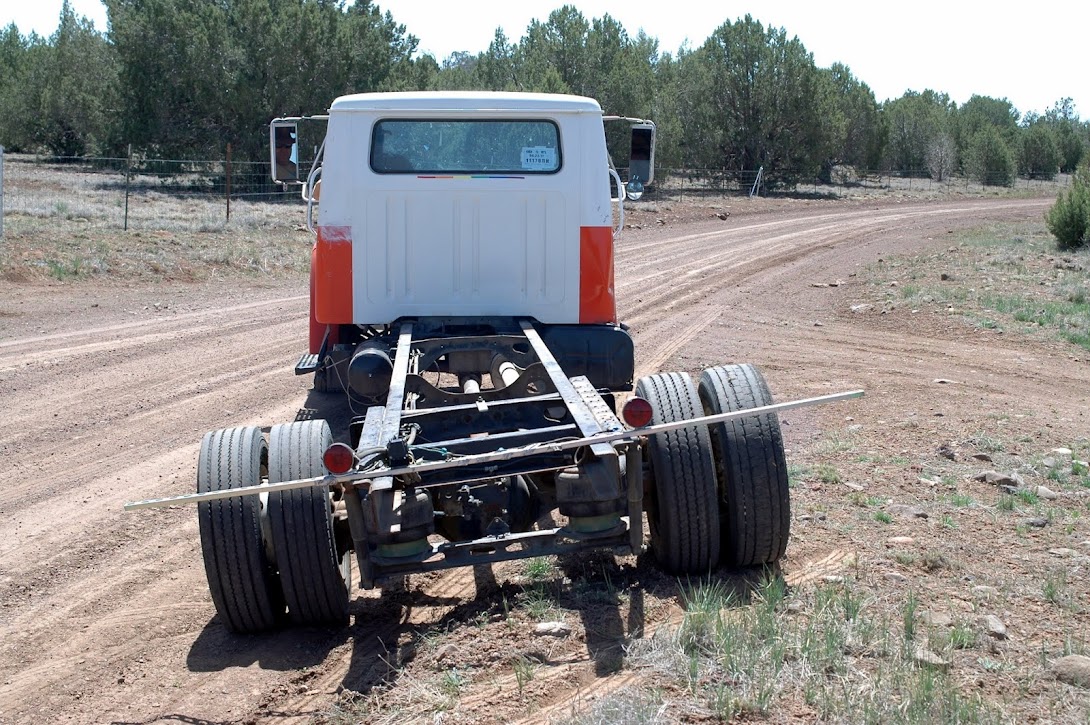
bad thing was that it was involved in a collision and the frame was cut after the cab :(

here are some pics from picking it up in ABQ NM on 3.6.2012

DSCN0076.JPG


DSCN0078.JPG


only had my doggy Van & a narrow trailer available (that i originally built for hauling steel tubing & atv`s)

DSC_9464.JPG


... and naturally we had very bad weather and high wind for the long drive to AZ :wtf:

DSC_9481.JPG


but we made it home without killing anybody ... pics from the next morning;

DSC_9550.JPG


DSC_9492.JPG


... to be continued ...
 
To avoid these ads, REGISTER NOW!
OP
R

RoosterBooster

Well-known member
Joined
Apr 24, 2014
Messages
225
Location
Vegas (winter) ...somewhere in the Utah mountains
this cab was just what i was looking for;
cabs of that vintage are narrow, but offer deep footboxes and amble headroom
i used to drive this International 4900 for many years;

myoldrig2.jpg


it was a great and reliable rig,
but the modern (short) IH cab had funky ergonomics for a 6' 3" guy like me
(even with the backwall open to the sleeper)

i loved the narrow cab of my Peterbilt 379 that i converted to an RV,
but with the big N14 Cummins it was just too much truck for what i usually tow
(and i got tired of the constant legal battle of driving a class8 without CDL)

so the goal for the <T> was to build a "light" medium duty truck with all the mistakes fixed i did with the IH 4900 and the Pete.

so first task was unloading the cab ...

DSC_9578.JPG


DSC_9655.JPG


... so that i could sit in it (with an adult beverage :beer:)
and start to visualize what needed to be done to make this my future Towrig/RV/Doggyhauler;

DSC_9615.JPG
 
OP
R

RoosterBooster

Well-known member
Joined
Apr 24, 2014
Messages
225
Location
Vegas (winter) ...somewhere in the Utah mountains
just like at the Pete i definitely wanted a open passage to the sleeper again,
so after some measuring i used the plasma ...

DSC_9737.JPG


and used a seat out of the Van for a mockup:

perfect leg room !

DSC_9847.JPG


and with the seat reclined past the rear wall there is now plenty of clearance,
even for a big guy like me

DSC_9828.JPG


now that i was confident that the cab will work for what i had in mind,
i started looking for a donor MDT chassis
...
 
OP
R

RoosterBooster

Well-known member
Joined
Apr 24, 2014
Messages
225
Location
Vegas (winter) ...somewhere in the Utah mountains
thanks for the comments ;)

initially i wanted to use a IH MDT or school bus chassis,
but i also wanted a low profile height (for looks as well as aerodynamics)
as well as an air ride cab/sleeper like i had on the Pete

the needed sub-frame to support the cab/sleeper combo adds to overall height,
so it became clear that a regular height frame would be too tall :headscrat

some other members at Pirate used ex U-haul box trucks as tow rigs
so after looking at some of the posted frame pics i found my chassis donor ;)

the U-hauls used the IH "low profile" series chassis with an excellent Z air leaf & track bar rear suspension design.
the frame has reduced height over the rear axle and also uses a lower C-channel profile compared to the regular MDT frames.
on top of that the frame is formed out of premium HSS steel
the wheel base of 239" was ideal for my towrig idea ...

so after some searching i found a Cab & chassis in Phoenix for $2200 :D

DSC_0777.JPG


DSC_0791.JPG


ugly as hell ... and horrible stiff little 19.5er tires :eek:
but that is all going to change

by design all the M/HD suspensions do not articulate very well
(to reduce sway of a tall box truck)
this rig will be off the pavement on a regular basis,
so it is essential to let the chassis twist freely for maximum rear axle traction...

DSC_0743.JPG


DSC_0752.JPG


this does not hurt the frame, but the twisting needs to be considered for any addition/modification to the frame
(like avoiding to use torsional stiff box-tubing for cross-members...
everything has to be open C- or U-channel to allow twisting)

this was another reason why i wanted an air ride cab/sleeper;
the combination of two front pivot points and flexible rear air bags allows near unlimited frame twist
 
Last edited:
OP
R

RoosterBooster

Well-known member
Joined
Apr 24, 2014
Messages
225
Location
Vegas (winter) ...somewhere in the Utah mountains
the first chassis modification was to square and clean the rear frame horns
(preowner cut the frame roughly with a torch ... but at least he didnt cut it too short :p)
then i fabricated and install a dropped trailer hitch "crate" ;

DSC_0820.JPG


DSC_0824.JPG


again: to preserve frame twist i only used C- and L -channel for the cross-braces
its not finished in the pics (will get some re-enforcing plates at key points later)
i left the extra L- channel (that was used to mount the U-haul box) on the frame; it was too much hassle to remove
(note that i welded only to the very last end of the frame and the mild steel L-channel so that i did not weaken the temper of the HSS steel)
the inside space of the crate will be used as a toolbox or generator compartment

next task was stripping just about everything off the frame in preparation for fabricating the air ride cab sub-frame.
i also inspected all the mechanics at the same time to see what would need attention.
here is a pic of the track link rear air suspension with the massive brake discs

DSC_0978.JPG


at this point i was used to air brake trucks and was a little worried about the squirt brakes...
but the hydraulic discs do work excellent and with zero fade :thumbup:

here is the frame with the IH cab removed

DSC_1078.JPG


i had plans to replace the engine (N/A V8 7.3l IDI) with an Inline 6 (DT 466 or Cummins 8.3),
but simply did not have the money at this time :(
i also found lots of telltale signs that this was not the original engine;
its a very fresh one ...and all the newer reman engines are build to turbo specs...
so i decided to keep it for now (and start thinking about a turbo conversion)
 
OP
R

RoosterBooster

Well-known member
Joined
Apr 24, 2014
Messages
225
Location
Vegas (winter) ...somewhere in the Utah mountains
i`m not a big fan of heavy & rusty steel tanks,
so i replaced the 55 gallon tank with a 155 gallon aluminum Peterbilt tank that i had laying around

DSC_0952.JPG


1500+ mile range may sounds a little excessive :D,
but this way i can fill up where and when i like and can do nonstop round trips without wasting time pulling off the highway.

i also started mocking-up the spare tire mount ...
however, eventually i moved it to the passenger side to help offset the weight of the fuel tank

after some planing of where i wanted the sleeper to end i started fabricating the saddles for the cab airbags;

DSC_0953.JPG


i`m using two basic 2600 lbs Firestone bags (had them laying around :)) ,
but two smaller diameter 2500 lbs bags would probably work just as well

DSC_0957.JPG


i used most of the saddle bolts to also mount the frame side of the panhard bar that will later position the cab/sleeper
its a forged steel panhard bar from a large Peterbilt sleeper
(i had it laying around ... yeah, i guess i`m a little bit of a packrat :p)
 

NASTYZEN

Well-known member
Joined
Jun 11, 2010
Messages
2,823
Location
St-Colomban,Que. Canada
Cool project. Scary how much twist you get in that rig. Going to be interesting to see how you mounted the rear box.
Thanks for sharing your project.:thumbup:
 
OP
R

RoosterBooster

Well-known member
Joined
Apr 24, 2014
Messages
225
Location
Vegas (winter) ...somewhere in the Utah mountains
yeah, a smaller diameter 100 gallon tank would have been easier to fit ...
but i had this tank already laying around... so may as well use it :p

i stripped the <T> cab and grille off of the stock frame and set it temporary onto the IH frame;

DSC_1163.JPG


the grille fits over the radiator like it was made for it
the cab has plenty of clearance to the low slung V8
originally the <T> had a huge gasoline I-6 in it (iirc 560 cid)
in the `50 the <T>`s had the reputation to pass everything (but a gas station :spit:)

DSC_1166.JPG


notice how "new" and clean the engine is;
U-haul sometimes replaced engines shortly before they sold off the trucks,
alternator is also brand spanking new ...
i guess i got a good deal :D

the <T> fenders are HUGE :scared:

DSC_1175.JPG


makes the 19.5 tires & rims look almost comical ... they definitely need to be replaced ... but more to that later

i`m used to tilting hood trucks (what makes it very easy to work on the engine)
but that was just not possible with the heavy <T> fenders, so i decided to fab "quick release" mounts for the fender supports instead;

DSC_1189.JPG


i used cycle track racing "bullet nose" wheel lugs and nuts ...
now with the help of an air gun i can remove the fenders in 30 seconds flat :thumbup:
 
To avoid these ads, REGISTER NOW!

-Brent-

Well-known member
Joined
Dec 23, 2009
Messages
4,709
Location
Utah
Rooster, will 1200 pounds of fuel be noticeable mounted only one side of the vehicle?
 
OP
R

RoosterBooster

Well-known member
Joined
Apr 24, 2014
Messages
225
Location
Vegas (winter) ...somewhere in the Utah mountains
Rooster, will 1200 pounds of fuel be noticeable mounted only one side of the vehicle?

Brent
not that i can tell ...
the spare tire, its mounting bracket as well as a rack for two LP bottles are on the opposite side of the frame.
they counteract most of the weight.
(i may add that it is absolutely essential to directly back up the tank hangers with frame cross-members
or the frame webbing will flex and possible crack under that amount of load over time)
the truck is still not completely finished,
but i already made close to 10000 miles with it and never noticed any fuel movement in the non-baffled tank.
however, i managed to run out of fuel on a steep hill on my way to Dolores,CO
(a half mile away from the gas station i wanted to use :eek: )
the fuel pickup is towards the front of the tank
and at the steep hill all the roughly 20-25 gallons that i still had in the tank went to the back of the tank :lol:
learned to keep at least 30 gallons of fuel in the tank at all times


after hanging the fenders and establishing the cab position i started with building the air ride sub-frame.
first i replaced the stock front cab mounts with fabricated pivot points
that use a large PU bushing in a 2" DOM tubing sleeve
(with an additional steel wrap for safety sake)

DSC_1202.JPG


this mount will see very heavy loads/forces so i positioned it as far forward as possible.
it is backed up by the SAE bell engine/trans mounting points and is right on top of the suspension shackle.

DSC_1200.JPG


i then fabricated a heavy plate bracket that wraps the bushing for safety in case the single M14 bolt should brake in an accident

DSC_1222.JPG


after that i started to establish the sub-fame layout.
unlike the chassis this frame has to be very torsional rigid, so it will be all box tubing (a mix of trussed 2x2" and 2x3" .125" tubing)

DSC_1219.JPG
 
OP
R

RoosterBooster

Well-known member
Joined
Apr 24, 2014
Messages
225
Location
Vegas (winter) ...somewhere in the Utah mountains
the subframe could be built a lot simpler with a couple 2x4 or 2x6 beams...
but i wanted the floor height & entry to be as low as possible.
so i made it overly complex with a couple miles of welds :rolleyes:

here is the subframe bracket of the panhard bar;

DSC_1251.JPG


and the air bag brackets & lower shock mounts;

DSC_1230.JPG


the subframe needs shocks to control the motion.
i use fairly inexpensive 5 way adjustable Rancho RS9000 shocks
(the one in the pic is too long and just for mockup)
i spaced the shocks as wide as possible to better dampen any sudden side to side motion.

here is the subframe almost completely raised ...

DSC_1254.JPG


... approximately at ride height ...

DSC_1225.JPG


... and completely down ;

DSC_1239.JPG


to get adequate clearance i had to step down some of the floor crossmembers

DSC_1241.JPG


obsessive :eek: ...
but this way i managed that the main floor is only ~3" over the frame rails at normal height
(the bathroom, the seating area and the rear storage cabinet are 3" higher)

the subframe also needs two sets of bumpstops;

one set is for "bottom out" protection and needs to be strong
so that the subframe can rest on it for extended time (if the air bags are deflated)
another set needs to prevent over-extension and also serves as protection in an accident
so that the cab/sleeper do not separate from the frame
 
OP
R

RoosterBooster

Well-known member
Joined
Apr 24, 2014
Messages
225
Location
Vegas (winter) ...somewhere in the Utah mountains
removed the cab one more time to finish the subframe welds
the cab floor is higher then the sleeper floor, so i had plenty of room to V-brace the subframe in that area.

DSC_1264.JPG


the upper tube will later be tied to the pivot point with a brace that goes up to the firewall

last pic before setting the cab permanently onto the subframe;

DSC_1285.JPG


the cab welded in place;

DSC_1301.JPG


DSC_1296.JPG


here is a quick sketch of the layout for the cab/sleeper;
(was too busy to do a propper CAD ...:p)

aasleeper1.jpg


initially i wanted the two extra seats side by side right behind the cab,
but the elevated bed behind the driver gave me extra room for the large fuel tank.
during construction i changed the bathroom layout as well as some of the chassis attachments;
the second tank was intended for gas (for refueling the toys), but i decided against it;
didnt feel comfortable of carrying 55 gallons of fuel exposed on the side in a single wall tank
(i will probably add a fuel cell somewhere later)
gas bottles are now in a rack where the fuel tank was
and the house batteries moved into that spot next to the entrance...
 

GRN96WS6

Well-known member
Joined
Dec 23, 2012
Messages
2,202
Location
SOMD
I wouldn't even know where to start to build this, but I'll have fun watching you do just that!
 

RogueFab

Well-known member
Joined
Jun 27, 2013
Messages
430
Location
Oregon
Wow. Huge project. So awesome though. I am interested to see how you make the sleeper part look nice with the original lines on that classic cab. Cool choice BTW.
 
OP
R

RoosterBooster

Well-known member
Joined
Apr 24, 2014
Messages
225
Location
Vegas (winter) ...somewhere in the Utah mountains
thank you all for the comments... i appreciate it :beer:

... I am interested to see how you make the sleeper part look nice with the original lines on that classic cab...


lol ... thats exactly what i wanted to explain in my next post ;) ...
so here it is;

how to build the sleeper in a shape that would fit the vintage (roundish) <T> cab gave me some sleepless nights.
most existing truck sleepers are too "squarish" ...
and a new construction would be very difficult and time consuming :dunno:

but then i stumbled over this old add for a REO Truck and instantly loved the box behind it;

a434.jpg


looking at its shape i realized that i have all the parts already behind the shop :willy_nil

back in mid 2011 i picked up this `54 Spartan Mansion in Phoenix;

IMG_5019.JPG


IMG_5035.JPG


i had plans to restore the trailer and use it as a replacement for my `66 Streamline
that was getting too crowded when camping with my two large & hairy boys

phoca_thumb_l_bc2.jpg


(they are Briards; French sheep dogs)

however, the last occupants have been very careless;
the inside was trashed and there was a lot of damage to the aluminum skin,
so i decided to buy a `50 Spartan Spartanette instead (same size, but less boxy)
i was trying to sell this trailer, but had no takers :dunno:

anyway, long story short;
the riveted all aluminum construction was ideal to dismantle, reconfigure and reassembly ...
and making it shorter would allow me to get rid of the damaged areas
so i decided to sacrifice it for the sleeper :ninja:
 

bullnerd

Well-known member
Joined
Sep 17, 2012
Messages
5,690
Location
Jersey
I told you guys Rooster Booster was no joke! Wait. That might have been the other thread....or the other site!

Super creative as always dude.
 
OP
R

RoosterBooster

Well-known member
Joined
Apr 24, 2014
Messages
225
Location
Vegas (winter) ...somewhere in the Utah mountains
Super creative as always dude.

Bull .... you make me blush :eek: :fawk:


with the sleeper question settled i moved on to trim the "cab to sleeper" passage
as well as enclose the cut with 14 gauge sheetmetal ;

DSC_1308.JPG


initially i planed on a simple straight opening,
but looking at the real thing i decided on an angled opening
it makes the passage visually larger and more open...
downside is that the upper tube is now too short ... oh well, i can fix that later
to keep heat distortion down i spot welded the 14 gauge with several passes

DSC_1309.JPG


after each side was done i fitted the upper pieces
and also spot welded them in place with plenty of cooling time in between passes

DSC_1316.JPG


DSC_1319.JPG


DSC_1322.JPG
 
Last edited:

lojim

Well-known member
Joined
Apr 17, 2009
Messages
76
Location
Cumberland County, PA
Followed your original thread since the beginning. Glad to see a condensed version coming together and amazed at how far this has come!
 

RogueFab

Well-known member
Joined
Jun 27, 2013
Messages
430
Location
Oregon
That rounded box is what I was picturing (essentially). It would be a shame to put a square steel box behind that cab. I think that RV will be a good donor. And light too.
 
OP
R

RoosterBooster

Well-known member
Joined
Apr 24, 2014
Messages
225
Location
Vegas (winter) ...somewhere in the Utah mountains
Are those black stripes on the tarmac shadows from the overhead powerlines, or did you "drift" that trailer into position? ;)

lol ... never noticed how the shadow lines mach the tires exactly :lol:

we left no drift marks ... but we shredded a couple of the old tires :rolleyes:
probably been rotting in the Phoenix sun/heat for 20+ years
good thing we had a couple spare tires with us

IMG_5053.JPG


IMG_5063.JPG


here is some progress pics on the passage;

DSC_1372.JPG


after i had the straight sides and top piece in place i fitted the rounded corner sections

to have a sturdy base for fastening the sleeper to the cab
and to give me at least some degree of rollover protection i framed the opening with large box-tubing
to keep with the "reuse is the best form of recycling" theme of this project i did it with used palette rack beams:p

DSC_1374.JPG


i used the same beams for the perimeter of the subframe as well;
the shape was just perfect for the "floor to wall" transition

here are some shots of the finish welded passage;

DSC_1358.JPG


DSC_1359.JPG


DSC_1361.JPG


i sanded the welds only roughly ...
didnt waste too much time on a detail that will later be hidden by the exhaust stacks anyway :dunno:
 
Last edited:
To avoid these ads, REGISTER NOW!
Top Bottom